How to: Build you own Poly Motor Mounts
 04-04-2008, 06:40 AM
#1
The Crazy Azz Cracka

Thread Starter
iTrader: (1)
Join Date: Aug 2003
Location: Chattanooga, TN
Posts: 3,035
This is a project that has been on my slate for a while, and I'm finally getting around to it. I have seen several people ask what the advantages of stiffer motor mounts are. The answer it simple, the more you reduce the amount the motor moves by rotational force, the more power you put to the pavement, and reduce wheel hop. They do not increase power, but allow you to harness the power you already have.
The down side is that engine vibration is greatly increased inside the cabin. There are trade off in every project you take on.
Here we go:
Step 1.
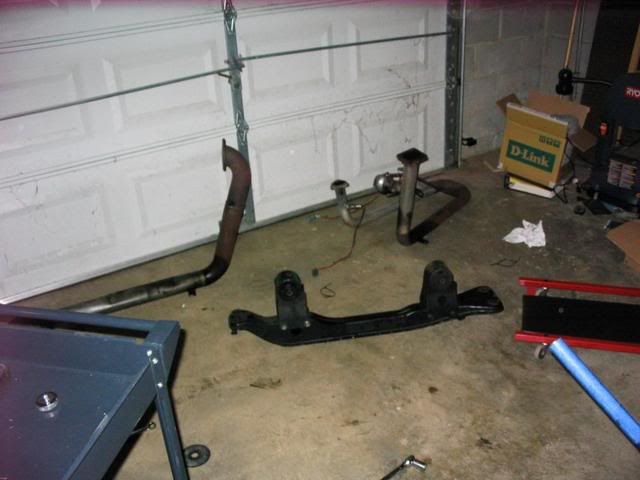
Jack up the car and support with jack stands. Remove the lower engine cradle. This can be done by supporting the weight of the motor with your floor jack to slowly lower it down. The tranny and timing cover mounts will support the motor while the lower support is out of the car. I've been turbo'd for 5 years, and I cannot recall if removal of the Y pipe is necessary. Use your own judgment.
Step 2.
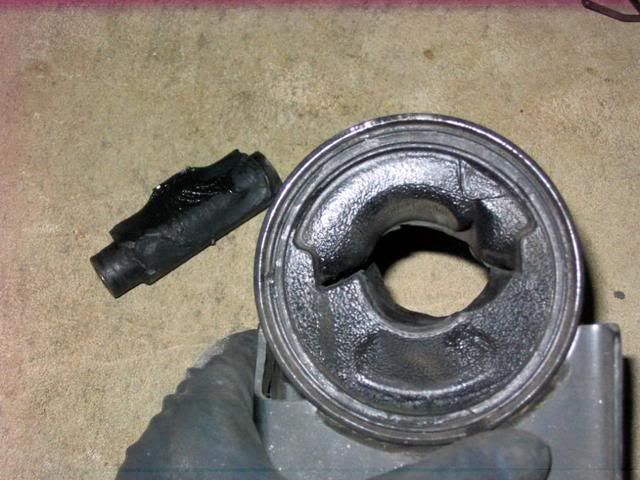
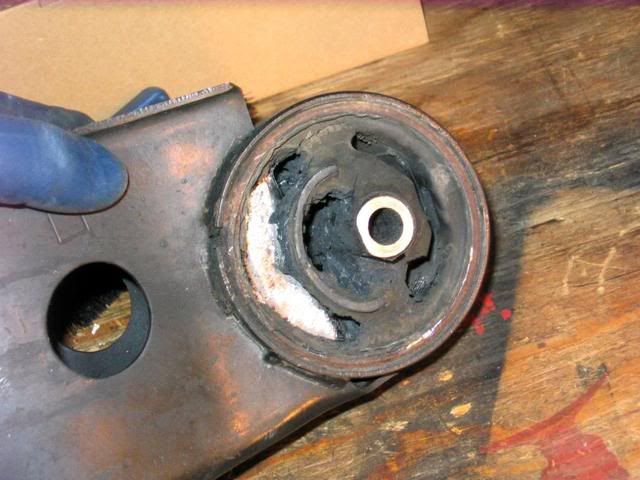
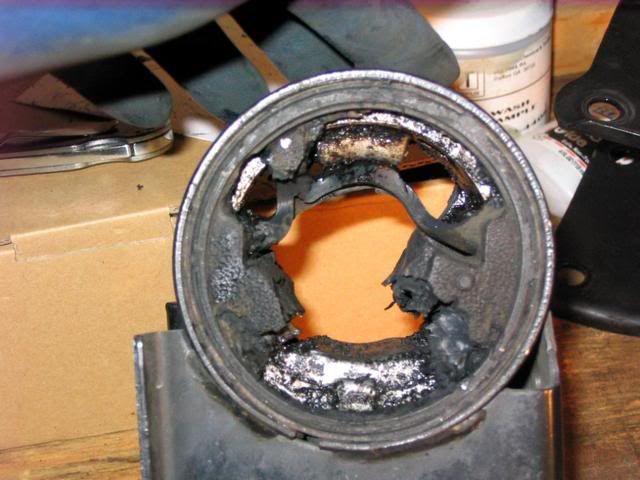
Once the mounts are out of the car, evaluate the condition of your mounts. You will want to remove a lot of the factory material; however you do not want to change location of the center bushing. Make sure you have a way to keep it in its factory location. I made sure I had plenty of rubber on both ends to keep it in place during curing.
Step 3.
Remove as much factory material as you fell comfortable with. The more Poly you have in there the stronger it will be. To do so, I used an electric drill and several sized drill bits, and a set of needle nosed pliers. There is considerable metal reinforcement on the inside of the mount, so don't be too afraid to explore. Just remember to keep the center bushing centered.
Step 4.
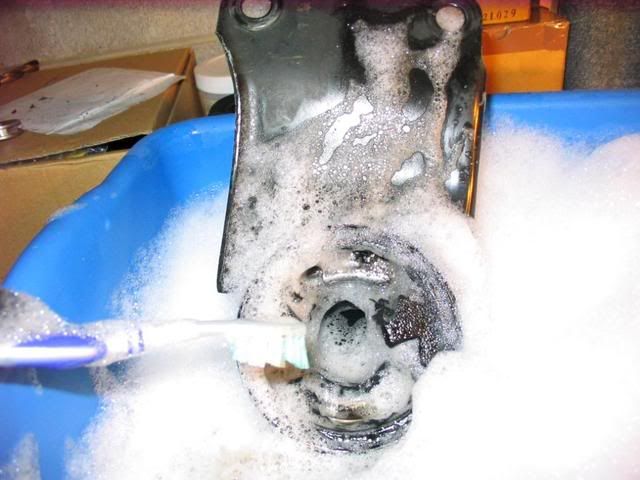
Cleanliness is next to Godliness! Get a bucket of hot soapy water and scrub away. The cleaner the inside of the mounts are the better the poly will stick to it. Depending on the funkiness, you might want to hit them with some degreaser first. Dawn dish washing detergent works wonders. If your mom won�t get too upset, put them in the toaster oven at 200 degrees to for an hour or so, to make sure they are good and dry.
Step 5.
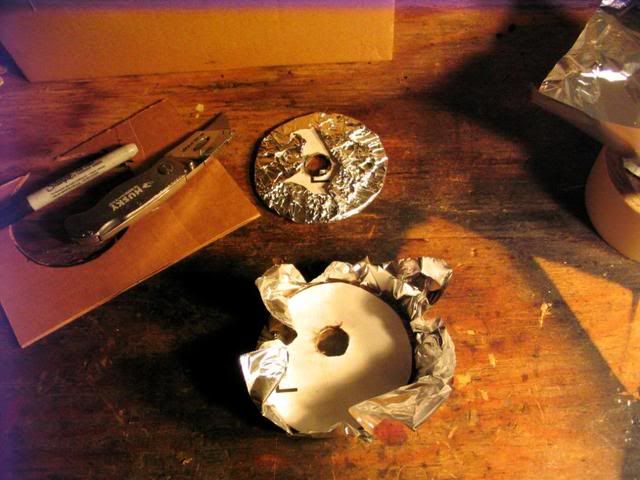
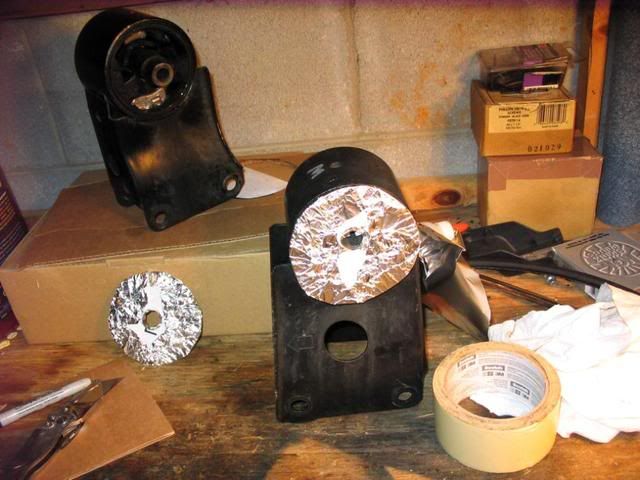
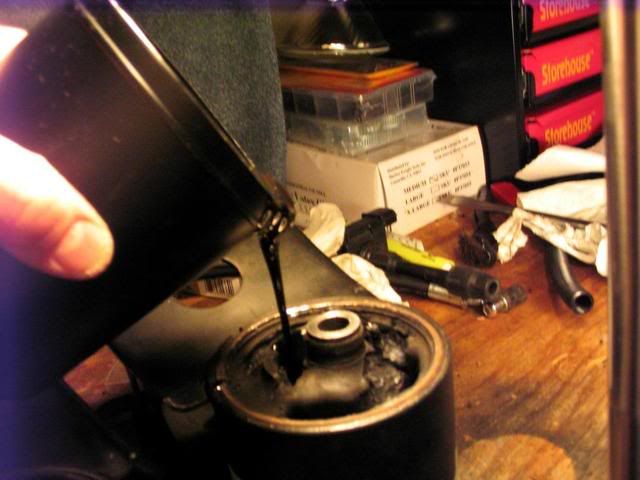
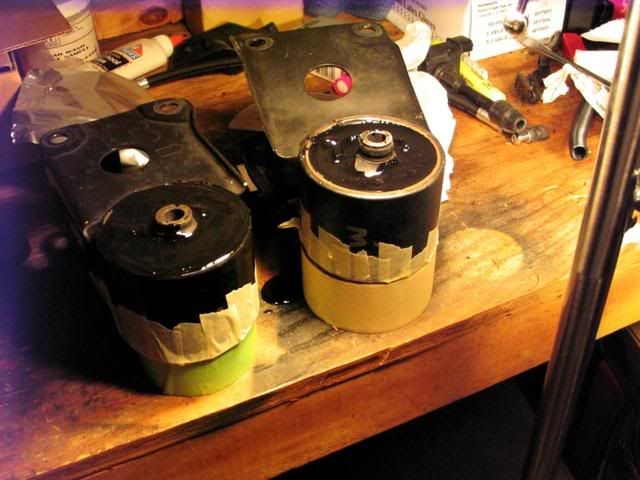
Seal one side of the motor mount. Trace out the outer boundary of the mount on cardboard and cut it out. Lay the mount on its side and center the circle cardboard piece on the center bushing. Lightly tap the center of the cardboard to make an impression of the center bushing. Cut out the center impression a little small, and then force it onto the center bushing. This will stop the resin from poring out the bottom. Cover the cardboard piece with aluminum foil, and pull it tight with out tearing. Spray some sort of release agent (PAM, Olive oil, WD-40) only on the side that will make contact with the motor mount. Tape it into place using masking tape. Masking tape will not leave residue like duct tape, but this is your project. Tape the ring securely to the mount. The more tape the better. There will be leaks that show up; this will just keep them at a minimum. Don�t forget to tape around the center hole really good. The resin pours in like warm molasses, and if it has a place to go, it WILL LEAK OUT. Then you have to start over.
Step 6.
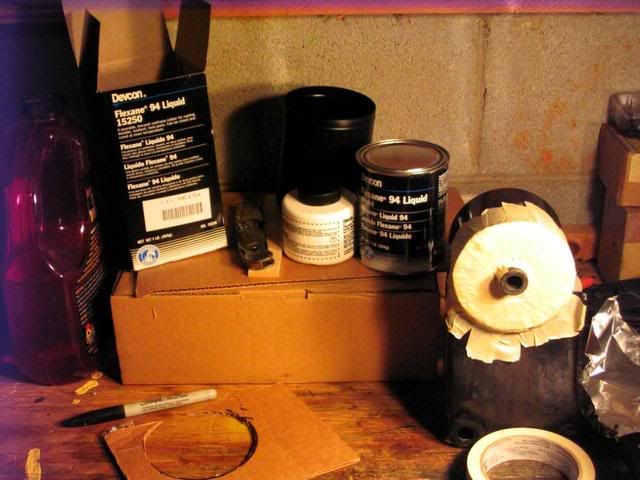
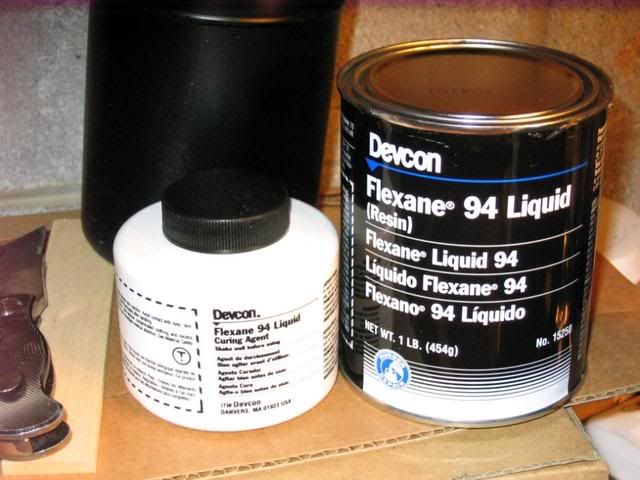
The Pour. The poly resin I used was Devcon, Flexane 94. It dries the hardest of their line; however they do have Flexane 60 that is more flexable. It can be picked up ant any industrial supply store, like Granger, for around $36. The kit comes with the resin, curing agent, plastic cup to mix it in, and a stir stick. One �kit� will build two mounts with some left over if you remove a considerable amount of material from the factory mount. Place the mounts on their sides, and make them level. Rolls of duct tape or masking tape work. Combine the resin and activator according to the enclosed directions and stir for a good 7 to 10 minutes. The mixture has a work time of a good ten to fifteen minutes depending on temp and humidity. The warmer it is the faster it cures. You only have one shot at this, so make sure the mounts are ready to be filled. Pour slowly and try to keep from developing bubbles in the mount. Fill one half full; fill the next one half full, and then top off the first. This gives the resin a change to seep into all the nooks and crannies, and allowing the air to escape. If small leaks appear, don�t freak out. The resin will thicken up and stop leaking. If a big leak shows up, get creative, you didn�t follow the directions.
Step 7.
The Cure. The mixture will harden so that it can be handled with in 30 to 45 minutes. To speed up this time, place them under a heat lamp. I have a torch lamp in my living room that has 3 adjustable lights that works perfectly. Remove the cardboard end and foil. They are hard in 24 hours and reach full stiffness with in 7 days. If this is a two day project then you can put them in the oven again at 200 degrees for 24 hours to speed up the cure.
Step 8.
Reinstall.
The down side is that engine vibration is greatly increased inside the cabin. There are trade off in every project you take on.
Here we go:
Step 1.
Jack up the car and support with jack stands. Remove the lower engine cradle. This can be done by supporting the weight of the motor with your floor jack to slowly lower it down. The tranny and timing cover mounts will support the motor while the lower support is out of the car. I've been turbo'd for 5 years, and I cannot recall if removal of the Y pipe is necessary. Use your own judgment.
Step 2.
Once the mounts are out of the car, evaluate the condition of your mounts. You will want to remove a lot of the factory material; however you do not want to change location of the center bushing. Make sure you have a way to keep it in its factory location. I made sure I had plenty of rubber on both ends to keep it in place during curing.
Step 3.
Remove as much factory material as you fell comfortable with. The more Poly you have in there the stronger it will be. To do so, I used an electric drill and several sized drill bits, and a set of needle nosed pliers. There is considerable metal reinforcement on the inside of the mount, so don't be too afraid to explore. Just remember to keep the center bushing centered.
Step 4.
Cleanliness is next to Godliness! Get a bucket of hot soapy water and scrub away. The cleaner the inside of the mounts are the better the poly will stick to it. Depending on the funkiness, you might want to hit them with some degreaser first. Dawn dish washing detergent works wonders. If your mom won�t get too upset, put them in the toaster oven at 200 degrees to for an hour or so, to make sure they are good and dry.
Step 5.
Seal one side of the motor mount. Trace out the outer boundary of the mount on cardboard and cut it out. Lay the mount on its side and center the circle cardboard piece on the center bushing. Lightly tap the center of the cardboard to make an impression of the center bushing. Cut out the center impression a little small, and then force it onto the center bushing. This will stop the resin from poring out the bottom. Cover the cardboard piece with aluminum foil, and pull it tight with out tearing. Spray some sort of release agent (PAM, Olive oil, WD-40) only on the side that will make contact with the motor mount. Tape it into place using masking tape. Masking tape will not leave residue like duct tape, but this is your project. Tape the ring securely to the mount. The more tape the better. There will be leaks that show up; this will just keep them at a minimum. Don�t forget to tape around the center hole really good. The resin pours in like warm molasses, and if it has a place to go, it WILL LEAK OUT. Then you have to start over.
Step 6.
The Pour. The poly resin I used was Devcon, Flexane 94. It dries the hardest of their line; however they do have Flexane 60 that is more flexable. It can be picked up ant any industrial supply store, like Granger, for around $36. The kit comes with the resin, curing agent, plastic cup to mix it in, and a stir stick. One �kit� will build two mounts with some left over if you remove a considerable amount of material from the factory mount. Place the mounts on their sides, and make them level. Rolls of duct tape or masking tape work. Combine the resin and activator according to the enclosed directions and stir for a good 7 to 10 minutes. The mixture has a work time of a good ten to fifteen minutes depending on temp and humidity. The warmer it is the faster it cures. You only have one shot at this, so make sure the mounts are ready to be filled. Pour slowly and try to keep from developing bubbles in the mount. Fill one half full; fill the next one half full, and then top off the first. This gives the resin a change to seep into all the nooks and crannies, and allowing the air to escape. If small leaks appear, don�t freak out. The resin will thicken up and stop leaking. If a big leak shows up, get creative, you didn�t follow the directions.
Step 7.
The Cure. The mixture will harden so that it can be handled with in 30 to 45 minutes. To speed up this time, place them under a heat lamp. I have a torch lamp in my living room that has 3 adjustable lights that works perfectly. Remove the cardboard end and foil. They are hard in 24 hours and reach full stiffness with in 7 days. If this is a two day project then you can put them in the oven again at 200 degrees for 24 hours to speed up the cure.
Step 8.
Reinstall.
Last edited by NmexMAX; 04-22-2013 at 12:19 PM.

 04-04-2008, 08:31 AM
#4
04-04-2008, 08:57 AM
#5
Senior Member

Join Date: Sep 2006
Location: Montreal Canada
Posts: 299
Really cool right up! I Like the way it came out!
I did poly bushings from energy suspension, they work well but what you did looks much stiffer!
Hows the vibrations in the engine bay? How are the vibrations inside the drivers seat(dash, shifter, steering wheel)?
I have very few vibrations but I'm in a 2000 and it might make a difference!
I also reduced a lot of vibrations and engine rock with a simple 40$ small shock(engine shock) I attached it to the right(passenger side) strut mount and sway bar with two solid 1/4 inch thick steel pieces and attached it in a screw hole on that side of the engine it holds it from moving that little bit back and forth and it removed a bit of vibrations from the drivers seat or the whole car!
04-04-2008, 09:19 AM
#6
The Crazy Azz Cracka
Thread Starter
iTrader: (1)
Join Date: Aug 2003
Location: Chattanooga, TN
Posts: 3,035
I've been working on some other things while I was in there, she should be on the ground tonight. I did the top two mounts 4 years ago, and the vibration difference wasn't that bad. I can tell you this, that motor does not move.
The whole reason I did this was that last time I went to the track ,the motor was rocking back so much that the 3" down pipe was dragging the ground just past the transmission. Wheel hope was so bad I didn't get traction till half track. This and the JClaw traction bars I got 2 years ago should do the trick.
The whole reason I did this was that last time I went to the track ,the motor was rocking back so much that the 3" down pipe was dragging the ground just past the transmission. Wheel hope was so bad I didn't get traction till half track. This and the JClaw traction bars I got 2 years ago should do the trick.
04-06-2008, 12:41 AM
#7
GearHead

Join Date: Nov 2007
Posts: 20
Very nice writeup. I saw something like this in Sport Compact a while back but they used some type of windshield adhesive made by 3M. I think your method might be better.
Here's a question: How about getting rid of all the rubber inside the mount and then pouring the polyurethane? Once it is hard, you can drill out a hole for the steel sleeve in the center. The key is to drill a hole that is just a wee bit smaller than the sleeve for a nice tight fit. It might work and give you a more durable mount.
Here's a question: How about getting rid of all the rubber inside the mount and then pouring the polyurethane? Once it is hard, you can drill out a hole for the steel sleeve in the center. The key is to drill a hole that is just a wee bit smaller than the sleeve for a nice tight fit. It might work and give you a more durable mount.
04-07-2008, 06:46 AM
#8
The Crazy Azz Cracka
Thread Starter
iTrader: (1)
Join Date: Aug 2003
Location: Chattanooga, TN
Posts: 3,035
Here is a little up date. Finally got teh car on the ground and took her for a test drive. At idol, there is a hint of vibration. However it was much more subdued from the busted mounts I had before. With the busted mounts the car felt like a Cummins Dodge Ram. When driving, the vibration is gone 100%. Course I have coilovers and 3" exhaust, so I couldn't tell you if there was vibration or not. Over all I am very pleased, the car is much more responsive, with minimal side effects.
Your metod would work on the rear mount but the front mount has a piece that is welded and floats in the mount and cannot be removed. The whole point of this procedure is to make the Poly bond to the mount and cener bushing. If you just push the center bushing through, there is no bond and it could just push back out, or stress cracks could show up, and the poly would tear in half.
It might work though, you never know till you try.
Very nice writeup. I saw something like this in Sport Compact a while back but they used some type of windshield adhesive made by 3M. I think your method might be better.
Here's a question: How about getting rid of all the rubber inside the mount and then pouring the polyurethane? Once it is hard, you can drill out a hole for the steel sleeve in the center. The key is to drill a hole that is just a wee bit smaller than the sleeve for a nice tight fit. It might work and give you a more durable mount.
Here's a question: How about getting rid of all the rubber inside the mount and then pouring the polyurethane? Once it is hard, you can drill out a hole for the steel sleeve in the center. The key is to drill a hole that is just a wee bit smaller than the sleeve for a nice tight fit. It might work and give you a more durable mount.
It might work though, you never know till you try.
Last edited by NmexMAX; 04-22-2013 at 12:20 PM.

 05-31-2013, 07:49 AM
#11
Also, why get junkyard mounts? This can be done in an afternoon with yours.
But, if you are wanting junkyward mounts, I've got a set collecting dust in my garage.


Thread
Thread Starter
Forum
Replies
Last Post
AaronL
5th Generation Maxima (2000-2003)
15
08-08-2020 10:31 AM
Unclejunebug
5th Generation Maxima (2000-2003)
10
04-02-2016 05:42 AM
CAN-Toronto FS: Basement cleaning
knight_yyz
5th Generation Classifieds (2000-2003)
12
11-01-2015 01:34 PM