NWP Engineering spacers installed w/MEVI
 06-05-2008, 09:38 AM
#1
'Trynna' is not a word

Thread Starter
iTrader: (19)
Join Date: Mar 2001
Location: Seattle Area, WA
Posts: 7,081
NWP Engineering spacers installed w/MEVI
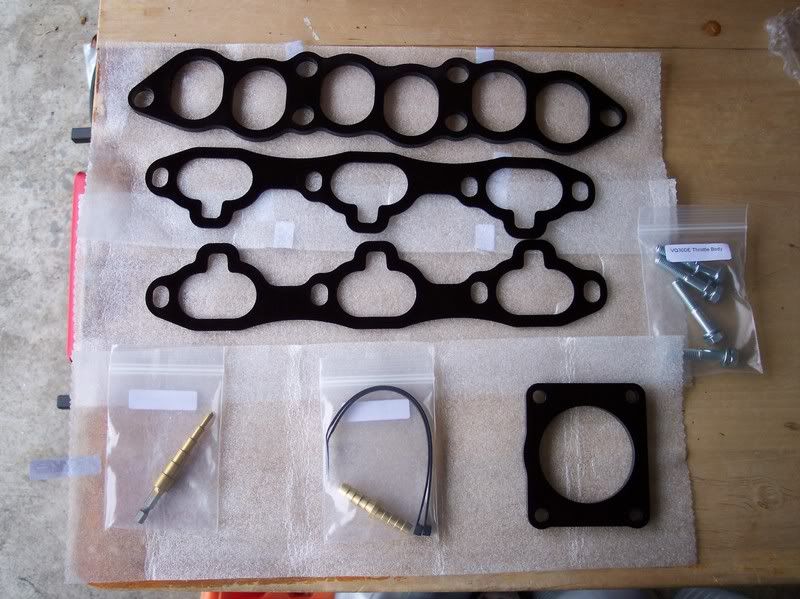
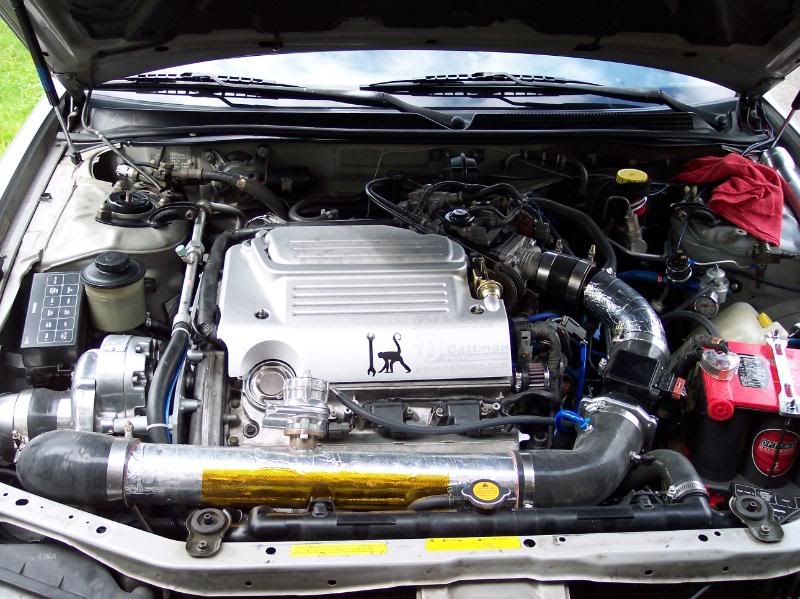
I recently installed NWP spacers on my Supercharged 98 and wanted to do a little write-up and review on them. I had my motor out last summer for other maintenance and replaced the valve cover gaskets while I was in there, but still ended up with a leak. I figured while I was fixing it, it would be a good time to take care of anything else I could, so I ordered up a set of gaskets from Aaron @ NWP. Shipping was prompt and everything came packaged really well.
I took several extra steps during my build up to reduce under hood temps, including getting my headers ceramic coated, and I also put several coats of ceramic white paint on the bottom of my MEVI to hopefully help disperse some of the radiated heat from the motor. Heat is the enemy of power, and I am already adding a lot more heat with the Supercharger. When I installed the MEVI the first time, and went ahead and replaced all the gaskets for the upper and lower manifold with new gaskets from Nissan. I noticed at the time that while they installed fine, there was no real way to line them up perfectly, and as a result, they partially blocked airflow. These spacers should take care of that.
Removal of components is relatively straight forward. I have already pulled the manifold before and know what I am doing, but the instructions included with the spacer kit were really well laid out and easy to understand. With these instructions, you do not need the FSM or a Haynes/Chilton�s manual, though I recommend you have both of these if you do a lot of maintenance to your Maxima.
The most difficult part of removing the manifold is the bolts at the rear of the manifold. If you have a half-way decent set of tools, these should not be a problem, it is just difficult to see what you are doing.
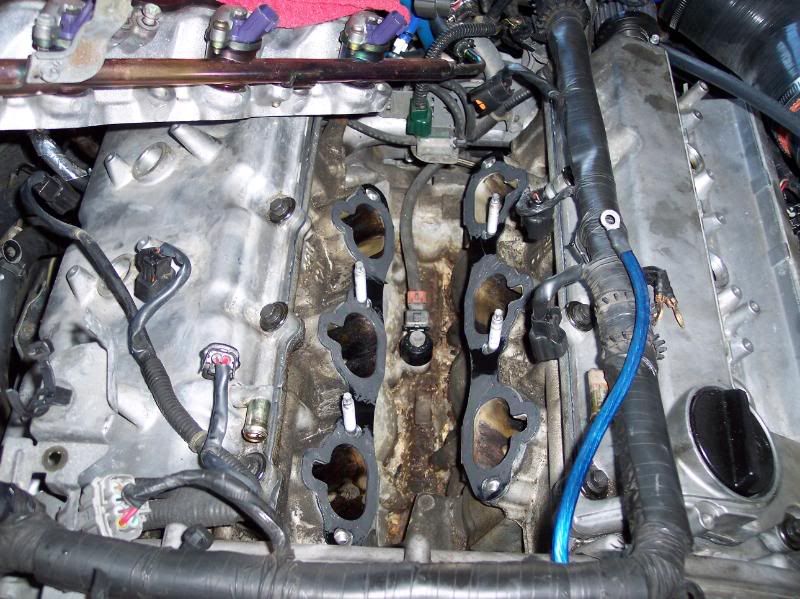
Once you have everything removed, be sure to clean the gasket mating surfaces really well, and make sure you do not drop anything into the open intake holes. I just used brake cleaner sprayed on a rag.
Take your time doing the install, the greatest benefit from these spacers comes from having them perfectly lined up. Once lined up, they eliminate the restriction I noticed from the stock gaskets, which partially block airflow, despite my best efforts to line them up, especially the upper stock gasket, which is just rubber and does not stay in place.
I could not find the 1 minute gasket recommend by Aaron for boosted applications, so I used Permatex high temp silicone RTV. Be sure to use a VERY thin layer. Once everything is torqued down, any excess will squeeze out, and could potentially block that smooth airflow provided by the spacers.
Lower spacers going on:
I took several extra steps during my build up to reduce under hood temps, including getting my headers ceramic coated, and I also put several coats of ceramic white paint on the bottom of my MEVI to hopefully help disperse some of the radiated heat from the motor. Heat is the enemy of power, and I am already adding a lot more heat with the Supercharger. When I installed the MEVI the first time, and went ahead and replaced all the gaskets for the upper and lower manifold with new gaskets from Nissan. I noticed at the time that while they installed fine, there was no real way to line them up perfectly, and as a result, they partially blocked airflow. These spacers should take care of that.
Removal of components is relatively straight forward. I have already pulled the manifold before and know what I am doing, but the instructions included with the spacer kit were really well laid out and easy to understand. With these instructions, you do not need the FSM or a Haynes/Chilton�s manual, though I recommend you have both of these if you do a lot of maintenance to your Maxima.
The most difficult part of removing the manifold is the bolts at the rear of the manifold. If you have a half-way decent set of tools, these should not be a problem, it is just difficult to see what you are doing.
Once you have everything removed, be sure to clean the gasket mating surfaces really well, and make sure you do not drop anything into the open intake holes. I just used brake cleaner sprayed on a rag.
Take your time doing the install, the greatest benefit from these spacers comes from having them perfectly lined up. Once lined up, they eliminate the restriction I noticed from the stock gaskets, which partially block airflow, despite my best efforts to line them up, especially the upper stock gasket, which is just rubber and does not stay in place.
I could not find the 1 minute gasket recommend by Aaron for boosted applications, so I used Permatex high temp silicone RTV. Be sure to use a VERY thin layer. Once everything is torqued down, any excess will squeeze out, and could potentially block that smooth airflow provided by the spacers.
Lower spacers going on:
 06-05-2008, 09:39 AM
#2
'Trynna' is not a word
Thread Starter
iTrader: (19)
Join Date: Mar 2001
Location: Seattle Area, WA
Posts: 7,081
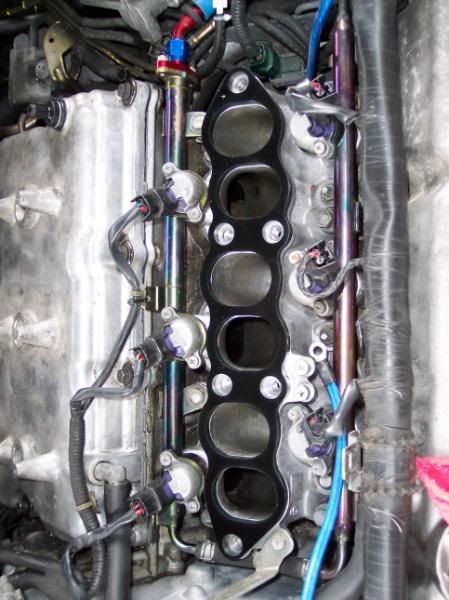
Upper spacer test fit, note no RTV yet:
Make sure you follow the tightening sequence for the manifold bolts when re-installing. If you do not, you could end up with a vacuum leak, which means you will be doing the work all over again. I always recommend using a torque wrench and torquing everything to spec. Some people trust there calibrated elbow to do the torque, but after 10 years as a helicopter mechanic, I have seen too many times what happens when you under or overtorque fasteners. Do it right, do it once.
You must enlarge the holes on the EGR tube to get it re-installed. I also recommend purchasing new gaskets for the EGR tube. It really sucks to get everything back together, and then have a leak. Due to the limited working space, it is also difficult to get RTV in there, so I feel it�s best to use a new gasket.
The EGR tube is one area where I had a slight issue. Once I enlarged the hole, I still had slight difficulty getting the upper bolts installed. I pulled the tube completely out, and slightly enlarged the lower holes, then everything went back together perfectly. Make sure all the gaskets are properly installed, or you will be dealing the vacuum leaks later.
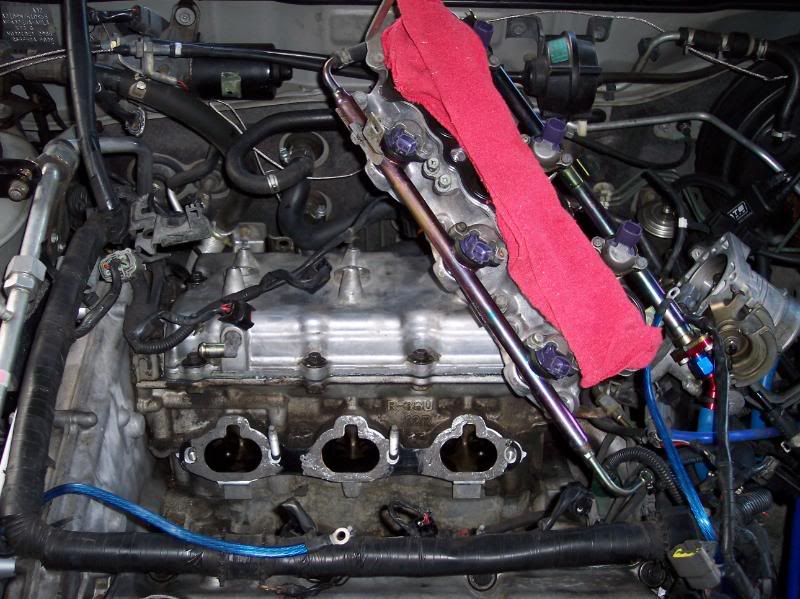
Everything back together:
Upon the first startup, my RPM went up to 4k RPM and would not come down. Turns out my cruise control cable had taken up some tension, and was causing the throttle body to open slightly. Easy fix, just something to watch out for.
Impressions:
My car starts up and idles exactly the same as before. Unfortunately, I was not able to do a before dyno these, but there value has already been proven to me. Smoother airflow, and reduced intake manifold temps, how can you go wrong?
My butt dyno says the car pulls harder up top. I have a quaife LSD installed, and before I could feel my tires tugging for grip at the top of second. After the spacer install, I can feel the tires spinning a bit more intensely. Scientific? No, but I feel a difference.
Final thoughts:
If you take your time, this is a mod even a novice can install in a day. For those of us looking to optimize performance, I don�t see how you could go wrong with this mod. Fit and finish are 100%, and the instructions were excellent. What is the point of having a cold air intake if your manifold is just going to heat the air back up?
Great finishing mod that any serious enthusiast should seriously consider!
Make sure you follow the tightening sequence for the manifold bolts when re-installing. If you do not, you could end up with a vacuum leak, which means you will be doing the work all over again. I always recommend using a torque wrench and torquing everything to spec. Some people trust there calibrated elbow to do the torque, but after 10 years as a helicopter mechanic, I have seen too many times what happens when you under or overtorque fasteners. Do it right, do it once.
You must enlarge the holes on the EGR tube to get it re-installed. I also recommend purchasing new gaskets for the EGR tube. It really sucks to get everything back together, and then have a leak. Due to the limited working space, it is also difficult to get RTV in there, so I feel it�s best to use a new gasket.
The EGR tube is one area where I had a slight issue. Once I enlarged the hole, I still had slight difficulty getting the upper bolts installed. I pulled the tube completely out, and slightly enlarged the lower holes, then everything went back together perfectly. Make sure all the gaskets are properly installed, or you will be dealing the vacuum leaks later.
Everything back together:
Upon the first startup, my RPM went up to 4k RPM and would not come down. Turns out my cruise control cable had taken up some tension, and was causing the throttle body to open slightly. Easy fix, just something to watch out for.
Impressions:
My car starts up and idles exactly the same as before. Unfortunately, I was not able to do a before dyno these, but there value has already been proven to me. Smoother airflow, and reduced intake manifold temps, how can you go wrong?
My butt dyno says the car pulls harder up top. I have a quaife LSD installed, and before I could feel my tires tugging for grip at the top of second. After the spacer install, I can feel the tires spinning a bit more intensely. Scientific? No, but I feel a difference.
Final thoughts:
If you take your time, this is a mod even a novice can install in a day. For those of us looking to optimize performance, I don�t see how you could go wrong with this mod. Fit and finish are 100%, and the instructions were excellent. What is the point of having a cold air intake if your manifold is just going to heat the air back up?
Great finishing mod that any serious enthusiast should seriously consider!

 06-05-2008, 06:48 PM
#5

are you one of the first to do this w/ the mevi?
have you heard of anyone doing this for a 4rth gen w/ the 00vi swap? well now that i think of it, i don't know how you could b/c if your running the stock 4rth gen LIM w/ the modified holes, the rear spacer holes wouldn't even line up. maybe you could just drill holes on those as well....
i know aaron is still testing it out but was just wondering if there were others out there that may have already done this. imo, i don't think it will show a lot of gains as far as reduction of temp compared to it on the USIM, since the 00vi is already made of plastic composites but who knows...
Last edited by G4nismo; 06-05-2008 at 06:53 PM.
06-05-2008, 06:57 PM
#6
are you one of the first to do this w/ the mevi?
have you heard of anyone doing this for a 4rth gen w/ the 00vi swap? well now that i think of it, i don't know how you could b/c if your running the stock 4rth gen LIM w/ the modified holes, the rear spacer holes wouldn't even line up. maybe you could just drill holes on those as well....
i know aaron is still testing it out but was just wondering if there were others out there that may have already done this. imo, i don't think it will show a lot of gains as far as reduction of temp compared to it on the USIM, since the 00vi is already made of plastic composites but who knows...
have you heard of anyone doing this for a 4rth gen w/ the 00vi swap? well now that i think of it, i don't know how you could b/c if your running the stock 4rth gen LIM w/ the modified holes, the rear spacer holes wouldn't even line up. maybe you could just drill holes on those as well....
i know aaron is still testing it out but was just wondering if there were others out there that may have already done this. imo, i don't think it will show a lot of gains as far as reduction of temp compared to it on the USIM, since the 00vi is already made of plastic composites but who knows...
06-05-2008, 08:00 PM
#7

ya I have done this on a MEVI already. I think I was the second one. No supercharger tho  , I think you are the first with that. Nice write up with pics.
Im sorta disappointed tho with the heat claims. My MEVI still gets REALLY hot after driving for half an hour on the highway in 80* weather.
btw heres the thread with the rest of us with the MEVI/NWP combo.
http://forums.maxima.org/showthread....light=nwp+mevi
, I think you are the first with that. Nice write up with pics.Im sorta disappointed tho with the heat claims. My MEVI still gets REALLY hot after driving for half an hour on the highway in 80* weather.
btw heres the thread with the rest of us with the MEVI/NWP combo.
http://forums.maxima.org/showthread....light=nwp+mevi
Last edited by black_maxed95; 06-05-2008 at 08:04 PM.
06-05-2008, 08:06 PM
#8
'Trynna' is not a word
Thread Starter
iTrader: (19)
Join Date: Mar 2001
Location: Seattle Area, WA
Posts: 7,081
maximase86 has pretty much the same mods I do, he has a smaller pulley, and I have headers. Once he gets his car up and going again, I'll see if maybe we can't get a temp reading on both our intake manifolds after running the same amount of time. We both have new babies in the house, so free time is not all that abundant right now... 
06-06-2008, 07:19 AM
#9
ya I have done this on a MEVI already. I think I was the second one. No supercharger tho , I think you are the first with that. Nice write up with pics.
Im sorta disappointed tho with the heat claims. My MEVI still gets REALLY hot after driving for half an hour on the highway in 80* weather.
btw heres the thread with the rest of us with the MEVI/NWP combo.
http://forums.maxima.org/showthread....light=nwp+mevi
, I think you are the first with that. Nice write up with pics.Im sorta disappointed tho with the heat claims. My MEVI still gets REALLY hot after driving for half an hour on the highway in 80* weather.
btw heres the thread with the rest of us with the MEVI/NWP combo.
http://forums.maxima.org/showthread....light=nwp+mevi
The stock 4th gen UIM after an hour of idling in place without any airflow, would get to 157 degrees. That would hurt if you touched it! After the spacers are installed, with the same 1 hour heat soak session, the UIM measured 117 degrees, which is still hot, but it won't take your skin off like before.
The lower intake manifold was 185 degrees before and 142 degrees after. Still hot to the touch, but a 43 degree temperature is pretty good.
Also, did you bypass the coolant on the MEVI?
06-06-2008, 07:31 AM
#10
mastere954 also has a mevi + nwp setup with no problems. i think he was one of the first.
why do you say use very little RTV on the plenum and LI gaskets?
when me and kenny did the install, we gobbed that **** on there and now i have this weird warm starting issue (sits for 8 hours = fine start, sits for 15 min on warm engine = starts but has trouble getting the RPMs up, sits for 5 seconds on warm engine = fine start)
also, the first time around we skipped the coolant bypass, but since then fixed it.
im leaning more and more toward the fact that this is an install error, but i still cant figure out what could be causing it.
ive heard everything from EGR to PCV to ECTS
06-06-2008, 07:39 AM
#11
mastere954 also has a mevi + nwp setup with no problems. i think he was one of the first.
why do you say use very little RTV on the plenum and LI gaskets?
when me and kenny did the install, we gobbed that **** on there and now i have this weird warm starting issue (sits for 8 hours = fine start, sits for 15 min on warm engine = starts but has trouble getting the RPMs up, sits for 5 seconds on warm engine = fine start)
also, the first time around we skipped the coolant bypass, but since then fixed it.
im leaning more and more toward the fact that this is an install error, but i still cant figure out what could be causing it.
ive heard everything from EGR to PCV to ECTS
why do you say use very little RTV on the plenum and LI gaskets?
when me and kenny did the install, we gobbed that **** on there and now i have this weird warm starting issue (sits for 8 hours = fine start, sits for 15 min on warm engine = starts but has trouble getting the RPMs up, sits for 5 seconds on warm engine = fine start)
also, the first time around we skipped the coolant bypass, but since then fixed it.
im leaning more and more toward the fact that this is an install error, but i still cant figure out what could be causing it.
ive heard everything from EGR to PCV to ECTS
As for your problem, you will need to do the install again as well as look further into the installation of the Ypipe you did at the same time as the spacers. If you have a particular question about your weird starting issue, please bump your thread in order to keep this one on topic and I'll help in anyway I can. Or you can always contact me directly.
06-06-2008, 08:09 AM
#12
maximase86 has pretty much the same mods I do, he has a smaller pulley, and I have headers. Once he gets his car up and going again, I'll see if maybe we can't get a temp reading on both our intake manifolds after running the same amount of time. We both have new babies in the house, so free time is not all that abundant right now...
S
06-06-2008, 08:10 AM
#13
Originally Posted by ROCKART
why do you say use very little RTV on the plenum and LI gaskets?

Nice job mtrai!
I still need to take IAT logs on my 5th gen.
 06-06-2008, 09:00 AM
#14
Great to hear. I've been away from the ORG for a while since the Max went down, but now I'm missing my car and want to get it back up and running. Came back and saw that there was a spacer kit out which I'll be picking up in a couple months. Appears to be a great mod, just make sense to lower temps.
06-07-2008, 11:46 PM
#15

Nice set up, i'll b doing the NWP spacers as well but, i have a MEVI and it didnt come wit the cover or the bottle that im seeing on every1 elses. Is there anything else that im missing? Where can i get these?
 07-03-2008, 11:48 AM
#22
'Trynna' is not a word
Thread Starter
iTrader: (19)
Join Date: Mar 2001
Location: Seattle Area, WA
Posts: 7,081
The code reader I have does not pull up run data, so no IAT's right now. I'm hoping to be able to measure them soon with something else though.
Life's been busy, I'll get temps on the IM as soon as I can. I need to do it when I have time to drive around and wait for the manifold to heat up. Today we have mass thunderstorms and I'm working.
Life's been busy, I'll get temps on the IM as soon as I can. I need to do it when I have time to drive around and wait for the manifold to heat up. Today we have mass thunderstorms and I'm working.
07-04-2008, 08:31 AM
#24
I'm glad everything is good. Thanks for the update.
That is definitely an impressive gain! We tested actual intake manifold surface temperatures and on the VQ30DE, we found the upper intake manifold decreased by 40 degrees on average and the lower intake manifold decreased by 43 degrees on average.
On the VQ35DE, we got a 40 degree reduction with the UIM and a 30 degree reduction in the LIM.
But having that decrease translate over to an actual Intake Air Temp difference near the MAF is definitely significant.
On the VQ35DE, we got a 40 degree reduction with the UIM and a 30 degree reduction in the LIM.
But having that decrease translate over to an actual Intake Air Temp difference near the MAF is definitely significant.

Thread
Thread Starter
Forum
Replies
Last Post
Maxboy23
5th Generation Maxima (2000-2003)
7
08-11-2015 11:59 AM