Pics of Painting Headlights
 10-07-2007, 07:38 AM
#1
name came from hairdryer

Thread Starter
iTrader: (4)
Join Date: Mar 2005
Location: Minneapolis 'burbs
Posts: 466
Pics of Painting Headlights
Took me about 10hrs, but that included dinner and putting two lil' kids to bed. Problably should only take about 5-6hrs.
Thanks to Deus for the Sticky!
Very easy and CHEAP Mod.
First, Drop Bumper & take out Headlights. Good time to Check the Fujita Filter is still there.

2nd, Take out bulbs and wire harness and Bake on 250Degrees for 15-20 Mins.

3rd, take out "Hot Potatoe" and Pull evenly around the ends. If it doesn't move much, put back in for 5 more mins.


Next, Its Time for Paint....
Thanks to Deus for the Sticky!
Very easy and CHEAP Mod.
First, Drop Bumper & take out Headlights. Good time to Check the Fujita Filter is still there.
2nd, Take out bulbs and wire harness and Bake on 250Degrees for 15-20 Mins.
3rd, take out "Hot Potatoe" and Pull evenly around the ends. If it doesn't move much, put back in for 5 more mins.
Next, Its Time for Paint....
 10-07-2007, 07:50 AM
#2
name came from hairdryer
Thread Starter
iTrader: (4)
Join Date: Mar 2005
Location: Minneapolis 'burbs
Posts: 466
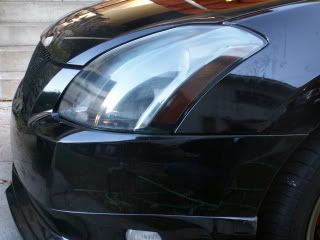
Time for paint
I choose to mask off some chrome to make it look like chrome rings around the lights.

I used Krylon Fusion gloss black. Just spay a quick times over, wait 30sec, then go over again, wait 30 secs, repeat...
After 15 mins, you can handle the painted piece and bring into the house where the A/C is running so its not so humid. I waited and hour then baked the painted piece only for another 20mins.

Then, put it back together, the sealant is super sticky and wont let you get it all the way together until you bake it again and squeeze together.

Then, do the other light, and put it back on your ride.

Lights Still work

I'll get some daytime pics today, after I give her a good scrubbing.
I used Krylon Fusion gloss black. Just spay a quick times over, wait 30sec, then go over again, wait 30 secs, repeat...
After 15 mins, you can handle the painted piece and bring into the house where the A/C is running so its not so humid. I waited and hour then baked the painted piece only for another 20mins.
Then, put it back together, the sealant is super sticky and wont let you get it all the way together until you bake it again and squeeze together.
Then, do the other light, and put it back on your ride.
Lights Still work
I'll get some daytime pics today, after I give her a good scrubbing.
 10-07-2007, 08:12 AM
#6
name came from hairdryer
Thread Starter
iTrader: (4)
Join Date: Mar 2005
Location: Minneapolis 'burbs
Posts: 466
Very easy, couple of clips under the hood, under the grill. The hardest part is pulling the plastic fender sheild back to fit your arms in and under the bumper cover to get the 4 10mm bolts. (2 on the left, 2 on the right) then just drop down. There are 5 10mm bolts holding on each headlamp assy' which are now easy to see and get too. Then unplug the harness and take out.
Dropping the bumper cover only takes 30mins.
Dropping the bumper cover only takes 30mins.


 10-07-2007, 09:19 AM
#11
Looks great. I like the chrome ring around the lights. I thought about doing that when I did mine, but I chose the blacked out look. Nice write up too. The lights wont melt as long as you have cardboard or other insulator from the metal oven tray. If its at 200-250 it should not be a problem. It took me 12 hours to do mine 2 1/2 years ago, because I did one light at a time in case I screwed one up and I took tons of pics of each step.

 good work... NOW CLEAN THAT ENGINE BAY!


 10-07-2007, 06:37 PM
#16
name came from hairdryer
Thread Starter
iTrader: (4)
Join Date: Mar 2005
Location: Minneapolis 'burbs
Posts: 466
I agree, plus I think I need them for the side marker light. I think I'll also,get some chrome strip overlays either in black or smoke when/if they become available. Great idea on that one btw.
 10-07-2007, 09:00 PM
#19
10-07-2007, 09:18 PM
#20
name came from hairdryer
Thread Starter
iTrader: (4)
Join Date: Mar 2005
Location: Minneapolis 'burbs
Posts: 466
Thanks alot everyone.
Rotors, and painting calipers is probably next. I believe mine are warped. I get the "shimmy" when I'm braking. Not so much when I'm cruising.
Rotors, and painting calipers is probably next. I believe mine are warped. I get the "shimmy" when I'm braking. Not so much when I'm cruising.


 10-08-2007, 03:11 PM
#24
name came from hairdryer
Thread Starter
iTrader: (4)
Join Date: Mar 2005
Location: Minneapolis 'burbs
Posts: 466
The shipping weight on the discount tires computer said 30lbs. That would include the box and packaging. Not sure how reliable the weight is in the stores computer though. I would say that should be about right. There's not alot of metal in them with only having 5 spokes.
 10-08-2007, 08:32 PM
#26
Donating Maxima.org Member

Join Date: Jan 2006
Posts: 103
Thanks for the short, concise instructions. Seeing the pictures of you actually pulling the light apart inspired me to go ahead and give it a shot! I am in between coats of gloss black as we speak! Thanks again!
Jon
Jon
10-08-2007, 08:49 PM
#27
name came from hairdryer
Thread Starter
iTrader: (4)
Join Date: Mar 2005
Location: Minneapolis 'burbs
Posts: 466
I forgot to mention to make sure you clean the Clear/glass part with something like a "swiffer", (grabs dust). I didn't do the best job at that but barely noticable.
Also, 48hrs later, a power wash and constant rain/humidity outside. NO FOGGING!!!

Post up some pics when your done.
 02-16-2008, 08:22 AM
#29

Bringin this thread back to life for a question i have. After you bake the lights and pull them apart, did you sand then paint, or just paint over the chrome. My fear is sanding the lights and dust sticking to all of the headlight sealant.
02-16-2008, 12:49 PM
#31
Thanks Deus..im almost 1/2 way done with 1 headlight. Got it open, sanded and now waiting for the first coat of paint to dry. Also installing my resistors and switchbacks today. And new H3's. And painting the OEM grill black too. Pics most likely later tonight when im done and wash the car.
 02-16-2008, 01:21 PM
#33
Nice, I like it....
This would b th first mod I would do if I owned A 6g. Although, I probably would paint the whole inner housing black, not leaving room for chrome in there....my .02
This would b th first mod I would do if I owned A 6g. Although, I probably would paint the whole inner housing black, not leaving room for chrome in there....my .02
02-16-2008, 02:48 PM
#34

when disassembling the light do we need to remove the fog light housing or just the bulb? Those screws look very hard to get to. Also in this post Deus mentioned tinting the side reflectors, will regular limo window tint work?
Last edited by wildman04; 02-16-2008 at 03:36 PM.

 02-17-2008, 09:16 AM
#37
man, ive had enough of this, i am going to quit being nervous and do this! spring break is in a month so i can have some down time and plus the weather will be hotter. also, i am waiting a sale to go through on some other stuff, might as well get the halos and do it all at once! only thing i am going to do different is sand down the sidemarker and use a light coat of light black or gunmetal to slightly tint that reflector for the perfect combo imo for an onyx max!
02-17-2008, 09:50 AM
#38
Def. the sickest mod. I love it. Im almost finished, re-assembling the headlights now. They look awesome. Crappy weather outside today though so probably no pics but we'll see when im done.
 02-17-2008, 07:34 PM
#40
Member

Join Date: Feb 2008
Location: Clarksville,TN
Posts: 84
!!!
Thats awesome man, I just got finished doing mine a few days ago. I used the krylon flat black. I think the blacked out look is waaayyy better! 
Check out my ride
http://www.cardomain.com/ride/3006571
Check out my ride
http://www.cardomain.com/ride/3006571