ptatohed's "interior decorating" (pics)
 01-26-2006, 01:35 PM
#1
Licensed to Spell


Thread Starter
iTrader: (12)
Join Date: Feb 2001
Location: Murrieta (southern California)
Posts: 4,521
ptatohed's "interior decorating" (pics)
Here is a list of everything I did to my interior recently:
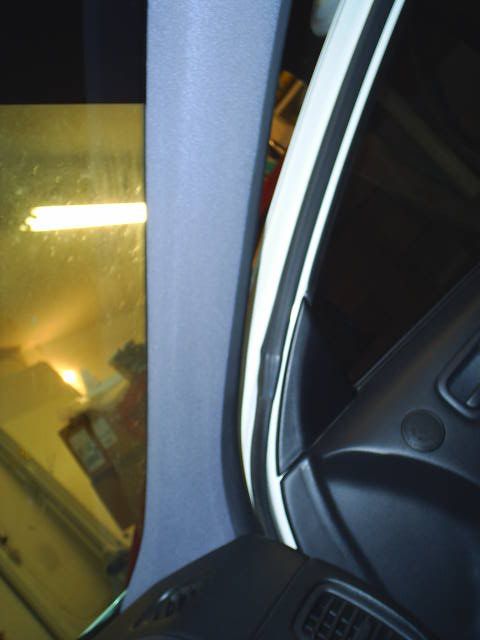
- All 6 hard plastic A,B,C pillars were replaced with fuzzy I30 pillars.
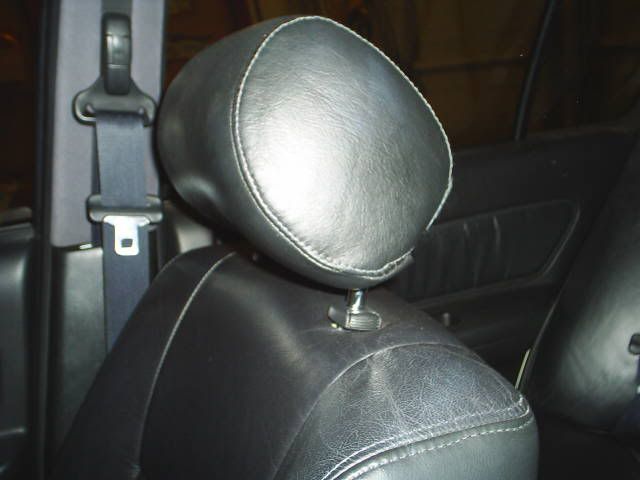
- Installed black leather tilting I30 headrests.
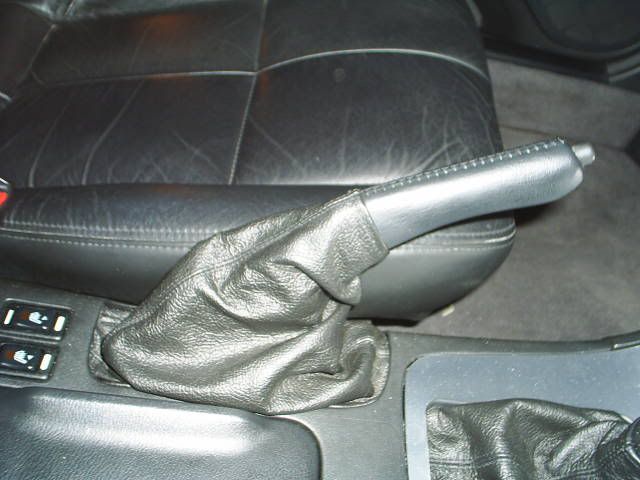
- I removed my plastic e-brake handle and installed an I30 black leather one.
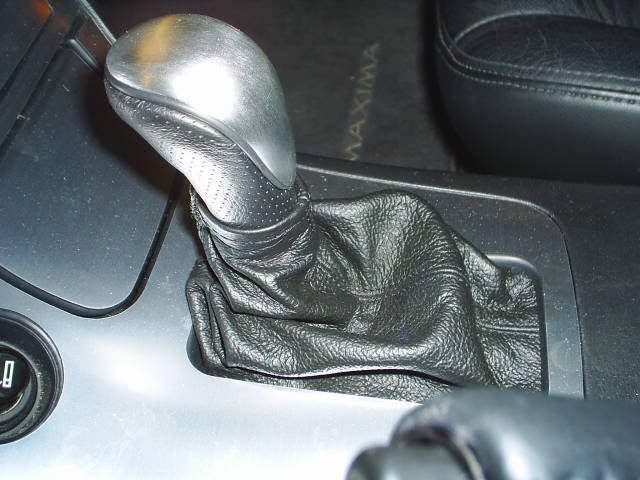
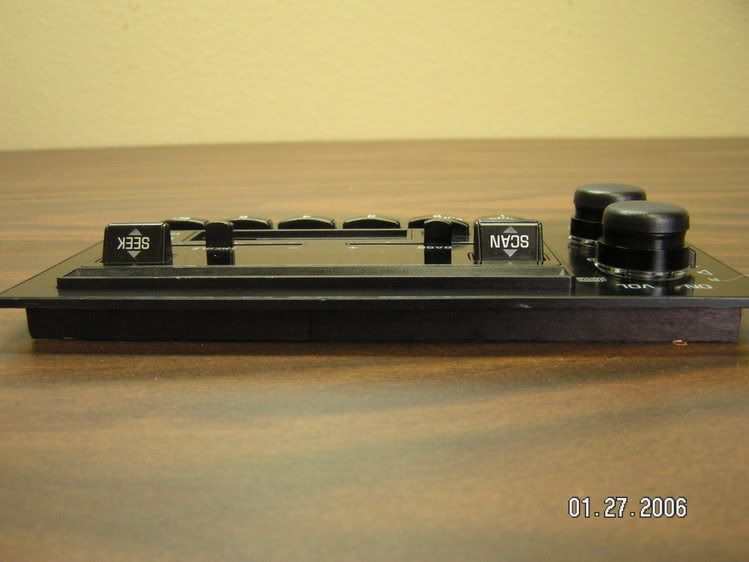
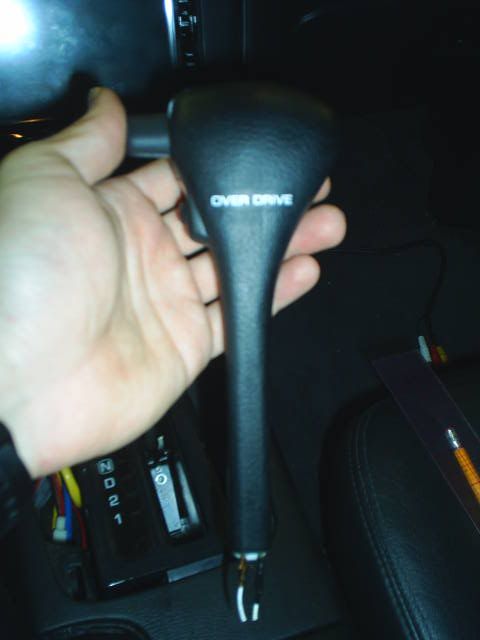
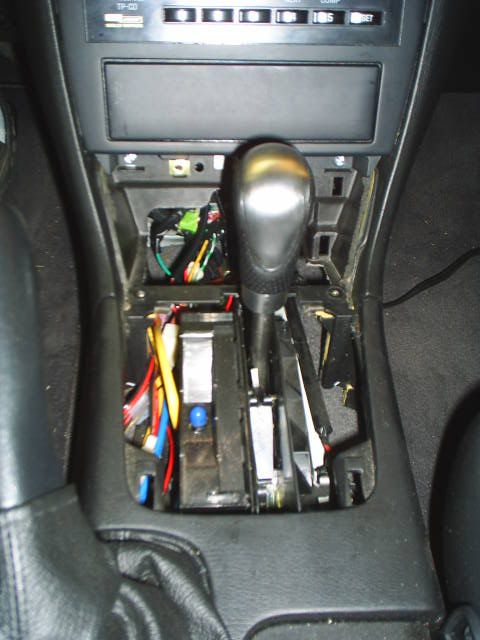
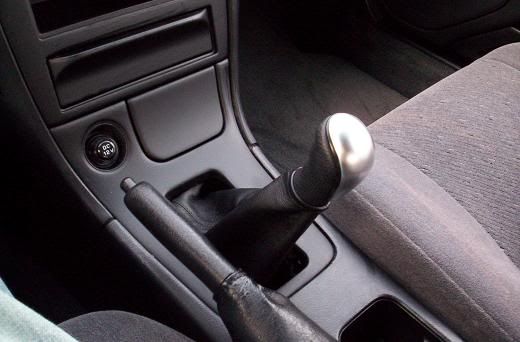
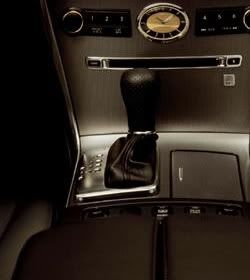
- I removed my stock auto shifter, lowered it 3", added a half brushed aluminum (to match my dash kit)/ half perforated leather (to match my steering wheel) shift ****, converted to push-down-to-shift (instead of push a button) and added a black leather auto shift boot.
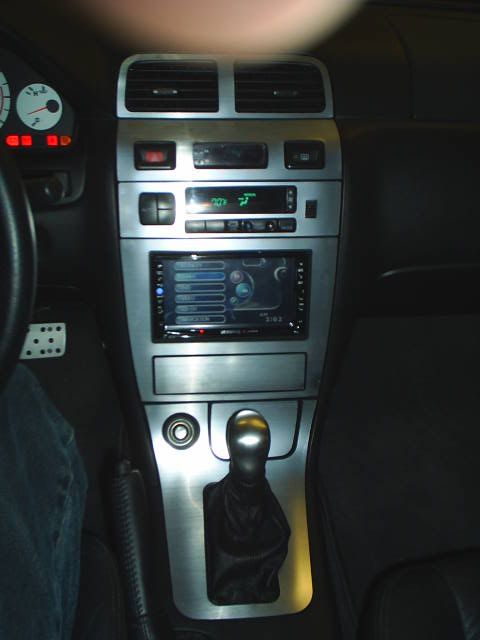
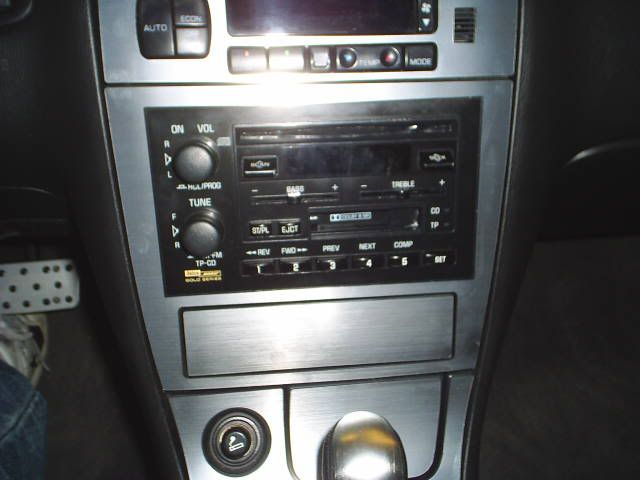
- Real brushed aluminum kit (just the center section for now but I may install the rest of the kit later).
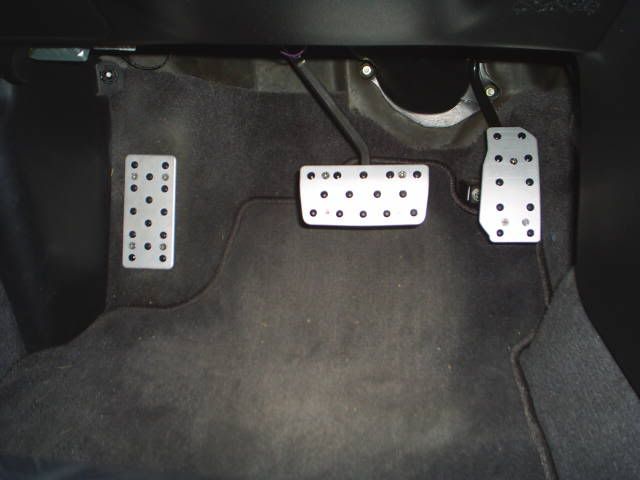
- Brushed aluminum pedals with black rubber inserts.
- Real leather (black) e-brake boot
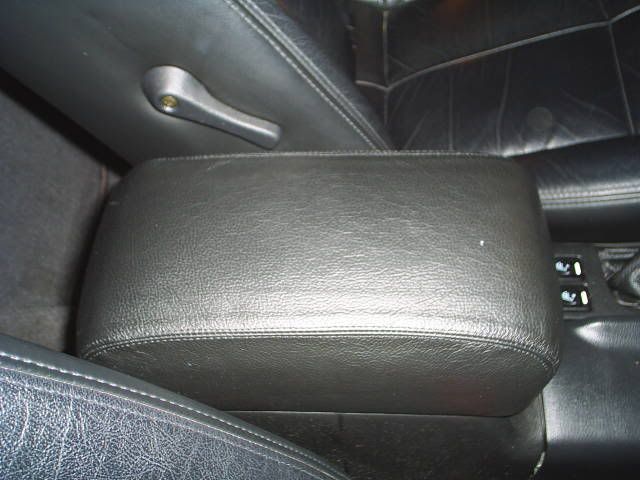
- Black leather (black) armrest cover with extra padding between the armrest and the leather.
- In-console cupholder (available only on '96 Maximas).
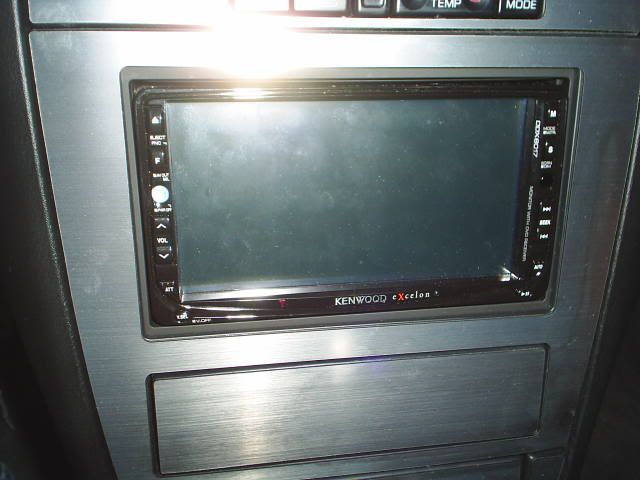
- Kenwood double din DVD/Navigation. (8017)
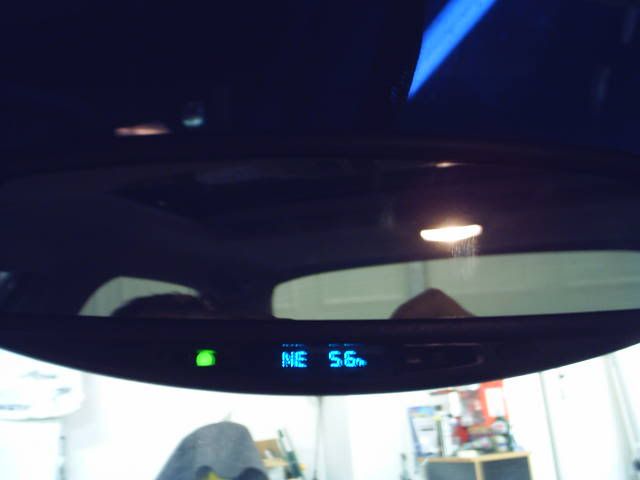
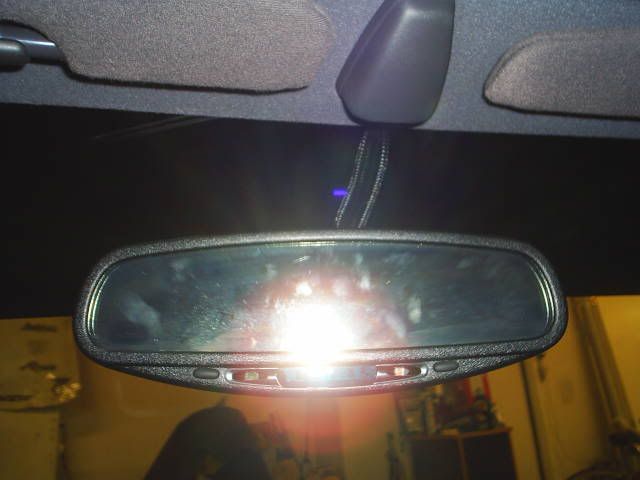
- Auto dim mirror with temperature display, compass and maplights.
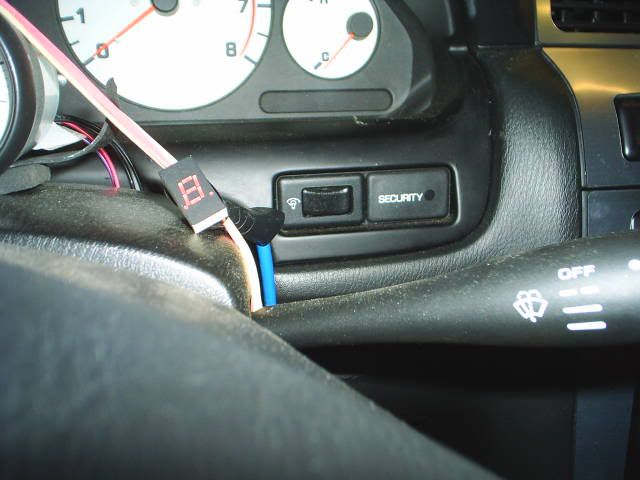
- Added an additional stock Security red LED to the right of the steering wheel (in the dud panel location).
- Window tint including a limo windshield strip and limo on the sunroof.
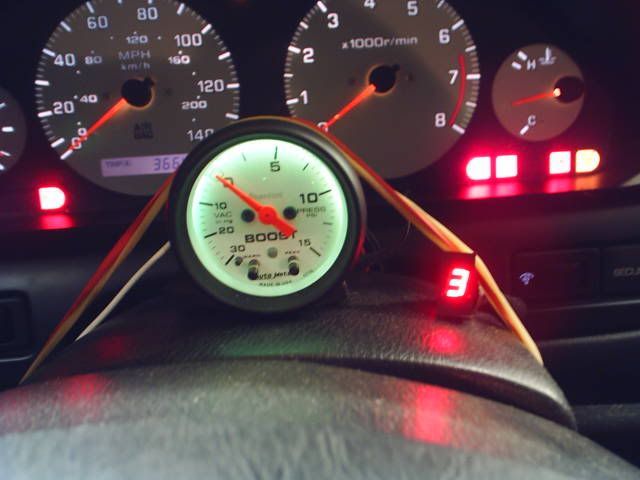
- Oh, and a boost gauge and my manumatic LED display (if those count) although they are not installed pretty yet. For now, I just have them propped with a rubber band.
Following are some pics. Feel free to comment (positive or negative) and feel free to ask any questions.
(More pics at photobucket).
Armrest (with extra foam padding):
Brushed Aluminum kit:
'96 In-Console cupholder:

Leather e-brake boot and leather e-brake handle:
- All 6 hard plastic A,B,C pillars were replaced with fuzzy I30 pillars.
- Installed black leather tilting I30 headrests.
- I removed my plastic e-brake handle and installed an I30 black leather one.
- I removed my stock auto shifter, lowered it 3", added a half brushed aluminum (to match my dash kit)/ half perforated leather (to match my steering wheel) shift ****, converted to push-down-to-shift (instead of push a button) and added a black leather auto shift boot.
- Real brushed aluminum kit (just the center section for now but I may install the rest of the kit later).
- Brushed aluminum pedals with black rubber inserts.
- Real leather (black) e-brake boot
- Black leather (black) armrest cover with extra padding between the armrest and the leather.
- In-console cupholder (available only on '96 Maximas).
- Kenwood double din DVD/Navigation. (8017)
- Auto dim mirror with temperature display, compass and maplights.
- Added an additional stock Security red LED to the right of the steering wheel (in the dud panel location).
- Window tint including a limo windshield strip and limo on the sunroof.
- Oh, and a boost gauge and my manumatic LED display (if those count) although they are not installed pretty yet. For now, I just have them propped with a rubber band.
Following are some pics. Feel free to comment (positive or negative) and feel free to ask any questions.
(More pics at photobucket).
Armrest (with extra foam padding):
Brushed Aluminum kit:
'96 In-Console cupholder:
Leather e-brake boot and leather e-brake handle:
 01-26-2006, 01:36 PM
#2
Licensed to Spell
Thread Starter
iTrader: (12)
Join Date: Feb 2001
Location: Murrieta (southern California)
Posts: 4,521
Boost Gauge and Manumatic display (temporarily rubberbanded for now):
Kenwood DVD/Navigation:
Fake security face:
Autodim mirror with compass, map lights and temp. display:
Aluminum pedals:
Kenwood DVD/Navigation:
Fake security face:
Autodim mirror with compass, map lights and temp. display:
Aluminum pedals:
01-26-2006, 01:37 PM
#3
Licensed to Spell
Thread Starter
iTrader: (12)
Join Date: Feb 2001
Location: Murrieta (southern California)
Posts: 4,521
Fuzzy pillars:
Extra stock security LED placed in the dud panel location:
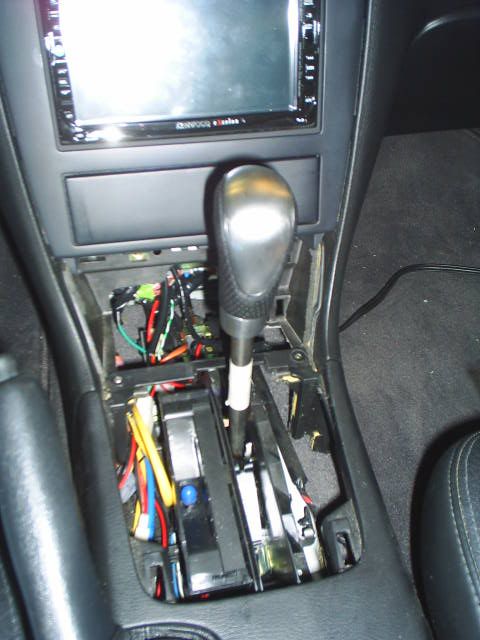
Chopped automatic shifter with leather boot (I chopped it about 3", I now push down to shift, I use my manumatic to turn OD on/off and, unfortunately, I lost my PRND read-out. I am working on getting the PRND display up in the gauge cluster):
I30 tilting headrests:
Edit: I almost forgot.... my seat fold-up mod!
Here is the link to ptatohed's back-seat fold-up mod.
Seat folds up to allow for pass-through storage for long/large items:

Extra stock security LED placed in the dud panel location:
Chopped automatic shifter with leather boot (I chopped it about 3", I now push down to shift, I use my manumatic to turn OD on/off and, unfortunately, I lost my PRND read-out. I am working on getting the PRND display up in the gauge cluster):
I30 tilting headrests:
Edit: I almost forgot.... my seat fold-up mod!
Here is the link to ptatohed's back-seat fold-up mod.
Seat folds up to allow for pass-through storage for long/large items:
01-27-2006, 05:54 PM
#4
Licensed to Spell
Thread Starter
iTrader: (12)
Join Date: Feb 2001
Location: Murrieta (southern California)
Posts: 4,521
:o)
O.k. guys, I am going to try to answer everyone's questions the best I can. If I miss any or I am not clear, feel free to ask me anything else. Here goes...
njmodi,amimaxima,86maxima96,Stagnet04,anj109,Dubby a,The Wizard,99grnmaxgxe,Tim96I30t,darklegend06,nismos14 ,MDeezy,D-Bo,NismoMaxman2,chillin014,maxima619,HomerMAC: Thanks for the compliments. Much appreciated.
amimaxima: Yes I am boosted. That's why I have a boost measuring gauge and that's why my signature reads:
"1999 SE, Pearl White/Black leather - Fully loaded with all options except TC (ABS, heated seats, side airbags, etc.) - Supercharged"

86maxima96: The padding I used for the armrest are these thin sheets of foam that you can get at a craft store or the fabric section at Wal-Mart. They are litterally called "Foamies". They are used for crafts. They come in 8.5"x11", or 11"x17", sticky back or non-sticky back. They are ~2mm thick. I used 3 stacks. Regarding the in-console cup holder, as I stated in thread number one ( ) it is from a '96 Maxima. '96 was the only year that the Maxima and I30 came with the cupholder. Most people don't know about it and most '96 owner's don't even have theirs any more. I bought it for ~$8 from Garrands Nissan (see my sig.)
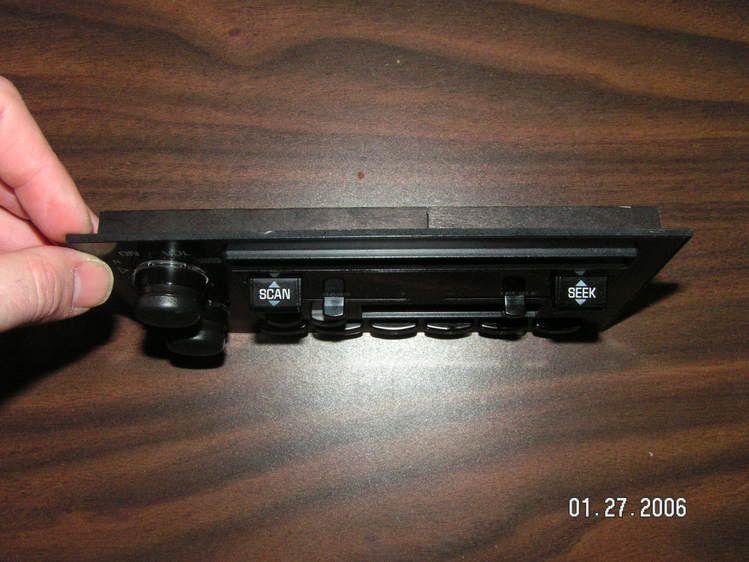
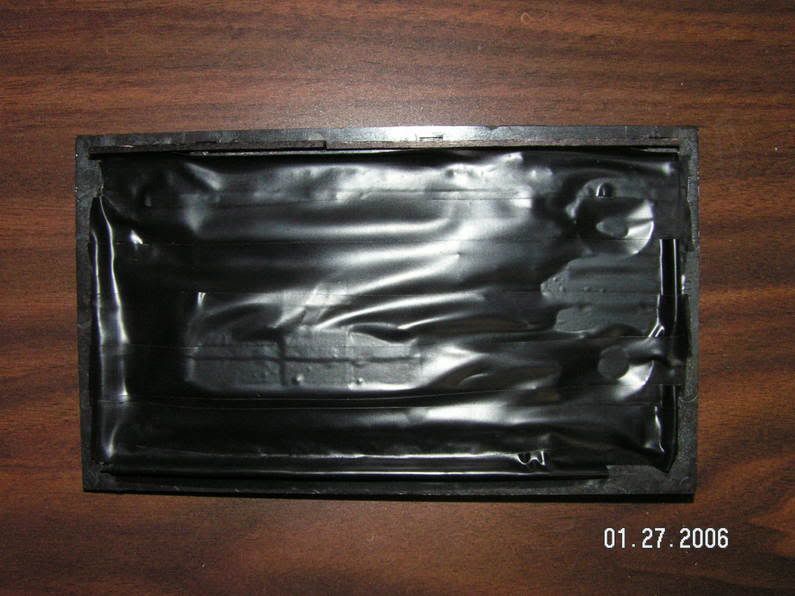
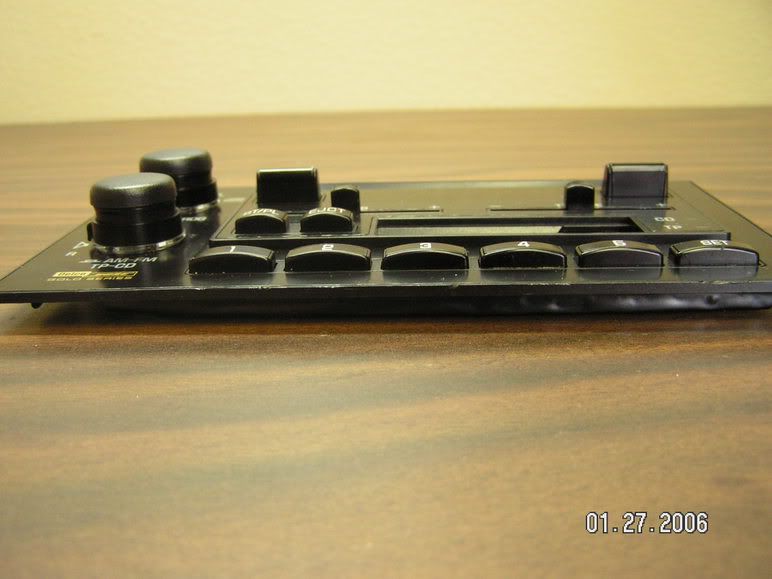
Stagnet04/aznsap/goldtooth: I made the fake security face. I took apart an old double din radio and dremiled out any "growths" on the back side and glued all the buttons in place. I glued a popsicle stick to the top so it would hang over my aftermarket stereo. I simply asked the shop where I bought my Kenwood from if he had any old double dins lying around. I will show more pics after I answer everyone's questions.
motorheadwannab: Well, I can kind of cheat and use my manumatic to turn the OD on and off. So, therefore, I do not have a separate OD button. I might add one later. But if someone were to do this shifter mod without a manumatic, then you would have to get a 'normally open' button from Radio Shack and place it somewhere in the car.
Dubbya: The rubber bands are temporary! :P I have another gauge that I am waiting to install. After that, I will install the two gauges and manumatic display "prettyly". As for the padding, please see my reply to 86maxima96 above.
The Wizard: Thanks for the pedals Christmas present Jim. :-)
Jepht20: Really? You think the things I did was rice? I thought it was fairly conservative. I didn't go with a chrome dash kit, bright red stitching in my leather or a neon glow shifter. I thought it was all tasteful. And some of it is even functional! Ex. the Kenwood 8017, security face, the security light, the padded armrest, etc. I basically felt like I was just modernizing my car. Most new cars like say the TL, the IS350, the G35 come with silver dashes, sport pedals and/or shift boots for the automatics, etc. I hear you about the 'posereskness' of the automatic shifter mod I did. And I did think about that too. And trust me, I am not a poser, because I truly don't want a stick shift. I was just simply trying to make mine more modern and sporty looking. Instead of that tall, unsemetrical, plastic cheesey looking shifter. I wasn't trying to be a poser and, in fact, it bothers me to not have my PRND showing. It will be harder but I might try to modify it so I get my PRND back. But my true goal is to get it up in the cluster like the JDM Maximas. That would be cool.
99grnmaxgxe: "Looks nice the shifter tricked me until I saw the pedals." Either that or you could just read the caption above the picture which reads "automatic shifter".
Tim96I30t: The cupholder isn't pointless. It's there if you need it. If you don't need it, don't use it. It has saved me a few times where I have had three drinks in the car. Also, he is a tad bigger than the stock two cupholders. And it is completely removable so you can take it in and out as needed. Definitely worth having. No it is not too hard to make the face stay on. You'll see how I use popsicle stick in the pictures to follow. I will provide you pics, front and back.
darklegend06: I don't have a write-up of the shifter mod. But I will post some pics I took while I was doing the mod. And if you decide to do it, I will be more than happy to walk you through it. Price of the parts needed? It was $20 for the shifter handle from AutoZone and the shift boot was $30 I believe, from redlinegoods. I didn't add one but you would need a OD button from RadioShack. I would guess $2-$4, tops. I think that's all you need.
njmodi,amimaxima,86maxima96,Stagnet04,anj109,Dubby a,The Wizard,99grnmaxgxe,Tim96I30t,darklegend06,nismos14 ,MDeezy,D-Bo,NismoMaxman2,chillin014,maxima619,HomerMAC: Thanks for the compliments. Much appreciated.
amimaxima: Yes I am boosted. That's why I have a boost measuring gauge and that's why my signature reads:
"1999 SE, Pearl White/Black leather - Fully loaded with all options except TC (ABS, heated seats, side airbags, etc.) - Supercharged"
86maxima96: The padding I used for the armrest are these thin sheets of foam that you can get at a craft store or the fabric section at Wal-Mart. They are litterally called "Foamies". They are used for crafts. They come in 8.5"x11", or 11"x17", sticky back or non-sticky back. They are ~2mm thick. I used 3 stacks. Regarding the in-console cup holder, as I stated in thread number one (
) it is from a '96 Maxima. '96 was the only year that the Maxima and I30 came with the cupholder. Most people don't know about it and most '96 owner's don't even have theirs any more. I bought it for ~$8 from Garrands Nissan (see my sig.)Stagnet04/aznsap/goldtooth: I made the fake security face. I took apart an old double din radio and dremiled out any "growths" on the back side and glued all the buttons in place. I glued a popsicle stick to the top so it would hang over my aftermarket stereo. I simply asked the shop where I bought my Kenwood from if he had any old double dins lying around. I will show more pics after I answer everyone's questions.
motorheadwannab: Well, I can kind of cheat and use my manumatic to turn the OD on and off. So, therefore, I do not have a separate OD button. I might add one later. But if someone were to do this shifter mod without a manumatic, then you would have to get a 'normally open' button from Radio Shack and place it somewhere in the car.
Dubbya: The rubber bands are temporary! :P I have another gauge that I am waiting to install. After that, I will install the two gauges and manumatic display "prettyly". As for the padding, please see my reply to 86maxima96 above.
The Wizard: Thanks for the pedals Christmas present Jim. :-)
Jepht20: Really? You think the things I did was rice? I thought it was fairly conservative. I didn't go with a chrome dash kit, bright red stitching in my leather or a neon glow shifter. I thought it was all tasteful. And some of it is even functional! Ex. the Kenwood 8017, security face, the security light, the padded armrest, etc. I basically felt like I was just modernizing my car. Most new cars like say the TL, the IS350, the G35 come with silver dashes, sport pedals and/or shift boots for the automatics, etc. I hear you about the 'posereskness' of the automatic shifter mod I did. And I did think about that too. And trust me, I am not a poser, because I truly don't want a stick shift. I was just simply trying to make mine more modern and sporty looking. Instead of that tall, unsemetrical, plastic cheesey looking shifter. I wasn't trying to be a poser and, in fact, it bothers me to not have my PRND showing. It will be harder but I might try to modify it so I get my PRND back. But my true goal is to get it up in the cluster like the JDM Maximas. That would be cool.
99grnmaxgxe: "Looks nice the shifter tricked me until I saw the pedals." Either that or you could just read the caption above the picture which reads "automatic shifter".
Tim96I30t: The cupholder isn't pointless. It's there if you need it. If you don't need it, don't use it. It has saved me a few times where I have had three drinks in the car. Also, he is a tad bigger than the stock two cupholders. And it is completely removable so you can take it in and out as needed. Definitely worth having. No it is not too hard to make the face stay on. You'll see how I use popsicle stick in the pictures to follow. I will provide you pics, front and back.
darklegend06: I don't have a write-up of the shifter mod. But I will post some pics I took while I was doing the mod. And if you decide to do it, I will be more than happy to walk you through it. Price of the parts needed? It was $20 for the shifter handle from AutoZone and the shift boot was $30 I believe, from redlinegoods. I didn't add one but you would need a OD button from RadioShack. I would guess $2-$4, tops. I think that's all you need.
01-27-2006, 05:54 PM
#5
Licensed to Spell
Thread Starter
iTrader: (12)
Join Date: Feb 2001
Location: Murrieta (southern California)
Posts: 4,521
:o)
Mxrider52: No, the mirror is not plug and play. It is totally different. The stock Maxima mirror is non-powered, ceiling mount. The new auto-dim/map lights/compass/temperature Donnely mirror is powered and window mount. You will need to glue a button to your windsield (  ) and cover up the old ceiling mount location. You will also need to run wires too for the power, ground and temp. probe. I'll try to take pics of what I did to cover the old ceiling mount location but basically I just used glue and popsicle sticks to get my old cover to fit back on (it won't fit on directly with the stock mirror gone).
nismos14: No sir. I love my automatic.
MDeezy: The rubber bands are temporary!!!!!
D-Bo: Please see answers above and pics below.
BluFlame: No I am not selling my manumatic and I don't think there is anything I said anywhere to indicate that I was.
chillin014: Not sure what you meant by how I hooked up my navigation. I have the Kenwood 4100 navigation in the trunk. Is that what you mean? As for prices on everything. Oh crap. I was afraid someone would ask. I don't even want to think about this! Here goes: Armrest/e-brake boot and shift boot were 3 for $90, if I remember correctly from redlinegoods.com. The dash kit was about $150 from brushedaluminum.com (24 pieces). The cupholder was $8 from garrands-nissan.com. The I30 e-brake was ~$115 from Pinnacle Infinit/Nissan. The fake face was free (99 cents for Super Glue). Boost gauge was $180. Manumatic was $300+, I believe (ouch). The Kenwood along with the nav. and 10-disk changer was around $2300. The mirror was $200-$250 (I bought it many years ago). The pedals were about $90. The pillars were free for the B and C since I traded with my '96 GLE. I bought the A pillars from Pinnical for I think $85 each. The security light was a few bucks from a guy who was parting out his car and I was already buying something else from him. The aluminum/perforated shifter was $20 from Autozone (almost always out of stock!). The I30 headrests cost me $100 and a trade of my Maxima non-tilting headrests. Did I miss anything?
ethnic6: What is a "booster"? Thanks for telling me that something that is temporary looks ghetto. It is an interim condition. :P
Future: It isn't a "manumatic shifter" so to speak. Please see HomerMAC's answer on page 2.
tatanko: See some of my description above as well as some pics I will post after this. What is your idea for the PRND?
maxima619: Jose, thanks! We will be at the races soon enough. We just have a few more tweeks to do on our 3" intake and water to air aftercooler project. I love that link you provided. Just two problems, that's for a 300Zx and it only holds one gauge, I need two. Is Ionic going to make those for the Maxima?
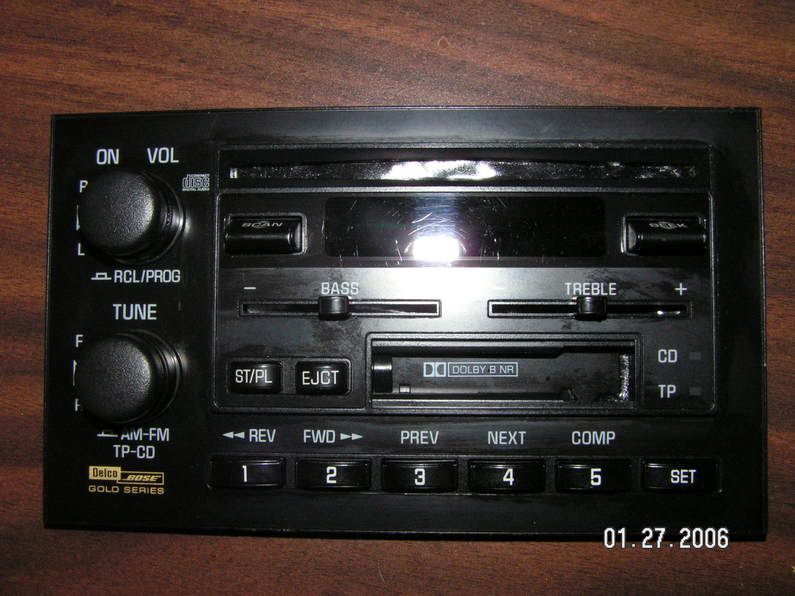
bobjohnson: I don't know what radio I used. I know it must be GM because it is a Delco. Yes, the buttons are SuperGlued. No velcro. I use a popsicle stick which forms a ledge to hook over my 8017. See following pics.
HomerMAC: Yes sir. The source of the shifter is AutoZone.
95maxrider: No, you have that wrong regarding the pillars. Here's the deal with Maxima/I30 pillars. All I30's, all years ('95-'99) have fuzzy pillars. Only '95 and '96 Maxima GLE's have fuzzy pillars. The Bose system only used A-pillar tweeters in '95 and '96. So, therefore, if you want fuzzy pillars with no tweeter hole, you need to buy '97-'99 I30 pillars. Did that make sense? As I mentioned, I bought mine at Pinnacle. No, my mirror is not the OEM I30 mirror. Yes it is annoyingly green when it auto-dims! I think it was $200-$250 off e-bay (years ago). It is made by Donnely. I will provide install tips if you are serious about getting one. But right now, my fingers are going to fall off. So please excuse me for now.
Ricksi30: See above.
aznprid972/MDeezy. LOL! Thanks for the laugh guys!
O.k., I think I got everyone. Sorry if I missed anyone. Just ask your question again if I did. I will now post some more detail/pics of the afifter and the fake face since that seemed to be the biggest two questions...
) and cover up the old ceiling mount location. You will also need to run wires too for the power, ground and temp. probe. I'll try to take pics of what I did to cover the old ceiling mount location but basically I just used glue and popsicle sticks to get my old cover to fit back on (it won't fit on directly with the stock mirror gone).nismos14: No sir. I love my automatic.
MDeezy: The rubber bands are temporary!!!!!
D-Bo: Please see answers above and pics below.
BluFlame: No I am not selling my manumatic and I don't think there is anything I said anywhere to indicate that I was.
chillin014: Not sure what you meant by how I hooked up my navigation. I have the Kenwood 4100 navigation in the trunk. Is that what you mean? As for prices on everything. Oh crap. I was afraid someone would ask. I don't even want to think about this! Here goes: Armrest/e-brake boot and shift boot were 3 for $90, if I remember correctly from redlinegoods.com. The dash kit was about $150 from brushedaluminum.com (24 pieces). The cupholder was $8 from garrands-nissan.com. The I30 e-brake was ~$115 from Pinnacle Infinit/Nissan. The fake face was free (99 cents for Super Glue). Boost gauge was $180. Manumatic was $300+, I believe (ouch). The Kenwood along with the nav. and 10-disk changer was around $2300. The mirror was $200-$250 (I bought it many years ago). The pedals were about $90. The pillars were free for the B and C since I traded with my '96 GLE. I bought the A pillars from Pinnical for I think $85 each. The security light was a few bucks from a guy who was parting out his car and I was already buying something else from him. The aluminum/perforated shifter was $20 from Autozone (almost always out of stock!). The I30 headrests cost me $100 and a trade of my Maxima non-tilting headrests. Did I miss anything?
ethnic6: What is a "booster"? Thanks for telling me that something that is temporary looks ghetto. It is an interim condition. :P
Future: It isn't a "manumatic shifter" so to speak. Please see HomerMAC's answer on page 2.
tatanko: See some of my description above as well as some pics I will post after this. What is your idea for the PRND?
maxima619: Jose, thanks! We will be at the races soon enough. We just have a few more tweeks to do on our 3" intake and water to air aftercooler project.
I love that link you provided. Just two problems, that's for a 300Zx and it only holds one gauge, I need two. Is Ionic going to make those for the Maxima?bobjohnson: I don't know what radio I used. I know it must be GM because it is a Delco. Yes, the buttons are SuperGlued. No velcro. I use a popsicle stick which forms a ledge to hook over my 8017. See following pics.
HomerMAC: Yes sir. The source of the shifter is AutoZone.
95maxrider: No, you have that wrong regarding the pillars. Here's the deal with Maxima/I30 pillars. All I30's, all years ('95-'99) have fuzzy pillars. Only '95 and '96 Maxima GLE's have fuzzy pillars. The Bose system only used A-pillar tweeters in '95 and '96. So, therefore, if you want fuzzy pillars with no tweeter hole, you need to buy '97-'99 I30 pillars. Did that make sense? As I mentioned, I bought mine at Pinnacle. No, my mirror is not the OEM I30 mirror. Yes it is annoyingly green when it auto-dims! I think it was $200-$250 off e-bay (years ago). It is made by Donnely. I will provide install tips if you are serious about getting one. But right now, my fingers are going to fall off. So please excuse me for now.
Ricksi30: See above.
aznprid972/MDeezy. LOL! Thanks for the laugh guys!
O.k., I think I got everyone. Sorry if I missed anyone. Just ask your question again if I did. I will now post some more detail/pics of the afifter and the fake face since that seemed to be the biggest two questions...
 01-27-2006, 06:58 PM
#7
Licensed to Spell
Thread Starter
iTrader: (12)
Join Date: Feb 2001
Location: Murrieta (southern California)
Posts: 4,521
:o)
O.k., now regarding the shifter. Without doing a detailed write-up, here is a link to all the pictures I took while doing the project (sorry, as always, I wish I took a lot more). If something is still not clear after what I wrote above and the pictures below, feel free to ask.
Here is a link to my photobucket shifter page with photos.
O.k., I'll attempt to do a "mini write-up":
First, remove your shifter trim. It is very easy. Get a grip on it at the bottom of the shifter opening and pull straight up a little. Get your fingers under the very bottom when you can and keep pulling up. When the trim is unclipped, take the top part and pull it down and away from the radio trim. Don't pull it too far away because you need to unplug the cigarette lighter power. Unplug it and remove the shifter trim completely.
It might be helpful to remove the ashtray now too. Undo one phillips screw on the left and then pull the ashtray straight out. Careful, the clips are stubborn! Unplug the light wire and remove the ashtray.
Next, remove your stock shifter. There are two little screws at the front of the shifter. Unscrew those and pull your shift button out of the shifter (mine was difficult but most people say theirs just falls right out). Then pull your shifter up on the metal shaft. The OD wires (black and white) will be just taut enough for you to not be able to pull your shifter completely off the pole Here is the part that sucks - Unless you have the patience to follow those wires to their source, you'll have to just cut them. I hate doing 'permanent' damage to my car but I figured it wasn't too bad to just put some electrical plugs on there (the plugs will make future modding a lot easier). Cut close to the shifter (assuming you won't be using it again) so you have more wire slack on the car-side.
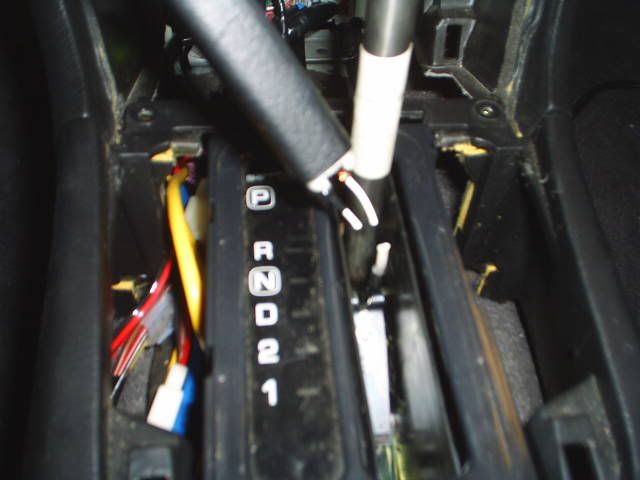
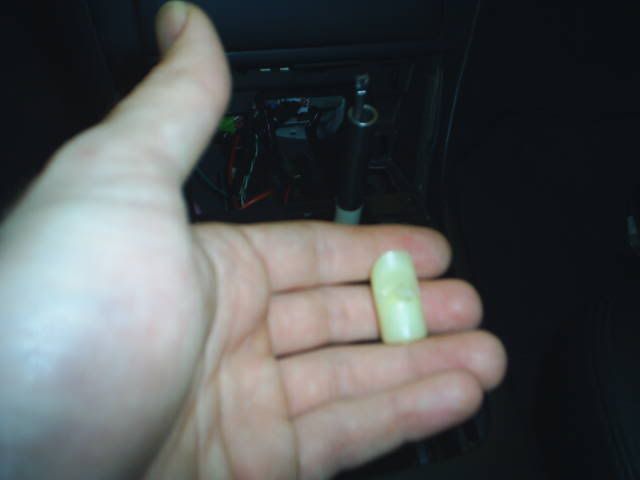
If you'd like, you can now remove your 'PRND' and orange selector indicator now that the shifter is gone. Only do this if you plan on adding a shift boot and you want to fill the entire shifter trim opening. If you are simply lowering your stock shifter, leave the PRND there. You will need to loosen the screws on the center console near the front of the console to remove the PRND trim. Like this:
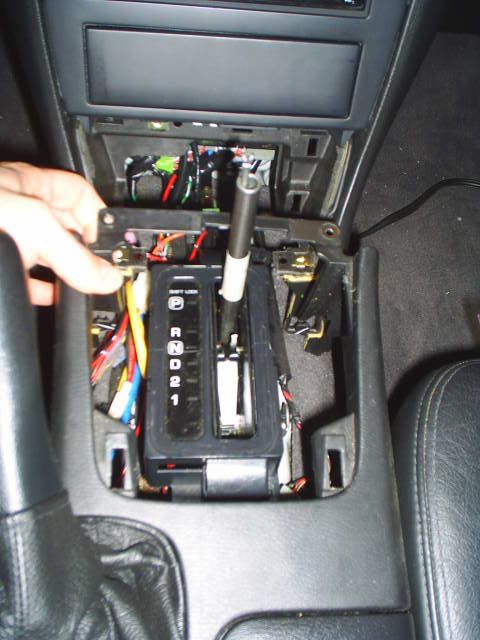
Remove PRND and the sliding indicator:
http://i8.photobucket.com/albums/a6/...p/S3010008.jpg
Here is a link to my photobucket shifter page with photos.
O.k., I'll attempt to do a "mini write-up":
First, remove your shifter trim. It is very easy. Get a grip on it at the bottom of the shifter opening and pull straight up a little. Get your fingers under the very bottom when you can and keep pulling up. When the trim is unclipped, take the top part and pull it down and away from the radio trim. Don't pull it too far away because you need to unplug the cigarette lighter power. Unplug it and remove the shifter trim completely.
It might be helpful to remove the ashtray now too. Undo one phillips screw on the left and then pull the ashtray straight out. Careful, the clips are stubborn! Unplug the light wire and remove the ashtray.
Next, remove your stock shifter. There are two little screws at the front of the shifter. Unscrew those and pull your shift button out of the shifter (mine was difficult but most people say theirs just falls right out). Then pull your shifter up on the metal shaft. The OD wires (black and white) will be just taut enough for you to not be able to pull your shifter completely off the pole
Here is the part that sucks - Unless you have the patience to follow those wires to their source, you'll have to just cut them. I hate doing 'permanent' damage to my car but I figured it wasn't too bad to just put some electrical plugs on there (the plugs will make future modding a lot easier). Cut close to the shifter (assuming you won't be using it again) so you have more wire slack on the car-side.If you'd like, you can now remove your 'PRND' and orange selector indicator now that the shifter is gone. Only do this if you plan on adding a shift boot and you want to fill the entire shifter trim opening. If you are simply lowering your stock shifter, leave the PRND there. You will need to loosen the screws on the center console near the front of the console to remove the PRND trim. Like this:
Remove PRND and the sliding indicator:
http://i8.photobucket.com/albums/a6/...p/S3010008.jpg
01-27-2006, 06:59 PM
#8
Licensed to Spell
Thread Starter
iTrader: (12)
Join Date: Feb 2001
Location: Murrieta (southern California)
Posts: 4,521
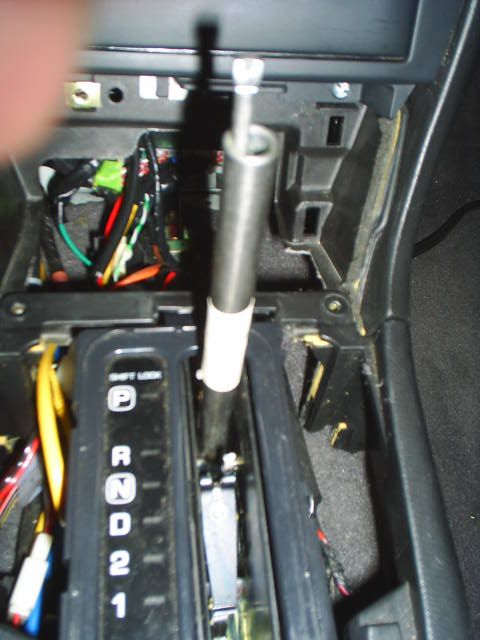
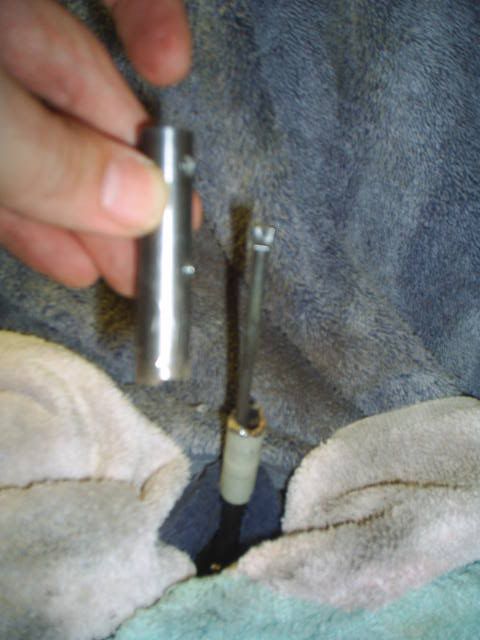
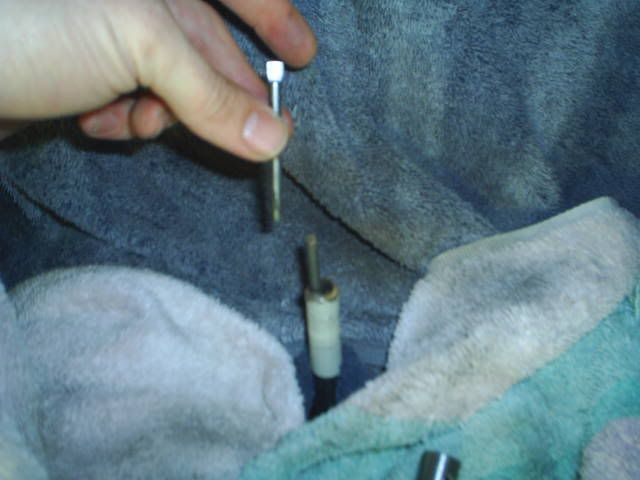
Next, pull off the white plastic 45-degreed piece at the top of your shift rod. There is a skinny bar that runs inside the pole. The bar gets pushed down when you change gears. The plastic 45 degree piece is for the stock shift button. You won't need that any more since you are converting to push-down-to-shift.
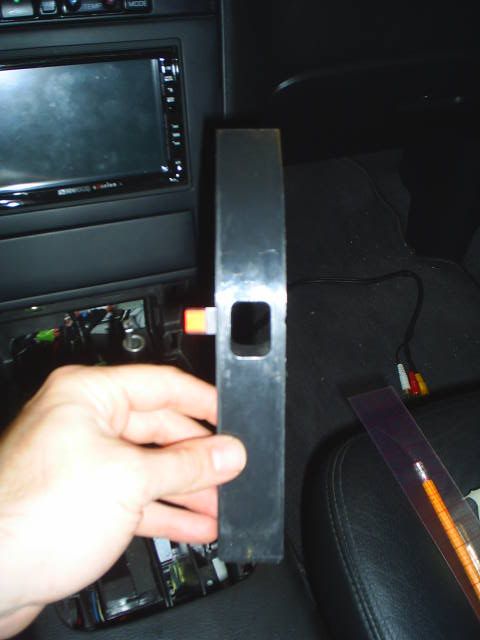
Next, trst fit on your new shifter and figure out how much you want to lower your shifter. Here is a pic. of me test-fitting my shifter:
I ended up going with a 3" 'chop'. Your chop will vary depending on the shifter you use and your personal preference. Now mark your location with masking tape and cut your pole with a dremil. Be very careful not to cut through the skinny inner rod! You will need to just patiently go around in circles to cut your pole without hurting the inner rod. Now cut the inner rod. Make sure it ends up being the exact same height above the pole that it was when stock! Here are some pics.
01-27-2006, 07:00 PM
#9
Licensed to Spell
Thread Starter
iTrader: (12)
Join Date: Feb 2001
Location: Murrieta (southern California)
Posts: 4,521
You are now ready to install your shift ****. Your shift **** should have come with instructions and adaptors, mine did. Make sure your **** is for an automatic because it needs to be spring loaded and be able to go up and down.
The shift boot is pretty self-ex. Just put the base down inside the shifter trim opening but since there is no where to mount it, just tape it to the underside with duct tape while you are working. And when you finally put everythign back together, it will be wedge-fit in.
I've been typing way too much and my brain is fried so I might have missed some stuff. I'll add it later is I think of anything. Or feel free to ask any questions for clarity.
- Josh
 01-30-2006, 09:33 AM
#10
Licensed to Spell
Thread Starter
iTrader: (12)
Join Date: Feb 2001
Location: Murrieta (southern California)
Posts: 4,521
O.k., I'll attempt to answer everyone's question(s) since my last post on Friday:
Tatanko: "Where did you get the shifter from?". Already answered sir. See above.
I like your idea about the PRND. Perhaps we can talk about this later when we are both ready. I'm going to shoot for the intrument cluster first though.
Northern Maxima: Give yourself some credit. You are smart enough to figure it out. I have no special skills. All it takes is desire and patience.
iceman82: Yes I did mention where I bought the shifter. A few times.
You are welcome for the write-up.
Tatanko: Tatanko, good questions. How is the shifter secured? I kind of left that part vague in my write-up. I said that your aftermarket shifter will come with instructions. And it does. But, in a nutshell. They give you plastic cylindrical adaptors that slide down on your shifter pipe. I forget the exact numbers but for conversation, let's say our shift poles are 10mm but the inside of the 'fixed' part of the shifter is 12mm. They provide you with a 10mm inside diameter and 12mm outside diameter plastic cylinder. Slide it to where you need it. Next, you slide down your pole the bottom part of the shifter which will later screw to the top part. Sorry, but I didn't show any of this in my pics. In fact, I placed my shift boot above the lower part of the shifter I am talking about so you can't see it in my pics. Next you slide on the 'fixed' part of the shifter over your plastic cylinder. Then you screw that in with set-screws. Now, the shifter lowers down on the pole and you bring up the bottom part and screw them together. The shifter slides up and down on the fixed part you screwed in. The shifter is spring loaded. Did that make sense?
Yes, you are correct. The only thing that makes the stock shifter side button work is the 45^ plastic thing. Once gone, just push straight down on the inner rod.
"Your 3" chop ends up just at the top of that white plastic piece on the shift rod, correct?". No! See, this is my fault for not taking enough pictures. The thing you are calling a 'white plastic piece' is my masking tape that I used to mark my cut line! Sorry about that. After carefully thinking about it, I placed tape where I wanted to cut and then marked a circle around the pole with my pencil.
Yeah, the shift boot is basically just pressure fit at the bottom. But because you need to keep it where you want it until you put it all back together, I used duct tape to hold it. You will need to remove the PRND display as I showed or else the boot won't make it.
I already answered the shift **** and dash kit question.
SleepersOwn: Yes, the automatic shifts and functions just like stock only you push straght down on the spring loaded shift **** instead of the spring loaded side button. OD button? Just strip back about 1/2" of wire on the black and white OD button wires and run wires and a button to where you want. Keep in mind guys, there are two styles of OD buttons. My '96 has an up/down on/off position but my '99 has a push on/off button. I am not sure what year Nissan switched over. Keep that in mind when shopping for a button.
maxima619: Awesome!
MaxGordon7: You still haven't installed it yet? What are you waiting for?
D-Bo: You're welcome! Thanks for the thanks.
Tatanko: "bump" Sorry, I rarely come on during the weekend.
arrrghhh: No, pushing down to shift is not awkward at all. Most new cars come that way in fact. I found there to be just a little too much frinction so I used some high temp greese and it works great. The spring tension is perfect. Maybe a little firm but it's better that way than too easy.
Tatanko: Try to buy it at autozone.com. If you can't find it, I can buy one and send it to you.
darklegend06 and chillin014: I am using the automatic trim.
Cdg2125 and arrrghhh and chillin014: See what I said about the OD button above. The year of your car might determine the type of OD button you get.
Yeah, I don't see it either on autozone.com
http://www.autozone.com/servlet/UiBr...rs=Shift+*****
I'll look at my package tonight and see if there is a website. Otherwise I will pick one up for you.
I agree with using the automatic shifter trim. In fact, mine is already a little "right heavy" (the shifter is a little to the right in the opening). So if it is true that the manual shifter opening is even more left, then the auto shifter would be even more right heavy.
Pedals were a X-Mas gift from my best friend, The Wizard (James).
He got them here:
http://www.autovationparts.com/
I think they are still doing a group deal of 20% off if you check the group deal forum.
Oh, it doesn't matter. Just any high temp. greese. Even the cheepest stuff at Wal-Mart will work fine. You'll see that even the stock shifter had some greese in it as well.
Also, did you notice when the shifter is completely assembled, it rocks back and forth ever so slightly? That bothered me so I placed a few strips of electrical tape on the fixed shifter part of the shift **** (The part you screw down). I used 3 layers thick to be exact. Then I put greese over the tape. Works like a charm!
I can't say for sure. You'll have to experiment. If it is real leather and you already have it, then it is worth a try. But remember, when I ordered my 5-speed shift boot from redlinegoods, I specified 'short through shifter'. If you do order from redlinegoods, don't forget, they are running a group deal discount code in the group deal forum.
Oh CR@P!!!!! You're right! Shoot, that would qualify as an interior mod, wouldn't it? Oh man. 
O.k., here is the link to ptatohed's back-seat fold-up mod.
Thanks 2 Da Max.
suicidal: Thanks for the kind words.
Cdg: I think you should be o.k. with the shifter you are considering.
Tat: Yeah, I can't say I have any complaints with redlinegoods. I feel their leather is a little too textured when compared to my stock seats but maybe I am being too picky. In fact, The Wizard requested smooth leather when he ordered his boots/armrest and they did come smooth!
You're welcome about the tip.
Yes sir. I will look today for you on my way home. I remember when I was shopping for mine, the first one I found had a defect so I didn't buy it but at least I knew it existed! So I went to other AutoZones - with no luck. It took me about 1.5 weeks to find one. Hopefully I can get you one sooner.
Tatanko: "Where did you get the shifter from?". Already answered sir. See above.
I like your idea about the PRND. Perhaps we can talk about this later when we are both ready. I'm going to shoot for the intrument cluster first though.
Northern Maxima: Give yourself some credit. You are smart enough to figure it out. I have no special skills. All it takes is desire and patience.
iceman82: Yes I did mention where I bought the shifter. A few times.
You are welcome for the write-up.
Tatanko: Tatanko, good questions. How is the shifter secured? I kind of left that part vague in my write-up. I said that your aftermarket shifter will come with instructions. And it does. But, in a nutshell. They give you plastic cylindrical adaptors that slide down on your shifter pipe. I forget the exact numbers but for conversation, let's say our shift poles are 10mm but the inside of the 'fixed' part of the shifter is 12mm. They provide you with a 10mm inside diameter and 12mm outside diameter plastic cylinder. Slide it to where you need it. Next, you slide down your pole the bottom part of the shifter which will later screw to the top part. Sorry, but I didn't show any of this in my pics. In fact, I placed my shift boot above the lower part of the shifter I am talking about so you can't see it in my pics. Next you slide on the 'fixed' part of the shifter over your plastic cylinder. Then you screw that in with set-screws. Now, the shifter lowers down on the pole and you bring up the bottom part and screw them together. The shifter slides up and down on the fixed part you screwed in. The shifter is spring loaded. Did that make sense?
Yes, you are correct. The only thing that makes the stock shifter side button work is the 45^ plastic thing. Once gone, just push straight down on the inner rod.
"Your 3" chop ends up just at the top of that white plastic piece on the shift rod, correct?". No! See, this is my fault for not taking enough pictures. The thing you are calling a 'white plastic piece' is my masking tape that I used to mark my cut line! Sorry about that. After carefully thinking about it, I placed tape where I wanted to cut and then marked a circle around the pole with my pencil.
Yeah, the shift boot is basically just pressure fit at the bottom. But because you need to keep it where you want it until you put it all back together, I used duct tape to hold it. You will need to remove the PRND display as I showed or else the boot won't make it.
I already answered the shift **** and dash kit question.
SleepersOwn: Yes, the automatic shifts and functions just like stock only you push straght down on the spring loaded shift **** instead of the spring loaded side button. OD button? Just strip back about 1/2" of wire on the black and white OD button wires and run wires and a button to where you want. Keep in mind guys, there are two styles of OD buttons. My '96 has an up/down on/off position but my '99 has a push on/off button. I am not sure what year Nissan switched over. Keep that in mind when shopping for a button.
maxima619: Awesome!
MaxGordon7: You still haven't installed it yet? What are you waiting for?
D-Bo: You're welcome! Thanks for the thanks.
Tatanko: "bump" Sorry, I rarely come on during the weekend.
arrrghhh: No, pushing down to shift is not awkward at all. Most new cars come that way in fact. I found there to be just a little too much frinction so I used some high temp greese and it works great. The spring tension is perfect. Maybe a little firm but it's better that way than too easy.
Tatanko: Try to buy it at autozone.com. If you can't find it, I can buy one and send it to you.
darklegend06 and chillin014: I am using the automatic trim.
Cdg2125 and arrrghhh and chillin014: See what I said about the OD button above. The year of your car might determine the type of OD button you get.
Originally Posted by Tatanko
I've looked on autozone.com and did not see the one you have. I may need you to grab me one if you don't see it on their either.
Oh, and to those who are thinking of using the manual shifter trim, I wouldn't. I say this because it may look goofy. The hole is larger, but the shifter will still be farther to the right. It would look almost like having a manual shifter in 5th or 6th/R all the time.
Oh, and to those who are thinking of using the manual shifter trim, I wouldn't. I say this because it may look goofy. The hole is larger, but the shifter will still be farther to the right. It would look almost like having a manual shifter in 5th or 6th/R all the time.
http://www.autozone.com/servlet/UiBr...rs=Shift+*****
I'll look at my package tonight and see if there is a website. Otherwise I will pick one up for you.
I agree with using the automatic shifter trim. In fact, mine is already a little "right heavy" (the shifter is a little to the right in the opening). So if it is true that the manual shifter opening is even more left, then the auto shifter would be even more right heavy.
Originally Posted by RB26DET
looks good. Where did you get those pedals?
He got them here:
http://www.autovationparts.com/
I think they are still doing a group deal of 20% off if you check the group deal forum.
Originally Posted by chillin014
okay then i'm gonna use the auto trim, haha.
i just need to get that boot!
i also noticed the friction with the ****, what brand greese did you use?
i just need to get that boot!
i also noticed the friction with the ****, what brand greese did you use?
Also, did you notice when the shifter is completely assembled, it rocks back and forth ever so slightly? That bothered me so I placed a few strips of electrical tape on the fixed shifter part of the shift **** (The part you screw down). I used 3 layers thick to be exact. Then I put greese over the tape. Works like a charm!
Originally Posted by Tatanko
Question...since I'm sticking with the auto shifter trim, and the manual shift boots don't need to be a perfect fit anyway, could I potentially use one meant for a 3rd gen?
Originally Posted by 2 Da Max
again nice work bro! you forgot to show them the fold up seats!
O.k., here is the link to ptatohed's back-seat fold-up mod.
Thanks 2 Da Max.
suicidal: Thanks for the kind words.
Cdg: I think you should be o.k. with the shifter you are considering.
Tat: Yeah, I can't say I have any complaints with redlinegoods. I feel their leather is a little too textured when compared to my stock seats but maybe I am being too picky. In fact, The Wizard requested smooth leather when he ordered his boots/armrest and they did come smooth!
You're welcome about the tip.
Yes sir. I will look today for you on my way home. I remember when I was shopping for mine, the first one I found had a defect so I didn't buy it but at least I knew it existed! So I went to other AutoZones - with no luck. It took me about 1.5 weeks to find one. Hopefully I can get you one sooner.
01-31-2006, 06:00 PM
#11
Originally Posted by Cdg2125
The shifter says it can be used for an automatic/manual transmission. Im guessing that should work?
02-01-2006, 07:54 AM
#12
Licensed to Spell
Thread Starter
iTrader: (12)
Join Date: Feb 2001
Location: Murrieta (southern California)
Posts: 4,521
Suicidal, I forgot to address your request about converting from a ceiling mount mirror to a windshield mount. I haven't had a chance to take more pics but I already had these. Look at these:
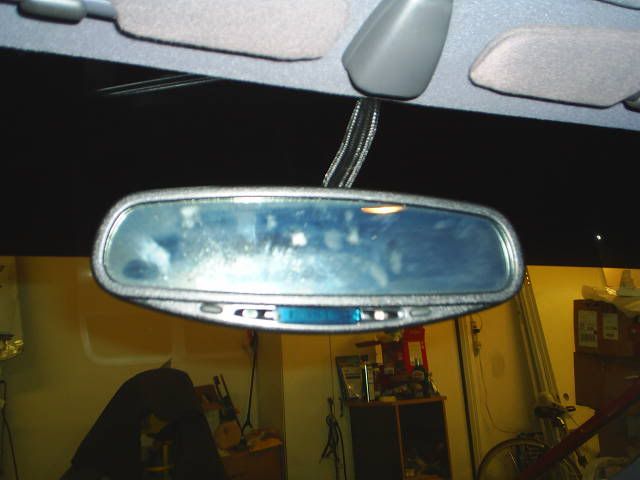
In a nutshell, I just reatached the plastic base cover that used to be on the stock ceiling mount. It looks a little odd but it looks a lot better than if you had a hole in your headliner. It's hard to explain but once the stock mirror is gone, the cover won't fit anymore. I'll take better pics later but I had to glue Popsicle sticks to the inside of my base cover to make it reach up and around the inside of the hole left on the headliner. The wires from the mirror just go straight under the headliner and run to the driver-side A-pillar.
Tatanko. If you prefer smooth leather, than yes, try to make the request. Now as for your ****, I went to 2 AutoZones for you last night... no luck. There are two more fairly close to me that I will check and I go to San Diego often and there are many AutoZones there. I'll find you one!
darklegen. I don't know the part number for the OEM shifter trim and boot. You can ask Dave at Garrand's though (my sig.). Yes, I will get you a shift **** too, if you like. If I remember correctly, they are $20 ($19.99), CA sales tax is 7.75% and shipping might be ~$5.
In a nutshell, I just reatached the plastic base cover that used to be on the stock ceiling mount. It looks a little odd but it looks a lot better than if you had a hole in your headliner. It's hard to explain but once the stock mirror is gone, the cover won't fit anymore. I'll take better pics later but I had to glue Popsicle sticks to the inside of my base cover to make it reach up and around the inside of the hole left on the headliner. The wires from the mirror just go straight under the headliner and run to the driver-side A-pillar.
Tatanko. If you prefer smooth leather, than yes, try to make the request. Now as for your ****, I went to 2 AutoZones for you last night... no luck.
There are two more fairly close to me that I will check and I go to San Diego often and there are many AutoZones there. I'll find you one!darklegen. I don't know the part number for the OEM shifter trim and boot. You can ask Dave at Garrand's though (my sig.). Yes, I will get you a shift **** too, if you like. If I remember correctly, they are $20 ($19.99), CA sales tax is 7.75% and shipping might be ~$5.
02-02-2006, 07:45 AM
#13
Licensed to Spell
Thread Starter
iTrader: (12)
Join Date: Feb 2001
Location: Murrieta (southern California)
Posts: 4,521
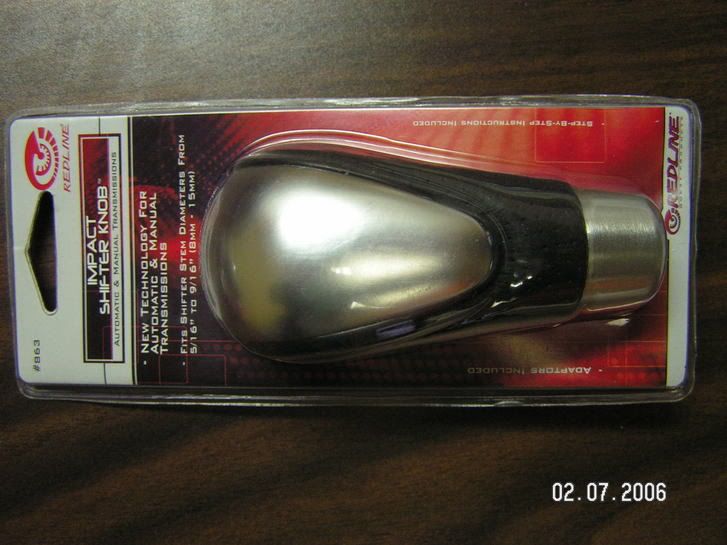
O.k., I did a little homework. I dug up my package. The name of the company is:
Redline Quest Products. The name of the actual **** is "Impact Shifter ****". The product number is #863. There is no contact info. anywhere on the product. However, in the instructions, there is a 'Technical Assistance' number and e-mail. They are: 1-800-900-0999 and techsupport@redline.net.
The other thing that is interesting is at AutoZone, there are other redline products with this website on it (but this website wasn't on the shifter package): http://www.pilotautomotive.com/
It reads 'Under Construction' but there are two phone #'s, a fax # and an address. (although my shifter package reads Miramar, FA and the website reads City of Industry, CA).
Try doing some research with the info. above.
I will continue to check AutoZone's and I will also enquire about a special order. Good luck.
02-06-2006, 09:37 AM
#14
Licensed to Spell
Thread Starter
iTrader: (12)
Join Date: Feb 2001
Location: Murrieta (southern California)
Posts: 4,521
O.k. guys. I have good news and I have great news. Which do you want first? I'll start with the great news: After litterally visiting 11 AutoZones from Riverside to San Diego, I found two shifters! The good news? Since they are discontinued, they were half off - only $9.99. I only found two, and quite frankly I am tired of schlepping all over, so I hope that no one else wants one. Tatanko and darklegend had dibs so these two shifters are for them. Guys, I don't want to rip you off so if you want to just reimburse me for what I paid ($10+$0.77 tax + ~$4-5 shipping =~$15-$16 total), that's fine but since I have spent a lot in time and gas, if you want to kick in a little extra, I'd appreciate it. It's up to you. But, otherwise, let's say $15 shipped (I hope it only costs ~$4-5) to ship. You can PayPal me at ptatohed@netzero.net. I'll send them off the day after I get payment. Let me know if you have any questions. Thanks.
- Josh
- Josh
02-07-2006, 06:01 PM
#15
Licensed to Spell
Thread Starter
iTrader: (12)
Join Date: Feb 2001
Location: Murrieta (southern California)
Posts: 4,521
Sorry guys, I've been busy. Catch-up time...
chill, I'm confused as to which stage you are in (per your picture). It appears that you removed more things than I did (ex. the PRND light bulb, etc.) yet your shifter is still attached? How did you manage that? Yes, my shifter is to the right a little. So what stage are you at now? Updated pics? No offense man, but I am not too sure about the black perferated leather/brushed aluminum shift **** with tan leather seats and fake wood grain. ?
tatanko and darklegend, I got your PMs. tat, I am working on an exact shipping price for you but it is hard when I am at work. In fact, I haven't even found a perfect sized small box to put the shifters in. Hopefully I can find two at home tonight.
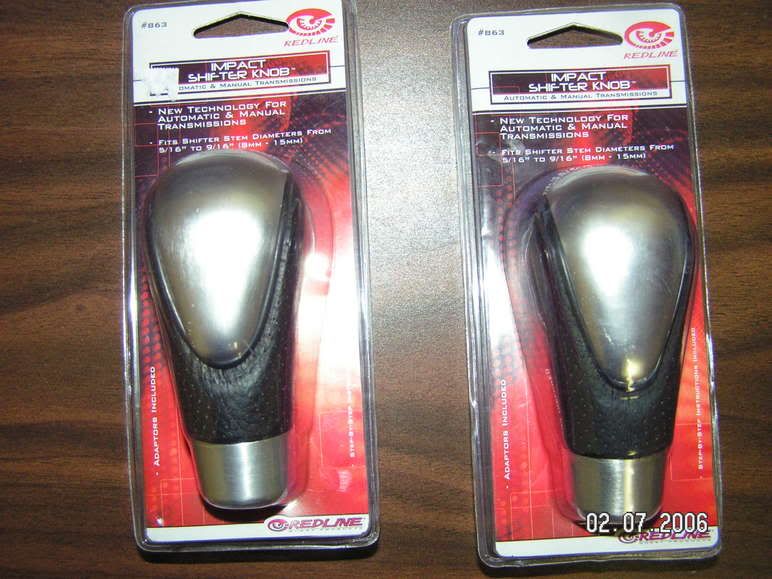
Turtle (and tatanko and darklegend), here is a picture of the shift **** in the package:
Here is a pic of tatanko's and darklegend's shift *****:
chill, I'm confused as to which stage you are in (per your picture). It appears that you removed more things than I did (ex. the PRND light bulb, etc.) yet your shifter is still attached? How did you manage that? Yes, my shifter is to the right a little. So what stage are you at now? Updated pics? No offense man, but I am not too sure about the black perferated leather/brushed aluminum shift **** with tan leather seats and fake wood grain. ?
tatanko and darklegend, I got your PMs. tat, I am working on an exact shipping price for you but it is hard when I am at work. In fact, I haven't even found a perfect sized small box to put the shifters in. Hopefully I can find two at home tonight.
Turtle (and tatanko and darklegend), here is a picture of the shift **** in the package:
Here is a pic of tatanko's and darklegend's shift *****:
02-08-2006, 09:30 AM
#16
Licensed to Spell
Thread Starter
iTrader: (12)
Join Date: Feb 2001
Location: Murrieta (southern California)
Posts: 4,521
:o)
Originally Posted by chillin014
you have no faith in me! i'm gonna hook it up mayn.
as tatanko said or should i say SPOILED, jk man, i'm switching all brown out to black. then i think there will be a nice contrast. if the shifter **** aluminum doesnt match and looks completely awkward there are alot of ***** out there i can swap it out. but i'm not concerned right now.
also, yeah i realized i did take out more than you, for some reason i thought you took out the gear selector piece. i just took the OEM shifter off and then manuevered the black peice out then stuck the shifter back on temporarily. i'll consider putting it back on if you think i need it to hold the boot in place.
so you just took out the little selector? what is the point?
chill, sounds like it will look really good when you are done.

I removed the parts I removed only for one reason. The bottom of the shift boot wasn't big enough to go around the PRND piece. I would have preferred to leave it actually. The only two pieces I removed were the PRND readout and the sliding shifter selector (with the orange indicator on it). Pics:


In fact, I probably should have but I never did unplug my light bulb. You might want to put it back to this stage (I think it helps hold the boot in place):

Although if you can get your boot to work without it, then it doesn't matter either way.
Now that you guys are getting into it, a few more tips/words:
Be very careful where you chop your shifter pole/rod. There is no going back. Think it through very carefully.
Place towels all around your shifter pole and dash/seats when you dremil the pole. Sparks go flying!
I recommend high temp. grease (as already discussed) but don't do it until the very end! Trust me. You will be doing lots of fine tuning and taking your **** on/off (especially while fitting the boot) and if you have already greased it, then the grease starts getting on your hands and boot and shifter, etc.
One thing I tried but haven't talked about here (and sorry, I never did take pics) is instead of filling the entire shifter opeing with the leather boot, I tried just filling the skinny rectangular opeing made for the sliding shift pole. The reason for this was so I could still have my PRND. The only problem was the boot didn't quite look right (obviously you don't see that much boot doing it this way) and you still need to ditch the sliding indicator piece (with the orange on it) so even though I could see the PRND, it still wouldn't show the selection. I was tempted to try to advance on this and try to make it all work, and I still might, but for now I will just leave what I have. But if it really bothers you to lose the PRND, you might persue this route.
I'll post again if I think of more tips. And, of course, feel free to ask questions.
02-08-2006, 06:20 PM
#17

the diagonal shapped one that is pressed on by the OEM button. its on the top of the stem, ptato shows it taken off and the top of the stem in the write up where he says then he test fits it to see waht height he wants.
btw today i did most of the thing. still dont have boots though.
i only did a 2 inch cut because three seems REALLY short, but i might cut it shorter than it is, i just want to wait for the boot first.
ptato did you use any of those black adapters that came with the ****? i just used the thinnest one, and that one still might be too much.
the **** is wobbly a little bit but i still gotta mess with it because its not pushed on all the way. alot of tampering to be done. here's my pics so far though.
02-08-2006, 06:33 PM
#18
i have more tampering to do but here's some picss
i only did a 2 inch cut so far until i get the boot and decide how i want to perfect it.
and tatanko, the plastic piece on top of the stem once you take the shifter off. its in the pic where ptato took it off to "test fit" the shifter or wahtever.
i only did a 2 inch cut so far until i get the boot and decide how i want to perfect it.
and tatanko, the plastic piece on top of the stem once you take the shifter off. its in the pic where ptato took it off to "test fit" the shifter or wahtever.
02-08-2006, 07:53 PM
#19
Originally Posted by Tatanko
Are those second pics with the 2" chop? That looks a lot lower than his 3" chop 
all i remember is he said 3" chop. and i went and measured and 3"'s was a LOT which is why i jsut did 2. ptato's looked low but now i feel like mine looks super low.....damnit.
maybe he meant there were 3"'s left or something?
i was about to ask but i got too impatient. well i guess theres no going back now unless i buy those metal pieces from a parted out auto or something.
its hard to compare the pictures, it looks like his reaches the bottom of the tray, and mine seems to do the same , when in park
ptatohed DID cut off more than i did, cause i didnt cut that far below the 2 screw hole/threads on that rod. he cut a good half an inch more than i did.
hmm.. still waiting for my boots.
Haha ill get some measurements when I get home later tonight.
You didn't cut much more than me I don't think. Imnot sure if I want the bottom piece to show or not, ill figure that out when I get the boot.
Is your **** wobbly at all? I have to mess with mine more I hope I can get it stiff
Also did you use any of those thin little plastic adapters?
Its like you have to press against the spring of the **** and the force of the stem to shift.
i didnt realize you HAD to use the adapters. but yeah, only the thinnest one fit and i still have to push the circle metal slider piece down onto it more. the screws arent necessary, i agree.
i gotta wait until tomorrow or i'm out of work today, agh.... i hate waiting alll day to do what i wanted to do.
02-09-2006, 08:02 AM
#20
Licensed to Spell
Thread Starter
iTrader: (12)
Join Date: Feb 2001
Location: Murrieta (southern California)
Posts: 4,521
Hey guys. I'm pretty sure I did a 3" cut. Now you have me doubting myself. But chillin's shifter trim is propped up a little so that adds to the illusion. Also, don't forget, I decided to place my boot up on my shift ****. If you wanted the lower, silver part of the **** to show, you shouldn't cut as much as I did. Take a look at the following picture. It looks like the distance between the two screw holes is how much more I cut below the lower screw hole. Does that make sense? I don't have it here at work so I was just trying to look at proportions. Can you measure that chill?
chillin, to answer your question about the 45^ piece - no I guess you don't need to remove it but I did so I could measure the distance from the top of the pole to the top of the inner rod, so I can keep the proportions the same when I chopped it. I removed it with vice grips by the way.
tat, I got your PayPal, I will try to get it out to you tomorrow. It shouldn't be a problem since we work half days on Friday.
02-09-2006, 09:18 AM
#21
Licensed to Spell
Thread Starter
iTrader: (12)
Join Date: Feb 2001
Location: Murrieta (southern California)
Posts: 4,521
:o)
Originally Posted by chillin014
Haha ill get some measurements when I get home later tonight.
You didn't cut much more than me I don't think. Imnot sure if I want the bottom piece to show or not, ill figure that out when I get the boot.
Is your **** wobbly at all? I have to mess with mine more I hope I can get it stiff
Also did you use any of those thin little plastic adapters?
Its like you have to press against the spring of the **** and the force of the stem to shift.
Did I use the plastic adaptors? You have to! Do you not? And there is only one that works for our car, right? Yes, I used the appropriate adaptor and slid it on my pole. It was a nice, tight fit. Then when I went to place the fixed part of the shift **** over the adaptor, it was soooo tight that I never bothered using the provided screws. I had to hammer my fixed piece over the adaptor (light taps). That's how tight it is. How did you do it?
"Its like you have to press against the spring of the **** and the force of the stem to shift". That is true. (I mentioned this before) You are fighting two forces when you push down. It is a tad stiff but not bad once you add the grease. But I prefer a little pressure be needed to shift rather than it be too easy. If you really don't like it, you can start shortening the inner rod and/or remove a spring coil. But try the tape and grease first.
Good luck.
02-09-2006, 01:47 PM
#22

heres an old thread with a different **** for anyone looking for one.
http://forums.maxima.org/showthread.php?t=375458&pp=30
i like the way your shifter turned out
but i am in love with that mirror. Where did you get it and how much was it? New or used?
http://forums.maxima.org/showthread.php?t=375458&pp=30
i like the way your shifter turned out
but i am in love with that mirror. Where did you get it and how much was it? New or used?
02-10-2006, 09:26 AM
#23
Licensed to Spell
Thread Starter
iTrader: (12)
Join Date: Feb 2001
Location: Murrieta (southern California)
Posts: 4,521
:o)
Originally Posted by pavelsmax
heres an old thread with a different **** for anyone looking for one.
http://forums.maxima.org/showthread.php?t=375458&pp=30
i like the way your shifter turned out
but i am in love with that mirror. Where did you get it and how much was it? New or used?
http://forums.maxima.org/showthread.php?t=375458&pp=30
i like the way your shifter turned out
but i am in love with that mirror. Where did you get it and how much was it? New or used?
The mirror is made by Donnely. It has autodim (automatically dims at night per the lighting conditions - there is no flicker switch), two map lights (one for the driver and one for the passenger), it has a compass (8-way, N, NW, W, S, SW, etc.), and it has a temperature display (you run a wire and place the temp. sensor where ever you want, typically toward the bottom front of your car).

I bought mine years ago off e-bay for $200-and-something. I think they are now just under $200. I bought it for my '96 because it bothered me that my electronic climate control didn't have outside temperature display! Well, since my '99 does have ambiant temp. display, I ran the temperature sensor for my mirror to inside the cabin. So now I know the temp. inside and out of my car!

For sale on e-bay.
For sale on e-bay.
02-14-2006, 07:52 AM
#24
Originally Posted by Cdg2125
Has anyone done the shift mod like a bmw? putting the shift boot only next to the prnd symbols? Is it possible in the max?
So in conclusion, it looks dumb and isn't functional anyway. Not YET...
Personally I'm trying to come up with an all new PRND display that will be built into the shifter trim, but won't have a slider or anything to show which gear you're in, you'll have to tell by looking at the position of the shifter.
02-14-2006, 08:00 AM
#25
the **** on mine is a tiny little bit wobbly. when its in park there seems a little room to push the **** down further before it pushes the rod down.
but when in drive, there isnt any room and i dont want any pressure on the rod when im not pressing on it.
so i gotta find another way to reduce the wobble, the tape hasnt done much, i have to put more maybe.
but when in drive, there isnt any room and i dont want any pressure on the rod when im not pressing on it.
so i gotta find another way to reduce the wobble, the tape hasnt done much, i have to put more maybe.
02-17-2006, 09:48 AM
#26
Licensed to Spell
Thread Starter
iTrader: (12)
Join Date: Feb 2001
Location: Murrieta (southern California)
Posts: 4,521
:o)
Originally Posted by chillin014
took it off, same thing, something is up with the threads, i didnt save the packaging so i cant imagine autozone giving me a refund. i woudlnt care if it was like a 5-10 dollar **** but it was like 21 bucks....
Chris,
First try teflon plumber's tape. If that doesn't work, do this: Buy a new **** and then take back your bad **** with the new package and receipt a few days later. Of course, that is assuming you still want that style shifter. ? It sounds like you crossthreaded your base and stripped the threads. I felt that temptation a few times but whenever I felt that, I stopped, separated the two pieces and started over. Good luck.
02-17-2006, 04:05 PM
#27
i figured it out! actually my dad did.
the shifter bottom only threads on about 1 5th of the threads. it is stopped when it meets the bottom of the shifter.
i think this is to provide room for that inner cylinder which moves inside it, so the only thing i'd be doing by shortening the base piece is reducing travel within the shifter. it should still be able to press down on the rod and function normally.
i think limiting the travel will be better anyhow since i always though it had too much.
i'll let yall know. im about to cut it with the dremel.
02-18-2006, 12:38 AM
#29
Licensed to Spell
Thread Starter
iTrader: (12)
Join Date: Feb 2001
Location: Murrieta (southern California)
Posts: 4,521
:o)
Originally Posted by Cdg2125
ptatohed, thanks for the input on the b&m. I understand what you're saying so I think I'll play it safe. Anyway you'd be able to get another shifter / or any ideas on how I could order one?
So, anyway, I will be going down to San Diego this weekend and spending another half a day cruising around looking for shift ****(s). Cdg2125, you're not the only one who has asked me to buy one for them so I will just go ahead and buy as many as I can find. As you know, I only found two the last time I did this so I can't make any promises but I'll try. Has anyone done any research on the phone number, fax number and address I gave a few pages back?
02-21-2006, 05:05 PM
#30
Licensed to Spell
Thread Starter
iTrader: (12)
Join Date: Feb 2001
Location: Murrieta (southern California)
Posts: 4,521
Hey guys. Well, I hit another 5 AutoZones in San Diego this past weekend. I was able to scoop up three more *****. All for $10 each! I need one (because I dented mine by accident as mentioned on the prior page) and (call me selfish but) I would like to keep a back-up, just in case. So that leaves one for sale. Oh, and a dinged one if anyone wants it. However, I might be able to get some more if anyone really wants one baddly. Cdg2125, you have first dibs per this thread. However, there was one other person who had PMed me asking for one first. I could be wrong, but I believe it was Maximus?? Anyway, if you were the person who requested one via PM, please speak up. I'll wait a few days. If I don't hear from anyone, then the shift **** is yours Cdg2125. And, like I said, if you both want one really bad, I can probably find at least one more. darklegend and tatanko were both kind enough to send $20 shipped (even though the cost was $10) so I'm just going to stick with that price to be fair to them. Thanks guys.
02-22-2006, 04:04 AM
#31
Originally Posted by darklegend06
ptatohed spent his gas for us so the 20 I sent him was for the **** and the shipping and the thanks for the work he did for me.
ptatohed I don't care if you want to keep it the same price, more power/money to you but if was very kind of you.
ptatohed I don't care if you want to keep it the same price, more power/money to you but if was very kind of you.
Originally Posted by chillin014
Iive lost so many dang clips and screws in that area by the shifter.
I don't know how you managed to get the shifter boot on there. Like that, I can't press the trim down cause of it.
I don't know how you managed to get the shifter boot on there. Like that, I can't press the trim down cause of it.
02-22-2006, 09:44 AM
#32
Licensed to Spell
Thread Starter
iTrader: (12)
Join Date: Feb 2001
Location: Murrieta (southern California)
Posts: 4,521
Check this site out. They have some pretty sweet ***** at nice prices.
http://www.exoticwooddash.com/ShowPr...categoryID=301
I like the idea of a top push-button. This **** is pretty cool, I just wish it had perforated leather:

http://www.exoticwooddash.com/ShowPr...categoryID=301
I like the idea of a top push-button. This **** is pretty cool, I just wish it had perforated leather:
02-22-2006, 06:07 PM
#33
Originally Posted by Cdg2125
im still sketch about cutting the pole, basically because I dont want to f it up. What's the possiblity of replacement after cutting the pole?
Originally Posted by chillin014
gotta just do it mayn.
i didnt see how everything pieced together, but i'd imagine anything could be bought and replaced off a car being parted out.
hey ptato, did you use the metal piece from the OEM ebrake boot and put it in the redline boot?
i didnt see how everything pieced together, but i'd imagine anything could be bought and replaced off a car being parted out.
hey ptato, did you use the metal piece from the OEM ebrake boot and put it in the redline boot?
Speaking of that, I need an ebrake boot now, too
The uber nice one I have for the shifter now makes my old one look even crappier than it did before. Even friends who get into my car take notice and make mention of it
02-23-2006, 07:43 AM
#34
Licensed to Spell
Thread Starter
iTrader: (12)
Join Date: Feb 2001
Location: Murrieta (southern California)
Posts: 4,521
:o)
Originally Posted by Cdg2125
im still sketch about cutting the pole, basically because I dont want to f it up. What's the possiblity of replacement after cutting the pole?
I hear you Cdg. Trust me, I hate doing "permanent" damage. When I am doing a mod that can easily go back to stock at any moment, I don't hesitate. When I need to do a mod that causes perm. dam., I agonize over it. :/ In answering your question - to be honest with you, it doesn't look easy to go back to stock. I seriously doubt you could simply extend the chopped pole and rod. So, therefore, you would have to buy the appropriate parts from a parted Max. Obviously I haven't done it but it does look like it would be quite a bit of work just looking down in the console. But, it has to be possible! The good thing about this mod, is at least the "permanent damage" is hidden. Try putting on a dash kit where, if you're slightly off, it is noticeable and you'll see it everyday.
 If you know for sure that you want it lowered, then go for it. If you aren't sure or you are thinking ahead about resale value, then don't lower it.
 Cdg, Maximus said he was low on funds right now and gave you first dibs on the ****. Let me know if you'd like it or not. Take your time, I have 30 days to return it if you (or anyone else) don't want it.
darklegend/tatanko, can you guys post pics?
02-23-2006, 08:08 AM
#35
Licensed to Spell
Thread Starter
iTrader: (12)
Join Date: Feb 2001
Location: Murrieta (southern California)
Posts: 4,521
:o)
Originally Posted by chillin014
just wanted to say that i have everythign done pretty much.
there is still SOME tweaking to do, and im considering cutting the spring in the **** so it'llb e a little less stiff when i bottom out the rod in the top of the ****.
the boot looks (and smells) wonderful, but i havent got theboot to sit quite right.
ptato did you use the metal piece from your OEM ebrake boot to get the boot to fit right in those skinny slots?
02-23-2006, 08:26 AM
#36
Originally Posted by ptatohed
No fair!  Mine were soldered!! Are you sure yours are plugs? They do look like plugs but they 'should be' soldered. And they are kind of weak so it is possible you just pulled apart the soldered points. I have even seen new OEM shift ***** in the box and they come with a foot or so of black and white wire soldered to them. Even per the .org how-to, they say you need to cut the wires:
https://maxima.org/modules.php?name=LSB
Mine were soldered!! Are you sure yours are plugs? They do look like plugs but they 'should be' soldered. And they are kind of weak so it is possible you just pulled apart the soldered points. I have even seen new OEM shift ***** in the box and they come with a foot or so of black and white wire soldered to them. Even per the .org how-to, they say you need to cut the wires:https://maxima.org/modules.php?name=LSB
I still need to tweak my ****, as well, and get a piece re-installed.
Originally Posted by ptatohed
Sorry chill, you asked that already, didn't you? I forgot to answer. Yes! Of course. You have to. It isn't fun or easy but you'll get it. I believe Redline has a how-to on the install on their website, don't they? You need to (unfortunately) open up your stock boot at the bottom (it is just glued). Then you need to cut the wire loop with wire cutters. I cut mine at the "9 o'clock" position (if 12 is toward the front of the car). Actually, I think that is where the OEM weld is, right? Then you need to tediously feed it through the new boot. Then, the tricky part is getting the boot in place without the cut you made "V"ing on you. I used an electrical splice connector "tunnel" and vise gripped it tight. Does that make sense? If you remove the outer jacket of the electrical tunnel, you won't see a bulge and it should fit fine in the boot "track". Let me know if you have any other Qs.
 03-06-2006, 12:05 PM
#38
Originally Posted by Cdg2125
:EDIT: I did find pics on cardomain but I can't seem to post them.
However, I wouldn't want to use the stock PRND display, I think it looks cheesey and that's the reason I got rid of it.
03-08-2006, 03:23 PM
#39
Originally Posted by ptatohed
Guys, how are you keeping your shift boot closed? I am using little velcro circles but at first the stick on part would slowly/eventually come off the leather. So I SuperGlued it. Now, the velcro to velcro connection comes undone after a few days.
It's tucked very neatly under the shifter trim towards the front, so it looks fine up there, and on the sides it's somewhat the same way. But towards the back it's sagging down in the hole. This is mostly due to the fact that I completely tore out the frame that the PRND display sits on, not knowing the PRND display could be seperated from it. Once I get that back in, it should sit just fine.
my boot stays tucked under the shifter trim. i think i managed to wrap one end actually over the edge of the prnd display (in its stripped appearance like you showed in the how too) but the otherside wasnt long enough to wrap around so i kinda tucked it meaning to get back to it later but i never did cause it never moved. the one side of the trim isnt exactly clipped in though, cause ilost the clips.
Alright...so after a few days of reading this...Im set to do the shifter mod. But I have one question, I dont care if I can turn O/D on or off, I never do anyway. So if its always on...thats fine. After cutting the wires for overdrive, do i absolutely need a switch? Or could I just put them together?
Originally Posted by Cdg2125
Pretty sure you can just tie them off and leave them. I'd say cap them and tape them somewhere so you could easily get to them later if you decide to put a button.
 I taped the ends of my wires and let them loose. I may eventually put an OD button in, but it's not exactly a priority of mine.
Originally Posted by Cdg2125
Hey guys bringing this one back for a minute lol. Thanks to ptato I installed the new shifter today! Looks great and it only took me about an hour! Still need to do the shift boot and then I'll post some pics.
I had to ask what you guys did to keep the shifter stable and still be able to move it well. What was it that you guys did?!
I had to ask what you guys did to keep the shifter stable and still be able to move it well. What was it that you guys did?!

Originally Posted by Cdg2125
Well it's nice and secure but just the top wobbles a little. I didn't think there was a way to make it solid since it would most likely screw up the up and down movement. Was there some type of lube that went in or anything?
03-18-2006, 10:04 PM
#40
Licensed to Spell
Thread Starter
iTrader: (12)
Join Date: Feb 2001
Location: Murrieta (southern California)
Posts: 4,521
This is what I did to get rid of the minute wobble Cdg. I put electrical tape on the metal adaptor. The fixed metal part which goes over the plastic adaptor which goes over the pole and gets screwed in by the set-screws. You know how there are "tracks" at the 12 o'clock and 6 o'clock position? Well, I put my tape at the 3 o'clock and 9 o'clock position. Litterally 3 pieces of tape. 2 was not enough and 4 was too much. I know this is extremely neurotic but since 3 is an odd number, I put 2 on the left and 1 on the right figuring it would push my shifter to the left (one electrical tape thickness - lol) since our shifter is already right-heavy. I then smeared some high temp greese on the fixed part and the outside of the tape. Works totally awesome now, no complaints.