Write-Up: Upper Oil Pan Removal
 01-28-2010, 03:17 PM
#1
Senior Member
Thread Starter
iTrader: (2)

Join Date: Feb 2009
Location: Oklahoma City, OKlahoma
Posts: 458
Write-Up: Upper Oil Pan Removal
Hey guys, I had an oil leak in my upper oil pan, so decided to give you a write-up on how to remove it! I’m going to assume everyone knows how to apply liquid gasket and seals, so I will be leaving that part out. So, if you ever have to remove your upper oil pan, whether its for a simple leak, or your replacing your rear main seal (the "correct" way) then I hope this helps!
I should also warn you. The first time I did this it took me just over 7 hours. But, this being my third time, it took me 5 hours. So be ready to spend the day under your car. I know it will take each person different amounts of time depending on experience. But this just gives you an idea.
Also, I suggest you clean up your engine and engine bay really well while you are in there. I used berrymans B12 carb and throttle body cleaner. The stuff is insane. But be careful to dry it off painted surfaces, just in case
Tools needed:
1/4" Ratchet
Extension
Breaker Bar
Universal Joint (Swivel Head)
10mm Socket
12mm Socket (Shallow & Deep)
14mm Socket (Shallow & Deep)
17mm Socket
13mm Wrench
17mm Wrench
Gasket Scraper
Flat Head Screwdriver
Rubber Mallet (May not be needed, I did need one)

Now on to the process!
Step 1: Remove the ground cable from your battery, safety first!
Step 2: Drain Engine oil (Mine was a 13mm Plug, however, yours may be 14mm or another, just try wrenches till you find the right one for you), and remove oil filter.
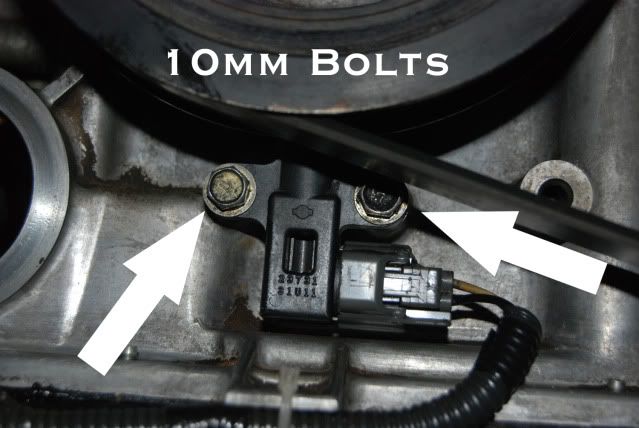
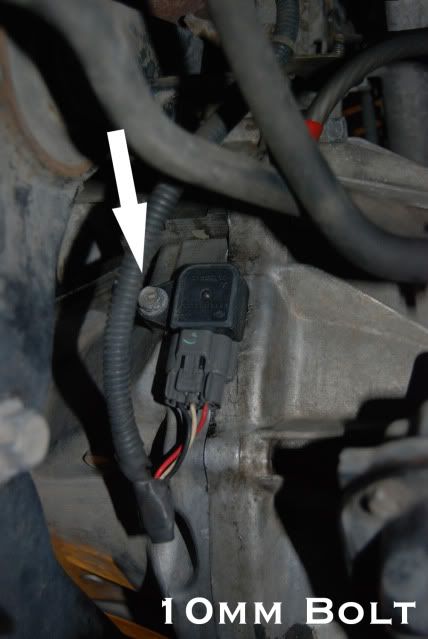
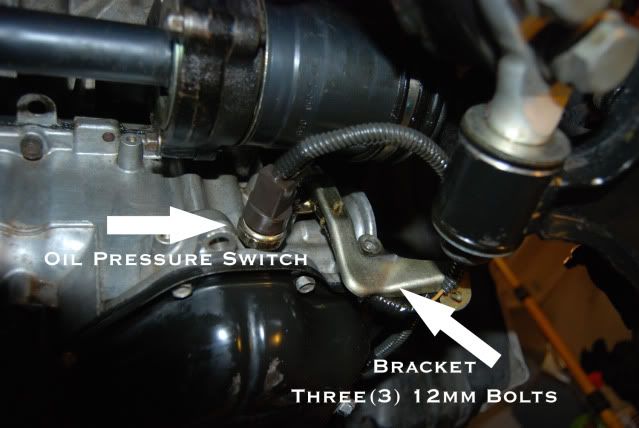
Step 3: Remove both CKPS sensors, three(3) 10mm bolts total, and the Oil pressure sensor(along with the little bracket that holds the wires, three(3), 12mm bolts)
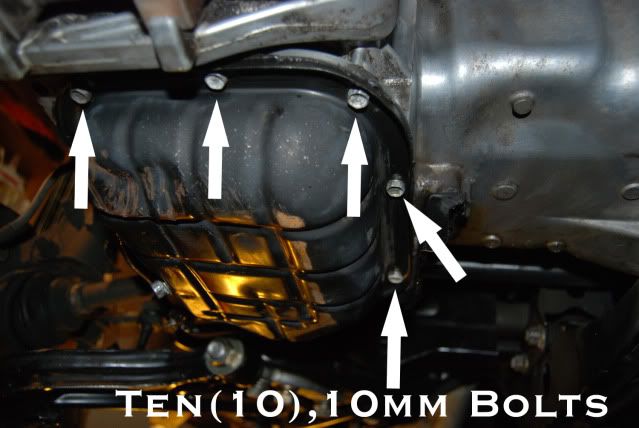
Step 4: Remove the ten(10), 10mm bolts that hold up the steel oil pan. Picture only shows five, but you get the idea.
I should also warn you. The first time I did this it took me just over 7 hours. But, this being my third time, it took me 5 hours. So be ready to spend the day under your car. I know it will take each person different amounts of time depending on experience. But this just gives you an idea.
Also, I suggest you clean up your engine and engine bay really well while you are in there. I used berrymans B12 carb and throttle body cleaner. The stuff is insane. But be careful to dry it off painted surfaces, just in case
Tools needed:
1/4" Ratchet
Extension
Breaker Bar
Universal Joint (Swivel Head)
10mm Socket
12mm Socket (Shallow & Deep)
14mm Socket (Shallow & Deep)
17mm Socket
13mm Wrench
17mm Wrench
Gasket Scraper
Flat Head Screwdriver
Rubber Mallet (May not be needed, I did need one)
Now on to the process!
Step 1: Remove the ground cable from your battery, safety first!
Step 2: Drain Engine oil (Mine was a 13mm Plug, however, yours may be 14mm or another, just try wrenches till you find the right one for you), and remove oil filter.
Step 3: Remove both CKPS sensors, three(3) 10mm bolts total, and the Oil pressure sensor(along with the little bracket that holds the wires, three(3), 12mm bolts)
Step 4: Remove the ten(10), 10mm bolts that hold up the steel oil pan. Picture only shows five, but you get the idea.
Last edited by SrgScott; 02-03-2010 at 11:31 PM.
 01-28-2010, 03:17 PM
#2
Senior Member
Thread Starter
iTrader: (2)
Join Date: Feb 2009
Location: Oklahoma City, OKlahoma
Posts: 458
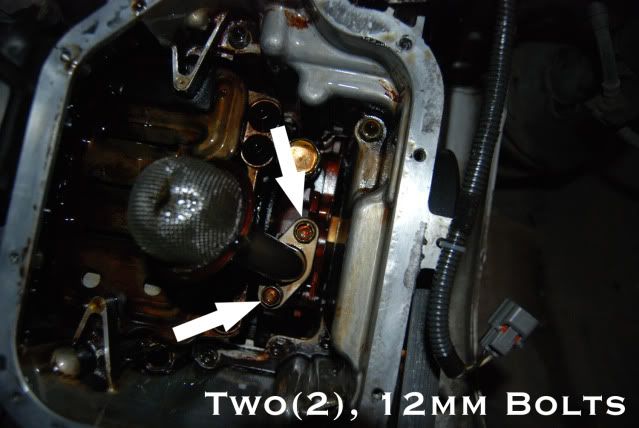
Step 5: Remove the oil strainer, two(2), 12mm bolts
Step 6: Remove the Y-Pipe, eight(8), 12mm nuts(Aparently on some other Maxs or I30s the 6 nuts at the manifold may be 14mm, again, just try them till you get your correct size). You will need your extension, universal joint, and both shallow and deep 12mm sockets here. Also, you may need some liquid wrench for the nuts, as they may be rusted on, be gentle yet firm and TAKE YOUR TIME, you don’t want to break a stud off. (Sorry, I don’t have a photo for this step, but if you need one let me know and I will get one for you!)
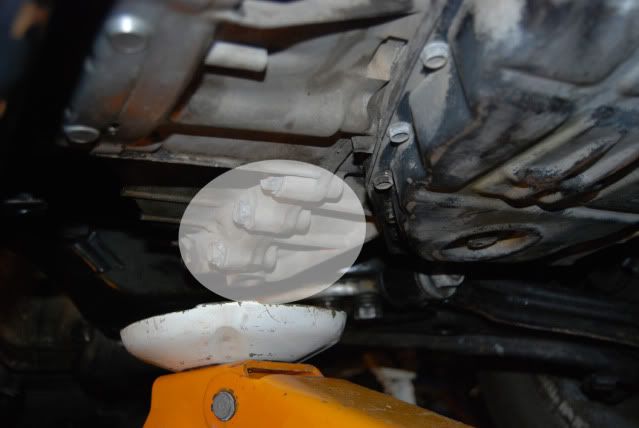
Step 7: Place a SUITABLEfloor jack on a SAFE location on the trans to support it for the next step. In the photo is where I placed my floor jack. You could also use an engine hoist if you want.
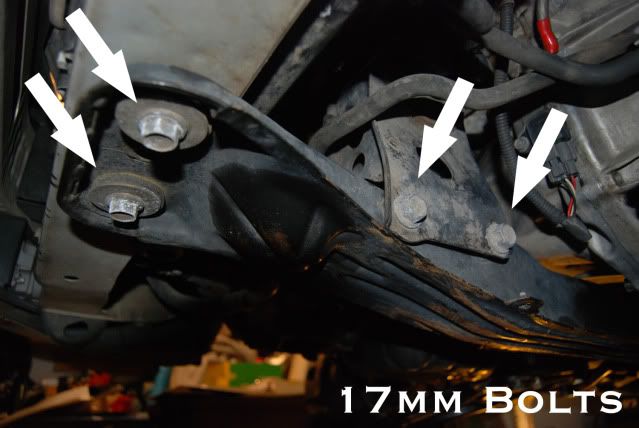
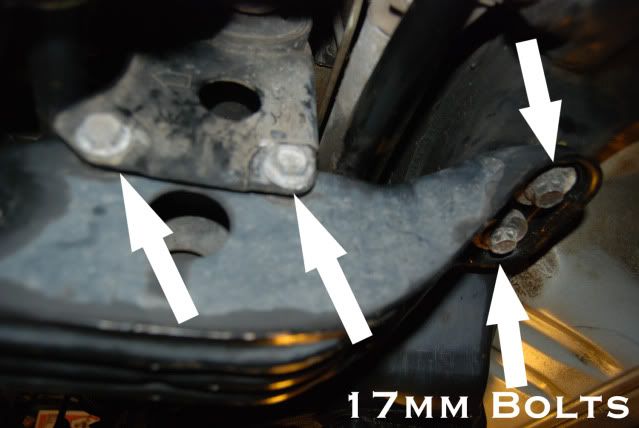
Step 8: Remove the eight(8) center beam bolts
Step 9: Remove your drive belt. 14mm deep socket and an extension is what I use.
Step 6: Remove the Y-Pipe, eight(8), 12mm nuts(Aparently on some other Maxs or I30s the 6 nuts at the manifold may be 14mm, again, just try them till you get your correct size). You will need your extension, universal joint, and both shallow and deep 12mm sockets here. Also, you may need some liquid wrench for the nuts, as they may be rusted on, be gentle yet firm and TAKE YOUR TIME, you don’t want to break a stud off. (Sorry, I don’t have a photo for this step, but if you need one let me know and I will get one for you!)
Step 7: Place a SUITABLEfloor jack on a SAFE location on the trans to support it for the next step. In the photo is where I placed my floor jack. You could also use an engine hoist if you want.
Step 8: Remove the eight(8) center beam bolts
Step 9: Remove your drive belt. 14mm deep socket and an extension is what I use.
Last edited by SrgScott; 01-31-2010 at 07:50 AM.
01-28-2010, 03:18 PM
#3
Senior Member
Thread Starter
iTrader: (2)
Join Date: Feb 2009
Location: Oklahoma City, OKlahoma
Posts: 458
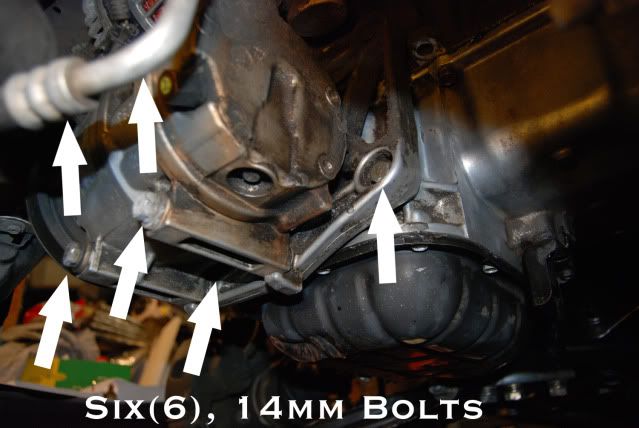
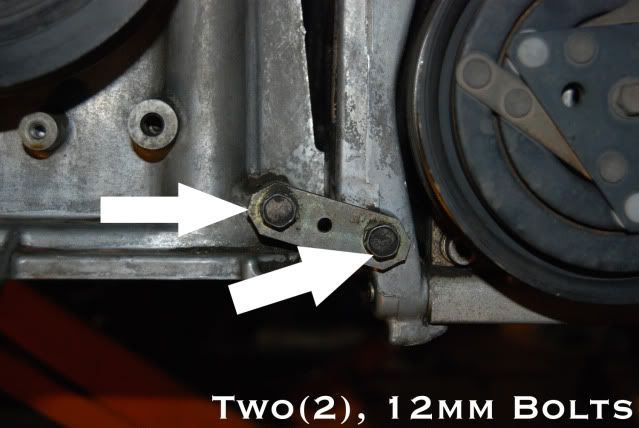
Step 10: Remove the A/C Compressor, and its brackets. Six(6), 14mm bolts, and two(2) 12mm bolts.
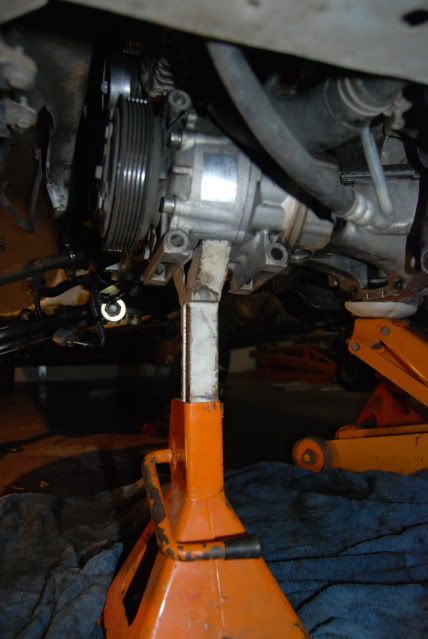
After removing the compressor, I place it on an extra jack stand so it is not just hanging there adding stress to the lines.
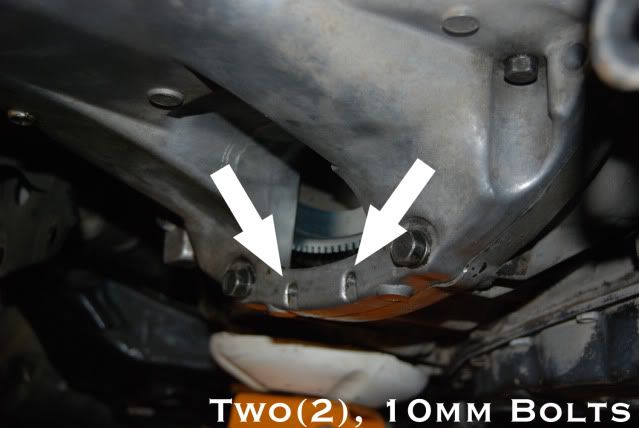
Step 11: Remove the cover plate, its black and literally covers a hole that lets you inspect the timing ring. Two(2), 10mm bolts. Sorry it’s not in the photo, but you get the idea.
After removing the compressor, I place it on an extra jack stand so it is not just hanging there adding stress to the lines.
Step 11: Remove the cover plate, its black and literally covers a hole that lets you inspect the timing ring. Two(2), 10mm bolts. Sorry it’s not in the photo, but you get the idea.
Last edited by SrgScott; 01-28-2010 at 03:24 PM.
01-28-2010, 03:18 PM
#4
Senior Member
Thread Starter
iTrader: (2)
Join Date: Feb 2009
Location: Oklahoma City, OKlahoma
Posts: 458
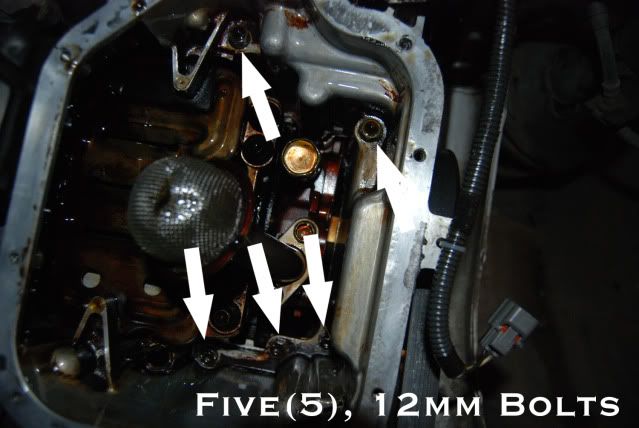
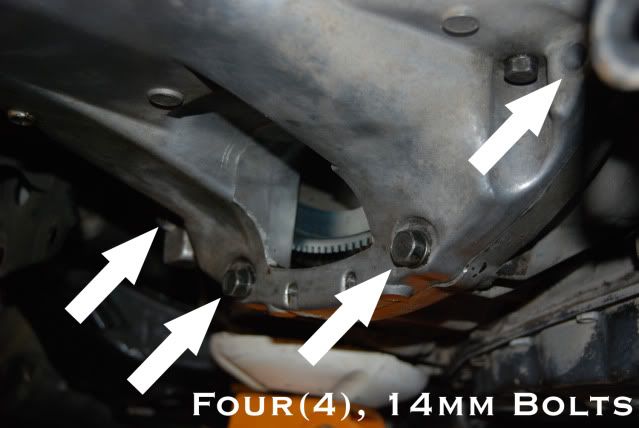
Step 12: Remove the Upper oil pan. Twelve(12), 12mm bolts(Five are inside where the oil strainer was, see photo), and then remove the four(4), 14mm tranny bolts(see photo). I'm sorry I dont have a photo of all twelve bolts the hold it up there, its just a little difficult to get a D80 under there. If you need me to get some photos of the bolts for you let me know and I'll do my best.
The upper pan won’t come out too easily. Just be patient with it, there are a few spot that have a slight indention where you can place a flat head screw driver(or the recommended tool the dealer uses) to pry it off. Just take your time and it will be off soon.
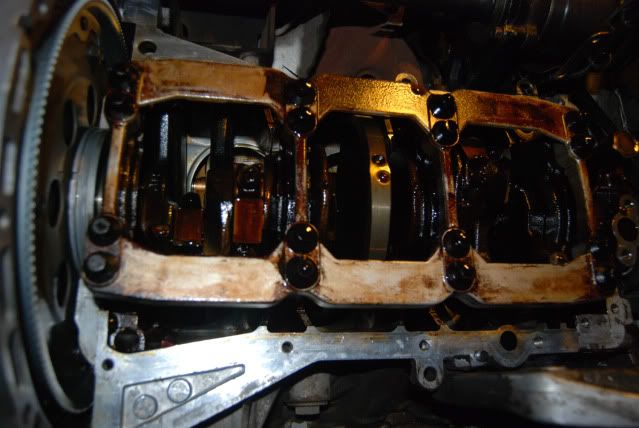
And here is the upper oil pan off of your car, congrats! I’m so proud of you…..
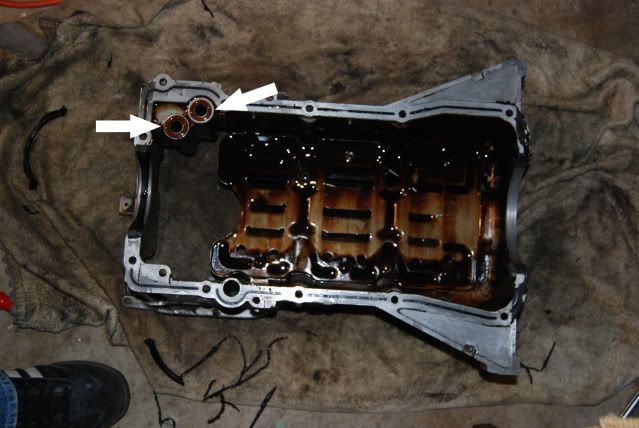
See the two little o-rings there? If they are still in good condition (as mine were) just clean them up and use them again, otherwise, replace them (dealer part?). Look at the bottom of your engine, you should see where they go, I just put a tiny bit of liquid gasket on them to hold them in place while I installed the upper oil pan. Be sure to scrape all of the old gasket out of those little crevasses, so that your new liquid gasket will work as intended!
And here is the view from the bottom of your engine, not the best photo, but you get the point.
Hope you guys enjoyed it and hope it was helpful. If you happen to see any typos or other mistakes please let me know!
The upper pan won’t come out too easily. Just be patient with it, there are a few spot that have a slight indention where you can place a flat head screw driver(or the recommended tool the dealer uses) to pry it off. Just take your time and it will be off soon.
And here is the upper oil pan off of your car, congrats! I’m so proud of you…..
See the two little o-rings there? If they are still in good condition (as mine were) just clean them up and use them again, otherwise, replace them (dealer part?). Look at the bottom of your engine, you should see where they go, I just put a tiny bit of liquid gasket on them to hold them in place while I installed the upper oil pan. Be sure to scrape all of the old gasket out of those little crevasses, so that your new liquid gasket will work as intended!
And here is the view from the bottom of your engine, not the best photo, but you get the point.
Hope you guys enjoyed it and hope it was helpful. If you happen to see any typos or other mistakes please let me know!
Last edited by SrgScott; 01-29-2010 at 09:59 AM.


 01-28-2010, 08:23 PM
#8

Wow. Excellent post. Exactly what doctor ordered... My seeping leak is getting worse. Not sure whether the RMS or the upper oil pan is the culprit. The leak started a year after my local dealer did the RMS. They wanted another $950 to do it again.  I am thinking to give a try myself... This post certainly gives me a lot of confidence.
BTW, do you have the pictures of the final step when the pan is out? How about the RMS - how far does it go from here?
I am thinking to give a try myself... This post certainly gives me a lot of confidence. BTW, do you have the pictures of the final step when the pan is out? How about the RMS - how far does it go from here?
 01-28-2010, 09:59 PM
#11
Member

Join Date: Dec 2009
Posts: 223
Really nice write up! I've done this 5 times now in the last 2 months(in the middle of the fifth). I've been chasing a runnaway oil leak lol and I'm finally trying the 2 o rings behind the rear timing case.
The drain plug on my 97 I30 is a 14mm, not a 13mm. To my understanding it should be the same on the Max.
On my stock exhaust on my 97 I30 the 6 bolts attaching the pipe to the manifold are 14mm, not 12. The 2 bolts holding the pipe's support are 12mm.
The drain plug on my 97 I30 is a 14mm, not a 13mm. To my understanding it should be the same on the Max.
Step 6: Remove the Y-Pipe, eight(8), 12mm nuts. You will need your extension, universal joint, and both shallow and deep 12mm sockets here. Also, you may need some liquid wrench for the nuts, as they may be rusted on, be gentle yet firm and TAKE YOUR TIME, you don�t want to break a stud off. (Sorry, I don�t have a photo for this step, but if you need one let me know and I will get one for you!)
01-28-2010, 11:13 PM
#12
Senior Member
Thread Starter
iTrader: (2)
Join Date: Feb 2009
Location: Oklahoma City, OKlahoma
Posts: 458
WXM
I will post a picture of the pan out, and of the engine with it off. I have them and mention to post but forgot. RMS, you just have to pull the tranny and flywheel to replace. I'll see if I can find a link to a write up. Or maybe do one myself.
Maxxx25
I have a photo of the O-Rings. Will post. Honestly I'm not sure where you can obtain them. I would assume they are a dealer part. I'll see if I can a little more info for you.
On your leak, you really need to check a drain plug, behind the crank pulley, to the left. It's in the timing chain case. That is where my leak was. Lol.
Your drain plug may be different, but mine is for sure 13mm. Perhaps mine was replace before I purchased my Max.
My two support nuts at the cat are 12mm. Also, I am positive the six that attatch the pipe to the manifold are also 12mm(as I used the same socket for ALL eight nuts). Not tryin to be rude or anything. But that's what mine are. And I'm sure people will be able to figure out their socket sizes easy enough though.
Thanks for all the responses!
I will post a picture of the pan out, and of the engine with it off. I have them and mention to post but forgot. RMS, you just have to pull the tranny and flywheel to replace. I'll see if I can find a link to a write up. Or maybe do one myself.
Maxxx25
I have a photo of the O-Rings. Will post. Honestly I'm not sure where you can obtain them. I would assume they are a dealer part. I'll see if I can a little more info for you.
Really nice write up! I've done this 5 times now in the last 2 months(in the middle of the fifth). I've been chasing a runnaway oil leak lol and I'm finally trying the 2 o rings behind the rear timing case.
The drain plug on my 97 I30 is a 14mm, not a 13mm. To my understanding it should be the same on the Max.
On my stock exhaust on my 97 I30 the 6 bolts attaching the pipe to the manifold are 14mm, not 12. The 2 bolts holding the pipe's support are 12mm.
The drain plug on my 97 I30 is a 14mm, not a 13mm. To my understanding it should be the same on the Max.
On my stock exhaust on my 97 I30 the 6 bolts attaching the pipe to the manifold are 14mm, not 12. The 2 bolts holding the pipe's support are 12mm.
Your drain plug may be different, but mine is for sure 13mm. Perhaps mine was replace before I purchased my Max.
My two support nuts at the cat are 12mm. Also, I am positive the six that attatch the pipe to the manifold are also 12mm(as I used the same socket for ALL eight nuts). Not tryin to be rude or anything. But that's what mine are. And I'm sure people will be able to figure out their socket sizes easy enough though.
Thanks for all the responses!
Last edited by SrgScott; 03-24-2010 at 08:32 AM.
01-29-2010, 06:23 AM
#13
01-29-2010, 07:04 AM
#14
Member
Join Date: Dec 2009
Posts: 223
WXM
On your leak, you really need to check a drain plug, behind the crank pulley, to the left. It's int the timing chain case. That is where my leak was. Lol.
My two support nuts at the cat are 12mm. Also, I am positive the six that attatch the pipe to the manifold are also 12mm(as I used the same socket for ALL eight nuts). Not tryin to be rude or anything. But that's what mine are. And I'm sure people will be able to figure out their socket sizes easy enough though.
Thanks for all the responses!
Yeah I figured people could find there socket sizes, but I'm extremely new to DIY and cars in general (only about 2 months). It was really frustrating trying to get the rear nuts off of the y-pipe, and I figured I might be able to saave some headaches for the newbies like me. But if yours are 12 and mine are 14, then I guess it's anyone's guess.
Thanks again for the note about the TC drain plug.
EDIT: FYI for me it made it a lot easier getting the pan back on when I removed the to rubber supports just a little further back on the y-pipe. You can swing it further out of the way and you get a little more room to work when you put the upper pan back on. Definitely not necessary, but it helped me.
Last edited by dan1el; 01-29-2010 at 07:09 AM.
01-29-2010, 10:05 AM
#15
Senior Member
Thread Starter
iTrader: (2)
Join Date: Feb 2009
Location: Oklahoma City, OKlahoma
Posts: 458
Yeah I figured people could find there socket sizes, but I'm extremely new to DIY and cars in general (only about 2 months). It was really frustrating trying to get the rear nuts off of the y-pipe, and I figured I might be able to saave some headaches for the newbies like me. But if yours are 12 and mine are 14, then I guess it's anyone's guess.
Thanks again for the note about the TC drain plug.
Thanks again for the note about the TC drain plug.
I know that the Maximas and the I30s should pretty much be the same mechanically, but maybe some of the nut sizes were changed, or perhapes, a '97 will be slightly different than a '95(as mine is). Thanks for the thought though!
Very welcome about the drain plug!
EDIT: FYI for me it made it a lot easier getting the pan back on when I removed the to rubber supports just a little further back on the y-pipe. You can swing it further out of the way and you get a little more room to work when you put the upper pan back on. Definitely not necessary, but it helped me.
 Thanks for the tip!

 01-31-2010, 07:01 AM
#20

Those two o-rings are listed as part number 11012G from courtesyparts.com for $4.36 each.
I love this write up man and plan on doing this myself when summer comes around. My question to you though is how you cleaned off the mating surfaces on the engine where the seals at each end of the pan goes? Also, did you use carb cleaner to clean the surface?
01-31-2010, 07:54 AM
#21
Senior Member
Thread Starter
iTrader: (2)
Join Date: Feb 2009
Location: Oklahoma City, OKlahoma
Posts: 458
Those two o-rings are listed as part number 11012G from courtesyparts.com for $4.36 each.
I love this write up man and plan on doing this myself when summer comes around. My question to you though is how you cleaned off the mating surfaces on the engine where the seals at each end of the pan goes? Also, did you use carb cleaner to clean the surface?
I love this write up man and plan on doing this myself when summer comes around. My question to you though is how you cleaned off the mating surfaces on the engine where the seals at each end of the pan goes? Also, did you use carb cleaner to clean the surface?
Thanks for the info on those o-rings!

I simply sraped the old gasket off of both surfaces, then wiped with alchohol to ensure a clean surface for the liquid gasket to adhear to.
I did not use any carb cleaner(though my favorite is berrymans B12, stuff is amazing) to clean the mating surfaces, but, it would probably work wonderfully, just make sure the surface is dry before putting the liquid gasket on there, to be safe.
01-31-2010, 09:11 AM
#22
01-31-2010, 12:39 PM
#23
Thanks for the info on those o-rings!
I simply sraped the old gasket off of both surfaces, then wiped with alchohol to ensure a clean surface for the liquid gasket to adhear to.
I did not use any carb cleaner(though my favorite is berrymans B12, stuff is amazing) to clean the mating surfaces, but, it would probably work wonderfully, just make sure the surface is dry before putting the liquid gasket on there, to be safe.
Forgive me if I am being too picky but I just want to make sure when I do this job, that I don't have to go back there no time soon. Are you using rubbing alcohol? Also, the rubber seals at the ends, do you place them on the block first or place them on the oil pan and then reinstall it? And you clean that part with alcohol? how does your hand reach those end corners for those rubber seals to clean them?
01-31-2010, 02:42 PM
#24
Senior Member
Thread Starter
iTrader: (2)
Join Date: Feb 2009
Location: Oklahoma City, OKlahoma
Posts: 458
Forgive me if I am being too picky but I just want to make sure when I do this job, that I don't have to go back there no time soon. Are you using rubbing alcohol? Also, the rubber seals at the ends, do you place them on the block first or place them on the oil pan and then reinstall it? And you clean that part with alcohol? how does your hand reach those end corners for those rubber seals to clean them?
Yes, I used rubbing alcohol, but remember, you can use just about any kind of solvent that you know will clean the surface well. Just make sure its good and dry before applying the liquid gasket(or RTV).
What I did with the two rubber seals, may be unconventional, but it works great. I place a thin layer(enough to hold) of liguid gasket(or RTV) on the top of the rubber seal, and placed the seal on the block itself, this was to help ensure that it would not slip of the pan while i was putting it back on.
I also did this with the two small o-rings.
You do want to ensure that the block is also clean and then wipe down with alcohol(or any good solvent), dry it, then install the pan.
You actually want to replace the rubber seals, you can get them at any auto parts store, or the dealer(I just asked for the upper oil pan seal). The package should come with the two seals, and some black RTV(unless from dealer, then I dont know if you will get any RTV or liquid gasket, you may only get the two seals).
I have smaller hands, so there really is no place I cant reach when replacing the upper oil pan seal(gotta be carefull with my wording there as not to make it sounds dirty
). You really just want to ensure your oil pan, and block are clean so the liquid gasket will adhear well to the metal. And be sure to wait at least 30min (time will vary depending on the weather), before you fill the car with oil again.
Last edited by SrgScott; 01-31-2010 at 02:44 PM.
01-31-2010, 08:48 PM
#25

Awesome writeup. I've been waiting for one of these for a long time now, as my 99 needs this work done. Seeing what it looks like in there before physically getting into the job helps out a lot. Definitely sticky worthy.....if those idiot noobs could follow the simple instructions that were clearly written in huge block letters.
02-01-2010, 03:28 AM
#26
Its cool man, this write-up was only discussing the "removal" process. But I dont mind helping you out with the install
Yes, I used rubbing alcohol, but remember, you can use just about any kind of solvent that you know will clean the surface well. Just make sure its good and dry before applying the liquid gasket(or RTV).
What I did with the two rubber seals, may be unconventional, but it works great. I place a thin layer(enough to hold) of liguid gasket(or RTV) on the top of the rubber seal, and placed the seal on the block itself, this was to help ensure that it would not slip of the pan while i was putting it back on.
I also did this with the two small o-rings.
You do want to ensure that the block is also clean and then wipe down with alcohol(or any good solvent), dry it, then install the pan.
You actually want to replace the rubber seals, you can get them at any auto parts store, or the dealer(I just asked for the upper oil pan seal). The package should come with the two seals, and some black RTV(unless from dealer, then I dont know if you will get any RTV or liquid gasket, you may only get the two seals).
I have smaller hands, so there really is no place I cant reach when replacing the upper oil pan seal(gotta be carefull with my wording there as not to make it sounds dirty).
You really just want to ensure your oil pan, and block are clean so the liquid gasket will adhear well to the metal. And be sure to wait at least 30min (time will vary depending on the weather), before you fill the car with oil again.
No worries, I PMed Kevlo to let him know I wanted to add the link. We shall see what he decides
Yes, I used rubbing alcohol, but remember, you can use just about any kind of solvent that you know will clean the surface well. Just make sure its good and dry before applying the liquid gasket(or RTV).
What I did with the two rubber seals, may be unconventional, but it works great. I place a thin layer(enough to hold) of liguid gasket(or RTV) on the top of the rubber seal, and placed the seal on the block itself, this was to help ensure that it would not slip of the pan while i was putting it back on.
I also did this with the two small o-rings.
You do want to ensure that the block is also clean and then wipe down with alcohol(or any good solvent), dry it, then install the pan.
You actually want to replace the rubber seals, you can get them at any auto parts store, or the dealer(I just asked for the upper oil pan seal). The package should come with the two seals, and some black RTV(unless from dealer, then I dont know if you will get any RTV or liquid gasket, you may only get the two seals).
I have smaller hands, so there really is no place I cant reach when replacing the upper oil pan seal(gotta be carefull with my wording there as not to make it sounds dirty
). You really just want to ensure your oil pan, and block are clean so the liquid gasket will adhear well to the metal. And be sure to wait at least 30min (time will vary depending on the weather), before you fill the car with oil again.
No worries, I PMed Kevlo to let him know I wanted to add the link. We shall see what he decides
Yeah those seals, the dealer sells individually but are not expensive. They run $20 for both seals without RTV. I acutally tried doing the shortcut route that another member wrote up doing it through the tranny side. Was good for a few weeks and just came back again so that's why I am considering this method now.
Yeah I asked for the cleaning because I wondered if you had your car sitting for a few days for most of the oil to return to the oil pan so it does not interfere with the surface when replacing the oil pan.
Also, I need a similar procedure with pics for the Timing chain cover since I have been searching and can't find one.
 02-01-2010, 10:11 AM
#27
Senior Member
Thread Starter
iTrader: (2)
Join Date: Feb 2009
Location: Oklahoma City, OKlahoma
Posts: 458
Yeah I asked for the cleaning because I wondered if you had your car sitting for a few days for most of the oil to return to the oil pan so it does not interfere with the surface when replacing the oil pan.
Also, I need a similar procedure with pics for the Timing chain cover since I have been searching and can't find one.
Also, I need a similar procedure with pics for the Timing chain cover since I have been searching and can't find one.
I think there is a write up on how to remove the timing chain cover on here somewhere, ill look and see if i can find it for ya.
02-15-2010, 07:19 PM
#28

wow im really happy i found this. i had my car on the lift today and saw i have just developed that leak. nice write up. thanks. do they have an actual gasket for this or do i have to use liquid gasket?
02-16-2010, 01:42 PM
#30
You know what I found interesting just the past couple of days, I was looking at the liquid gasket the dealer used and they said it is discontinued. So I went ahead and looked at what they use for the newer models like the 2004 and they have the same oil pan but I do not see any liquid gasket. Are they using an actual gasket now or is it still liquid gasket?
02-16-2010, 02:02 PM
#31
Member
Join Date: Dec 2009
Posts: 223
You know what I found interesting just the past couple of days, I was looking at the liquid gasket the dealer used and they said it is discontinued. So I went ahead and looked at what they use for the newer models like the 2004 and they have the same oil pan but I do not see any liquid gasket. Are they using an actual gasket now or is it still liquid gasket?
02-17-2010, 09:58 AM
#32
Senior Member
Thread Starter
iTrader: (2)
Join Date: Feb 2009
Location: Oklahoma City, OKlahoma
Posts: 458
You know what I found interesting just the past couple of days, I was looking at the liquid gasket the dealer used and they said it is discontinued. So I went ahead and looked at what they use for the newer models like the 2004 and they have the same oil pan but I do not see any liquid gasket. Are they using an actual gasket now or is it still liquid gasket?
I actuall dont know the answer to that. I didnt use the "recomended" liquid gasket, I just used black RTV.
02-18-2010, 09:46 PM
#33
10-09-2010, 12:17 PM
#34
Hey guys I noticed I have a small leak and I know its coming from the real main seal. Well, actually I replaced the rear main seal last September when I did my trans rebuild however I did not touch the upper oil pan seal (half moon seal) and I was wondering if there is a short cut to installing it while the transmission is removed and WITHOUT having to remove the oil pan. I've heard of shortcuts on installing it successfully. Anyone know how?
btw very good write up I'm just feeling lazy to do the whole process lol
btw very good write up I'm just feeling lazy to do the whole process lol
01-08-2011, 06:55 PM
#35
Newbie - Just Registered

Join Date: Sep 2006
Posts: 2
White Sheppard Oil Stop Leak
I had an upper oil pan leak for about a year or so on my 96 Max and even with the great step by step instructions on this board I did not feel like lying on my back in my driveway trying to replace it. I asked a mechanic for an estimate. He said he would do it, but to try white sheppard first. He said 99% of the time it would seal the leak. He said it cost about 20 bucks, but it would save me over $200. I changed my oil and added a bottle and within an hour of letting it run in my driveway the leak had stopped. I am not sure if it would work on valve cover gaskets, but I know it works on oil pan gaskets, front seals, rear seals, etc. I purchased mine from a local auto parts store. Do your research, but this stuff is Great.
01-08-2011, 07:35 PM
#36

Thanks for this write-up!
I wonder what else it clogged up.
I had an upper oil pan leak for about a year or so on my 96 Max and even with the great step by step instructions on this board I did not feel like lying on my back in my driveway trying to replace it. I asked a mechanic for an estimate. He said he would do it, but to try white sheppard first. He said 99% of the time it would seal the leak. He said it cost about 20 bucks, but it would save me over $200. I changed my oil and added a bottle and within an hour of letting it run in my driveway the leak had stopped. I am not sure if it would work on valve cover gaskets, but I know it works on oil pan gaskets, front seals, rear seals, etc. I purchased mine from a local auto parts store. Do your research, but this stuff is Great.
01-19-2011, 10:52 PM
#39
Newbie - Just Registered

Join Date: May 2005
Location: WA
Posts: 1
Does anyone know how far the oil dipstick tube reaches into the oil pan? I am asking to see if anyone has tried pumping oil out from the dipstick tube like they do in Benzes. I just moved to an apartment and am thinking of buying one of those suction pumps for a less mess job. (Sry about posting here couldn't find a better thread)
