98 SE, custom "burlwood" interior
 04-07-2009, 01:16 PM
#1

98 SE, custom "burlwood" interior
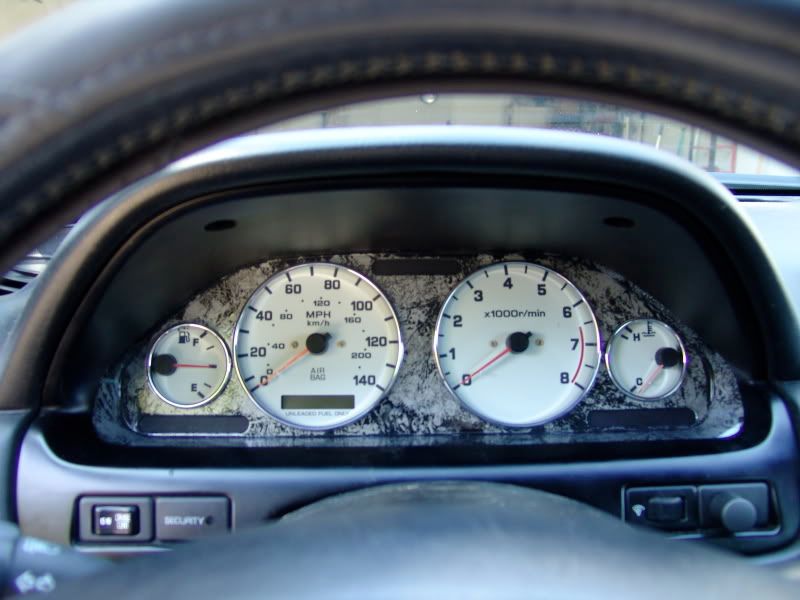
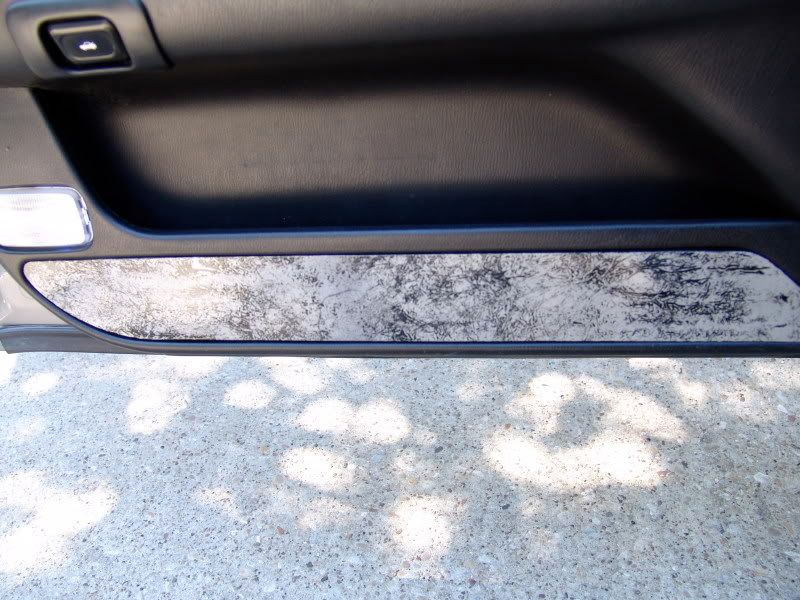
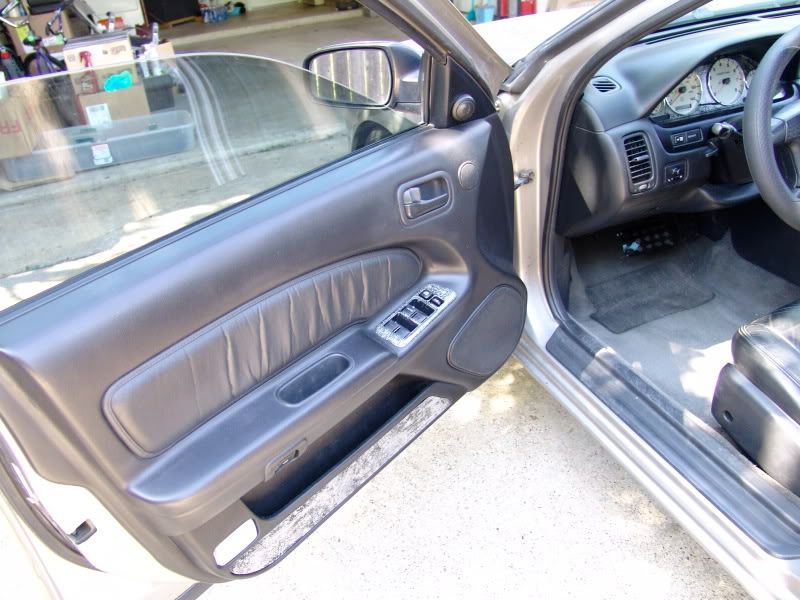
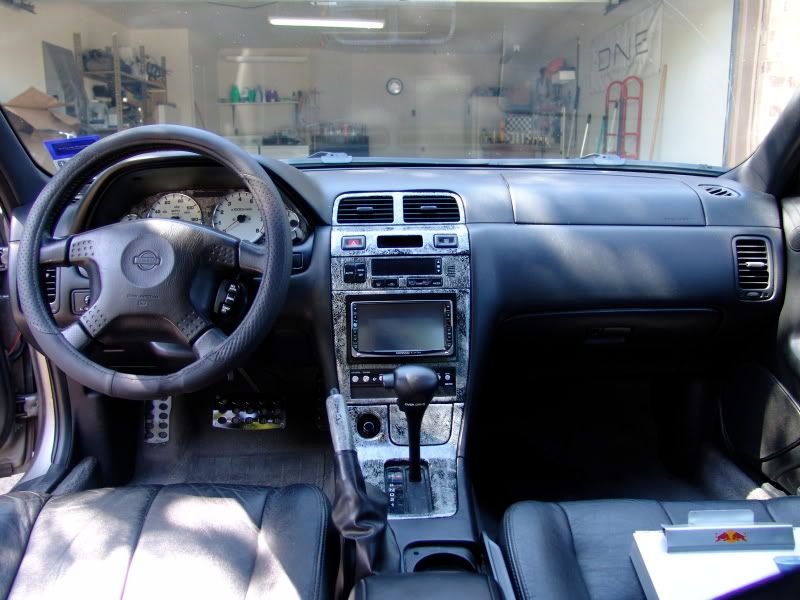
I had a bunch of paint laying around and I thought I'd play around with the interior trim pieces. The black, while nice and clean, seemed to blend in too much. And I hate the factory wood trim. Also I had some pieces made out of metal to replace the carpeted door inserts. So I played around with silver, black, some pearl, and a butt load of clear. It turned out better than I thought it would. Let me know what you think. I take criticism well. I'd really like to hear BlackOnBlack98's opinions.
On to the pics...
On to the pics...


 04-07-2009, 03:21 PM
#6
Working on a write-up with pics right now.
Kinda, yeah.
For an A32 I30? I got enough pieces for one to do a full interior minus the metal door inserts I had made.
I appreciate your honesty. I knew it wouldnt be everyones taste.
Kinda, yeah.
For an A32 I30? I got enough pieces for one to do a full interior minus the metal door inserts I had made.
I appreciate your honesty. I knew it wouldnt be everyones taste.


 04-07-2009, 05:11 PM
#11


 04-07-2009, 06:44 PM
#17

didn't know my opinion was so valued...
it looks like crap!
jk jk. i think it came out very good. i agree that it is a little bright, but that's all a matter of preference. i think with a third layer of dark silver you could get some awesome depth/texture as well as bring the contrast to the interior down.
i give it an "a" for execution since what you did do looks very well done, "b-" for vision since i think it looks a little flat and too high contrast. imo, there should have been more than one color layer, or at least a darker single color.
opinion given, as positive and constructive as possible.
04-07-2009, 06:49 PM
#18
I thought about it when I was doing it and it would be easy to make a darker version of this just by switching the stages I did the colors in.
If decide to go darker I can always spray on some tint and re-clear after that.
04-07-2009, 07:07 PM
#19
if you have any extra pieces you could try wet sanding the clear and applying another layer in something like a gunmetal then reclearing. that would leave some light spots but still bring down the overall brightness rather than tinting the entire piece to a darker shade.
that is assuming, of course, you agree that it is too bright and are willing to tear it down again.
that is assuming, of course, you agree that it is too bright and are willing to tear it down again.

 04-07-2009, 07:27 PM
#21
didn't know my opinion was so valued...
it looks like crap!
jk jk. i think it came out very good. i agree that it is a little bright, but that's all a matter of preference. i think with a third layer of dark silver you could get some awesome depth/texture as well as bring the contrast to the interior down.
i give it an "a" for execution since what you did do looks very well done, "b-" for vision since i think it looks a little flat and too high contrast. imo, there should have been more than one color layer, or at least a darker single color.
opinion given, as positive and constructive as possible.
it looks like crap!
jk jk. i think it came out very good. i agree that it is a little bright, but that's all a matter of preference. i think with a third layer of dark silver you could get some awesome depth/texture as well as bring the contrast to the interior down.
i give it an "a" for execution since what you did do looks very well done, "b-" for vision since i think it looks a little flat and too high contrast. imo, there should have been more than one color layer, or at least a darker single color.
opinion given, as positive and constructive as possible.
if you have any extra pieces you could try wet sanding the clear and applying another layer in something like a gunmetal then reclearing. that would leave some light spots but still bring down the overall brightness rather than tinting the entire piece to a darker shade.
that is assuming, of course, you agree that it is too bright and are willing to tear it down again.
that is assuming, of course, you agree that it is too bright and are willing to tear it down again.
 I like your idea of doing a gunmetal over the black and silver to darken it. I think it would give the right contrast and add more depth to the finish. The pieces didnt look so bright until they were actually in place.
04-07-2009, 07:27 PM
I like your idea of doing a gunmetal over the black and silver to darken it. I think it would give the right contrast and add more depth to the finish. The pieces didnt look so bright until they were actually in place.
04-07-2009, 07:27 PM
#22
04-07-2009, 07:28 PM
#23
Nice, good PS work. I was actually thinking of going even darker. But thats pretty close.
Oops, just noticed its a completely different car.
Oops, just noticed its a completely different car.
Last edited by JNCoRacer; 04-07-2009 at 07:30 PM. Reason: not seeing the obvious.
 04-08-2009, 06:51 AM
#26

 04-08-2009, 09:14 AM
#29
As easy as it is to do I'd feel bad charging someone to do it.
Thanks. After looking at it and sitting in the car with everything in place it actually does seem out of place. I think I'll definitely be going darker with it.
Thanks. After looking at it and sitting in the car with everything in place it actually does seem out of place. I think I'll definitely be going darker with it.
04-08-2009, 04:01 PM
#31
Well if the pieces are sent to me I'd say $75 bucks shipped. That would be the cost of the paint(around $25-$30), a little for labor(around $30), and whatever the shipping is(I'll include it in the price). It would only take me a day to paint all the pieces, but I'd let them sit a full extra day to completely dry before shipping them back since theres so many paint layers on there...like 8-9, mostly clear coat. But unless youve got extra pieces to send it would be a while without your trim. Figure 1-2 days for shipping, 2 days for paint and drying, and another 1-2 days to ship back. Thats about a week.
So here's the method I used to do it.
Materials used:
Primer
Duplicolor wheel paint clear (good stuff).
HobbyMaker gloss pearl clear.
Krylon Rust Tough semi-flat black.
Duploicolor chrome.
Plastic grocery bags. Yeah, you read correct.
Step 1. Clean, clean, clean.
Step 2. Primer. Spray it evenly to coat the entire surface, but not on too thick. If you dont get full coverage on the first spray you may need to do 2 coats.
Step 3. Chrome. This stuff goes on really thick so its best to keep the can farther away from what your painting.
Step 4. Clear. I used the wheel paint because of how fast and hard it dries. It'll turn the chrome a dull silver color so you can actually use a silver. I just used what I had.
Step 5. Pearl clear. I just put enough on to cover the surface. It didnt have to be perfect since it'll be covered later.
Step 6. Clear. Added more clear because of how fast and hard it dries again.
Step 7. Black. Most of this will come off in the next step so you dont want this to dry.
Step 8. Before you spray the black paint you want to take your grocery bag and crumple it up into a ball in your hand, the open it back up. See how the plastic isnt smooth anymore? Thats where you get the texture or effect from. So while the black paint is still wet(this needs to be done in seconds of spraying the paint on), take your grocery bag which you have crumpled and re-opened and lay it over the piece youre painting. Rub your hand over it and lightly press down. Then lift the bag off. There's your "burlwood" effect.
Step 9. Clear. Once again, I used the wheel paint clear. This stuff is tough against scratches and shines really well. Add as many coats as you'd like depending on your preference. The more coats you do the glossier it'll be. I did 4 coats.
Step 10. Let dry. This is very important. With this many coats of paint on the surface it'll need at least a full day to dry and harden.
And thats it. You can play around with any color or combination of colors you want. If you want something darker then put the darker color on first...ie, I used silver then black- black then silver wouldve been a much darker result.
Anyone who's got questions can PM me.


Thread
Thread Starter
Forum
Replies
Last Post
BPuff57
Advanced Suspension, Chassis, and Braking
33
04-16-2020 05:15 AM
CAN-Toronto 97 SE BLACK w/ BLACK. PART OUT.
worldwiderecognized
4th Generation Classifieds (1995-1999)
2
09-24-2015 06:56 PM