HID fog lights installation (sticky?)
 08-08-2011, 08:52 PM
#1

HID fog lights installation (sticky?)

Very first thing you need to do is to choose what HID color you want. There are many options, ranging from 3000k to 30,000k. Since I tried only two colors on my car, I will show you pictures of these below.
First one is 12,000k. I was told that it will produce violet color, but in reality it shows very blue one. I personally think that this color might be illegal in many states because generally blue and red colors are illegal in front of civilian vehicles.


Second and last for now is 6,000k. My HID headlights are 6,000k and that is the brightest color possible. The brightest color is 5,000k, but it�s nearly impossible to find that bulb. Close to 5,000k we got 4,300k, which is crystal white and 6,000k, which is brilliant white. I like brilliant white more because it does look like brilliant with little bit of blue colors in it.


 08-08-2011, 08:55 PM
#2
Last thing I can do for this section is put up a chart where you can see other colors.

By the way, if you own Infiniti i35 or Infiniti i30, or may be 00-03 maxima, fog bulbs size are H3. From what I have heard, most people use H3 HID bulbs and they don’t have problems with that, but there were few that said they had to buy H3C bulbs because they are shorter. For me personally, H3 fit just fine, just MAKE SURE you get 35W kit with 35W bulbs. If you use 55W, you are risking burning fog assembly and wires. If you are reading this and you have another car (maxima might have different bulb size), go to Sylvania web site and find the right bulb size for yours. Just be sure to put 35W in your fogs, NOT 55W.

Now that you hopefully choose your color, it’s time to look for HID kit. The ballasts you have on your headlights will cost you about $200 each, but nowadays HID technology went up and apparently it’s not that hard to make HID kits now, so you can find one for yourself for very cheap price.
You might wonder should I get regular ballast or slim? Slim is a lot better, I did not find any pros for regular ballast, but slim is lighter, less grounding problems, and easier to fit, and actually they seem to be cheaper too.
The best place to get HID kits is ebay. Make sure you find U.S. seller so that you get the HID kit to your door within 4 days instead of 4 weeks. I got mine for $32.
Now comes installation part. I had many problems by using existing guides on the installation. I will tell you very best way on how to connect the kit professionally, clean, and without any problems. Don’t use other guides in combination with this one, DON’T CUT ANY WIRES YET.
First thing to do is take your fog light out. Remove three bolts or whatever it is under the fog light. You don’t need to remove whole splash guard, just remove three bolts in the front. Once you do that, look at fog light assembly, you will see one Philips screw under the assembly. Take the screw out. That’s it. If you can’t remove the light, use a flag screwdriver and move the fog light around, be sure not to scratch the bumper.

Once the fog light comes off, disconnect the corner light. Take off the stock cap or cover from the fog light. Inside you will see stock halogen bulb and wires that are connected to the cap. Gently disconnect the two wires from the cap. Remove halogen bulb and ground wire.

By the way, if you own Infiniti i35 or Infiniti i30, or may be 00-03 maxima, fog bulbs size are H3. From what I have heard, most people use H3 HID bulbs and they don’t have problems with that, but there were few that said they had to buy H3C bulbs because they are shorter. For me personally, H3 fit just fine, just MAKE SURE you get 35W kit with 35W bulbs. If you use 55W, you are risking burning fog assembly and wires. If you are reading this and you have another car (maxima might have different bulb size), go to Sylvania web site and find the right bulb size for yours. Just be sure to put 35W in your fogs, NOT 55W.
Now that you hopefully choose your color, it’s time to look for HID kit. The ballasts you have on your headlights will cost you about $200 each, but nowadays HID technology went up and apparently it’s not that hard to make HID kits now, so you can find one for yourself for very cheap price.
You might wonder should I get regular ballast or slim? Slim is a lot better, I did not find any pros for regular ballast, but slim is lighter, less grounding problems, and easier to fit, and actually they seem to be cheaper too.
The best place to get HID kits is ebay. Make sure you find U.S. seller so that you get the HID kit to your door within 4 days instead of 4 weeks. I got mine for $32.
Now comes installation part. I had many problems by using existing guides on the installation. I will tell you very best way on how to connect the kit professionally, clean, and without any problems. Don’t use other guides in combination with this one, DON’T CUT ANY WIRES YET.
First thing to do is take your fog light out. Remove three bolts or whatever it is under the fog light. You don’t need to remove whole splash guard, just remove three bolts in the front. Once you do that, look at fog light assembly, you will see one Philips screw under the assembly. Take the screw out. That’s it. If you can’t remove the light, use a flag screwdriver and move the fog light around, be sure not to scratch the bumper.
Once the fog light comes off, disconnect the corner light. Take off the stock cap or cover from the fog light. Inside you will see stock halogen bulb and wires that are connected to the cap. Gently disconnect the two wires from the cap. Remove halogen bulb and ground wire.
08-08-2011, 08:59 PM
#3
Take stock wire off the cap, use flag screw driver to work around because it can be little tricky removing the wire (it’s been there nearly 10 years). Now look at the cap from inside, where you can see the ground and positive clamp or whatever it’s called. Take a drill with 5/32 bit (you can use metal bit) and drill two holes, each hole next to the clamps.


Now take your HID bulbs and cut wire about three inches from the bulbs. It will void the warranty of the bulbs, but nothing we can do. Now that you cut the wire, take the other side of the wire and see if it will fit in the holes, if it doesn’t fit, take 9/64 bit and expand the holes. 9/64 worked for me, if it doesn’t work for you, you should try bigger bit.
The reason you should make nearly perfect holes is so that moisture or dirt won’t be able to get inside the light assembly. If the wires can go through the holes, go to the next step.
If the wires from bulb are still attached to the ballast, take AMP connectors off. Pull the wires through to the inside the cap and inside the assembly. Put HID bulb inside the assembly.

Use wire nuts or crimp caps inside the cap and assembly to connect the positive and negative wires. Close the cap. Your fog assembly is ready.


Now take your HID bulbs and cut wire about three inches from the bulbs. It will void the warranty of the bulbs, but nothing we can do. Now that you cut the wire, take the other side of the wire and see if it will fit in the holes, if it doesn’t fit, take 9/64 bit and expand the holes. 9/64 worked for me, if it doesn’t work for you, you should try bigger bit.
The reason you should make nearly perfect holes is so that moisture or dirt won’t be able to get inside the light assembly. If the wires can go through the holes, go to the next step.
If the wires from bulb are still attached to the ballast, take AMP connectors off. Pull the wires through to the inside the cap and inside the assembly. Put HID bulb inside the assembly.
Use wire nuts or crimp caps inside the cap and assembly to connect the positive and negative wires. Close the cap. Your fog assembly is ready.
08-08-2011, 09:02 PM
#4
Now it�s time to work with the ballast. It is important for the ballast to be safely secured and as far from the water as possible. There are three ways to secure it good and one way to secure it bad. The bad way is to use 3m tape. I tried it and next day it rained, I found one of my lights not working and the ballast resting on the splash guard. Now good way, best way and the hardest way is to secure the ballast with screws. Second way is to use zip tides, but this one may cause the ballast to move around. Keep in mind that some ballasts don�t come with brackets or any way to secure them with screws. Here is what I did, I used 3m tape, but I used super glue on them. You can see exactly what I did looking at the pictures.


Don�t wait too long, after you put super glue on the tape, attach it to the wall. I attached it next to OEM HID ballast.

Now that your ballast is in place and your fog assembly is ready, take the wire from ballast that is to be connected with the stock wiring and make beautiful connection with the stock wire. I would recommend you to splice the stock wires right next to its connector. Put the connector back on cap to keep dust and other bad stuff from the cap. As always, for the connection you can use wire nuts or crimp cap. Some people use other connections, but these two work best for me.
So now we have powered ballast with AMP connectors and fog assembly with AMP connectors sticking out of the cap. I hope you know what to do now. If length permits you, connect the AMP connectors while the fog assembly is out. Don�t pull on wires too hard. When I worked with mine, one of AMP connectors broke off. If your connection broke off, you can always splice the wires and make connection with a wire nut or crimp cap. Now when the AMP connectors are connected, connect the corner light and put whole assembly back. If your wires are not long enough to make connection while the fog assembly is out, you can make connection when the assembly is in. Just be careful when you connecting the wires, they are not too strong and you can accidently disconnect or even worse, brake connectors.
Before you secure the light with a screw, you can check it out to see if it works fine. Try to turn the light on and off couple times to make sure it�s all right. I am not sure if you know how HID works, but it takes a lot more juice to start the HID light and once it�s started, it uses about three times less power than regular halogen would use. So it your light started one time, it does not necessarily mean everything fine, double check it couple times. Also, VERY IMPORTANT, check it out when your car is running. If you will trigger the HID couple times, you will run out of battery pretty soon. If you do have some problems, feel free to write it down here, I�ll try to help you.
That�s it. Installation is completed. Now I will cover some mistakes on previous guides.
1. Use double tape = your car is moving around, the wall gets pretty hot, therefore, double tape may not be good idea. Like I said earlier, one of my ballasts got messed up because it fell on a splash guard and it rained. Most ballast manufacturers say their ballast is waterproof, manufacturer of my ballast said the same thing, but truth is waterproof have some levels. There is difference if you can put powered ballast under water or sprinkle some water on it. There was heavy rain and my ballast was lying on a splash guard, it stopped working after that.
2. To save the cap and keep moisture from getting inside the fog assembly, use stock wires and stock cap = Low voltage is going in the ballast and high voltage is coming out. You must have HID wires after the ballast. My fogs were acting weird after first installation. Sometimes one, sometimes another, sometimes both and sometimes none of the lights would work. I had to take everything out and in as much as six times, trying to find out the problem. I checked the power after ballast and it would show me 0v. I replaced the ballast and still had the same problem. Apparently, if the wires are too thin for the high voltage, the ballast would somehow just stop sending the power to the bulb, that�s why I did not get voltage from the ballast.

3. To keep the cap, have connections outside the cap = here is another problem. As I read in previous guides, if you want to keep the cap stock and not modified, you will have to splice way too many wires and guess what? You will have many connections in unprotected area, where it is fairly easy for what to get in to. If you do the installation how I showed you, the only connection where you had to splice the wires will be inside the cap (protected) and stock wires to the ballast (unprotected). Now if you use other guides I�ve seen here, you will have connection inside the cap (protected), stock wires to the ballast (unprotected), from the ballast to the stock wires (unprotected), so two vs. one. On top of that, keep in mind, if you use my version, you will have strong HID wires supplying the high voltage to the bulbs verses stock thin wires carrying high voltage instead of low voltage that they were made to do.
Well, that is it. I did not know that I will end up writing such long guide. The main reason I wrote it was because I used other guides for my installation and got stock on the problem (listed above). For over two weeks I was trying to figure out the problem, nobody on internet seemed to have the same problem and therefore I had no solution. I came to conclusion that the bulb and ballast were good by connecting them directly to the battery. After putting in relay, which did not help, I thought that may be my battery was the problem. I checked the ballast and bulb on other car and then on my car. To make sure my battery was all right, I turned my headlights on and then checked the ballast and bulb and they still work. That�s when I came to conclusion that the ballast gets what it needs and the bulb works fine, so that means that there must be something going on between the ballast and the bulb. So the problem fixed and now everyone can do the installation and enjoy the beautiful HID lighting in their fog lights.
UPDATE: During heavy rains, the setup might fail, even if you have your ballast feet higher than splash guard. I did now perfect installation, brought 2 1m amp extensions and installed the ballast under the hood.
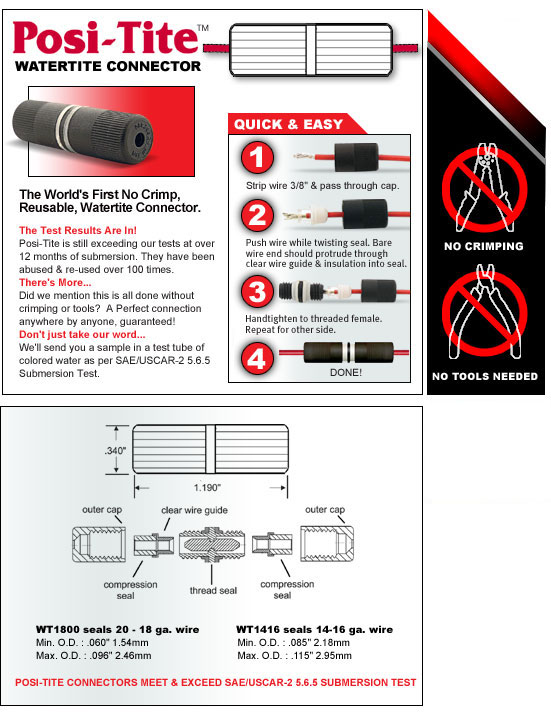
Also, I used posi-tite connector to connect original wires to my relay (you can connect them straight to your ballasts if you don't have relay)
Little update.
Its been couple months now since I've been using DDM HID kit. Turned out that the problem I had was because ebay xentex or whatever was sheet. They sent me two more ballasts for free as a replacement and they gave me same sheet. So my advice is DON'T GET THE EBAY $30 KIT. I spend about $60 on DDM HID kit and my fog lights work all the time now.
So for those of you that did not want to do HID kit on your fogs after reading my write up, you can do it now, just use DDM HID.
More pictures and information in Original Source
http://bestpcreviews.com/car/207-hid...tallation.html
Don�t wait too long, after you put super glue on the tape, attach it to the wall. I attached it next to OEM HID ballast.
Now that your ballast is in place and your fog assembly is ready, take the wire from ballast that is to be connected with the stock wiring and make beautiful connection with the stock wire. I would recommend you to splice the stock wires right next to its connector. Put the connector back on cap to keep dust and other bad stuff from the cap. As always, for the connection you can use wire nuts or crimp cap. Some people use other connections, but these two work best for me.
So now we have powered ballast with AMP connectors and fog assembly with AMP connectors sticking out of the cap. I hope you know what to do now. If length permits you, connect the AMP connectors while the fog assembly is out. Don�t pull on wires too hard. When I worked with mine, one of AMP connectors broke off. If your connection broke off, you can always splice the wires and make connection with a wire nut or crimp cap. Now when the AMP connectors are connected, connect the corner light and put whole assembly back. If your wires are not long enough to make connection while the fog assembly is out, you can make connection when the assembly is in. Just be careful when you connecting the wires, they are not too strong and you can accidently disconnect or even worse, brake connectors.
Before you secure the light with a screw, you can check it out to see if it works fine. Try to turn the light on and off couple times to make sure it�s all right. I am not sure if you know how HID works, but it takes a lot more juice to start the HID light and once it�s started, it uses about three times less power than regular halogen would use. So it your light started one time, it does not necessarily mean everything fine, double check it couple times. Also, VERY IMPORTANT, check it out when your car is running. If you will trigger the HID couple times, you will run out of battery pretty soon. If you do have some problems, feel free to write it down here, I�ll try to help you.
That�s it. Installation is completed. Now I will cover some mistakes on previous guides.
1. Use double tape = your car is moving around, the wall gets pretty hot, therefore, double tape may not be good idea. Like I said earlier, one of my ballasts got messed up because it fell on a splash guard and it rained. Most ballast manufacturers say their ballast is waterproof, manufacturer of my ballast said the same thing, but truth is waterproof have some levels. There is difference if you can put powered ballast under water or sprinkle some water on it. There was heavy rain and my ballast was lying on a splash guard, it stopped working after that.
2. To save the cap and keep moisture from getting inside the fog assembly, use stock wires and stock cap = Low voltage is going in the ballast and high voltage is coming out. You must have HID wires after the ballast. My fogs were acting weird after first installation. Sometimes one, sometimes another, sometimes both and sometimes none of the lights would work. I had to take everything out and in as much as six times, trying to find out the problem. I checked the power after ballast and it would show me 0v. I replaced the ballast and still had the same problem. Apparently, if the wires are too thin for the high voltage, the ballast would somehow just stop sending the power to the bulb, that�s why I did not get voltage from the ballast.
3. To keep the cap, have connections outside the cap = here is another problem. As I read in previous guides, if you want to keep the cap stock and not modified, you will have to splice way too many wires and guess what? You will have many connections in unprotected area, where it is fairly easy for what to get in to. If you do the installation how I showed you, the only connection where you had to splice the wires will be inside the cap (protected) and stock wires to the ballast (unprotected). Now if you use other guides I�ve seen here, you will have connection inside the cap (protected), stock wires to the ballast (unprotected), from the ballast to the stock wires (unprotected), so two vs. one. On top of that, keep in mind, if you use my version, you will have strong HID wires supplying the high voltage to the bulbs verses stock thin wires carrying high voltage instead of low voltage that they were made to do.
Well, that is it. I did not know that I will end up writing such long guide. The main reason I wrote it was because I used other guides for my installation and got stock on the problem (listed above). For over two weeks I was trying to figure out the problem, nobody on internet seemed to have the same problem and therefore I had no solution. I came to conclusion that the bulb and ballast were good by connecting them directly to the battery. After putting in relay, which did not help, I thought that may be my battery was the problem. I checked the ballast and bulb on other car and then on my car. To make sure my battery was all right, I turned my headlights on and then checked the ballast and bulb and they still work. That�s when I came to conclusion that the ballast gets what it needs and the bulb works fine, so that means that there must be something going on between the ballast and the bulb. So the problem fixed and now everyone can do the installation and enjoy the beautiful HID lighting in their fog lights.
UPDATE: During heavy rains, the setup might fail, even if you have your ballast feet higher than splash guard. I did now perfect installation, brought 2 1m amp extensions and installed the ballast under the hood.
Also, I used posi-tite connector to connect original wires to my relay (you can connect them straight to your ballasts if you don't have relay)
Little update.
Its been couple months now since I've been using DDM HID kit. Turned out that the problem I had was because ebay xentex or whatever was sheet. They sent me two more ballasts for free as a replacement and they gave me same sheet. So my advice is DON'T GET THE EBAY $30 KIT. I spend about $60 on DDM HID kit and my fog lights work all the time now.
So for those of you that did not want to do HID kit on your fogs after reading my write up, you can do it now, just use DDM HID.
More pictures and information in Original Source
http://bestpcreviews.com/car/207-hid...tallation.html
Last edited by pahanorlando; 08-27-2012 at 02:26 PM.

 Nice write-up though.
08-15-2011, 05:20 PM
Nice write-up though.
08-15-2011, 05:20 PM
#10
Well, the way I did the holes in the cap, it was tight that it was kinda hard to get wires through them, so I don't think water will get there. To be on the safe side, you could also use construction caulk, it will do the job
I have 6k in my headlights (by the way they are a lot better than 4300) and I use 6k fogs. As you see in the pics, there are some differences, but overall they look the same
I have 6k in my headlights (by the way they are a lot better than 4300) and I use 6k fogs. As you see in the pics, there are some differences, but overall they look the same
08-15-2011, 08:40 PM
#11
Junior Member

Join Date: Nov 2010
Location: Blacksburg, VA
Posts: 65
Yeah, you're method looks a lot cleaner than what I did. I doubt you'll have any problems, good job!
I like 4300K better because they put out more light and whiter light but it's all a matter of opinion!
I like 4300K better because they put out more light and whiter light but it's all a matter of opinion!
08-15-2011, 09:15 PM
#12
Yeah, but from my experience I didn't notice less light output with 6000k, it might be little dimmer, but hardly noticeable. In my case I even think they are brighter now.
Also, 6000k is diamond white, so its still white, but diamond white
Also, 6000k is diamond white, so its still white, but diamond white
08-15-2011, 09:17 PM
#13
by the way,
UPDATE: Don't use super glue with 3m tape to secure ballast, engine walls get pretty hot and ballasts might fall down. Only use zip tides or screws. Screws is better in my opinion.
UPDATE: Don't use super glue with 3m tape to secure ballast, engine walls get pretty hot and ballasts might fall down. Only use zip tides or screws. Screws is better in my opinion.
08-29-2011, 07:22 AM
#14
UPDATE: During heavy rains, the setup might fail, even if you have your ballast feet higher than splash guard. I did now perfect installation, brought 2 1m amp extensions and installed the ballast under the hood.
Also, I used posi-tite connector to connect original wires to my relay (you can connect them straight to your ballasts if you don't have relay)
That way, even if you in a 3 feet pond, your HID fogs should be okey (for some time )
)
Also, I used posi-tite connector to connect original wires to my relay (you can connect them straight to your ballasts if you don't have relay)
That way, even if you in a 3 feet pond, your HID fogs should be okey (for some time
)
 10-18-2011, 01:55 PM
#19

UPDATE: During heavy rains, the setup might fail, even if you have your ballast feet higher than splash guard. I did now perfect installation, brought 2 1m amp extensions and installed the ballast under the hood.
Also, I used posi-tite connector to connect original wires to my relay (you can connect them straight to your ballasts if you don't have relay)
That way, even if you in a 3 feet pond, your HID fogs should be okey (for some time )
Also, I used posi-tite connector to connect original wires to my relay (you can connect them straight to your ballasts if you don't have relay)
That way, even if you in a 3 feet pond, your HID fogs should be okey (for some time
)You gotta post pics of your set up..
10-18-2011, 04:13 PM
#20
So as I explained here before, theoretically speaking, it is the best and safest setup. But there is a problem, that's what happens when dealing with Chinese sheet. The wires are BS, they look like they strong enough, but if you splice the wire, you will see that they are VERY thin. That causes lights not turn on all the time. The shorter the wire, the more chances you will have for lights to work every time you turn them on. But if you will have short wires, your ballast and all connections may get wet because your connections and ballast will have to be close to fog light. The longer the wires, then your lights will not work all the times because of the thin wire lengh.
Anyways, here is what I am planning to do, find another HID kit with bigger wire and long too (so I can have connection from fog light to behind headlight) OR find strong extension AMP wire.
The problem with second option is that if there will be 6 inch of THIN wire coming from ballast and then 3 feet of STRONG wire going to fog light assembly, there might be electrical problems and possibly SHORT wire will burn.
So I am looking more towards better and unfortunatelly more expensive ballasts.
P.S. my passenger side fog light lights up about 90% of the time
and my driver side fog light lights up about 98% of the time (drivers side wire about 1 feet shorter)
10-18-2011, 05:34 PM
#21
Senior Member

Join Date: Oct 2000
Location: South Jersey
Posts: 1,329
Are you connecting the ballast directly to the stock headlight wires or using a relay??
When I did my HIDs few years ago I used a relay. I had read at that time that you can get better performance (including getting the lights to come on each and every time) if you get the power for the ballast directly from the battery with a relay.
Just a thought.
Nice write up!
When I did my HIDs few years ago I used a relay. I had read at that time that you can get better performance (including getting the lights to come on each and every time) if you get the power for the ballast directly from the battery with a relay.
Just a thought.
Nice write up!
Last edited by sascuderi; 10-18-2011 at 05:39 PM.
10-19-2011, 08:34 AM
#23
 I am not looking forward to this project as i read more and more.
So paraphrasing what i understand: Get thicker and longer wire so the ballast can be extended further up?
Get a relay (installed between ballast and stock wires??)
anyone have any pics to post up besides the instructions as i take it that way has taken a back seat to what is being discussed???
12-06-2011, 03:40 PM
#26
Little update.
Its been couple months now since I've been using DDM HID kit. Turned out that the problem I had was because ebay xentex or whatever was sheet. They sent me two more ballasts for free as a replacement and they gave me same sheet. So my advice is DON'T GET THE EBAY $30 KIT. I spend about $60 on DDM HID kit and my fog lights work all the time now.
So for those of you that did not want to do HID kit on your fogs after reading my write up, you can do it now, just use DDM HID.
P.S. Joeker, here is my updated signature
Last edited by pahanorlando; 12-06-2011 at 04:53 PM.
12-06-2011, 04:37 PM
#27

Little update.
Its been couple months now since I've been using DDM HID kit. Turned out that the problem I had was because ebay xentex or whatever was sheet. They sent me two more ballasts for free as a replacement and they gave me same sheet. So my advice is DON'T GET THE EBAY $30 KIT. I spend about $60 on DDM HID kit and my fog lights work all the time now.
So for those of you that did not want to do HID kit on your fogs after reading my write up, you can do it now, just use DDM HID.
P.S. Joeker, here is my updated signature
Its been couple months now since I've been using DDM HID kit. Turned out that the problem I had was because ebay xentex or whatever was sheet. They sent me two more ballasts for free as a replacement and they gave me same sheet. So my advice is DON'T GET THE EBAY $30 KIT. I spend about $60 on DDM HID kit and my fog lights work all the time now.
So for those of you that did not want to do HID kit on your fogs after reading my write up, you can do it now, just use DDM HID.
P.S. Joeker, here is my updated signature
 12-06-2011, 05:30 PM
#29
Looks nice dude.
Did Ceramic Pads in the front this weekend on my I30. The semi-metallic sqeeled like a pig with my cross drilled rotors. Much quieter now, the shims are rubber instead of tin.
Did Ceramic Pads in the front this weekend on my I30. The semi-metallic sqeeled like a pig with my cross drilled rotors. Much quieter now, the shims are rubber instead of tin.
12-06-2011, 08:01 PM
#30
Nice! I got ceramic pads but since I put them on bad rotors i get squeels. Probably from next paycheck i'll put hawks pads and new rotors too.
Last edited by pahanorlando; 12-07-2011 at 04:39 PM.
12-08-2011, 02:28 PM
#31
Little update.
Its been couple months now since I've been using DDM HID kit. Turned out that the problem I had was because ebay xentex or whatever was sheet. They sent me two more ballasts for free as a replacement and they gave me same sheet. So my advice is DON'T GET THE EBAY $30 KIT. I spend about $60 on DDM HID kit and my fog lights work all the time now.
So for those of you that did not want to do HID kit on your fogs after reading my write up, you can do it now, just use DDM HID.
P.S. Joeker, here is my updated signature
Its been couple months now since I've been using DDM HID kit. Turned out that the problem I had was because ebay xentex or whatever was sheet. They sent me two more ballasts for free as a replacement and they gave me same sheet. So my advice is DON'T GET THE EBAY $30 KIT. I spend about $60 on DDM HID kit and my fog lights work all the time now.
So for those of you that did not want to do HID kit on your fogs after reading my write up, you can do it now, just use DDM HID.
P.S. Joeker, here is my updated signature
 I've installed the ebay Xentec kit w/ no issues..

 06-11-2012, 09:30 AM
#35
Newbie - Just Registered

Join Date: Jun 2012
Location: Georgia
Posts: 2
Well, I'm trying to do the same thing to my Infiniti. I'm new to this forum and I really like it. I've been reading threads for months now and it's really helped me find stuff for my car because it's not an easy car to find parts for. I just posted a picture of my car on here. Trying to get known a little bit.
06-11-2012, 05:26 PM
#36
I don't understand where and how you found $500 there. In the guide it says how much they cost. Later in this post I said that I switched to DDM HID kit. They cost about $50. I don't think on that and on may be some installation parts, it will cost you like $70.
08-17-2012, 11:49 AM
#37

Your write up is excellent. But for someone who isnt sure going forward, it would have been nice to specify which wires are which on the factory fog harness, so you wouldnt cross polarity. The solid black wire is ground, while the black wire with a stripe is the power
Last edited by D Moolah; 08-27-2012 at 07:08 AM.
08-27-2012, 08:01 AM
#38
I went the cheap, ebay Xentec route. Needless to say, my lights were ok for a couple days, and no longer the case. Pretty much did everything you said in this write up, only I didnt use a relay. Before, only one ballast was bad, so I had to wait for a replacement. Now, both ballasts are out, and I verified by swapping bulbs and checking connections. Looks like I'll have to go a different route if I want HID fogs. I hate the way Umnitza does business, but I'm also not going to spend an arm and a leg for HID fogs from hid-planet or whatever it is. Ahhh, decisions decisions. OP, so you still had same intermittent issues even after ballast replacements?
08-27-2012, 02:23 PM
#39
Hey, Xentec is pure garbage, I had 4 faulty ones and 0 good ones.
DDM ballasts is way to go. I believe they still offer lifetime warranty. I had one fail probably about year ago, but they replaced it for free. Other than that I have them working nicely no problems whatsoever.
DDM ballasts is way to go. I believe they still offer lifetime warranty. I had one fail probably about year ago, but they replaced it for free. Other than that I have them working nicely no problems whatsoever.
09-25-2012, 08:01 PM
#40

Hey, Xentec is pure garbage, I had 4 faulty ones and 0 good ones.
DDM ballasts is way to go. I believe they still offer lifetime warranty. I had one fail probably about year ago, but they replaced it for free. Other than that I have them working nicely no problems whatsoever.
DDM ballasts is way to go. I believe they still offer lifetime warranty. I had one fail probably about year ago, but they replaced it for free. Other than that I have them working nicely no problems whatsoever.
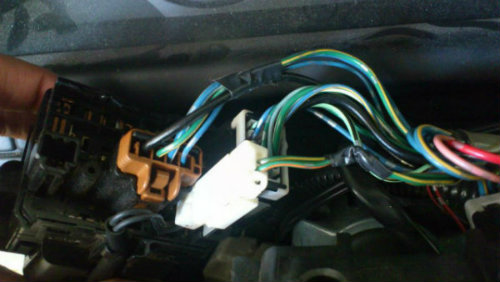
EDIT: after weeks of no sleeping and headaches, i finally figured out why my fog lights didn't turn on.. and it was the simplest and dumbest mistake ever, lol.. so all the fuses relays and wiring was correct, it was the STALK that i messed up on.. i forgot to plug in the little connector to power the fog lights on, it is the smaller white one with the two wires next to the brown connector in the picture
everything worked for about 5 minutes and then my fuse started blowing left and right, so my conclusion is that pahanorlando was right, the xentec ballasts are the major cause of any electrical faults that you might have with HID's.. i'm going to order my DDM tuning kit right now! thank you for the help guys!

Last edited by picnik99; 10-01-2012 at 12:46 PM.