Minor Spring Mods!!!?@!@#!!11!!


 06-11-2008, 02:21 PM
#4

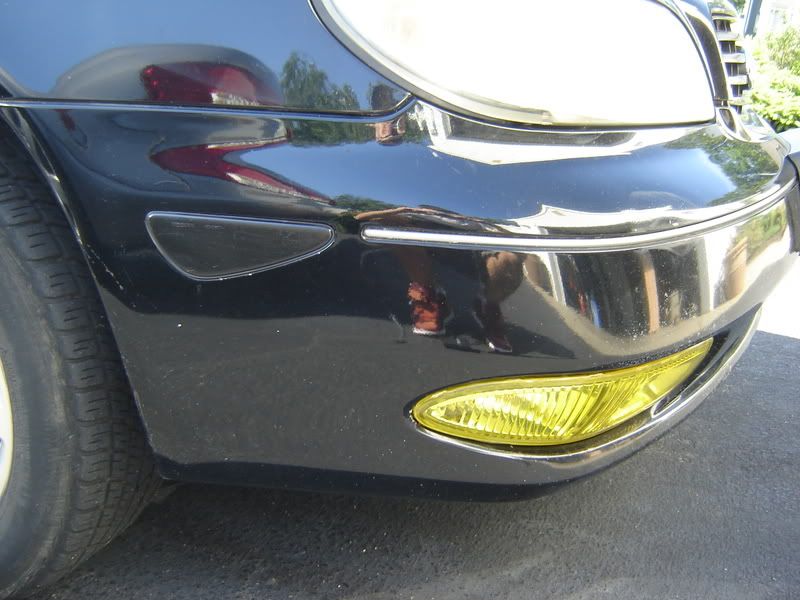
It's just my opinion, but I dont like it at all. It takes away the class from the car and makes it look tacky. It doesn't flow well. I say, ditch the yellow fog tint and get some capsules or 3000k HIDs. Just smoke the side markers some, and paint the headlight housing and grill to tie it all together.
Again though, it's not my car and if you really like it, keep it and be proud. You might have some other changes coming that will tie what you have done so far together.
Again though, it's not my car and if you really like it, keep it and be proud. You might have some other changes coming that will tie what you have done so far together.
06-11-2008, 02:25 PM
#5
Senior Member

Join Date: Aug 2007
Location: Staten Island,NY
Posts: 700
i kind of like that idea. i already have 3000k on my fogs but my cornering light is still that ugly oem color and if this make it look yellow i would do this. BTW did you buy a bulk or pre-cut? and how much and where did u get it from?
06-11-2008, 02:34 PM
#6
I order it Bulk. They only had precuts for the I35 and it costs almost $200+ for film for the whole front end. I order a piece 16x7. I fit perfectly so I can handle it around the edges and not have to worry about finger prints. It costs $50 shipped for 2 sheets.
Last edited by C P Squared; 06-11-2008 at 04:17 PM. Reason: error
 06-12-2008, 01:48 PM
#10
I'm trying to make my car as blacked out as possible without smoking the lights or black rims. I just don't like how much the orange/clear sidemarkers standout
06-14-2008, 06:52 PM
#12
 06-15-2008, 06:28 PM
#13
Senior Member

Join Date: May 2007
Location: Atlanta, GA
Posts: 652
The first thing I did when I got my I35 was take out the corners because I hate orange lights on cars. Its not exactly a simple task, but it can be done by a beginner if done correctly. I should mention that I haven't been able to find amber color LEDs that are bright enough to be seen in daylight, nor have I been able to find regular amber color bulbs that fit in that light slot, but here ya go:
1) Remove headlights (2 bolts on top, and one on the bottom which may require removal of plastic wheel well shields to access screw)
2) Remove the screw on outter end if each headlight (you'll know it when you see it). Heat lights (without bulbs) in oven on cookie sheet to make sealant between clear lense cover and black housing pliable. 300 degrees in the oven for NO LONGER THAN 45 SECONDS TO 1 MINUTE AT A TIME should be sufficient.
3) CAREFULLY pry lense away from housing at outter end (this may require repeated heating if sealant gets hard too quickly).
4) You don't have to completely remove the lense from the front of the housing - pry it away just enough so that you can pull out the amber corner insert. You may have to actually break the plastic amber piece to remove it if its stubborn.
5) Put light back in oven to warm up sealant enough to press lense back onto housing (this also may require heating several times). Put end screws back in place.
6) This is optional, but you should do it to prevent fog build up inside lense in the future: Drill 4-6 small holes in bottom of lense where it meets the housing - be carefull not to drill too far in, as you'll bust through the chrome in the lights themselves. This will allow for water to drain/evaporate in the event that the sealant doesnt completely seal.
Any questions? Zach@gadson.com if you want. I'd be happy to help.
And no, I do not still have the blue bulbs in the headlights. It looked too Honda Civic like...
06-15-2008, 08:32 PM
#14
The first thing I did when I got my I35 was take out the corners because I hate orange lights on cars. Its not exactly a simple task, but it can be done by a beginner if done correctly. I should mention that I haven't been able to find amber color LEDs that are bright enough to be seen in daylight, nor have I been able to find regular amber color bulbs that fit in that light slot, but here ya go:
1) Remove headlights (2 bolts on top, and one on the bottom which may require removal of plastic wheel well shields to access screw)
2) Remove the screw on outter end if each headlight (you'll know it when you see it). Heat lights (without bulbs) in oven on cookie sheet to make sealant between clear lense cover and black housing pliable. 300 degrees in the oven for NO LONGER THAN 45 SECONDS TO 1 MINUTE AT A TIME should be sufficient.
3) CAREFULLY pry lense away from housing at outter end (this may require repeated heating if sealant gets hard too quickly).
4) You don't have to completely remove the lense from the front of the housing - pry it away just enough so that you can pull out the amber corner insert. You may have to actually break the plastic amber piece to remove it if its stubborn.
5) Put light back in oven to warm up sealant enough to press lense back onto housing (this also may require heating several times). Put end screws back in place.
6) This is optional, but you should do it to prevent fog build up inside lense in the future: Drill 4-6 small holes in bottom of lense where it meets the housing - be carefull not to drill too far in, as you'll bust through the chrome in the lights themselves. This will allow for water to drain/evaporate in the event that the sealant doesnt completely seal.
Any questions? Zach@gadson.com if you want. I'd be happy to help.
And no, I do not still have the blue bulbs in the headlights. It looked too Honda Civic like...
Awesome man, thanks a lot
06-15-2008, 11:17 PM
#15
These should do the trick for the amber corners... lol at price though
http://www.v-leds.com/Shop/Control/P...id/0/SFV/32481
You will also need a load resistor to prevent hyperflashing.. 1 for each side..
http://www.v-leds.com/Shop/Control/P...id/0/SFV/32481
You will also need a load resistor to prevent hyperflashing.. 1 for each side..


Thread
Thread Starter
Forum
Replies
Last Post
litch
4th Generation Maxima (1995-1999)
123
01-04-2024 07:01 PM
MaxLvr21
5th Generation Maxima (2000-2003)
14
10-17-2015 12:11 PM