HamZer11's Mods (keeping it subtle)
 08-28-2010, 09:36 PM
#1

HamZer11's Mods (keeping it subtle)
I wanted to keep one place to post my mods so figured I create my own thread. There's just too many threads to post the different updates into.
Got the car on lease so the mods will be limited but here goes:
Bought the car in July- stock pictures:


Upgraded to LED kit from ebay for interior lights:
They are not blue, its just the pictures


Got in on the HappyBuyitNow rear window spoiler group buy. Sorry only have install pics, will get regular pics up soon


Upgraded front lower grille trim based on a member's thread here: Notice the middle chrome as well as the surround

Rear Turn Signals and reverse lights changed to LED:


Full write-up for the rear and more pics here:
http://forums.maxima.org/7th-generat...ulbs-leds.html
Got the car on lease so the mods will be limited but here goes:
Bought the car in July- stock pictures:
Upgraded to LED kit from ebay for interior lights:
They are not blue, its just the pictures
Got in on the HappyBuyitNow rear window spoiler group buy. Sorry only have install pics, will get regular pics up soon
Upgraded front lower grille trim based on a member's thread here: Notice the middle chrome as well as the surround
Rear Turn Signals and reverse lights changed to LED:
Full write-up for the rear and more pics here:
http://forums.maxima.org/7th-generat...ulbs-leds.html
Last edited by hamzer11; 10-07-2010 at 05:57 PM.
 08-28-2010, 09:38 PM
#2
Upgraded lights
LED front signal/parking lights - Amber/White from VLED
LED front corner light - White
Both side load resistors
LED parking light strips - White
Yellow Nokya fog bulbs
Pictures are off a little but the lights match up great. The HID headlights are a little bit bluer but not noticeable


LED front signal/parking lights - Amber/White from VLED
LED front corner light - White
Both side load resistors
LED parking light strips - White
Yellow Nokya fog bulbs
Pictures are off a little but the lights match up great. The HID headlights are a little bit bluer but not noticeable
Last edited by hamzer11; 08-28-2010 at 09:41 PM.

 08-28-2010, 10:04 PM
#6
Senior Member

Join Date: Jul 2010
Location: Queens, NY
Posts: 108
Everything looking good hamzer!!! I was gonna say in a earlier post you should update you sig pics  with all the new mods. Really like the grill! Haven't seen one at night like yours yet. Perfect man!~ Also i see you have opted for the nyc license plates. Did you get them after you got your original orange plates?? Just wondering how that works. I want to get them as well.
with all the new mods. Really like the grill! Haven't seen one at night like yours yet. Perfect man!~ Also i see you have opted for the nyc license plates. Did you get them after you got your original orange plates?? Just wondering how that works. I want to get them as well.
Last edited by keon718nyc; 08-28-2010 at 10:08 PM.
08-29-2010, 12:15 PM
#7
Thanks guys. Yes I should really update my signature. I haven't had a chance to make one.
As far as the color of the fogs, I went back and forth but I really like yellow fogs. I know what you mean by going with the color though. Maybe I will reconsider sometime in the future.
Keon, for the plates you go the NYS DMV website and select custom plates, you can either keep the same # and have the NY plate or do both things custom. Takes about 4-6 weeks to get it though. I could not stand the ugly new plates, worth every penny for a cleaner looking plate.


 08-29-2010, 08:18 PM
#11
Senior Member

Join Date: Jul 2010
Location: Central N.J.
Posts: 424
Looks good.how did you select the turn signals in led? Did you need a new digital flasher to keep them from flashing to fast? I want to do my front and rear flashers in led but not sure if we need a new flasher relay ?
also thise who have leds in the rear map light let me know if you can see a slight glow from them at night when all the lights are off?mine seem to be lit slightly.
also thise who have leds in the rear map light let me know if you can see a slight glow from them at night when all the lights are off?mine seem to be lit slightly.
08-29-2010, 09:50 PM
#12
Thanks
Looks good.how did you select the turn signals in led? Did you need a new digital flasher to keep them from flashing to fast? I want to do my front and rear flashers in led but not sure if we need a new flasher relay ?
also thise who have leds in the rear map light let me know if you can see a slight glow from them at night when all the lights are off?mine seem to be lit slightly.
also thise who have leds in the rear map light let me know if you can see a slight glow from them at night when all the lights are off?mine seem to be lit slightly.
08-30-2010, 06:44 AM
#14
Last edited by hamzer11; 08-30-2010 at 06:48 AM.
 09-03-2010, 05:19 PM
#16
Member

Join Date: Jul 2009
Posts: 105
I am really interested in doing these LED lights on the bottom of my bumper. Do you think you could do a quick write up of how you installed everything. I have never used load resistors or capacitors before. I am not sure where you powered these LED lights from. It sounds like from the turn signals.
09-03-2010, 06:03 PM
#17
Junior Member

Join Date: Sep 2010
Posts: 50
I also just leased a maxima and would like to do the LEDs ..looking good..
Last time I tried wiring something in my last car I fried my satellite radio ..
What do u have it hooked to? Do u have a separate switch to turn the LEDs on or do u have them hooked up to your parking lights?
Last time I tried wiring something in my last car I fried my satellite radio ..
What do u have it hooked to? Do u have a separate switch to turn the LEDs on or do u have them hooked up to your parking lights?
09-03-2010, 07:33 PM
#19
I am really interested in doing these LED lights on the bottom of my bumper. Do you think you could do a quick write up of how you installed everything. I have never used load resistors or capacitors before. I am not sure where you powered these LED lights from. It sounds like from the turn signals.
I also just leased a maxima and would like to do the LEDs ..looking good..
Last time I tried wiring something in my last car I fried my satellite radio ..
What do u have it hooked to? Do u have a separate switch to turn the LEDs on or do u have them hooked up to your parking lights?
Last time I tried wiring something in my last car I fried my satellite radio ..
What do u have it hooked to? Do u have a separate switch to turn the LEDs on or do u have them hooked up to your parking lights?
Mine are not HID so it was a basic bulb swap to Nokya yellow bulbs.
09-05-2010, 11:11 AM
#21
FRONT LED INSTALLATION WRITE-UP
As promised, here is a guide to installing the VLED LED strips and LED turn signals with load resistors. I borrowed a lot of images from VLED but since it�s their product I hope they don�t mind. Also, I did not disconnect the battery but it�s up to you if you want to for safety reasons. Finally, I am not a professional at these write-ups. Sorry if it�s a little crude and all I had was Paint to edit the pictures.
SUPPLIES:
STEP 1:
First you want to remove the tire and fold back the inner fender lining. This is the only way to have easy access to the wiring. I wish I could tell off Nissan for making changing bulbs in a car so difficult.


Step 2: Changing Light Bulbs
These are the two sockets for the Signal\Running combo light (the bigger Socket on the left) and the small parking light (smaller socket to the right).
A= Signal\Running Light
B= Parking Light
C= Several ground wires (these will come in handy instead of splicing into the socket ground wire)

Replacing bulbs (sorry no pics)
Remove Socket A and replace the bulb (3157 CK style bulb) with the LED bulb. Turn on your parking lights and make sure you get the constant light to work. Then turn on your hazards and make sure the signal part of the LED is working. Do not put the sockets back into the light because it�s easier to work with the wires while out.
Remove Socket B. Replace the LED wedge (194) bulb and make sure it lights up by turning on the parking lights. If it doesn�t work, remove it, flip it over and try again. Once it works, turn off the lights. Do not put the socket back in the light because it�s easier to work with the wires while out.
Step 3: INSTALLING THE LOAD RESISTORS

VLED load resistors come with the �Scothlok� quick connect connectors. They are similar to the blue ones pictures above. The connectors had two holes. One is closed on one end and the other is open so wire can pass straight through. The OPEN ended side is for the FACTORY wire you are splicing into. The CLOSED ended side is for the LOAD RESISTOR wire you are splicing with the factory wire.
To learn how to actually use the connectors please see the following page along with the video
http://www.v-leds.com/BlinkerWarning...-p7420629.html
(REFER TO PICTURE BELOW AS YOU READ THIS)
You want to install one of the ScotchLok connectors to the bottom (GREEN) wire on SOCKET A by placing the GREEN wire into the OPEN ended hole of the connector. Use the instructions from the link above to get the connector onto the wire and snap the connector closed. DO NOT PRESS DOWN ON THE METAL PART YET. Now you want to push one end of the wire of the LOAD RESISTOR into the closed hole. NOW PRESS DOWN ON THE METAL PART WITH A PLYER. Make sure the metal part pushes all the way down. Close the connector across the top. I put some electric tape around it just to secure it well. This completes the positive side.
Repeat the steps above with any of the GROUND wires (Letter C in the diagram).
Now secure the LOAD RESISTOR with MOUNTING TAPE to the fender bracket right behind the lights (see pic)

That�s it. Test by using your turn signal. If installed correctly you should have normal flashing.
Reinstall the socket back into the light and repeat on the other side.
Step 4: INSTALLING THE LED STRIPS
Clean the insert next to the fog light with alcohol.
Peel the backing off the LED strip and begin by sticking the plain side (the one without the connector) to the inner corner and working out to the connector side. (SEE PICTURE FOR BETTER EXPLANATION).

Run the wire behind the bumper through one of the holes in the mesh of the insert.
The wire that comes with these is not long enough to reach the parking light wires (Connector B above). You will have to extend the wire. I had some automotive standard gauge wire that I added allowing the wire to reach Connector B.
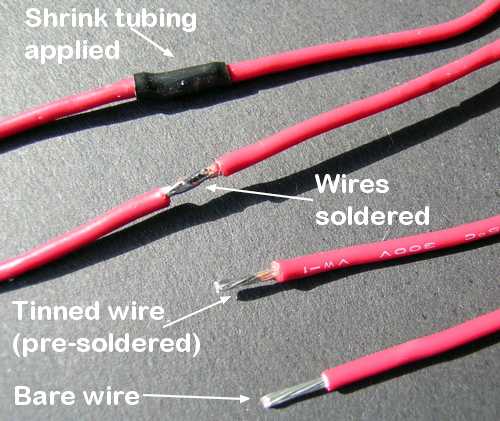
Something like the picture below but I used crimp connectors so no soldering or shrink tubing. These do not have a heavy load and should be fine. You will have to add some wiring to both POSTIVE (solid black wire) and NEGATIVE (striped wire). Seal off the connection well with electrical tape.
Now you want to use the extra SPLICING CONNECTORS and attach the POSTIVE wire coming from the LED strip to the GREEN wire of Connector B in the picture below. This should go exactly like the load resistor install. The GREEN wire will go into the open ended side and the positive wire of the LED strip will go into the closed ended side. Crimp down and close the connector.
Using the same type of connector run the GROUND wire of the LED strip to any ground wire of Connector C.
Do the same for the other side and you are done.
SUPPLIES:
- Two of the LOAD RESISTORS below.
3 OHM if changing front and rear to LED. 6 OHM if only changing either front or rear.
3 OHM
6 OHM - Two of the LED STRIPS based on color preference:
LED Strips 5K
LED Strips 6K - Four connectors for the LED strips (These can be bought from RadioShack in a pack for pretty cheap):
LED to Parking Light Connectors - Four connectors for extending the LED strip wire:
Crimp Connectors - Plyers
- Electrical Tape
- Basic Screwdrivers
STEP 1:
First you want to remove the tire and fold back the inner fender lining. This is the only way to have easy access to the wiring. I wish I could tell off Nissan for making changing bulbs in a car so difficult.
Step 2: Changing Light Bulbs
These are the two sockets for the Signal\Running combo light (the bigger Socket on the left) and the small parking light (smaller socket to the right).
A= Signal\Running Light
B= Parking Light
C= Several ground wires (these will come in handy instead of splicing into the socket ground wire)
Replacing bulbs (sorry no pics)
Remove Socket A and replace the bulb (3157 CK style bulb) with the LED bulb. Turn on your parking lights and make sure you get the constant light to work. Then turn on your hazards and make sure the signal part of the LED is working. Do not put the sockets back into the light because it�s easier to work with the wires while out.
Remove Socket B. Replace the LED wedge (194) bulb and make sure it lights up by turning on the parking lights. If it doesn�t work, remove it, flip it over and try again. Once it works, turn off the lights. Do not put the socket back in the light because it�s easier to work with the wires while out.
Step 3: INSTALLING THE LOAD RESISTORS
VLED load resistors come with the �Scothlok� quick connect connectors. They are similar to the blue ones pictures above. The connectors had two holes. One is closed on one end and the other is open so wire can pass straight through. The OPEN ended side is for the FACTORY wire you are splicing into. The CLOSED ended side is for the LOAD RESISTOR wire you are splicing with the factory wire.
To learn how to actually use the connectors please see the following page along with the video
http://www.v-leds.com/BlinkerWarning...-p7420629.html
(REFER TO PICTURE BELOW AS YOU READ THIS)
You want to install one of the ScotchLok connectors to the bottom (GREEN) wire on SOCKET A by placing the GREEN wire into the OPEN ended hole of the connector. Use the instructions from the link above to get the connector onto the wire and snap the connector closed. DO NOT PRESS DOWN ON THE METAL PART YET. Now you want to push one end of the wire of the LOAD RESISTOR into the closed hole. NOW PRESS DOWN ON THE METAL PART WITH A PLYER. Make sure the metal part pushes all the way down. Close the connector across the top. I put some electric tape around it just to secure it well. This completes the positive side.
Repeat the steps above with any of the GROUND wires (Letter C in the diagram).
Now secure the LOAD RESISTOR with MOUNTING TAPE to the fender bracket right behind the lights (see pic)
That�s it. Test by using your turn signal. If installed correctly you should have normal flashing.
Reinstall the socket back into the light and repeat on the other side.
Step 4: INSTALLING THE LED STRIPS
Clean the insert next to the fog light with alcohol.
Peel the backing off the LED strip and begin by sticking the plain side (the one without the connector) to the inner corner and working out to the connector side. (SEE PICTURE FOR BETTER EXPLANATION).
Run the wire behind the bumper through one of the holes in the mesh of the insert.
The wire that comes with these is not long enough to reach the parking light wires (Connector B above). You will have to extend the wire. I had some automotive standard gauge wire that I added allowing the wire to reach Connector B.
Something like the picture below but I used crimp connectors so no soldering or shrink tubing. These do not have a heavy load and should be fine. You will have to add some wiring to both POSTIVE (solid black wire) and NEGATIVE (striped wire). Seal off the connection well with electrical tape.
Now you want to use the extra SPLICING CONNECTORS and attach the POSTIVE wire coming from the LED strip to the GREEN wire of Connector B in the picture below. This should go exactly like the load resistor install. The GREEN wire will go into the open ended side and the positive wire of the LED strip will go into the closed ended side. Crimp down and close the connector.
Using the same type of connector run the GROUND wire of the LED strip to any ground wire of Connector C.
Do the same for the other side and you are done.

 09-05-2010, 06:19 PM
#25
Thanks. I will be adding the rears soon. I have to install mine still. Got too tired. I was working in the blazing sun on one of those 90+ degree days while fasting (no food or water). I might do the rear lights tomorrow. Going with RED rear signals and bright reverse lights.
09-06-2010, 09:04 PM
#26

Hamzer....nice work. Car looking good. Post some pics to get those tail lights off...I tried on mine but no luck...i took the 2 screws out..but for some reason the tail lights wont come out..
I'm Queens Village, so if u in the area any day..drop me a "pm"..so i can take a 1st hand look at the WHIP..
I'm Queens Village, so if u in the area any day..drop me a "pm"..so i can take a 1st hand look at the WHIP..
09-07-2010, 06:29 AM
#27
There are two clips from what I can tell having looked at pics of the lights removed. You know those metal clips that they have when removing the interior pieces. Looks like they will have to be yanked real hard. Didn't get to do it this weekend. Will try for next. I really want to complete it. I'm in Floral Park mostly. Will let you know if I'm going to be around your way.
10-16-2010, 07:46 AM
#28

Join Date: Jul 2010
Location: North Carolina
Posts: 18
I wanted to keep one place to post my mods so figured I create my own thread. There's just too many threads to post the different updates into.
Got the car on lease so the mods will be limited but here goes:
Bought the car in July- stock pictures:
Upgraded to LED kit from ebay for interior lights:
They are not blue, its just the pictures
Got in on the HappyBuyitNow rear window spoiler group buy. Sorry only have install pics, will get regular pics up soon
Upgraded front lower grille trim based on a member's thread here: Notice the middle chrome as well as the surround
Rear Turn Signals and reverse lights changed to LED:
Full write-up for the rear and more pics here:
http://forums.maxima.org/7th-generat...ulbs-leds.html
Last edited by Nightassassin45; 10-29-2010 at 08:53 AM.
10-16-2010, 11:14 AM
#29
Everything looks good. I have a couple of questions though. Where did you get your lower grill to match you upper one? and where did you get the LEDs to replace you factory bulbs in the head and tail lights and which ones did you get? I guess what I asking for is a quick list of what you have and where you got it all from for everyones benifit.
The grille is not actually replaced. I bought 3/4" chrome molding and put it across the middle and around the opening. This was based on a wonderful thread started by another member.
http://forums.maxima.org/7th-generat...imple-mod.html
There is a another good thread with the replacement numbers for the bulbs in our cars.
http://forums.maxima.org/7th-generat...b-listing.html
I purchased the front signal and fog light strips from V-LED. It's the expensive as heck amber/white switchback bulb. Make sure you get the CK style.
The write-up is in this thread already
The interior, license plate and front marker lights are all from the ebay led kit
You can find info on the rear turn signals and reverse bulb here:
http://forums.maxima.org/7th-generat...ulbs-leds.html
Let me know if you need more specifics.
Oh and the fogs are Nokya brand from Amazon @ stock wattage. Very happy with these.
Couple of things though, I would get better reverse bulbs if I had to do it again, these are okay but not bright enough in my opinion. Same for the license plate bulbs and the front marker light bulbs, they are more blueish than white. I might replace these in the spring.
Last edited by hamzer11; 10-16-2010 at 11:16 AM.
12-27-2010, 03:51 PM
#30
Senior Member

Join Date: Nov 2010
Location: Maryland
Posts: 4,020
Great looking mods by the way Hamzer, lovin' it. One question for you regarding the LED strip on the lower side grill areas. Where did you mount the LED strip to? I noticed you did the chrome mod on the lower grill areas, which I'm looking to do as well, but can't tell how you mounted the LED strip there to not interfere with or cover up the chrome pieces you added. Did you mount the LED strip in that location facing towards the sky? Or did you just mount it on the front?
Oh also one quick question about Autoillumination.com - are the orders there for a single bulb or pairs of bulbs? It doesn't seem to clarify and I'd hate to order one of each and end up getting a single bulb if that's the case.
Oh also one quick question about Autoillumination.com - are the orders there for a single bulb or pairs of bulbs? It doesn't seem to clarify and I'd hate to order one of each and end up getting a single bulb if that's the case.
Last edited by Ghozt; 12-27-2010 at 03:59 PM.
12-27-2010, 05:04 PM
#31
Senior Member
Join Date: Jul 2010
Location: Central N.J.
Posts: 424
Here is a question for you all.Those who have all exterior leds done do you notice after your hazards or turns signals being on for a few minutes you can see the parking light bleed through o nthe CK type bulb?It looks likre a glitch after the hazards been on for more than 5min.Usually the white parking light will stay off during blinkier action,but after a few minutes of continuous blinking the white parking light trys to come on and makes it look out of sync and glitchy.

 12-29-2010, 09:38 AM
#33
Here is a question for you all.Those who have all exterior leds done do you notice after your hazards or turns signals being on for a few minutes you can see the parking light bleed through o nthe CK type bulb?It looks likre a glitch after the hazards been on for more than 5min.Usually the white parking light will stay off during blinkier action,but after a few minutes of continuous blinking the white parking light trys to come on and makes it look out of sync and glitchy.
Great looking mods by the way Hamzer, lovin' it. One question for you regarding the LED strip on the lower side grill areas. Where did you mount the LED strip to? I noticed you did the chrome mod on the lower grill areas, which I'm looking to do as well, but can't tell how you mounted the LED strip there to not interfere with or cover up the chrome pieces you added. Did you mount the LED strip in that location facing towards the sky? Or did you just mount it on the front?
Oh also one quick question about Autoillumination.com - are the orders there for a single bulb or pairs of bulbs? It doesn't seem to clarify and I'd hate to order one of each and end up getting a single bulb if that's the case.
Oh also one quick question about Autoillumination.com - are the orders there for a single bulb or pairs of bulbs? It doesn't seem to clarify and I'd hate to order one of each and end up getting a single bulb if that's the case.
I believe Autolumination lists their bulbs as individual but I haven't checked recently. I believe it says "ea" next to the price meaning each bulb.
12-29-2010, 11:38 AM
#34
Senior Member
Join Date: Nov 2010
Location: Maryland
Posts: 4,020
Oh, so you mounted the LED strip to the black part right above where you mounted the Chrome strips? Or am I under the incorrect impression that you put chrome trim all the way across the bottom bumper, and you only actually did it in the center piece?

 01-01-2011, 08:38 PM
#37
Thanks. Having a lease is limiting so I do the best I can.
Thanks
02-07-2011, 04:54 PM
#38
Senior Member
Join Date: Nov 2010
Location: Maryland
Posts: 4,020
Thanks for the great write-up Hamzer, it was extremely helpful when doing some of these mods. I must have spent an hour wiring in the load resistors; I got one side working fine but went to duplicate the work on the other side and couldn't get it to work. Finally figured out that the wiring was opposite from the other side of the car so I eventually tried the other green wire and it worked.
I did the inexpensive mod chrome strip, but did it all the way across including the both small areas in the corners. I installed the 6" 6k LED strips right above that and stuck them to the black part right above the chrome strip. Looks nice cause you mostly see the chrome strips during the day and then mostly the LEDs at night.
Going to go back in there in a week or so and finish waterproofing all my splices so I don't run into issues in the future. Thanks again for the write-up and the work it took to get together Hamzer, much appreciated!!
