
Matte Black Grille how-to
 04-09-2010, 02:14 AM
#1
Senior Member
Thread Starter

Join Date: Jan 2010
Location: Las Vegas/San Diego
Posts: 311
Matte Black Grille how-to
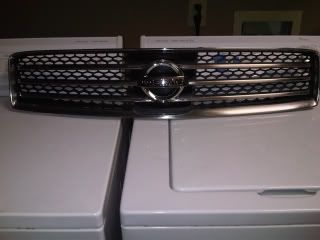
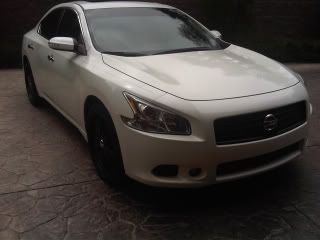
Ok guys so I have had a few requests to post a how to for converting your stock grille to a matte black finish while leaving the nissan emblem chrome
Materials:
Duplicolor Black Primer
Dupilcolor Matte Black Paint
Rubbing Alcohol
Exacto Knife
Blue Painters Tape
400 Grit Sand Paper
Step By Step ... Here ya go
Step 1. Follow the guide to removing the stock grille (link below), just be cautious of the location of the clips, some of which are tucked away pretty good but just take your time releasing them evenly and it will eventually pop out
http://www.nicoclub.com/FSM/maxima/2009/EXT.pdf
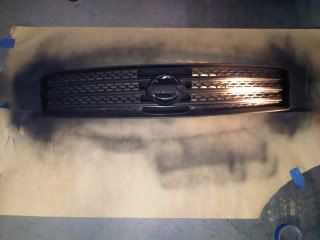
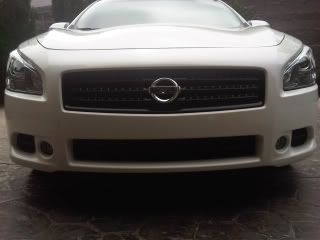
Step 2. Use the 400 Grit Sand Paper to sand the chrome inserts on the grille down to a dull, foggy finish. Essentially remove the protective coating from the Chrome strips so that the finish resembles the photo below
Step 3. Wash the grille with soapy water making sure that any dirt/debris/sanded particles are washed away. Once the grille dries, wipe down the grille with rubbing alcohol using a cloth towel
Step 4. Carefully tape around the chrome emblem so that it is completely masked by the blue painters tape. Use the Exacto knife to make sure the tape follows the curve of the emblem perfectly, trimming any pieces of tape that mask any other parts of the grille. Once this is done gently wipe down the grille one last time with rubbing alcohol to get any remaining grease off and allow to dry completely
Step 5. Once the grille is prepped follow the instructions on the primer to apply 5 coats of the product. This is the foundation of the paint so make sure coats are even. Allow Primer to dry for at least 10 hours before the final paint is applied
Step 6. Follow instructions on the paint can for coating instructions. Apply 6 light coats to the already primed surface. Remember this is a grille the more coats the better when thinking of possible rock impacts etc. while driving. Remove masking tape from emblem to make sure the finish around the piece if perfect
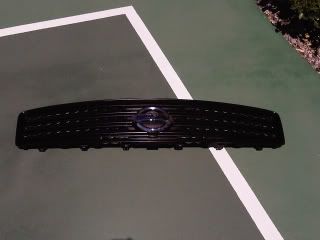
Step 7. Allow at least 4 hours for the final coat of paint to dry in the warm sun before the grille is reinstalled. Before reinstalling the grille use the blue painters tape to protect the edges of the grille where they might come in contact with other body pieces while being installed.
Step 8. Remove all masking tape once all the clips are snapped in and you are all done
If you have any other questions guys feel free to PM me or comment
Materials:
Duplicolor Black Primer
Dupilcolor Matte Black Paint
Rubbing Alcohol
Exacto Knife
Blue Painters Tape
400 Grit Sand Paper
Step By Step ... Here ya go
Step 1. Follow the guide to removing the stock grille (link below), just be cautious of the location of the clips, some of which are tucked away pretty good but just take your time releasing them evenly and it will eventually pop out
http://www.nicoclub.com/FSM/maxima/2009/EXT.pdf
Step 2. Use the 400 Grit Sand Paper to sand the chrome inserts on the grille down to a dull, foggy finish. Essentially remove the protective coating from the Chrome strips so that the finish resembles the photo below
Step 3. Wash the grille with soapy water making sure that any dirt/debris/sanded particles are washed away. Once the grille dries, wipe down the grille with rubbing alcohol using a cloth towel
Step 4. Carefully tape around the chrome emblem so that it is completely masked by the blue painters tape. Use the Exacto knife to make sure the tape follows the curve of the emblem perfectly, trimming any pieces of tape that mask any other parts of the grille. Once this is done gently wipe down the grille one last time with rubbing alcohol to get any remaining grease off and allow to dry completely
Step 5. Once the grille is prepped follow the instructions on the primer to apply 5 coats of the product. This is the foundation of the paint so make sure coats are even. Allow Primer to dry for at least 10 hours before the final paint is applied
Step 6. Follow instructions on the paint can for coating instructions. Apply 6 light coats to the already primed surface. Remember this is a grille the more coats the better when thinking of possible rock impacts etc. while driving. Remove masking tape from emblem to make sure the finish around the piece if perfect
Step 7. Allow at least 4 hours for the final coat of paint to dry in the warm sun before the grille is reinstalled. Before reinstalling the grille use the blue painters tape to protect the edges of the grille where they might come in contact with other body pieces while being installed.
Step 8. Remove all masking tape once all the clips are snapped in and you are all done
If you have any other questions guys feel free to PM me or comment


 04-09-2010, 09:13 AM
#3
Senior Member
Thread Starter
Join Date: Jan 2010
Location: Las Vegas/San Diego
Posts: 311
 Thanx
Thanx


 06-12-2010, 08:17 PM
#11
Senior Member

Join Date: Sep 2008
Location: CT
Posts: 1,192
I agree that it is much more durable. I know someone here in CT that painted his grill black on his black Max S model and it chipped in a few spots due to rocks hitting his grill.


 06-14-2010, 06:34 PM
#17
Junior Member

Join Date: Jun 2010
Location: Central Florida
Posts: 28
sand it down, tac rag it, then use paint thinner to clean it, then spray away.
I do two coats on my grills, and that lasts forever.
But try that tractor paint. They sell it at ACE, and like tractor stores.
I do two coats on my grills, and that lasts forever.
But try that tractor paint. They sell it at ACE, and like tractor stores.

 03-19-2011, 10:11 AM
#21
Senior Member

Join Date: Jul 2010
Location: Columbus, Ohio
Posts: 326
ok so i just removed the grill and I am gettin ready to paint but b4 i do just wanted to ask one question. My car is super black so if there going to be a noticeable difference between the two paints??

 <3
04-09-2012, 02:50 PM
<3
04-09-2012, 02:50 PM
#23

i want black emblems and i did some searches online and found this...what do you guys think?
http://www.allsentra.com/viewtopic.php?f=59&t=3491
http://www.allsentra.com/viewtopic.php?f=59&t=3491
04-09-2012, 07:22 PM
#24

A lot of people use Plasti-dip on these forums. You can use it for a bunch of little projects. Some like it because they can see how something looks before they decide to use paint. Others like it simply because if they don't like it they can pull it off and redo it (or turn back in if leased).
You can check out dipyourcar.com
You can check out dipyourcar.com
04-16-2012, 09:07 AM
#25
Member

Join Date: Feb 2012
Location: Jersey
Posts: 253
A lot of people use Plasti-dip on these forums. You can use it for a bunch of little projects. Some like it because they can see how something looks before they decide to use paint. Others like it simply because if they don't like it they can pull it off and redo it (or turn back in if leased).
You can check out dipyourcar.com
You can check out dipyourcar.com
05-19-2012, 08:52 PM
#27

so based on that writeup on the sentra forum, you an just clean and prep the grille, and hit it with the plasti dip. and literally if you dont like the look just peel it off. the can instructions say to use primer, but if it peels off that easy just to test the look it seems like a great option.
maybe ill start a weekend project...sunday project anyway.
maybe ill start a weekend project...sunday project anyway.
06-22-2012, 07:16 AM
#28
Senior Member

Join Date: Oct 2000
Posts: 602
Just removed my grill and in the process of prepping it atm. Going the plastidip route.
The only tough part in removing the grill with the bumper cover on is the 2 clips near the bottom middle. There is 2 guards right there that you have to get your hands between.
Another tip...If you have some type of plastic panel remover, you can undo a few clips, pull the grill out a little and use the panel remover to keep the grill from popping back into place. The most time I spent removing the grill was going back and popping the tabs back out when I went to the opposite side to remove the other side's clips.
The whole removal process took about 5 minutes, and was not difficult. If you have big hands, you may need to get someone with smaller hands to get those 2 clips in the middle, but there shouldn't be any issues removing the rest.
Last edited by MaxDoogie; 06-22-2012 at 07:18 AM.
06-22-2012, 11:08 AM
#29
Yea those middle 2 really are a pain to get to and are the only real reason the process takes as long as it does.
The first time I painted mine I used Plasti-dip. Last weekend, I pulled it out again, and actually painted it with 3 coats of black (each coats a little heavier than the other) and 3 coats of clear.
I would recommend you guys to take the extra 5 minutes and actually pull the grill apart from the "honeycomb" insert in the grill. This makes painting a whole lot easier...Well for me it did because I wanted to leave the outer chrome intact and just do the bars.

 03-28-2016, 09:35 AM
#32
Junior Member

Join Date: Jun 2015
Posts: 50
Just plasti dipped mine. Clips are not that bad. Just depress the clip and use your other hand to gently push the grill out. Even the bottom two came out easy.
For Plasti dip:
Cleaned the grill once removed. (just wiped it down with water and paper towels)
I used 5 coats with 15 to 20 min btwn each application.
Grill came out great.
For Plasti dip:
Cleaned the grill once removed. (just wiped it down with water and paper towels)
I used 5 coats with 15 to 20 min btwn each application.
Grill came out great.


Thread
Thread Starter
Forum
Replies
Last Post
REDinLV
7th Generation Maxima (2009-2015)
4
10-18-2015 05:31 AM
Dennis Twohy
1st & 2nd Generation Maxima (1981-1984 and 1985-1988)
0
10-01-2015 06:01 PM