
Removing front bumper facia & headlights
 01-22-2009, 07:26 PM
#1
Senior Member
Thread Starter

Join Date: Dec 2001
Location: Ft. Sask. AB Canada
Posts: 166
Removing front bumper facia & headlights
Having traded in a SV Sport with HIDs for a plain SV I found myself really missing the HIDs (all of our vehicles have them). I ordered a set of TSX projectors and an OEM equivalent HID kit, but I physically have to remove the headlights to retofit them. From the service manual and parts manual I almost believe that the Xenon and halogen projectors are the same in the '09 and I may not even need the new projectors, but I can't tell until I crack them open.
Question is - has anyone removed the front bumper facia on the '09 to get access to the lights? If so, was it much work? The service manual simply says remove the clips and the facia (no kidding ) The diagram sucks and doesn't show where the clips are or if I have to remove the fender protectors first. It will be -25C this weekend and I will hold off if it is a PITA. Don't want to get stuck halfway and get frustrated by a hidden bolt or clip. Anyone done this before?
Question is - has anyone removed the front bumper facia on the '09 to get access to the lights? If so, was it much work? The service manual simply says remove the clips and the facia (no kidding
) The diagram sucks and doesn't show where the clips are or if I have to remove the fender protectors first. It will be -25C this weekend and I will hold off if it is a PITA. Don't want to get stuck halfway and get frustrated by a hidden bolt or clip. Anyone done this before?
 01-24-2009, 08:23 PM
#2
Senior Member
Thread Starter
Join Date: Dec 2001
Location: Ft. Sask. AB Canada
Posts: 166
O.K. - I guess I'm the 1st idiot to try this at -26C. First off - don't try this at -26C, the clips are too brittle and I chipped two and completely busted two others. In hindsight, I now know that you don’t have to perform all the other steps listed in the FSM for removing the bumper to get just the facia off.
1. Remove the core support cover (the black plastic thingy attached to the top of the bumper facia). Simply pop the clips.
2. Unplug the fog lamps and pop the clips on the front of the “Engine under cover” (the black plastic thingy under the bumper facia)
3. Remove the 2 sets of 3 screws on the underneath corners of the bumper facia.
4. You may need to pop a couple of clips to pull back the fender protectors enough to remove a screw holding the facia to the fender right by each headlight. Not knowing better I removed the fender protectors completely (another story).
5. Here is where the frustration set in and I lost all feeling in my fingers.... By the headlights there is a bumper reinforcement on each side with two screws that seem to attach to a piece of plastic/foam that seem to attach to the facia – NOT! Just pull the edge of the facia away from the fender as it is only held by notched clips.
6. The rest is pretty obvious. Just work the facia away from the bumper and you can access the headlight bolts.
01-24-2009, 08:25 PM
#3
Senior Member
Thread Starter
Join Date: Dec 2001
Location: Ft. Sask. AB Canada
Posts: 166
I forgot to mention, if all you want to do is access the headlight bulbs, you are better off just (partially) removing the fender protectors. There is plenty of room behind to access the bulbs and even install a HID conversion kit (separate thread).
Some pics here....
http://forums.maxima.org/members/max...-retrofit.html
Some pics here....
http://forums.maxima.org/members/max...-retrofit.html
Last edited by maxed; 01-26-2009 at 12:40 PM.
08-06-2009, 12:12 PM
#4
Newbie - Just Registered

Join Date: Aug 2009
Posts: 1
Hey does anyone have pictures or better yet a video of how to install HIDs on the 2009 maxima, i have a 2009 base model, and i want to put in a set of 5000k hids maybe even this weekend. I dont want to take it to a shop cause they are expensive and i have bad experience letting others change my bulbs, any dumbass know to wear gloves when handling gloves but the shop guys think that doesnt apply to them.

 08-06-2009, 01:25 PM
#6
Senior Member
Thread Starter
Join Date: Dec 2001
Location: Ft. Sask. AB Canada
Posts: 166
I used to have a walkthrough of the procedure, but it seems to be removed from the site. Below is a link to the pics from the walkthrough. Hover over a pic to get a description.
Former pics can now be seen here:
http://forums.maxima.org/album.php?albumid=473
Here is how I now do it from inside the wheel well instead of removing the bumper and lights. In a nutshell:
Former pics can now be seen here:
http://forums.maxima.org/album.php?albumid=473
Here is how I now do it from inside the wheel well instead of removing the bumper and lights. In a nutshell:
- Buy a H11 retrofit kit (suggest 4300 K for stock projectors)
- optional - but may be easier to jack up front of car on crossmember
- remove wheel
- Remove screws/clips to pull back fender protector
- disconnect wire harness from oem H11 bulb
- Find a place to attach the ballast (there are several options depending on the ballast and wire length)
- Unplug existing bulb and replace with HID rebased H11 bulb (not D2S)
- Plug in to ballast & plug ballast into existing harness
- Put Fender liner & wheel back on
- Try it out & smile

04-11-2011, 09:32 PM
#7
Junior Member

Join Date: Aug 2010
Posts: 15
So it's the time of the year again when it's actually warm enough to start playing around with your car.
Purchased and already received my H11 HID kit which I plan to use to replace my current fog lights. I own the SV (known as the Premium package in Canada), so therefore already have the HID headlights.
The Deal: Please provide me with as many tips as possible from past experience. The main thing I am worried about is getting the bumper off and actually being able to remount it flawlessly.
Would a One-Man job be possible?
Lifting the vehicle necessary?
What do I need to be aware of when separating the bumper?
Any wiring that I need to look out for?
Where are the bolts/clips locate? how many?
In return I will take as many pics as possible during the installation (When I am actually confident enough and have the ***** to go through it). But yes, the main thing is getting the bumper off. If someone would be able to walk me through step by step (with pics preferred) that would be great.
Thanks in advance.
PS: I was provided these pics from djdavebse, who very generously went out of his way to take for me for ref. I will share what he has sent me with everyone. Please comment on any steps that requires one to be cautious about or may prove some challenges. Point out anything that may have been missed.
04-12-2011, 07:23 AM
#8
Member

Join Date: Feb 2011
Location: Toronto
Posts: 279
It is very easy. Along with all the push plugs and 2 side screws you will have to remove the under splash shield which is also held with about 10 more push plugs. In the last pic (just above this post) you will see two 10mm bolts that need to come off. They are holding a plastic retainer clip which holds the cover snug up to the fenders (where they meet at the top).
You do not need to lift the vehicle but having a second hand would help for sure. Once you get the bumper cover loose, each side needs to be pulled/popped off (where the cover meets the fender on lower edge). *Make sure you remove the 2 screws as noted in the 2nd pic above, just pull on the splash shield and you will see it. Once its off you will just need to disconnect the fog light wires and you're done.
Get someone to help you mount the cover when you're ready to put her back together. Just reverse your earlier steps for install. Dont be intimidated by this, its really straight forward. You will probably laugh after its done and say "that was easy"
 ). Wait for the results.
 05-04-2011, 09:20 PM
#11
Junior Member
Join Date: Aug 2010
Posts: 15
Result
For those who cares. Here are the results:


Since the weather wasn't too bad today and I free time, I figured I should just this project over with. The whole process from start to finish took about 4 hours while working alone. Taking the bumper off wasn't as easy as you made it sound. After taking off the clips and bolts there were still latches to deal with. Most of the time was spent figuring out how to take it off (Of course, if things don't come off, use force; good thing nothing broke)

Started off raising the front of the car. Although not necessary as mentioned by others, I figured it'll definitely make things easier.


Purchased a set of Axle stands from Canadian Tire ($20)
Since the weather wasn't too bad today and I free time, I figured I should just this project over with. The whole process from start to finish took about 4 hours while working alone. Taking the bumper off wasn't as easy as you made it sound. After taking off the clips and bolts there were still latches to deal with. Most of the time was spent figuring out how to take it off (Of course, if things don't come off, use force;
good thing nothing broke)Started off raising the front of the car. Although not necessary as mentioned by others, I figured it'll definitely make things easier.
Purchased a set of Axle stands from Canadian Tire ($20)
05-04-2011, 09:21 PM
#12
Junior Member
Join Date: Aug 2010
Posts: 15

8000k HID set purchased from ebay (~$50)


Under the bumper, there are about 5 of these clips plus 3 screws on each side. Remove them.

After bolt is removed at the inner side of bumper. This is sorta a clip. Lift to separate from bumper.

This side was tricky as the plastic piece was in the way of me taking the bolt off.

Bumper off. Hard part done. Didn't take many pictures then since it took me a while to take this off. Some force is needed, don't worry.

The wire on this side was cable tied to the bumper. I had to use side cutters to cut the tie.

Other side

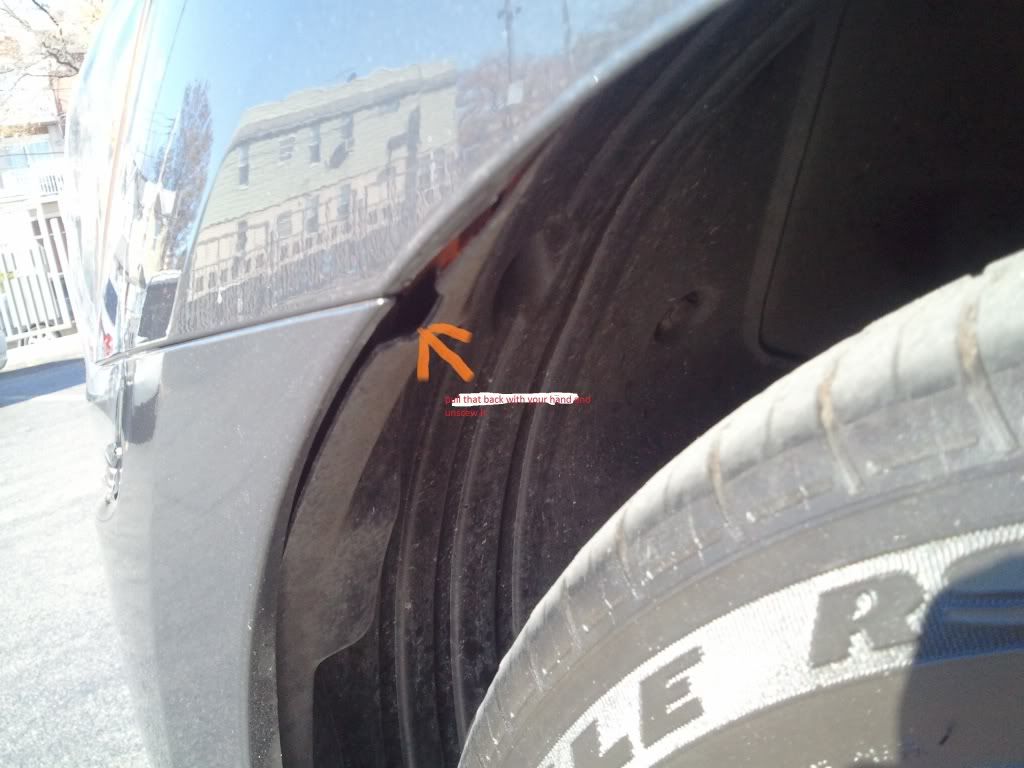
This is one of the latch that keeps the bumper held. Located both side right under the headlights. Use some force. It eventually separated.

This part clips directly to the bumper. Pull with slight force to separate.
05-04-2011, 09:22 PM
#13
Junior Member
Join Date: Aug 2010
Posts: 15


Find a place for the ballast:


Many options as there is lots of room in there. I chose this spot as there were two holes there where I can loop a couple of cable ties.


Make sure to test your lights before you put everything back on. Last thing you need is to take everything apart again just because you have the + and - terminals switched up.
Used some electrical tape to ensure wire connection doesn't come off. Don't have a picture of the connection. Sorry.

I found it easier to have the HID bulb put onto the bumper first before mounting it back on then making the quick-connect connections. Use some cable ties for cable management. You wouldn't want cables going everywhere, especially the see through hole beside the fog lights.
Putting the bumper back on felt natural. Just work from top to bottom. Did have some trouble with the clips at the same. Make sure the holes at the bottom where the push clips and screws goes are aligned.
Give it a try. Disregard the typos if any. Been a long day and I'm tired. Time to sleep.
 05-05-2011, 06:49 AM
#15
Senior Member

Join Date: Nov 2010
Location: Maryland
Posts: 4,020
I just removed the fender lining to do mine; but at least he learned quite a bit about his car and now could easily remove the headlights or install new grills/etc. Thanks for the write up for other people looking for help removing the bumper!
05-05-2011, 08:12 AM
#16
yes...thank you for the pictures...i'll probably have to take off my bumper to install HID's to high beams and crack open my headlights to do the demon eye mod, once my warranty is over in september!!!! (don't want to do any crazy mods until warranty is up)
 05-30-2011, 03:30 PM
#18
Junior Member
Join Date: Aug 2010
Posts: 15
I used to have a walkthrough of the procedure, but it seems to be removed from the site. Below is a link to the pics from the walkthrough. Hover over a pic to get a description.
Former pics can now be seen here:
http://forums.maxima.org/album.php?albumid=473
Here is how I now do it from inside the wheel well instead of removing the bumper and lights. In a nutshell:
Former pics can now be seen here:
http://forums.maxima.org/album.php?albumid=473
Here is how I now do it from inside the wheel well instead of removing the bumper and lights. In a nutshell:
- Buy a H11 retrofit kit (suggest 4300 K for stock projectors)
- optional - but may be easier to jack up front of car on crossmember
- remove wheel
- Remove screws/clips to pull back fender protector
- disconnect wire harness from oem H11 bulb
- Find a place to attach the ballast (there are several options depending on the ballast and wire length)
- Unplug existing bulb and replace with HID rebased H11 bulb (not D2S)
- Plug in to ballast & plug ballast into existing harness
- Put Fender liner & wheel back on
- Try it out & smile
Attempted and failed.
I tried to pull the fender back without removing the wheels as some users suggested to just turn it the opposite side. Problem is... I cannot seem to be able to pull the fender back enough. What are clips/screws/nuts that need to be taken out.. what am I mising.
I noticed that there is a white cover covering the bulb. How do I remove that?
Maxima Premium Package 2010

 01-28-2012, 09:47 AM
#22
Newbie - Just Registered

Join Date: Jan 2012
Posts: 1
Hello,I just joined the forum,AndI have to say you guys are a very helping group and maybe some one can shed a little light on my problem.I have a 2009 Maxima s I bought new only 7,654 miles on it I have a mountaineer I use as my everyday beater.
I need some advice,I installed a conversion HID H11 bulbs harness and Ballast,it was a pain in the ***, took about 5-6 hours I installed the bulbs from the top on the engine compartment by removing all the top plastic shielding,the battery the fuse & wiring box and squized my hand into possition to replace the bulbs.
All said and done this is not the way to do it.
My problem now is the lights are shinning too low,Where are the adjusting screws located and how can I get to them.Will some one be kind enough to help me out and I'll be sure to post the whole process with pictures.
Thank You
Tony51


Thread
Thread Starter
Forum
Replies
Last Post
vingodine
5th Generation Classifieds (2000-2003)
45
05-21-2016 12:46 PM
MAXSE5SPD
Other For Sale/Wanted
2
08-23-2015 12:06 PM
jomax14
7th Generation Maxima (2009-2015)
12
08-12-2015 11:49 AM