Need help removing brake light switch
 02-01-2009, 04:41 PM
#1
Senior Member
Thread Starter

Join Date: Aug 2008
Location: Brandon, FL
Posts: 897
Need help removing brake light switch
Anybody has any experience removing the brake light switch? It is held in place by some kind of plastic lock nut and I'm not sure what is the trick for removing this part. I tried pressing the side tabs on that nut while pushing out but was not successful and was afraid of breaking something. Other than removing the whole brake pedal assembly, I don't know waht to do. The closest information I found was this thread but there is no mention of anyone actually removing it.


 02-02-2009, 04:53 PM
#7
Senior Member

Join Date: Aug 2006
Posts: 601
that is like a regular bolt nut. turn it 90 degrees with a pliers and it should go loose and then just pull the switch out.
when you install it start the car and have it running and push it through the hole and make sure when you install the plastic lock nut you don't ride the pedal as it can be riding the brakes if pressed all the way in.
when you install it start the car and have it running and push it through the hole and make sure when you install the plastic lock nut you don't ride the pedal as it can be riding the brakes if pressed all the way in.
02-02-2009, 09:09 PM
#8
Senior Member
Thread Starter
Join Date: Aug 2008
Location: Brandon, FL
Posts: 897
Got it!!!!.. This is my humble contribution to the Org for those of you who are in need of replacing the Stop Lamp Switch (or brake light switch). (Moderators, feel free to move it to the "How-To's" if you feel it might be helpful to someone).
I became aware of a malfunctioning Stop Lamp Switch in my car when I began having trouble with my gear selector being "locked", unable to move from Park, unless I manually depressed the shift lock. This started happening on rare ocassions, so I paid little attention to it at first. As it was happening more often, I began to search for information and found out that the culprit was indeed a defective stop lamp swicth. I also found out that, while I was having this issue, my brake lights were not working, and I began noticing that cars behind me were stopping dangerously close to my rear end, since my brake lights were not doing its job of warning them when I was slowing down.
Before getting down to the brake pedal area to meet in person the cause of the trouble, I was hoping that it was held in place simply by a couple of metal nuts, like many other cars. To my surprise, it was held by some kind of plastic lock nut. Not being familiar with the mechanism and procedure involved in removing the switch, I began to request tips on how to remove it. I trully appreciate the suggestions made by some fellow org members.
Parts and procedure are as follows:
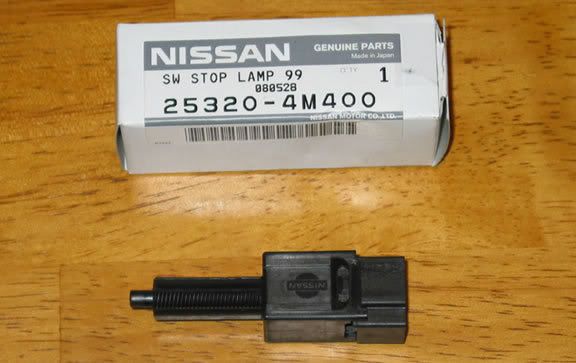
The picture below shows the Stop Lamp Switch (also known as Brake Light Switch) along with the packaging displaying the part number. At a local Nissan dealer, the price out-the-door, including taxes, was $37.73.
Since it was a little uncomfortable for me, I removed the plastic cover under the steering wheel so I can give myself more room to maneuver. Some people may not need to go through this step and save some time in the process.
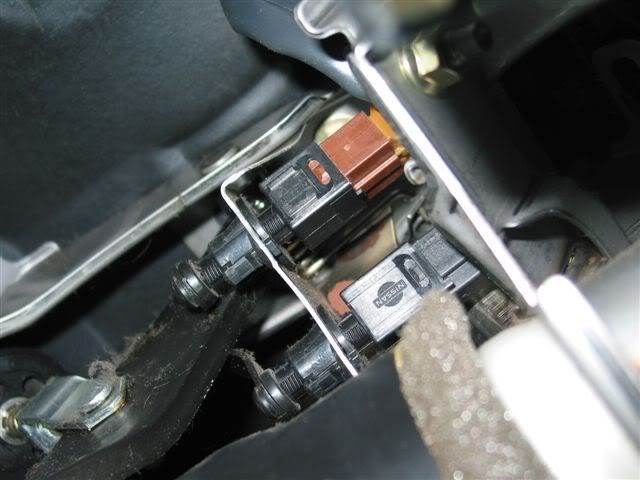
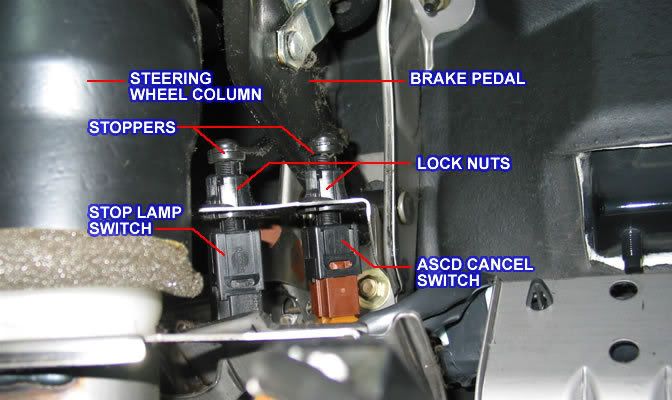
The next picture shows the general area where the Stop Lamp and the Automatic Speed Control Device (ASCD) switches are located. This view is from the driver side floor looking up towards the dashboard.
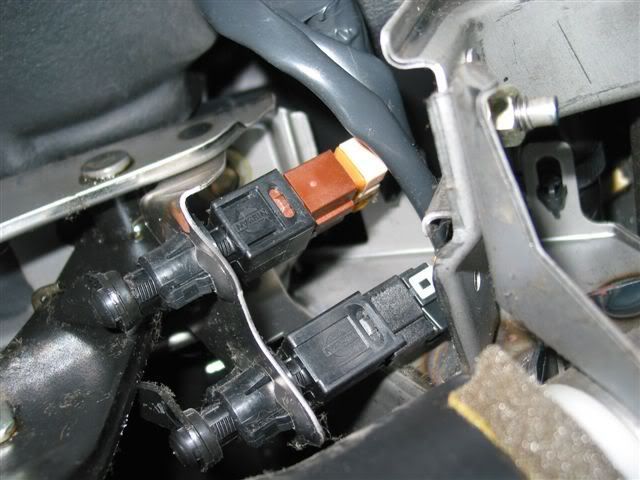
In order to release the defective part, hold it by the body (where the Nissan logo is) and turn it 45 degrees, in the direction of the arrow shown in the picture below.
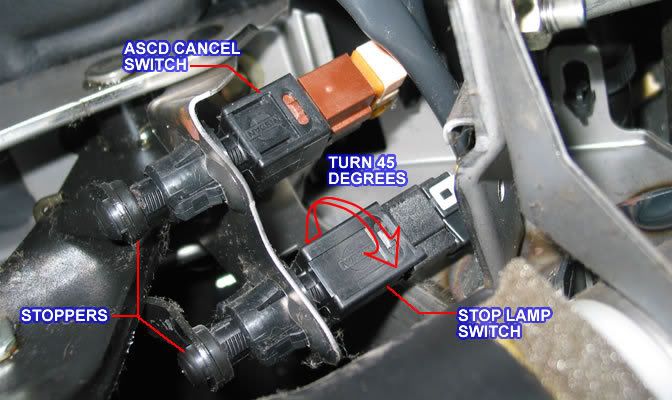
This twisting action will cause the switch to pop out towards the harness. (Note the position of the switch as it is being released).
Completely slide out the switch, disconnect it from the harness and set it aside.
Grab the new switch and connect it to the harness.
Slide it through the hole and push it against the stopper attached to the brake pedal, holding the switch in the same position as the old switch was when it was released.
While pushing the switch against the stopper, turn it 45 degrees, this time in the opposite direction as the arrow shows in the picture above, in order to secure it in place.
To finalize, depress and release the brake pedal a few times to make sure the switch is securely in place, and to test that your brake lights are working.
If everything is in working order, you are done.
I became aware of a malfunctioning Stop Lamp Switch in my car when I began having trouble with my gear selector being "locked", unable to move from Park, unless I manually depressed the shift lock. This started happening on rare ocassions, so I paid little attention to it at first. As it was happening more often, I began to search for information and found out that the culprit was indeed a defective stop lamp swicth. I also found out that, while I was having this issue, my brake lights were not working, and I began noticing that cars behind me were stopping dangerously close to my rear end, since my brake lights were not doing its job of warning them when I was slowing down.
Before getting down to the brake pedal area to meet in person the cause of the trouble, I was hoping that it was held in place simply by a couple of metal nuts, like many other cars. To my surprise, it was held by some kind of plastic lock nut. Not being familiar with the mechanism and procedure involved in removing the switch, I began to request tips on how to remove it. I trully appreciate the suggestions made by some fellow org members.
Parts and procedure are as follows:
The picture below shows the Stop Lamp Switch (also known as Brake Light Switch) along with the packaging displaying the part number. At a local Nissan dealer, the price out-the-door, including taxes, was $37.73.
Since it was a little uncomfortable for me, I removed the plastic cover under the steering wheel so I can give myself more room to maneuver. Some people may not need to go through this step and save some time in the process.
The next picture shows the general area where the Stop Lamp and the Automatic Speed Control Device (ASCD) switches are located. This view is from the driver side floor looking up towards the dashboard.
In order to release the defective part, hold it by the body (where the Nissan logo is) and turn it 45 degrees, in the direction of the arrow shown in the picture below.
This twisting action will cause the switch to pop out towards the harness. (Note the position of the switch as it is being released).
Completely slide out the switch, disconnect it from the harness and set it aside.
Grab the new switch and connect it to the harness.
Slide it through the hole and push it against the stopper attached to the brake pedal, holding the switch in the same position as the old switch was when it was released.
While pushing the switch against the stopper, turn it 45 degrees, this time in the opposite direction as the arrow shows in the picture above, in order to secure it in place.
To finalize, depress and release the brake pedal a few times to make sure the switch is securely in place, and to test that your brake lights are working.
If everything is in working order, you are done.
 08-03-2009, 12:33 PM
#10
Senior Member
Thread Starter
Join Date: Aug 2008
Location: Brandon, FL
Posts: 897
02-01-2010, 09:01 AM
#11
Got it!!!!.. This is my humble contribution to the Org for those of you who are in need of replacing the Stop Lamp Switch (or brake light switch). (Moderators, feel free to move it to the "How-To's" if you feel it might be helpful to someone).
I became aware of a malfunctioning Stop Lamp Switch in my car when I began having trouble with my gear selector being "locked", unable to move from Park, unless I manually depressed the shift lock. This started happening on rare ocassions, so I paid little attention to it at first. As it was happening more often, I began to search for information and found out that the culprit was indeed a defective stop lamp swicth. I also found out that, while I was having this issue, my brake lights were not working, and I began noticing that cars behind me were stopping dangerously close to my rear end, since my brake lights were not doing its job of warning them when I was slowing down.
Before getting down to the brake pedal area to meet in person the cause of the trouble, I was hoping that it was held in place simply by a couple of metal nuts, like many other cars. To my surprise, it was held by some kind of plastic lock nut. Not being familiar with the mechanism and procedure involved in removing the switch, I began to request tips on how to remove it. I trully appreciate the suggestions made by some fellow org members.
Parts and procedure are as follows:
The picture below shows the Stop Lamp Switch (also known as Brake Light Switch) along with the packaging displaying the part number. At a local Nissan dealer, the price out-the-door, including taxes, was $37.73.
Since it was a little uncomfortable for me, I removed the plastic cover under the steering wheel so I can give myself more room to maneuver. Some people may not need to go through this step and save some time in the process.
The next picture shows the general area where the Stop Lamp and the Automatic Speed Control Device (ASCD) switches are located. This view is from the driver side floor looking up towards the dashboard.
In order to release the defective part, hold it by the body (where the Nissan logo is) and turn it 45 degrees, in the direction of the arrow shown in the picture below.
This twisting action will cause the switch to pop out towards the harness. (Note the position of the switch as it is being released).
Completely slide out the switch, disconnect it from the harness and set it aside.
Grab the new switch and connect it to the harness.
Slide it through the hole and push it against the stopper attached to the brake pedal, holding the switch in the same position as the old switch was when it was released.
While pushing the switch against the stopper, turn it 45 degrees, this time in the opposite direction as the arrow shows in the picture above, in order to secure it in place.
To finalize, depress and release the brake pedal a few times to make sure the switch is securely in place, and to test that your brake lights are working.
If everything is in working order, you are done.
02-01-2010, 09:40 AM
#12
Senior Member
Thread Starter
Join Date: Aug 2008
Location: Brandon, FL
Posts: 897
I'd say no more than 10 minutes.
 04-13-2010, 07:54 AM
#14
Junior Member

Join Date: Jan 2004
Location: Pennsylvania
Posts: 15

WOW thanks for the detail pics. I have been having this problem for months and though is was a problem with my park neutral switch. My problem wasn't as bad as yours I would press the brake pedal and after a minute or more I would be able to hear the click and move out of park. Every time I have a problem with my Max I just search the org site and find my answer. Keep up the good work everyone. I have been a member for a lot of years and haven't had a chance to reply to post with any good info that isn't already there
If anyone is in the market for coil packs go to Autozone Duralast. they are the cheapist and they are from Nissan. but the Nissan logo and part number are ground off. I tried to post this info but I guess I don't have enough post to do so. I posted pics in my album to see the comparison.
04-13-2010, 07:10 PM
#15
Junior Member
Join Date: Jan 2004
Location: Pennsylvania
Posts: 15
Maybe not the brake light switch
I just when out to see if my brake lights were working and they are just fine. When I turn the key to accessories I hear a click in the shifter console. when I turn on the car I hear it again. Then I put my foot on the brake (tail lights work fine) I hear the click again. but I can't push in the button on the shifter. I have to wait a while for the second click in the shifter handle. sometime this waiting could last two min. Which switch is going bad.
11-02-2010, 03:15 PM
#16

i dont have enough posts to make my own thread so i guess ill post my question here...
my driver side brake light isnt working. all the lights in the taillight function, its just that the red one doesnt brighten when i press the brake. i replaced the stop light switch today, but that didnt resolve the issue.
does anybody have any suggestions?
its kinda funny that im listed as "newbie - just registered" even though i registered in 2005....
11-02-2010, 04:20 PM
#17
Senior Member
Thread Starter
Join Date: Aug 2008
Location: Brandon, FL
Posts: 897
i dont have enough posts to make my own thread so i guess ill post my question here...
my driver side brake light isnt working. all the lights in the taillight function, its just that the red one doesnt brighten when i press the brake. i replaced the stop light switch today, but that didnt resolve the issue.
does anybody have any suggestions?
its kinda funny that im listed as "newbie - just registered" even though i registered in 2005....
my driver side brake light isnt working. all the lights in the taillight function, its just that the red one doesnt brighten when i press the brake. i replaced the stop light switch today, but that didnt resolve the issue.
does anybody have any suggestions?
its kinda funny that im listed as "newbie - just registered" even though i registered in 2005....
By the way, newbie status is determined by the number of posts you have, regardless of when you registered.
Also, just so you know, there is a thread for those who can't create one yet, but need to post questions:
http://forums.maxima.org/5th-generat...on-thread.html
EDIT: If you brake light switch was the problem, none of your brake lights would've worked properly, not just one.
Last edited by Nelsito65; 11-02-2010 at 05:08 PM.
11-03-2010, 02:06 PM
#18
I'm going to put it out there, just in case, but is it safe to assume that you already tried replacing that bulb, or at least tried switching that bulb with the one on the passenger side?
By the way, newbie status is determined by the number of posts you have, regardless of when you registered.
Also, just so you know, there is a thread for those who can't create one yet, but need to post questions:
http://forums.maxima.org/5th-generat...on-thread.html
EDIT: If you brake light switch was the problem, none of your brake lights would've worked properly, not just one.
as for the newbie status thing...im aware of that, i was more referring to how long ive been on this forum without a single post. thanks for pointing out the other thread.
EDIT: i was replying based on the email i got so i just saw what you said about the switch controlling all lights. sure, it wouldve been nice to know that earlier and all, but i got some experience actually doing something car related. i feel a bit more manly now.
Last edited by tristanstewart; 11-03-2010 at 02:10 PM.
06-16-2011, 12:48 PM
#19
Newbie - Just Registered

Join Date: Jun 2011
Posts: 1
AWESOME posting with gr8 details.........

Got it!!!!.. This is my humble contribution to the Org for those of you who are in need of replacing the Stop Lamp Switch (or brake light switch). (Moderators, feel free to move it to the "How-To's" if you feel it might be helpful to someone).
I became aware of a malfunctioning Stop Lamp Switch in my car when I began having trouble with my gear selector being "locked", unable to move from Park, unless I manually depressed the shift lock. This started happening on rare ocassions, so I paid little attention to it at first. As it was happening more often, I began to search for information and found out that the culprit was indeed a defective stop lamp swicth. I also found out that, while I was having this issue, my brake lights were not working, and I began noticing that cars behind me were stopping dangerously close to my rear end, since my brake lights were not doing its job of warning them when I was slowing down.
Before getting down to the brake pedal area to meet in person the cause of the trouble, I was hoping that it was held in place simply by a couple of metal nuts, like many other cars. To my surprise, it was held by some kind of plastic lock nut. Not being familiar with the mechanism and procedure involved in removing the switch, I began to request tips on how to remove it. I trully appreciate the suggestions made by some fellow org members.
Parts and procedure are as follows:
The picture below shows the Stop Lamp Switch (also known as Brake Light Switch) along with the packaging displaying the part number. At a local Nissan dealer, the price out-the-door, including taxes, was $37.73.
Since it was a little uncomfortable for me, I removed the plastic cover under the steering wheel so I can give myself more room to maneuver. Some people may not need to go through this step and save some time in the process.
The next picture shows the general area where the Stop Lamp and the Automatic Speed Control Device (ASCD) switches are located. This view is from the driver side floor looking up towards the dashboard.
In order to release the defective part, hold it by the body (where the Nissan logo is) and turn it 45 degrees, in the direction of the arrow shown in the picture below.
This twisting action will cause the switch to pop out towards the harness. (Note the position of the switch as it is being released).
Completely slide out the switch, disconnect it from the harness and set it aside.
Grab the new switch and connect it to the harness.
Slide it through the hole and push it against the stopper attached to the brake pedal, holding the switch in the same position as the old switch was when it was released.
While pushing the switch against the stopper, turn it 45 degrees, this time in the opposite direction as the arrow shows in the picture above, in order to secure it in place.
To finalize, depress and release the brake pedal a few times to make sure the switch is securely in place, and to test that your brake lights are working.
If everything is in working order, you are done.
I became aware of a malfunctioning Stop Lamp Switch in my car when I began having trouble with my gear selector being "locked", unable to move from Park, unless I manually depressed the shift lock. This started happening on rare ocassions, so I paid little attention to it at first. As it was happening more often, I began to search for information and found out that the culprit was indeed a defective stop lamp swicth. I also found out that, while I was having this issue, my brake lights were not working, and I began noticing that cars behind me were stopping dangerously close to my rear end, since my brake lights were not doing its job of warning them when I was slowing down.
Before getting down to the brake pedal area to meet in person the cause of the trouble, I was hoping that it was held in place simply by a couple of metal nuts, like many other cars. To my surprise, it was held by some kind of plastic lock nut. Not being familiar with the mechanism and procedure involved in removing the switch, I began to request tips on how to remove it. I trully appreciate the suggestions made by some fellow org members.
Parts and procedure are as follows:
The picture below shows the Stop Lamp Switch (also known as Brake Light Switch) along with the packaging displaying the part number. At a local Nissan dealer, the price out-the-door, including taxes, was $37.73.
Since it was a little uncomfortable for me, I removed the plastic cover under the steering wheel so I can give myself more room to maneuver. Some people may not need to go through this step and save some time in the process.
The next picture shows the general area where the Stop Lamp and the Automatic Speed Control Device (ASCD) switches are located. This view is from the driver side floor looking up towards the dashboard.
In order to release the defective part, hold it by the body (where the Nissan logo is) and turn it 45 degrees, in the direction of the arrow shown in the picture below.
This twisting action will cause the switch to pop out towards the harness. (Note the position of the switch as it is being released).
Completely slide out the switch, disconnect it from the harness and set it aside.
Grab the new switch and connect it to the harness.
Slide it through the hole and push it against the stopper attached to the brake pedal, holding the switch in the same position as the old switch was when it was released.
While pushing the switch against the stopper, turn it 45 degrees, this time in the opposite direction as the arrow shows in the picture above, in order to secure it in place.
To finalize, depress and release the brake pedal a few times to make sure the switch is securely in place, and to test that your brake lights are working.
If everything is in working order, you are done.
01-16-2012, 11:11 AM
#20

Wow I just wanted to say THANK YOU for this. I almost broke my back (literally)...trying to figure out where the damn brake switch was and once I came across this thread you made everything a lot easier. Thanks for the Pics too!

 Let's hear it for Nelsito65 who posted such lucid and detailed instructions. You should write a DIY book, my mate. I know I'll buy it.
 03-15-2012, 03:52 PM
#24
Newbie - Just Registered

Join Date: Feb 2012
Posts: 4
 ). But when I turned it the correct way, it popped out just as described.
Your contribution is greatly appreciated.
Cory
 10-05-2012, 06:18 AM
#27
Newbie - Just Registered

Join Date: Oct 2012
Posts: 6
Is this part similar on a 97? I have the opposite problem, my brake lights won't turn off. I had to unplug the switch so the battery wouldn't run down. The car has been sitting for 1.5years so i think the rubber stopper dry rotten. I was wondering if just that piece can be fixed.
10-05-2012, 10:31 AM
#28
It is the same concept but the 4th gen has a 1/4 inch thick metal bar welded to the brake pedal instead of little tabs that the 5th gen uses. But the 4th gen uses these rubber bumpers to make contact with the switch.
You can get the bumpers at the dealer or some people have used JB Weld to glue a penny on the brake arm. Either way, when you are done, the plunger of the switch will still have a little bit of movement when the brake pedal is not being depressed. If the switch doesn't have any movement, that means the pedal is resting all its weight on the switch and this will destroy the switch.
You can get the bumpers at the dealer or some people have used JB Weld to glue a penny on the brake arm. Either way, when you are done, the plunger of the switch will still have a little bit of movement when the brake pedal is not being depressed. If the switch doesn't have any movement, that means the pedal is resting all its weight on the switch and this will destroy the switch.
Last edited by DennisMik; 10-05-2012 at 10:36 AM.
04-07-2013, 12:35 PM
#29
Newbie - Just Registered

Join Date: Apr 2013
Posts: 1
Brakes are not responding after replacing rubber stopper.
Hello everyone, I have a 2002 Nissan Maxima.
The other day I realized my brake lights were on after I had turned off my car and had gotten out. I found a broken stopper for the brake light switch and pulled the fuse when I got home, so I didn't drain the battery. Fast forward to after I replaced the stopper I had gotten from a dealership, and now the brake lights are not working at all. I had initially gotten a size to big from the dealerships parts department, which I installed and then had to cut out because the switch would never be able to release the plunger. I didn't put the switch back into place because the simply wasn't enough space too.
Not really sure what could be causing this since I had put the fuse back in and even swapped out the cig lighter fuse which is also a 15 amp fuse. Unless just twisting the switch out of it's harness caused it to break. I never disconnected it from the wiring, just popped the stopper in and put the switch back in place.
I should mention the drivers brake light was out when the lights would not turn off. I replaced the bulb after replacing the stopper, but since all of them stopped working I don't know if that was why it was out.
Any ideas?
Also, in case anyone else has to put the stopper in, I found a good way to do it is to tape plastic cards(like an old gift card) together and then put a sticky layer of tape down to hold the stopper to the card. This allows you to slide into place and then release the brake pedal down onto it. Might need a little bit of effort to get it in fully.
04-07-2013, 03:14 PM
#30
Normally the switch having a problem and a burned out bulb are 2 totally separate problems. I suggest you remove the new bulb that you put in check the fuse for the brake lights and see if the other brake lights work. Every once in a while you get a bad bulb.
If the brake lights still don't work, remove the brake light switch from the holder and operate it by hand. If the brake lights work like this, re-install the switch being careful that you don't push it too far in.
If the brake lights still don't work, remove the brake light switch from the holder and operate it by hand. If the brake lights work like this, re-install the switch being careful that you don't push it too far in.
04-12-2013, 05:43 PM
#31
Member

Join Date: Dec 2012
Location: Tampa, FL
Posts: 107
Sorry to resurrect such an old problem, but I'm currently sitting in the garage with my Maxima having the same problem. My rubber seal is still on, so it must be the switch. I've tried turning the switch to take it out as hard as I can, but I simply can't get it out. Oh well. I'll just have to disconnect the battery and take it into the shop tomorrow.
10-25-2013, 06:45 AM
#33
Newbie - Just Registered

Join Date: Oct 2013
Posts: 1
More than just a Brake Light sometimes
Nelsito65, your instructions are great. I have a 2002 Infiniti Q45 and your clear instructions were 100% applicable and saved me a lot of time and money. Much appreciated!
What was crazy about the issue was that as I was driving along, my TSC, VSC, Slip, and ABS lights all came on. When I stopped the car, I could only shift into Neutral and Drive. I couldn't shift into reverse or park, or remove the key . Although, I could turn off the car and restart it in neutral. My brake lights also stopped working. Pushing the shift lock release on the shifter console didn't help.
Anyway, I replaced the brake light switch for $40 using an adjustable wrench in 5 minutes with the help of your instructions. That resolved the warning lights, enabled the brake lights, and released the shifter.
Now if you have a solution for burning oil like an old factory, let me know!
What was crazy about the issue was that as I was driving along, my TSC, VSC, Slip, and ABS lights all came on. When I stopped the car, I could only shift into Neutral and Drive. I couldn't shift into reverse or park, or remove the key
. Although, I could turn off the car and restart it in neutral. My brake lights also stopped working. Pushing the shift lock release on the shifter console didn't help. Anyway, I replaced the brake light switch for $40 using an adjustable wrench in 5 minutes with the help of your instructions. That resolved the warning lights, enabled the brake lights, and released the shifter.
Now if you have a solution for burning oil like an old factory, let me know!
11-16-2013, 10:12 AM
#34
Going to bring this one on again. My rear light are on all the time after replacing the driver side stop light. Had to remove the fuse not to drain the battery. What could cause the light to be on all the time? The switch, the stoppers? I need to fix this fast, hate to be putting the fuse on and off until I can fix it. Anyway to determine which one is bad? Like I said, I just replace the driver side bulb which was bad and now they are on all the time even with the car been off. Thanks in advance
11-16-2013, 11:43 AM
#35
Senior Member
Thread Starter
Join Date: Aug 2008
Location: Brandon, FL
Posts: 897
Going to bring this one on again. My rear light are on all the time after replacing the driver side stop light. Had to remove the fuse not to drain the battery. What could cause the light to be on all the time? The switch, the stoppers? I need to fix this fast, hate to be putting the fuse on and off until I can fix it. Anyway to determine which one is bad? Like I said, I just replace the driver side bulb which was bad and now they are on all the time even with the car been off. Thanks in advance
I'm referring to the tip that comes out of the left part in the picture below:

Never mind the "depressed" part; that piston is supposed to be depressed all the time unless you're stepping on the brake.
Last edited by Nelsito65; 11-16-2013 at 11:52 AM.
11-16-2013, 11:55 AM
#37
Senior Member
Thread Starter
Join Date: Aug 2008
Location: Brandon, FL
Posts: 897
I thought about the stopper after I posted the reply. That allows the piston to freely stick out all the way,causing the switch to "read" as if you are applying the brakes.
03-08-2014, 03:29 PM
#39
Junior Member

Join Date: Dec 2009
Location: Pacific Northwest
Posts: 29
Stop lamp replacement on a 2000 I30 / Maxima
These pictures were extremely helpful but on my 2000 I30 the crowded area around the brake light switch made it pretty much impossible to get a grip on, either with tools or with my hand. The solution that worked was removing the cruise control switch to create enough clearance to access the brake light switch. Once that was done I was able to get a grip on the brake light switch with a pliers and twist it. Snapping them both back into place was very easy.
10-15-2014, 12:25 PM
#40
Newbie - Just Registered

Join Date: Jun 2013
Posts: 3
Thank you very much for the informative instructions on changing the brake light switch. What was seemingly an easy part swap-out, turned into a difficult project unless you are a small framed individual...which I am not!
I dropped the dash panel for better access which helped and pulled out the cruise control switch (brown capped connector). Although I could barely see the brake light switch due to the steering column and very tight quarters, I was able to feel my way thru and made the swap.
A couple things to keep in mind when changing out the switch:
1. Using long needle nose pliers to loosen the switch(s) and turning counter clockwise to remove is much easier than by hand
2. Don't confuse the brake light switch with the cruise control switch (brown connector housing on end).
Found my brake light switch at AutoZone for $30.