MAF, TB, IACV, and EGR cleaning for dummies
 06-22-2009, 02:03 PM
#1
Senior Member
Thread Starter

Join Date: Apr 2005
Location: 92626
Posts: 1,187
MAF, TB, IACV, and EGR cleaning for dummies
I cleaned my maf, tb, iacv, and egr guide tube last week after some extensive research here on the org. I felt like none of the threads included directions for a total newb to do everything. Doing everything at the same time makes sense b/c if you're gonna get to the egr, might as well attack everything else while you're at it so here it is. My car is a 1999 Infiniti i30t, your car might vary slightly in terms of hoses, tubes, and plugs.
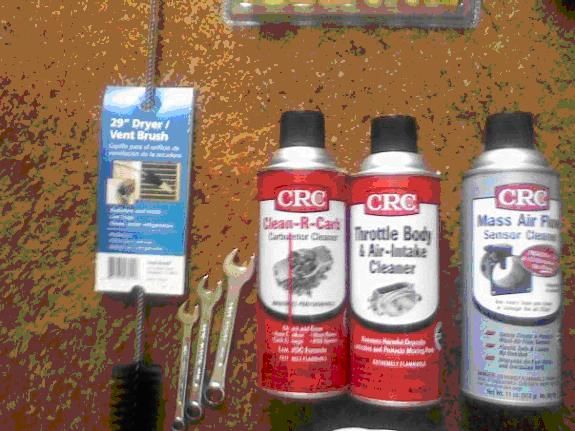
1st off, what you're gonna need:
Tools:
- 3/4 racket
- 8, 10 socket wrenches
- 3" and 6" socket extensions
- 12mm deep socket
- 12mm box end wrench (for getting at lower rear nut of egr guide tube
- Flat screwdriver
- Pliers
- paperclips - the type that is in an "X" since they're the biggest
- Large phillips screwdriver
- Hacksaw blade
Consumables:
- Lower EGR guide tube gasket part # 14722-38u02 $5.86 (Connell Nissan prob rip me off)
- Upper EGR guide tube gasket part # 14722-38u01 $3.75 (@OC Nissan in Garden Grove)
- IACV gasket part # 23785-AD100 $3.88
- TB gasket part # 16175-31u01 $3.65
What they look like

The brush is a heater chute cleaner, but I didn't know the EGR guide tube was only the size of a finger
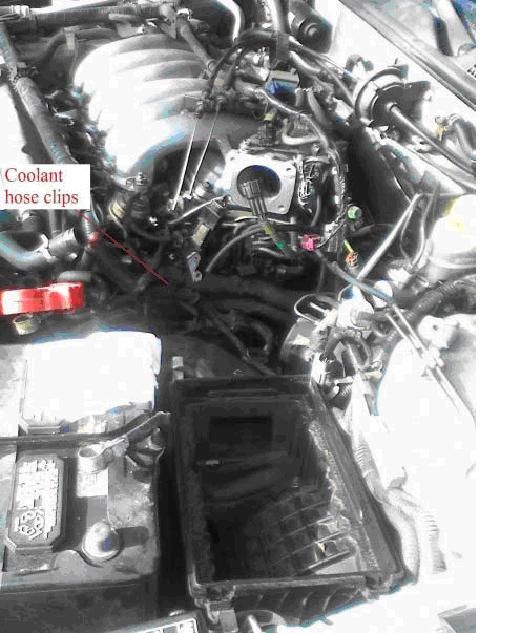
here's a picture of the engine bay labelled for future reference
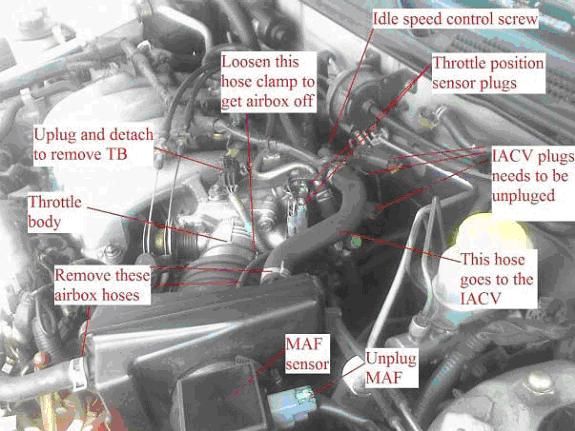
Steps - airbox:
- use 10mm box ends to remove Neg battery terminal and then positive
- disconnect MAF
- detach hoses on airbox (next to the "MAF sensor" label in pic)
- Undo the 4 clips holding the box w/ the air filter not shown in pic
- use pliers to slide airbox hose clamps off - squeeze them all the way will make them slide a lot easier
- Pull of the 2 big hose and a small hose (tubing really)
- Loosen the big hose clamp next to the throttle body
- Lift airbox out
It should look like this:
notice you can see one of the large airbox hoses and the rubber tubing[/quote]
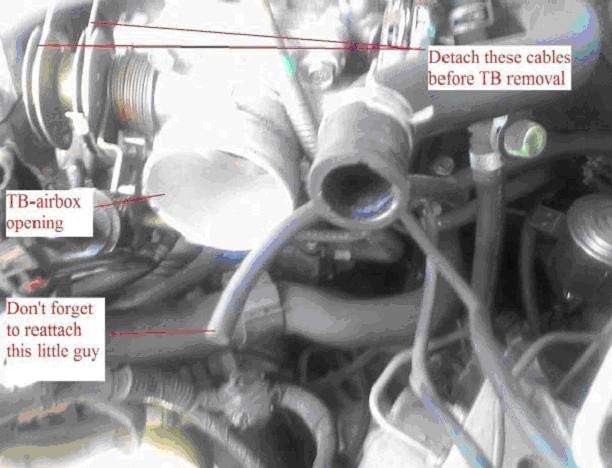
Throttle body removal:
- Disconnect cables to throttle body
- Disconnect the 2 throttle position sensor (TPS) plugs
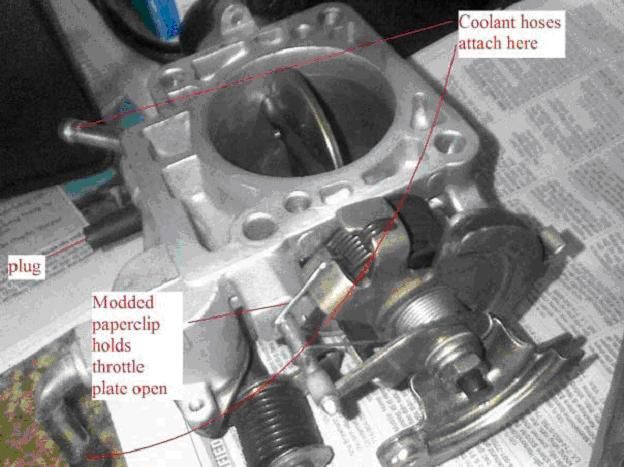
- Disconnect the plug on top of throttle body and detach it from the metal bracket (picture above shows it already detached)
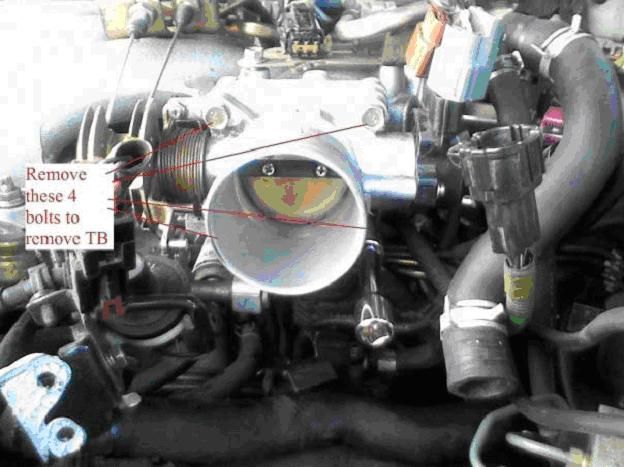
- Use your 12mm socket to unscrew the 4 bolts holding the TB
- Pull TB up, there should be 2 or 3 coolant hoses attached to it, undo them
- Remove any residue of the old gasket
- Optional - fabricate and clip like this to hold the throttle plate open
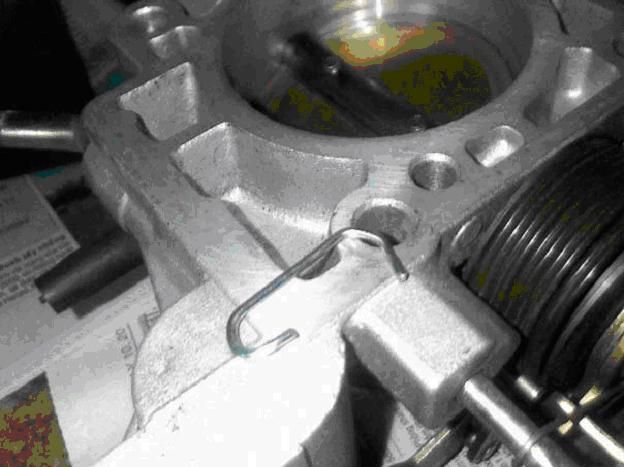
[

IACV:
- Remove the 3 electrical (in my case) plugs to the IACV
- Remove bracket that holds the rearmost plug
- screw bolt back on IACV to prevent loss
- use 12mm sockets to remove the 3 bolts that hold the IACV
- Pull IACV off and remove gasket if it sticks
Your engine bay should look like this now
EGR guide tube removal:
- Unclip the large coolant hose clip (2 pictures up) with a flat head screwdriver
- Locate EGR guide tube - it is attached to the plug whose bracket you just removed
- Locate the lower rear stud of the EGR guide tube not be confused with the EGR tube that is located forward left of it
- Hacksaw the non-threaded part of the stud off (you need ~ 3mm off of it to get egr guide tube out), this is for me the most painful step as I had to do it with a hacksaw blade - can't fit a whole hacksaw in there
- leave the 2 upper EGR bolts alone - it'll make removing the lower ends easier
- Get in with your 12mm box end to undo the nut - you'll likely only get one wrench tooth position's worth of rotation each stroke but it comes out fast, you can turn it with fingers
- Carefully remove the nut and 2 washers 1 by one as not to drop it
- Use your 12mm deep socket to remove front lower nut of EGR guide tube
- Also remove the nut and 2 washers one by one
- Use your 12mm socket to remove the 2 upper bolts of the EGR guide tube
- Pull EGR guide tube off
- Remove gaskets with flathead if needed - my lower one was quite stuck, spray it w/ carb cleaner
Here's a pic of how I attacked the lower front nut of EGR guide tube

[quote=96i30azn;7085370]At this point, your biggest problems are over, you just have to clean the parts and reinstall them. Use the TB cleaner on intake, TB, and stuff attached to it, MAF cleaner for MAF, and carb cleaner for everything else. There are 3 things to take off of the parts you have for as easy thorough clean:
- IACV - remove the little drum that's held on by 3 screws
- TB - remove the large hose so that the MAF is closer to get to
- EGR guide tube - remove temperature sensor to clean and clean out all orifices
Cleaning Tips:
- Use knife and straightened paperclips along with carb cleaner to clean our EGR guide tube
- Toothbrush works well for cleaning TB and IACV, but it scrub away from you or you'll get dirty
Here's a clean EGR guide tube for kicks

When you've put everything together again, it's time to adjust idle speed:
- Warm your engine up to operating temperature
- Unplug the 2 TPS plugs in the 1st engine pic
- Turn black idle speed adjust screw on the IACV, in the pic right under IlyaK's post (also in 1st engine pic), clockwise to lower idle speed and CC to elevate it
Troubleshooting:
- I have heard that if you forget a vacuum hose, you will get high RPM idle
- I forgot to tighten the large EGR tube (the one I mentioned "not to be confused with"), it also gave me high RPM idle and excessive engine campartment heat - coolant temp reads normal though
1st off, what you're gonna need:
Tools:
- 3/4 racket
- 8, 10 socket wrenches
- 3" and 6" socket extensions
- 12mm deep socket
- 12mm box end wrench (for getting at lower rear nut of egr guide tube
- Flat screwdriver
- Pliers
- paperclips - the type that is in an "X" since they're the biggest
- Large phillips screwdriver
- Hacksaw blade
Consumables:
- Lower EGR guide tube gasket part # 14722-38u02 $5.86 (Connell Nissan prob rip me off)
- Upper EGR guide tube gasket part # 14722-38u01 $3.75 (@OC Nissan in Garden Grove)
- IACV gasket part # 23785-AD100 $3.88
- TB gasket part # 16175-31u01 $3.65
What they look like
The brush is a heater chute cleaner, but I didn't know the EGR guide tube was only the size of a finger
here's a picture of the engine bay labelled for future reference
Steps - airbox:
- use 10mm box ends to remove Neg battery terminal and then positive
- disconnect MAF
- detach hoses on airbox (next to the "MAF sensor" label in pic)
- Undo the 4 clips holding the box w/ the air filter not shown in pic
- use pliers to slide airbox hose clamps off - squeeze them all the way will make them slide a lot easier
- Pull of the 2 big hose and a small hose (tubing really)
- Loosen the big hose clamp next to the throttle body
- Lift airbox out
It should look like this:
notice you can see one of the large airbox hoses and the rubber tubing[/quote]
Throttle body removal:
- Disconnect cables to throttle body
- Disconnect the 2 throttle position sensor (TPS) plugs
- Disconnect the plug on top of throttle body and detach it from the metal bracket (picture above shows it already detached)
- Use your 12mm socket to unscrew the 4 bolts holding the TB
- Pull TB up, there should be 2 or 3 coolant hoses attached to it, undo them
- Remove any residue of the old gasket
- Optional - fabricate and clip like this to hold the throttle plate open
[
IACV:
- Remove the 3 electrical (in my case) plugs to the IACV
- Remove bracket that holds the rearmost plug
- screw bolt back on IACV to prevent loss
- use 12mm sockets to remove the 3 bolts that hold the IACV
- Pull IACV off and remove gasket if it sticks
Your engine bay should look like this now
EGR guide tube removal:
- Unclip the large coolant hose clip (2 pictures up) with a flat head screwdriver
- Locate EGR guide tube - it is attached to the plug whose bracket you just removed
- Locate the lower rear stud of the EGR guide tube not be confused with the EGR tube that is located forward left of it
- Hacksaw the non-threaded part of the stud off (you need ~ 3mm off of it to get egr guide tube out), this is for me the most painful step as I had to do it with a hacksaw blade - can't fit a whole hacksaw in there
- leave the 2 upper EGR bolts alone - it'll make removing the lower ends easier
- Get in with your 12mm box end to undo the nut - you'll likely only get one wrench tooth position's worth of rotation each stroke but it comes out fast, you can turn it with fingers
- Carefully remove the nut and 2 washers 1 by one as not to drop it
- Use your 12mm deep socket to remove front lower nut of EGR guide tube
- Also remove the nut and 2 washers one by one
- Use your 12mm socket to remove the 2 upper bolts of the EGR guide tube
- Pull EGR guide tube off
- Remove gaskets with flathead if needed - my lower one was quite stuck, spray it w/ carb cleaner
Here's a pic of how I attacked the lower front nut of EGR guide tube
[quote=96i30azn;7085370]At this point, your biggest problems are over, you just have to clean the parts and reinstall them. Use the TB cleaner on intake, TB, and stuff attached to it, MAF cleaner for MAF, and carb cleaner for everything else. There are 3 things to take off of the parts you have for as easy thorough clean:
- IACV - remove the little drum that's held on by 3 screws
- TB - remove the large hose so that the MAF is closer to get to
- EGR guide tube - remove temperature sensor to clean and clean out all orifices
Cleaning Tips:
- Use knife and straightened paperclips along with carb cleaner to clean our EGR guide tube
- Toothbrush works well for cleaning TB and IACV, but it scrub away from you or you'll get dirty
Here's a clean EGR guide tube for kicks
When you've put everything together again, it's time to adjust idle speed:
- Warm your engine up to operating temperature
- Unplug the 2 TPS plugs in the 1st engine pic
- Turn black idle speed adjust screw on the IACV, in the pic right under IlyaK's post (also in 1st engine pic), clockwise to lower idle speed and CC to elevate it
Troubleshooting:
- I have heard that if you forget a vacuum hose, you will get high RPM idle
- I forgot to tighten the large EGR tube (the one I mentioned "not to be confused with"), it also gave me high RPM idle and excessive engine campartment heat - coolant temp reads normal though
Last edited by phenryiv1; 08-29-2012 at 12:55 PM.
 06-22-2009, 02:17 PM
#2
Senior Member
Thread Starter
Join Date: Apr 2005
Location: 92626
Posts: 1,187

Throttle body removal:
- Disconnect cables to throttle body
- Disconnect the 2 throttle position sensor (TPS) plugs
- Disconnect the plug on top of throttle body and detach it from the metal bracket (picture above shows it already detached)
- Use your 12mm socket to unscrew the 4 bolts holding the TB
- Pull TB up, there should be 2 or 3 coolant hoses attached to it, undo them
- Remove any residue of the old gasket
- Optional - fabricate and clip like this to hold the throttle plate open


Last edited by 96i30azn; 06-22-2009 at 02:20 PM.
06-22-2009, 02:25 PM
#4
Senior Member
Thread Starter
Join Date: Apr 2005
Location: 92626
Posts: 1,187

IACV:
- Remove the 3 electrical (in my case) plugs to the IACV
- Remove bracket that holds the rearmost plug
- screw bolt back on IACV to prevent loss
- use 12mm sockets to remove the 3 bolts that hold the IACV
- Pull IACV off and remove gasket if it sticks
Your engine bay should look like this now


EGR guide tube removal:
- Unclip the large coolant hose clip (2 pictures up) with a flat head screwdriver
- Locate EGR guide tube - it is attached to the plug whose bracket you just removed
- Locate the lower rear stud of the EGR guide tube not be confused with the EGR tube that is located forward left of it
- Hacksaw the non-threaded part of the stud off (you need ~ 3mm off of it to get egr guide tube out), this is for me the most painful step as I had to do it with a hacksaw blade - can't fit a whole hacksaw in there
- leave the 2 upper EGR bolts alone - it'll make removing the lower ends easier
- Get in with your 12mm box end to undo the nut - you'll likely only get one wrench tooth position's worth of rotation each stroke but it comes out fast, you can turn it with fingers
- Carefully remove the nut and 2 washers 1 by one as not to drop it
- Use your 12mm deep socket to remove front lower nut of EGR guide tube
- Also remove the nut and 2 washers one by one
- Use your 12mm socket to remove the 2 upper bolts of the EGR guide tube
- Pull EGR guide tube off
- Remove gaskets with flathead if needed - my lower one was quite stuck, spray it w/ carb cleaner
Here's a pic of how I attacked the lower front nut of EGR guide tube

Last edited by 96i30azn; 06-22-2009 at 03:03 PM.
06-22-2009, 02:54 PM
#5
Senior Member
Thread Starter
Join Date: Apr 2005
Location: 92626
Posts: 1,187
At this point, your biggest problems are over, you just have to clean the parts and reinstall them. Use the TB cleaner on intake, TB, and stuff attached to it, MAF cleaner for MAF, and carb cleaner for everything else. There are 3 things to take off of the parts you have for as easy thorough clean:
- IACV - remove the little drum that's held on by 3 screws
- TB - remove the large hose so that the MAF is closer to get to
- EGR guide tube - remove temperature sensor to clean and clean out all orifices
Cleaning Tips:
- Use knife and straightened paperclips along with carb cleaner to clean our EGR guide tube
- Toothbrush works well for cleaning TB and IACV, but it scrub away from you or you'll get dirty
Here's a clean EGR guide tube for kicks

When you've put everything together again, it's time to adjust idle speed:
- Warm your engine up to operating temperature
- Unplug the 2 TPS plugs in the 1st engine pic
- Turn black idle speed adjust screw on the IACV, in the pic right under IlyaK's post (also in 1st engine pic), clockwise to lower idle speed and CC to elevate it
Troubleshooting:
- I have heard that if you forget a vacuum hose, you will get high RPM idle
- I forgot to tighten the large EGR tube (the one I mentioned "not to be confused with"), it also gave me high RPM idle and excessive engine campartment heat - coolant temp reads normal though
- IACV - remove the little drum that's held on by 3 screws
- TB - remove the large hose so that the MAF is closer to get to
- EGR guide tube - remove temperature sensor to clean and clean out all orifices
Cleaning Tips:
- Use knife and straightened paperclips along with carb cleaner to clean our EGR guide tube
- Toothbrush works well for cleaning TB and IACV, but it scrub away from you or you'll get dirty
Here's a clean EGR guide tube for kicks
When you've put everything together again, it's time to adjust idle speed:
- Warm your engine up to operating temperature
- Unplug the 2 TPS plugs in the 1st engine pic
- Turn black idle speed adjust screw on the IACV, in the pic right under IlyaK's post (also in 1st engine pic), clockwise to lower idle speed and CC to elevate it
Troubleshooting:
- I have heard that if you forget a vacuum hose, you will get high RPM idle
- I forgot to tighten the large EGR tube (the one I mentioned "not to be confused with"), it also gave me high RPM idle and excessive engine campartment heat - coolant temp reads normal though
Last edited by 96i30azn; 06-22-2009 at 07:05 PM. Reason: Added idle speed adjust


 07-13-2009, 11:06 AM
#10

I'm at the hacksaw blade part now, PITA. A suitable replacement might be a dremel with the flextool attachment and I wish I had the flextool right now. The dremel without flextool attachment is too large and can't hit the bolt at the correct angle.
What is the giant metallic tube right infront of the lower EGR bolts? This is the reason for the hacksaw requirement. If it is fuel or coolant related I won't undo it to see about getting the EGR sans hacksaw but if not I may be trying to undo that tube. I thought I got lucky because the nut came off the bolt but nothing else will.
Now wearing thick leather gloves for the hacksaw as it has drawn blood. Not so fun.
It helps if you bust the blade to a smaller size but you need to wear gloves, even before busting the blade but especially after.
Last edited by bushd; 07-13-2009 at 11:43 AM.
07-13-2009, 11:32 AM
#11
Senior Member

Join Date: Jun 2007
Location: Lowell/Boston, MA
Posts: 1,613
Nice write up. The brush is In-genus. Al thought IMHO you don't need all 3 cans you only need Carb cleaner and MAF cleaner. And you don't ALWAYS need to replace the gaskets if they are not worn or ripped. If they are sticky ones, YES you do, but the IACV is just a normal gasket and I don't know why ppl say you need to replace it, IF it is great condition like mine was.
07-13-2009, 11:54 AM
#12
Just for people looking at doing this job it takes some time but it isn't actually removing the pieces. I spent a great majority of my time trying to get at factory hose clamps they were facing the wrong way on old hoses. Between this and the hack saw removing each of the pieces is nothing. I've been going at this for probably 5 hours but not constant and I've never done it before. After putting it back together with new screw type hose clamps and a precut lower egr bolt it'd probably take 30 minutes for disassembly if that.
I'm assuming the everything attached to TB/intake includes IACV for the TB cleaner comment. I used carb cleaner on the EGR guide tube but I plan on sitting it out in the sun to dry so that shouldn't be an issue.
I'm assuming the everything attached to TB/intake includes IACV for the TB cleaner comment. I used carb cleaner on the EGR guide tube but I plan on sitting it out in the sun to dry so that shouldn't be an issue.
Last edited by bushd; 07-13-2009 at 01:43 PM.
07-14-2009, 11:03 PM
#13
Senior Member
Thread Starter
Join Date: Apr 2005
Location: 92626
Posts: 1,187
That would be the EGR tube. It is the one in mentioned in the second bullet under "troubleshooting." What you are trying remove and clean is the EGR guide tube
I wrapped the blade in paper towels which felt less clumsy than gloves
I wrapped the blade in paper towels which felt less clumsy than gloves
Last edited by 96i30azn; 07-14-2009 at 11:06 PM.
 07-15-2009, 11:17 PM
#15
Senior Member
Thread Starter
Join Date: Apr 2005
Location: 92626
Posts: 1,187
It's nice you got an improvement. Your issue seems unrelated as you had it before and still do. Please ask you question in the Newb thread or a more relevant thread as I did this writeup to save Newbs attempting this from having to filter through other irrelevant clutter, thank you.
 07-16-2009, 04:03 PM
#17

I just did this and it helped. Make sure you tighten up your throttle\cruise control cables. I had slack in mine and now the pedal is perfect. Also don't forget a 300zx fuel filter. It's twice as big as the stock one and for $15 at a nissan dealer it's a great deal. The build quality was amazing for a fuel filter.
07-16-2009, 08:41 PM
#18
Member

Join Date: May 2007
Location: Bolton, CT
Posts: 199
you don't ALWAYS need to replace the gaskets if they are not worn or ripped. If they are sticky ones, YES you do, but the IACV is just a normal gasket and I don't know why ppl say you need to replace it, IF it is great condition like mine was.

 07-20-2009, 09:26 PM
#20
Newbie - Just Registered

Join Date: Jan 2004
Posts: 1
Thank you for this valuable information. I just wanted to share a little bit of advice that I found on my journey today. When cleaning the IACV don't unscrew the top plastic piece as that area is sealed off from the outside and contains a spring. Hopefully, I didn't do any damage there. Instead unscrew the bottom cover and the middle screws to get to the dirty parts. Also, I had a question about cleaning. My father-in-law brought over some mineral spirits and suggested that I soak everything in that. Since I don't know what I'm doing I stuck to this forums steps and didn't soak anything. Would soaking the Throttle Body or the IACV damage anything since there are sensors and coolant hoses? I'm letting everything dry over night and plan on re-installing it all tomorrow afternoon. Hopefully my problems will be behind me. Thanks again for the info and any suggestions you have about the mineral spirits or any other cleaning ideas.


 08-21-2009, 02:38 PM
#23
Senior Member
Thread Starter
Join Date: Apr 2005
Location: 92626
Posts: 1,187
I'm not sure, but the TB has a teflon(? I read on another thread, can't find right now) coat that Carb cleaner would eat away so I wouldn't try anything new on that.

 thx sry to threadjack
09-29-2009, 12:35 PM
thx sry to threadjack
09-29-2009, 12:35 PM
#26
Newbie - Just Registered

Join Date: Aug 2009
Posts: 2
Cannot restore stable idling speed after IACV clean-up
Does anyone have an idea of how to restore steady idling after the cleanup procedure? The Idle adjusting procedure does not work on my 160K GLE, when I disconnect the TPS, the idle cannot be adjusted to settle at 700rpm, the adjusting screw does not seem to have effect. This is probably my own doing but I cannot figure it out. Thanks in advance

 10-05-2009, 12:28 PM
#29
Senior Member
Thread Starter
Join Date: Apr 2005
Location: 92626
Posts: 1,187
^ no I didn't mess with that one.
Edit: I looked at that one today, it goes into the canister (the EGR valve) attached to the large EGR tube. Another hose from the EGR valve goes to the TB.
Edit: I looked at that one today, it goes into the canister (the EGR valve) attached to the large EGR tube. Another hose from the EGR valve goes to the TB.
Last edited by 96i30azn; 10-09-2009 at 10:49 AM.
10-09-2009, 06:40 PM
#30
Junior Member

Join Date: Oct 2009
Posts: 13
http://forums.maxima.org/4th-generat...ml#post7238447
Last edited by acclimate; 10-09-2009 at 06:46 PM.
12-02-2009, 07:10 AM
#31
Senior Member

Join Date: Sep 2009
Location: Worcester, MA
Posts: 4,011
Good writeup bro
JMO.... But, if you change the air filter and use fuel injector cleaner regularly, then theoretically, you shouldnt need to do any of this. I mean, this isnt even listed as normal interval maintenance in the Haynes.
JMO.... But, if you change the air filter and use fuel injector cleaner regularly, then theoretically, you shouldnt need to do any of this. I mean, this isnt even listed as normal interval maintenance in the Haynes.
 12-04-2009, 11:47 AM
#33
Newbie - Just Registered

Join Date: Oct 2009
Posts: 3
Spacer?
I keep seeing a spacer listed along with the 2 egr gaskets at the autoparts stores websites. Is this something I need to get also? I removed and cleaned my egr guide tube already and the gaskets are all crumbled and torn, but I can't tell if there were spacers attached to them. They cold be melted together by now (214k miles)?
If so the spacer is shaped like the more rounded gasket, so I wonder if it just goes on 1 side or if I would need 2 spacers?
Thanks for any help anyone can provide.
Thanks for the writeup, it has helped a lot. Especially the part where you hack saw the bolt.
If so the spacer is shaped like the more rounded gasket, so I wonder if it just goes on 1 side or if I would need 2 spacers?
Thanks for any help anyone can provide.
Thanks for the writeup, it has helped a lot. Especially the part where you hack saw the bolt.
Last edited by praxeo; 12-04-2009 at 11:49 AM.
12-04-2009, 05:03 PM
#34

I keep seeing a spacer listed along with the 2 egr gaskets at the autoparts stores websites. Is this something I need to get also? I removed and cleaned my egr guide tube already and the gaskets are all crumbled and torn, but I can't tell if there were spacers attached to them. They cold be melted together by now (214k miles)?
If so the spacer is shaped like the more rounded gasket, so I wonder if it just goes on 1 side or if I would need 2 spacers?
Thanks for any help anyone can provide.
Thanks for the writeup, it has helped a lot. Especially the part where you hack saw the bolt.
If so the spacer is shaped like the more rounded gasket, so I wonder if it just goes on 1 side or if I would need 2 spacers?
Thanks for any help anyone can provide.
Thanks for the writeup, it has helped a lot. Especially the part where you hack saw the bolt.
. When mounting the tube back on you just use the two gaskets. The heads of the tube are shaped differently so the gaskets are sold seperately.
 12-29-2009, 11:18 AM
#36
Senior Member
Join Date: Sep 2009
Location: Worcester, MA
Posts: 4,011
I would clean as much as u can...carb cleaner isnt harmful to the engine. I cleaned the TB with it still installed in the car. Jus used a rag and stick and cleaned as far inside as i could
01-17-2010, 03:39 PM
#37
Supporting Maxima.org Member

Join Date: Sep 2005
Location: S. Philadelphia
Posts: 221
I took out my throttle body today and cleaned it, thanks to this post. I would never have had the nerve to do this without the pictures and the play-by-play. Thanks a lot.
I didn't have time to do the IACV or EGR (new ebay $95 MAF is on order). Can I leave the throttle body on next time I go in there to do the rest of this?
My main goal here is to get the car to idle more smoothly and not stall. After taking the car for a test drive after cleaning the TB, I noted a slightly higher idle but no stalling. Yesterday it stalled like crazy which made me go to the dealer and buy the gaskets to try giving this cleaning procedure a shot.
Also, when I put the negative battery terminal back on and tightened it, I noticed it could still be lifted off the terminal, so I used plumbing pliers to squeeze it tighter, and then put it back on the terminal and tapped it down with a mallet and retightened so it is now snug. I'm wondering what the effect of it being kind of loose might have been.
01-18-2010, 09:13 AM
#38
Also, when I put the negative battery terminal back on and tightened it, I noticed it could still be lifted off the terminal, so I used plumbing pliers to squeeze it tighter, and then put it back on the terminal and tapped it down with a mallet and retightened so it is now snug. I'm wondering what the effect of it being kind of loose might have been.
Last edited by jholley; 01-18-2010 at 09:16 AM.


