is there any way?


 09-19-2009, 11:43 PM
#2
Member

Join Date: Sep 2009
Posts: 95
I dont' think there is any product to take out scratches, etc. I have the same thing on my 2005 SL with scratches I think happened when I scraped off the ice in the winter I think. I looked into using Meguier's PlastX, but after reading the label I found it was more of a polisher/detailing product for plastic. I don't want to go off and try other products similar to what is used in repairing cd's/dvd's as those actually "melt" the plastic a little. Maybe someone else has an answer to this problem but unfortunately I can't even post the questions I have yet... ")
 09-20-2009, 12:32 AM
#4


I dont' think there is any product to take out scratches, etc. I have the same thing on my 2005 SL with scratches I think happened when I scraped off the ice in the winter I think. I looked into using Meguier's PlastX, but after reading the label I found it was more of a polisher/detailing product for plastic. I don't want to go off and try other products similar to what is used in repairing cd's/dvd's as those actually "melt" the plastic a little. Maybe someone else has an answer to this problem but unfortunately I can't even post the questions I have yet...
stuff works great....
if the headlight is cracked through the lens then, no you need a new lens...but just scratches....this will work
did you ever crack your headlights open or put a hid kit in? have you ever seen condensation in there? feel the outside around the cloudyness to make sure its on the outside....
09-20-2009, 04:54 AM
#6
Senior Member

Join Date: Nov 2007
Location: New Brunswick, Canada
Posts: 497
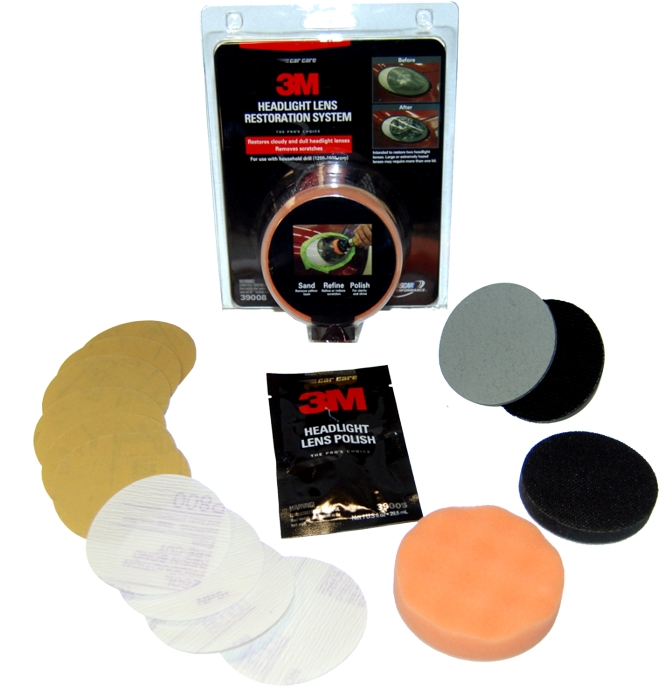
This is what you want: http://meguiarsdirect.com/detail/MEG+G12310. It worked wonders on my old Mazda MX6.
09-20-2009, 06:49 AM
#7
Senior Member

Join Date: Apr 2006
Location: Houston, TX
Posts: 966
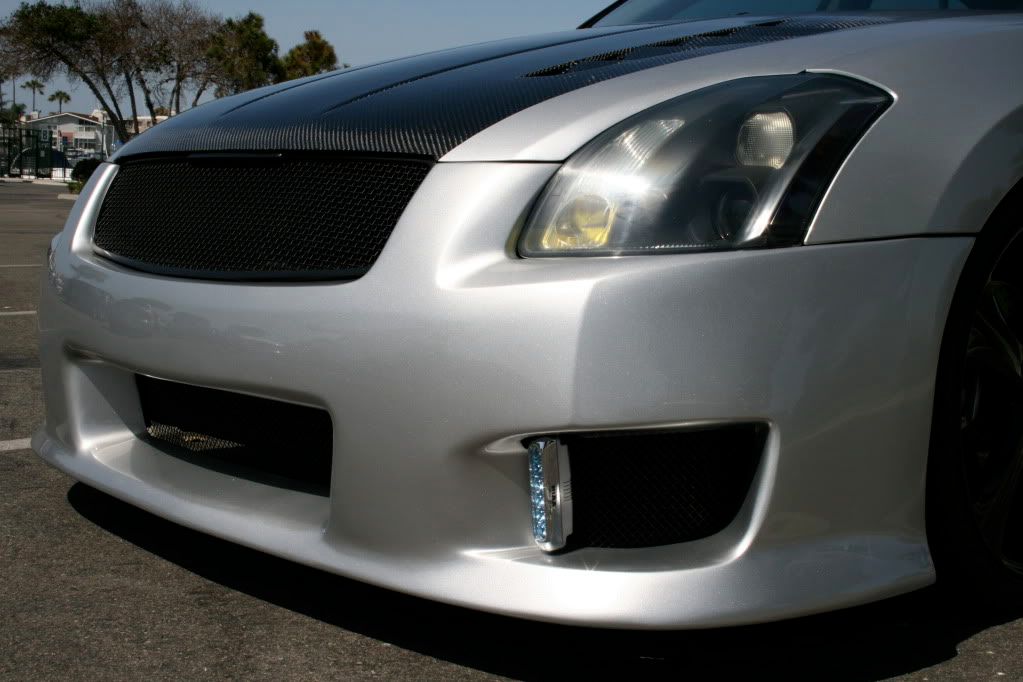
This is exactly what I was looking for. I dont have the problem like the other guy but my lights are dull and foggy as ever. It's funny because I take good care of the car and ensure the lights are clean but they still are dull. Can you use this by hand or do you need a buffer of some sort??
09-20-2009, 07:49 AM
#8

My lights looked just like yours, I tired a few different kits and they never turned out like I wanted. I finally called a headlight restoration company, paid $20 per light and they look like new!
09-20-2009, 10:08 AM
#9
I have a double problem in that I have stuff on the outside and the inside. The inside is from waaay back when, when I painted the inside of my headlights binfut did not allow enough time for the paint to dry. I got a varnish build up from the evaporating paint. I also have pits and cloudiness on the outside from time sitting in the sun. Ill need to take my lights apart again and buff out the lense on both sides and assemble. While Im in there I will probably install some DRLs and paint red rings around the edge of the headlights and foglights to go with my theme.
09-20-2009, 10:33 AM
#10
Senior Member
Join Date: Nov 2007
Location: New Brunswick, Canada
Posts: 497
This is exactly what I was looking for. I dont have the problem like the other guy but my lights are dull and foggy as ever. It's funny because I take good care of the car and ensure the lights are clean but they still are dull. Can you use this by hand or do you need a buffer of some sort??
You can do it by hand or buffer. I did it by hand with a clean towel. Works great.
Unfortunately, you can be as meticulous with your car as you want but the plastic may still become dull. This is from the oxidation of the plastic from the sun. In the end, the deciding factor will be the type of plastic that the headlight it made out of, not how much you take care of them.
Anyhoo, this stuff is pretty cheap and works great, so it is pretty low on the PITA scale
 09-20-2009, 05:42 PM
#11

I used the 3m stuff and it was scarry. I mean the lights looked like complete crap as I was using the kit and I finally got finished and it looked good. I applied the polish and then Plastix. The Plastics cleaned up the lights and showed everything. I have to redue a couple steps because there are scratches like crazy. I do not recommend this kit unless you have major repair needed. Even then I would think twice about it. These lights are plastic not glass. Use the plastix, you will not be disappointed. Use some elbow grease and remove that crap. It will come off and the plastix will protect the lens. Use it when you wax and you should be good. The only reason I used the 3m is because I saw it recommended in the detailing section. Everyone praised it and well I do not. I had tried to wetsand my lights before because that is what was recommended by a local detailing shop, but that left tiny marks on the top of the lights which I eventually got out but left the light hazy looking so that is why I tried the 3m kit. Not a good idea, now both my lights look like crap and need redone, hopefully I will have better things to say about it when I do it again. I mean I did follow the steps but I think I could have sanded a little bit more. To make a long story short use Plastix. If it doesn't work use alcohol with q-tips to remove the yellow and then clean with water. Make sure you don't get the alcohol on your paint. If you do wash away with plenty of water fast. Then add a polish like plastix. Plastix is a polish/cleaner. GL and let us know what works for you.
09-21-2009, 08:40 AM
#13

i used a turtle wax kit looks like the one stormzusmc posted $8 bucks at autozone worked great, using just the cleaners like plastix does alot of nada most of the time def get a full resto kit
09-21-2009, 01:02 PM
#14
Member
Join Date: Sep 2009
Posts: 95
I used the 3m stuff and it was scarry. I mean the lights looked like complete crap as I was using the kit and I finally got finished and it looked good. I applied the polish and then Plastix. The Plastics cleaned up the lights and showed everything. I have to redue a couple steps because there are scratches like crazy. I do not recommend this kit unless you have major repair needed. Even then I would think twice about it. These lights are plastic not glass. Use the plastix, you will not be disappointed. Use some elbow grease and remove that crap. It will come off and the plastix will protect the lens. Use it when you wax and you should be good. The only reason I used the 3m is because I saw it recommended in the detailing section. Everyone praised it and well I do not. I had tried to wetsand my lights before because that is what was recommended by a local detailing shop, but that left tiny marks on the top of the lights which I eventually got out but left the light hazy looking so that is why I tried the 3m kit. Not a good idea, now both my lights look like crap and need redone, hopefully I will have better things to say about it when I do it again. I mean I did follow the steps but I think I could have sanded a little bit more. To make a long story short use Plastix. If it doesn't work use alcohol with q-tips to remove the yellow and then clean with water. Make sure you don't get the alcohol on your paint. If you do wash away with plenty of water fast. Then add a polish like plastix. Plastix is a polish/cleaner. GL and let us know what works for you.
10-10-2009, 07:29 PM
#15
Member

Join Date: Dec 2008
Posts: 90
they need to be wet sanded with something like 2000 grit, then take them to a paint shop have them lay down 2 to 3 wet coates of clear. Give them some time to dry a couple of days you realy want that clear to dry. After they have dried, again lightly wet sand and i mean lightly this will get w.e inperfections are in the clear coat out.. after youve completed all above steps buff them with mothers polish/wax.. you have to use a power buffer to bring the shine out in the clear make sure to move the buffer quickly or you will burn right threw you nice clear coat... if this is done correctly theyl shine like the clear coat on your car.. ... defiantly the best process iv come across...the lights litterally look clear and new. good luck i hope this helps..
10-10-2009, 11:01 PM
#16
http://www.mothers.com/02_products/05100-05101.html
Has cleaned every single headlight ive used it on. And Ive done probably 20+ cars with it with no problems. And yes, I know its mag polish, but it works and it lasts along time, one can does over 20 sets.
Has cleaned every single headlight ive used it on. And Ive done probably 20+ cars with it with no problems. And yes, I know its mag polish, but it works and it lasts along time, one can does over 20 sets.
10-18-2009, 11:45 PM
#17
I found a perfect solution to the problem. Buy the 3m kit, 2000 grit sandpaper, http://www.mothers.com/02_products/06208.html and a bottle of this. About $30 total. Good for fixing alot of headlights. I used the 3m kit by itself and screwed up the headlights, so I bought the 2000 grit sandpaper and the plastic polish from mothers. I went home and used the 2000 grit sandpaper WET and sanded the lights making sure the sandpaper was wet the whole time. wiped them dry with a cloth. Then used the foam attachment from the 3m kit and a drill with the plastic polish to buff things out. They look as good as new and got rid of the huge swirl marks that damned 3m kit left. I realize that was because the kit only comes with 300 and 900 grit sand paper circles. So I recommend wet sand with 2000 grit and use the foam adapter with plastic polish to finish it off. Should take less than 5 minutes a light.