Rear Endlinks - Installation???
 10-27-2007, 06:30 AM
#1
Senior Member
Thread Starter

Join Date: Feb 2007
Location: Pittsburgh, PA
Posts: 634
Rear Endlinks - Installation???
Check out these two different pictures of the rear endlinks installation. One is from Prjctmax and one is from cyclops (I believe):


In the first one the endlink is mounted on the outside of the swaybar, in the second, its mounted on the inside???
Which is the correct way?
Joshua
In the first one the endlink is mounted on the outside of the swaybar, in the second, its mounted on the inside???
Which is the correct way?
Joshua
 10-27-2007, 10:46 AM
#2

Because there are multiple suspension setups there really isn't a wrong way in terms of in or outboard. Just as long as they are put in a straight (vertically as possible).
 10-28-2007, 10:59 AM
#6
Donating Maxima.org Member


Join Date: Jan 2006
Posts: 103
Thanks for the credit, but those aren't my pictures. I have a stillen RSB, and I installed my endlinks inside (to the rear of) the swaybar. That top picture makes me nervous with the endlink being so close to the brake line. Probably won't touch, but I am kind of a freak about brakes....
 10-28-2007, 07:06 PM
#9
Senior Member
Thread Starter
Join Date: Feb 2007
Location: Pittsburgh, PA
Posts: 634
I installed today. Not as easy as it would see (for me). Couldn't get the bolts to get the stock endlinks off of the frame, so I had to unbolt the piece that bolts to the frame off to get off the stock sway bar. Then had to burn out the bearing and use vice grips to hold it while I took off the nut. Almost put the new RSB on backwards. 
Luckily, after screaming "NOOB" under the car for about an hour, I got it done. Car handles phenomenal. Progress RSB and rear endlinks are certainly the way to go.
Thank you Taz.
Joshua
Luckily, after screaming "NOOB" under the car for about an hour, I got it done. Car handles phenomenal. Progress RSB and rear endlinks are certainly the way to go.
Thank you Taz.
Joshua
10-29-2007, 04:40 AM
#11
Donating Maxima.org Member
Join Date: Jan 2006
Posts: 103
I installed today. Not as easy as it would see (for me). Couldn't get the bolts to get the stock endlinks off of the frame, so I had to unbolt the piece that bolts to the frame off to get off the stock sway bar. Then had to burn out the bearing and use vice grips to hold it while I took off the nut. Almost put the new RSB on backwards.
Luckily, after screaming "NOOB" under the car for about an hour, I got it done. Car handles phenomenal. Progress RSB and rear endlinks are certainly the way to go.
Thank you Taz.
Joshua
Luckily, after screaming "NOOB" under the car for about an hour, I got it done. Car handles phenomenal. Progress RSB and rear endlinks are certainly the way to go.
Thank you Taz.
Joshua
 )
10-29-2007, 05:12 AM
)
10-29-2007, 05:12 AM
#12
11-02-2007, 12:22 PM
#13
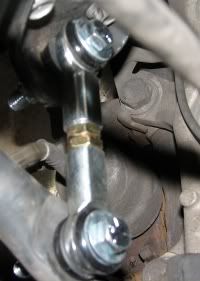
Guys, I'm putting on my links now. However I was curious, in this shot it shows the washer going between the rubber element and the swaybar. However I put my washer on the outside of the swaybar (that way the rubber element is between the endlink and the swaybar). Does this matter much? I haven't taken it for a drive yet but that just seemed the most logical to me. Taz, any comments here?
 11-02-2007, 12:46 PM
#15
Nations 1st 6th Gen Turbo

iTrader: (15)
Join Date: May 2005
Location: Displaced New Yorker in Southern, MD
Posts: 10,202
Guys, I'm putting on my links now. However I was curious, in this shot it shows the washer going between the rubber element and the swaybar. However I put my washer on the outside of the swaybar (that way the rubber element is between the endlink and the swaybar). Does this matter much? I haven't taken it for a drive yet but that just seemed the most logical to me. Taz, any comments here?
11-02-2007, 12:48 PM
#16
Nations 1st 6th Gen Turbo
iTrader: (15)
Join Date: May 2005
Location: Displaced New Yorker in Southern, MD
Posts: 10,202
That bottom picture does not look very vertical for max energy transfer to the sway...
Check out these two different pictures of the rear endlinks installation. One is from Prjctmax and one is from cyclops (I believe):
In the first one the endlink is mounted on the outside of the swaybar, in the second, its mounted on the inside???
Which is the correct way?
Joshua
In the first one the endlink is mounted on the outside of the swaybar, in the second, its mounted on the inside???
Which is the correct way?
Joshua
11-02-2007, 12:51 PM
#17
Thanks Chern. Just before I came up to read this I actually went looking for some extra washers in order to have them on both sides as well. Thanks man!
11-02-2007, 01:36 PM
#18
Senior Member
Thread Starter
Join Date: Feb 2007
Location: Pittsburgh, PA
Posts: 634
 11-02-2007, 02:05 PM
#20
Hmm, ok I couldn't find any extra washers. I put the endlinks on as in the picture of them with the red bushings. It feels as if there should've been an extra set of washers to put between the swaybar (bottom) and the mount (top) as well instead of mounting the nut flush against them. I may pick some up at some point to put on there.
Otherwise these babies are certainly MUCHO higher quality than stock. Fronts next!
Otherwise these babies are certainly MUCHO higher quality than stock. Fronts next!
11-02-2007, 02:12 PM
#22
One last question. I'm assuming the bushings will expand and contract a bit. Should I go back in, in a week or two to re-tighten everything?
Last edited by Mack; 11-02-2007 at 02:14 PM.
11-02-2007, 03:45 PM
#23
Senior Member
Thread Starter
Join Date: Feb 2007
Location: Pittsburgh, PA
Posts: 634
Damn, I wish you would have mentioned that an hour ago. So I guess my initial instincts to have the bushing sit softly against the swaybar was correct. Man, I shoulda just went with that. Thanks Taz....
One last question. I'm assuming the bushings will expand and contract a bit. Should I go back in, in a week or two to re-tighten everything?
One last question. I'm assuming the bushings will expand and contract a bit. Should I go back in, in a week or two to re-tighten everything?
Joshua
 11-02-2007, 08:44 PM
#27
 11-03-2007, 06:23 AM
#28
-spacers leave the hiem bearing exposed, meaning it'll wear alot faster, especially for northern regions where snow exists.
-the bushing, while adding longevity also add a little extra stiffness to the hiem allowing it to respond even faster.
 11-03-2007, 12:41 PM
#32
When I first initiated the ES upgrade and posted the results, I thought my troubles were over. Either Im taking turns at 90 degrees at 90 MPH or Im just unlucky. Ive got V2s on order and am re doing the whole back with my progress. The washer is not needed on the bar itself Mack as directed.
11-04-2007, 09:28 PM
#33
11-05-2007, 04:38 AM
#34
Donating Maxima.org Member
Join Date: Jan 2006
Posts: 103
I had that same problem when I had the V1 endlinks - I couldn't tighten them down enough. I bet you just don't have it snugged down enough... My noise went away when I upgraded to the v2 endlinks... The bolts I had with the v1 endlinks weren't threaded all the way, so I couldn't get the bushings compressed enough (at least that is my theory). Have you tried tightening them down some?
11-05-2007, 05:59 AM
#35
I still have this unresolved and am currently on OEM endlinks. Couldn't stand the noise anymore. I had V1 setup and its just laying in the basement. TAZ whats is the fix for this and can you provide support?

Thread
Thread Starter
Forum
Replies
Last Post
kingw323
4th Generation Maxima (1995-1999)
20
10-21-2015 08:36 AM
Huttig2009
5th Generation Classifieds (2000-2003)
8
09-25-2015 03:31 PM

