Ultra Racing Room Bar Install
 02-25-2013, 05:39 PM
#1

Ultra Racing Room Bar Install
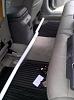
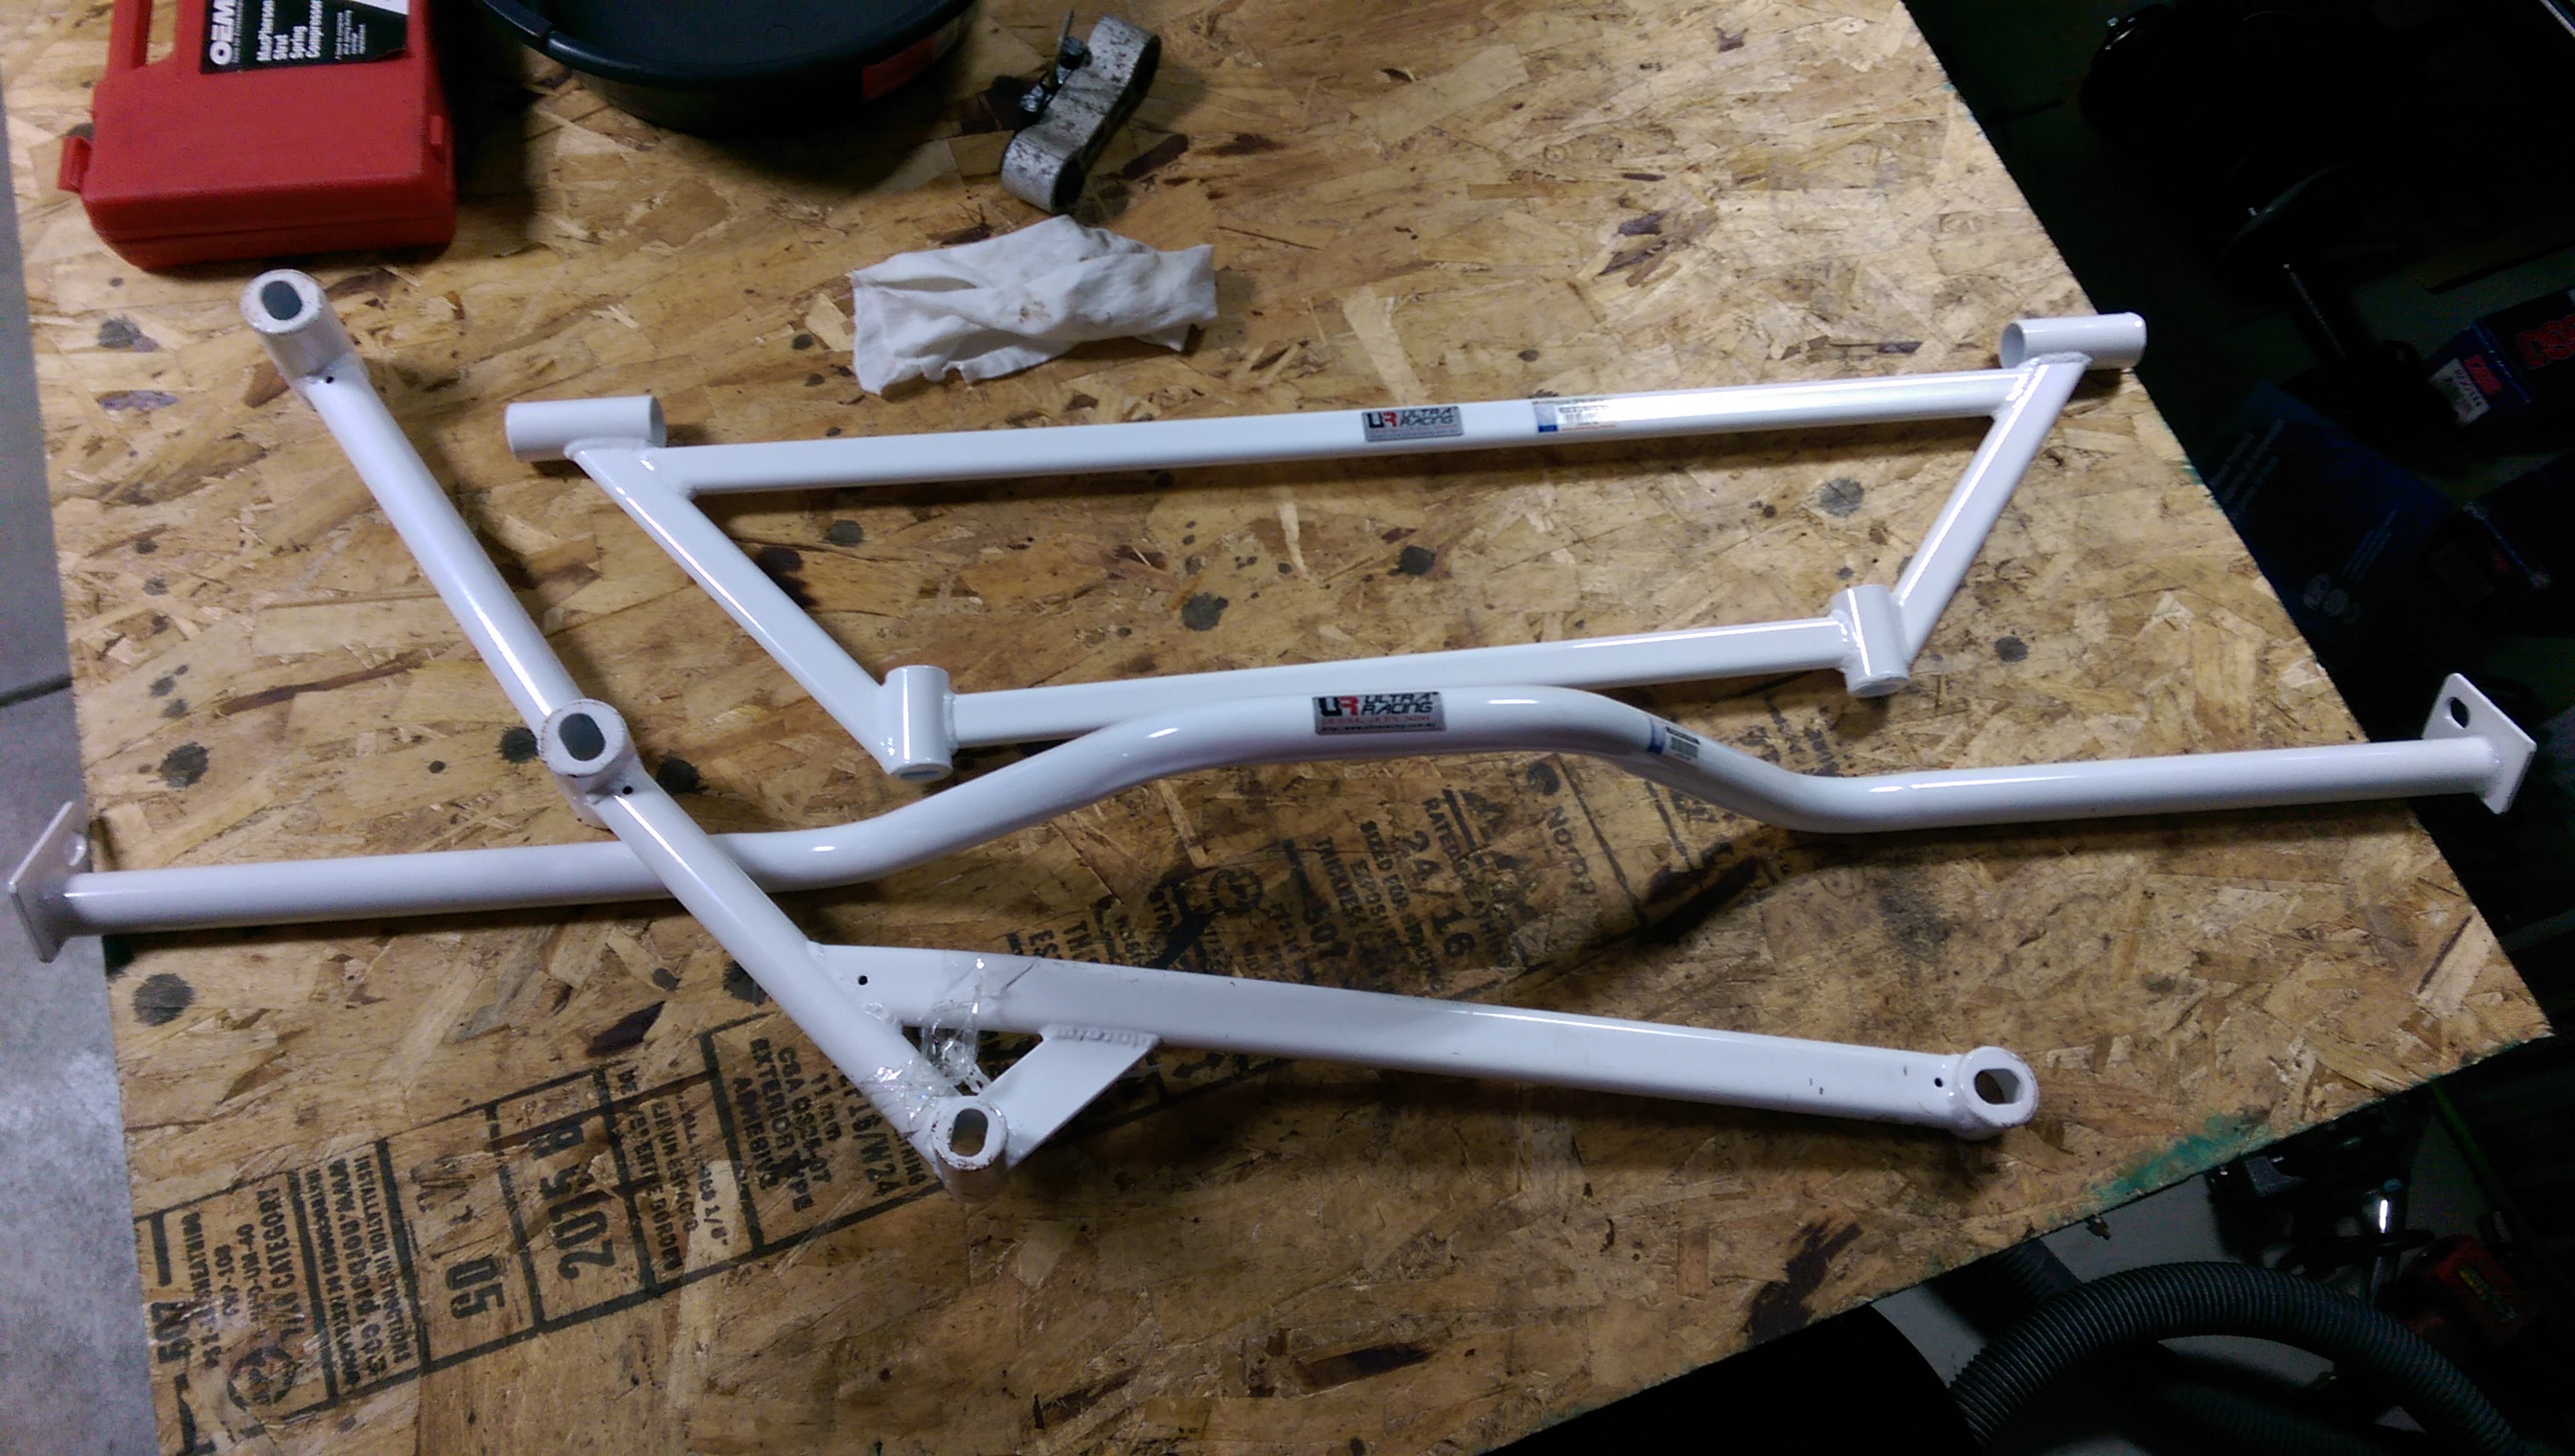
Took the gamble and bought the Ultra Racing room bar meant for the A33 Cefiro. Fitment for our car was exact, which shows promise for the other parts Ultra Racing offers. Quality is great, its steel not aluminum but ship weight was 3.1lbs. It came bubble wrapped from Malaysia, with no damage along the way. I couldn't flex the pipe at all using my "guns". I got it on Ebay with a "best offer" price of $142.
Install was a 1 out of 5.
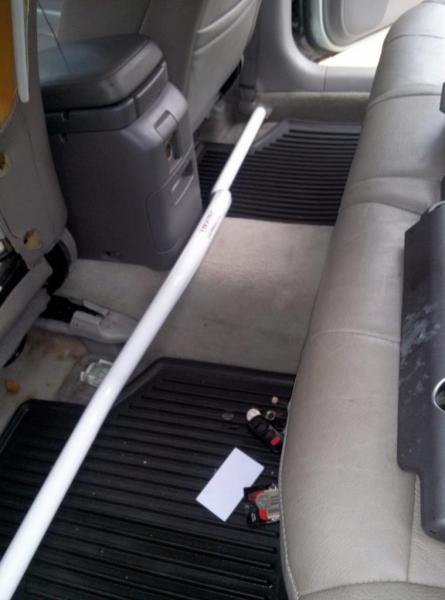
1.) Take the seat belt bolt out from each side.
2.) Remove the solid metal washer from the bolt.
3.) Cut the carpet a tad to be able to slide the bar under the carpet.
4.) Hammer the bracket below the bolt hole.
5.) Slide bar in and line the holes up.
6.) Hand tighten each side then tighten to dam tight (yank the bar to see if there's movement).
7.) DONE
The only thing that could get in the way is under the carpet there is a bracket for the upper seat belt. I used a hammer to flatten it a bit, which halfway worked. Not sure if removing it is easy or safe.
The rear cup holder doesn't open, I'll check again if I can rotate the bar a little to make space. It's very close to opening right now.
EDIT: It clears the cupholder now.
It will take some time to see if this actually improves performance. I'm going to take it off after a few weeks to see if anything changes. I installed Moog in/out tie rods, sway bar links, and CV axles (with help from bgsl1ck) around the same time, and everything was shot so as of now I can't be certain if anything has improved by the room bar only")
A pic of the pretty bar:
http://i139.photobucket.com/albums/q...ps983e0ca6.jpg
Install was a 1 out of 5.
1.) Take the seat belt bolt out from each side.
2.) Remove the solid metal washer from the bolt.
3.) Cut the carpet a tad to be able to slide the bar under the carpet.
4.) Hammer the bracket below the bolt hole.
5.) Slide bar in and line the holes up.
6.) Hand tighten each side then tighten to dam tight (yank the bar to see if there's movement).
7.) DONE
The only thing that could get in the way is under the carpet there is a bracket for the upper seat belt. I used a hammer to flatten it a bit, which halfway worked. Not sure if removing it is easy or safe.
The rear cup holder doesn't open, I'll check again if I can rotate the bar a little to make space. It's very close to opening right now.
EDIT: It clears the cupholder now.
It will take some time to see if this actually improves performance. I'm going to take it off after a few weeks to see if anything changes. I installed Moog in/out tie rods, sway bar links, and CV axles (with help from bgsl1ck) around the same time, and everything was shot so as of now I can't be certain if anything has improved by the room bar only
A pic of the pretty bar:
http://i139.photobucket.com/albums/q...ps983e0ca6.jpg
Last edited by nishfish871; 11-27-2013 at 05:23 AM.


 02-26-2013, 07:33 AM
#9

thanks for the post nishfish good to know that one of A33 cerfio parts from Ultra racing fits the maxima. hopefully that translates to others fitting fairly well.
I am highly conisdering these from them

oh yeah and I guess for all the people who want an extinct LTB they can get it through them now.
I am highly conisdering these from them
oh yeah and I guess for all the people who want an extinct LTB they can get it through them now.
02-26-2013, 07:36 AM
#10
its makes a huge difference for what it is worth $20-30. You can't get many handling improvements under $50.
But in the big scheme of things it dosen't make a night and day difference, but it is absolutely noticeable. Id say go for it.
But in the big scheme of things it dosen't make a night and day difference, but it is absolutely noticeable. Id say go for it.
02-26-2013, 07:51 AM
#11
thanks for the post nishfish good to know that one of A33 cerfio parts from Ultra racing fits the maxima. hopefully that translates to others fitting fairly well.
I am highly conisdering these from them
oh yeah and I guess for all the people who want an extinct LTB they can get it through them now.
I am highly conisdering these from them
oh yeah and I guess for all the people who want an extinct LTB they can get it through them now.


 01-10-2017, 07:14 AM
#18
Lower Side bars though amazing, different car and feels like what you would think the SubFrameConnectors do expect these have bolts and can be taken off, and not welded (permanent)
i have this slight slight suspension though because of such a stiff chasiss though it slips a lil more on ice winter weather.... not exactly sure though.. but that woudl go with any handlying performance kind of mod in general... push pull, turn fast, slide quicker... slide less turn worse....
honestly the biggest thing i noticed on the first few miles is how the rear felt alive again , it felt way more connected to my front.
later i just feel a solid as car now, (mind you have have other chassis bars) i cant imagine taking them off, that would really show me what they do, its been 16 months with them now...

 01-10-2017, 08:30 PM
#20
Senior Member

Join Date: Dec 2016
Location: Wisconsin
Posts: 432
Is that even attached to the strut towers? If not, I don't know what it would connect to that would offer any improvement.
 01-12-2017, 01:49 PM
#22
I have the lower side bars they are amazing, i wouldn't give much credit to the floor bar but i never tried it, it dosen't seem like it is worth it.
Lower Side bars though amazing, different car and feels like what you would think the SubFrameConnectors do expect these have bolts and can be taken off, and not welded (permanent)
Lower Side bars though amazing, different car and feels like what you would think the SubFrameConnectors do expect these have bolts and can be taken off, and not welded (permanent)
Do we know if UR-LA2-1164 fits with cattman headers & ypipe?
01-13-2017, 05:38 AM
#23
and considering how Blehmco designed the LTBs id say highly unlikely....
i pick LTB over headers... (i do have a ws y-pipe, the trash shop i allowed to work on it had trouble fitting it, and had the audacity to tell me it wasn't going to work, but they got it to work )

 09-25-2017, 07:38 AM
#26
i see , flat floor bar, the LTB, and the rare conncetor on our solid rear axle near the multi link point !
it reminds me of the 2jracing rod that bolts to the solid rear axle to the frame
09-25-2017, 02:01 PM
#27
yeah the 4-point under body rear brace was a bit of work to get it installed. I'm not sure I took very many pics during the install though, but I do have some post-install.
What do you guys use for image hosting these days, now that photobucket has ruined forums all over the internet? I used imgur for the image above, but I'm not crazy about how that's organized and the user interface. Would be nice to find a good reliable host, and I'll post up the pics I do have.
I'm installing the trunk 4-point brace this week.
I also just purchased the 4-point underbody brace that goes around the stock resonator in the middle of the car. More details on that later.
09-26-2017, 05:19 AM
#28
amazing man !! and use Flickr i think they are still good, i found a place a cpl mnths ago and IIRC it was Flickr, the org u can upload pics directly too.
please provide feedback on the rear underbody brace that connects to the solid rear axle !!!!!!! there is not one other brace like that for our car!!
props for going for all of them, I know you will like them !! I absolutely love my SIDE LOWER BARS, they are the best and closest thing to bolt on subframe connectors.
09-26-2017, 10:15 AM
#30
Junior Member

Join Date: May 2012
Location: Brandon, FL
Posts: 69
I just purchased the 3 point side bars and can't wait to install those.
I too am excited to see how the rear axle bar turns out and if it or anyone of these can clear headers and 3inch exhaust. If I recall correctly I don't think the rear bar will clear 3inch exhaust.
I too am excited to see how the rear axle bar turns out and if it or anyone of these can clear headers and 3inch exhaust. If I recall correctly I don't think the rear bar will clear 3inch exhaust.
09-26-2017, 10:36 PM
#31
My free time these past two days has been spent trying to find a good image hosting site......idk maybe I'm being overly picky but I'm not impressed by the options out there. The websites are fine but I find the apps really lacking. I can't find one app where you have a simple way of copy & pasting the [img] links so I can do this on my phone. After trying Instagram, Flickr, and like 2 others I can't remember, I'm going with Imgur. Freakin' photobucket *sigh* Ok enough complaining, onto the fun.
That's cool they are working out. I was going to buy those too....literally had em in cart about to push 'buy it now'. Then I remembered the thread about the Truax sub-frame connectors, and even though they're like 8 years old, thought, 'what the hell, I wonder if I could find a set of those?'. So I stalked Mr. Truax online, actually found him, and I bought his last remaining sets of sub-frame connectors.  It took a few months, but they just arrived a few days ago. Kinda pumped......and curious to see if they're as nice as everyone says they are.
It took a few months, but they just arrived a few days ago. Kinda pumped......and curious to see if they're as nice as everyone says they are.
09-26-2017, 10:36 PM
#32
(edit: this turned out really long, sorry)
I didn't really understand how and where it connected when I bought it..... even after I got it actually lol. At first I thought it connected to the rear beam somehow. It was pretty obvious once I got the car up on stands tho.
It bolts to the sub-frame between the gas tank and the spare tire compartment. It's under the rear suspension frame not above it, so no problem with anything exhaust related.
The install was actually pretty complicated. For me. But I am a self-admitted newb, so....... I've never done anything like this before. I must have sat there laying under my car for a good hour just staring. I had to think through it a while, and slowly. For others it might go pretty quick.
The bar fit perfect. All bolt holes lined up without issue. I was able to get all 4 bolts threaded in by hand without problem, then tightened down one by one. Only one socket got a little stuck but no big deal, I just loosened em all up again and did that one first and the others tightened down easy peasy.
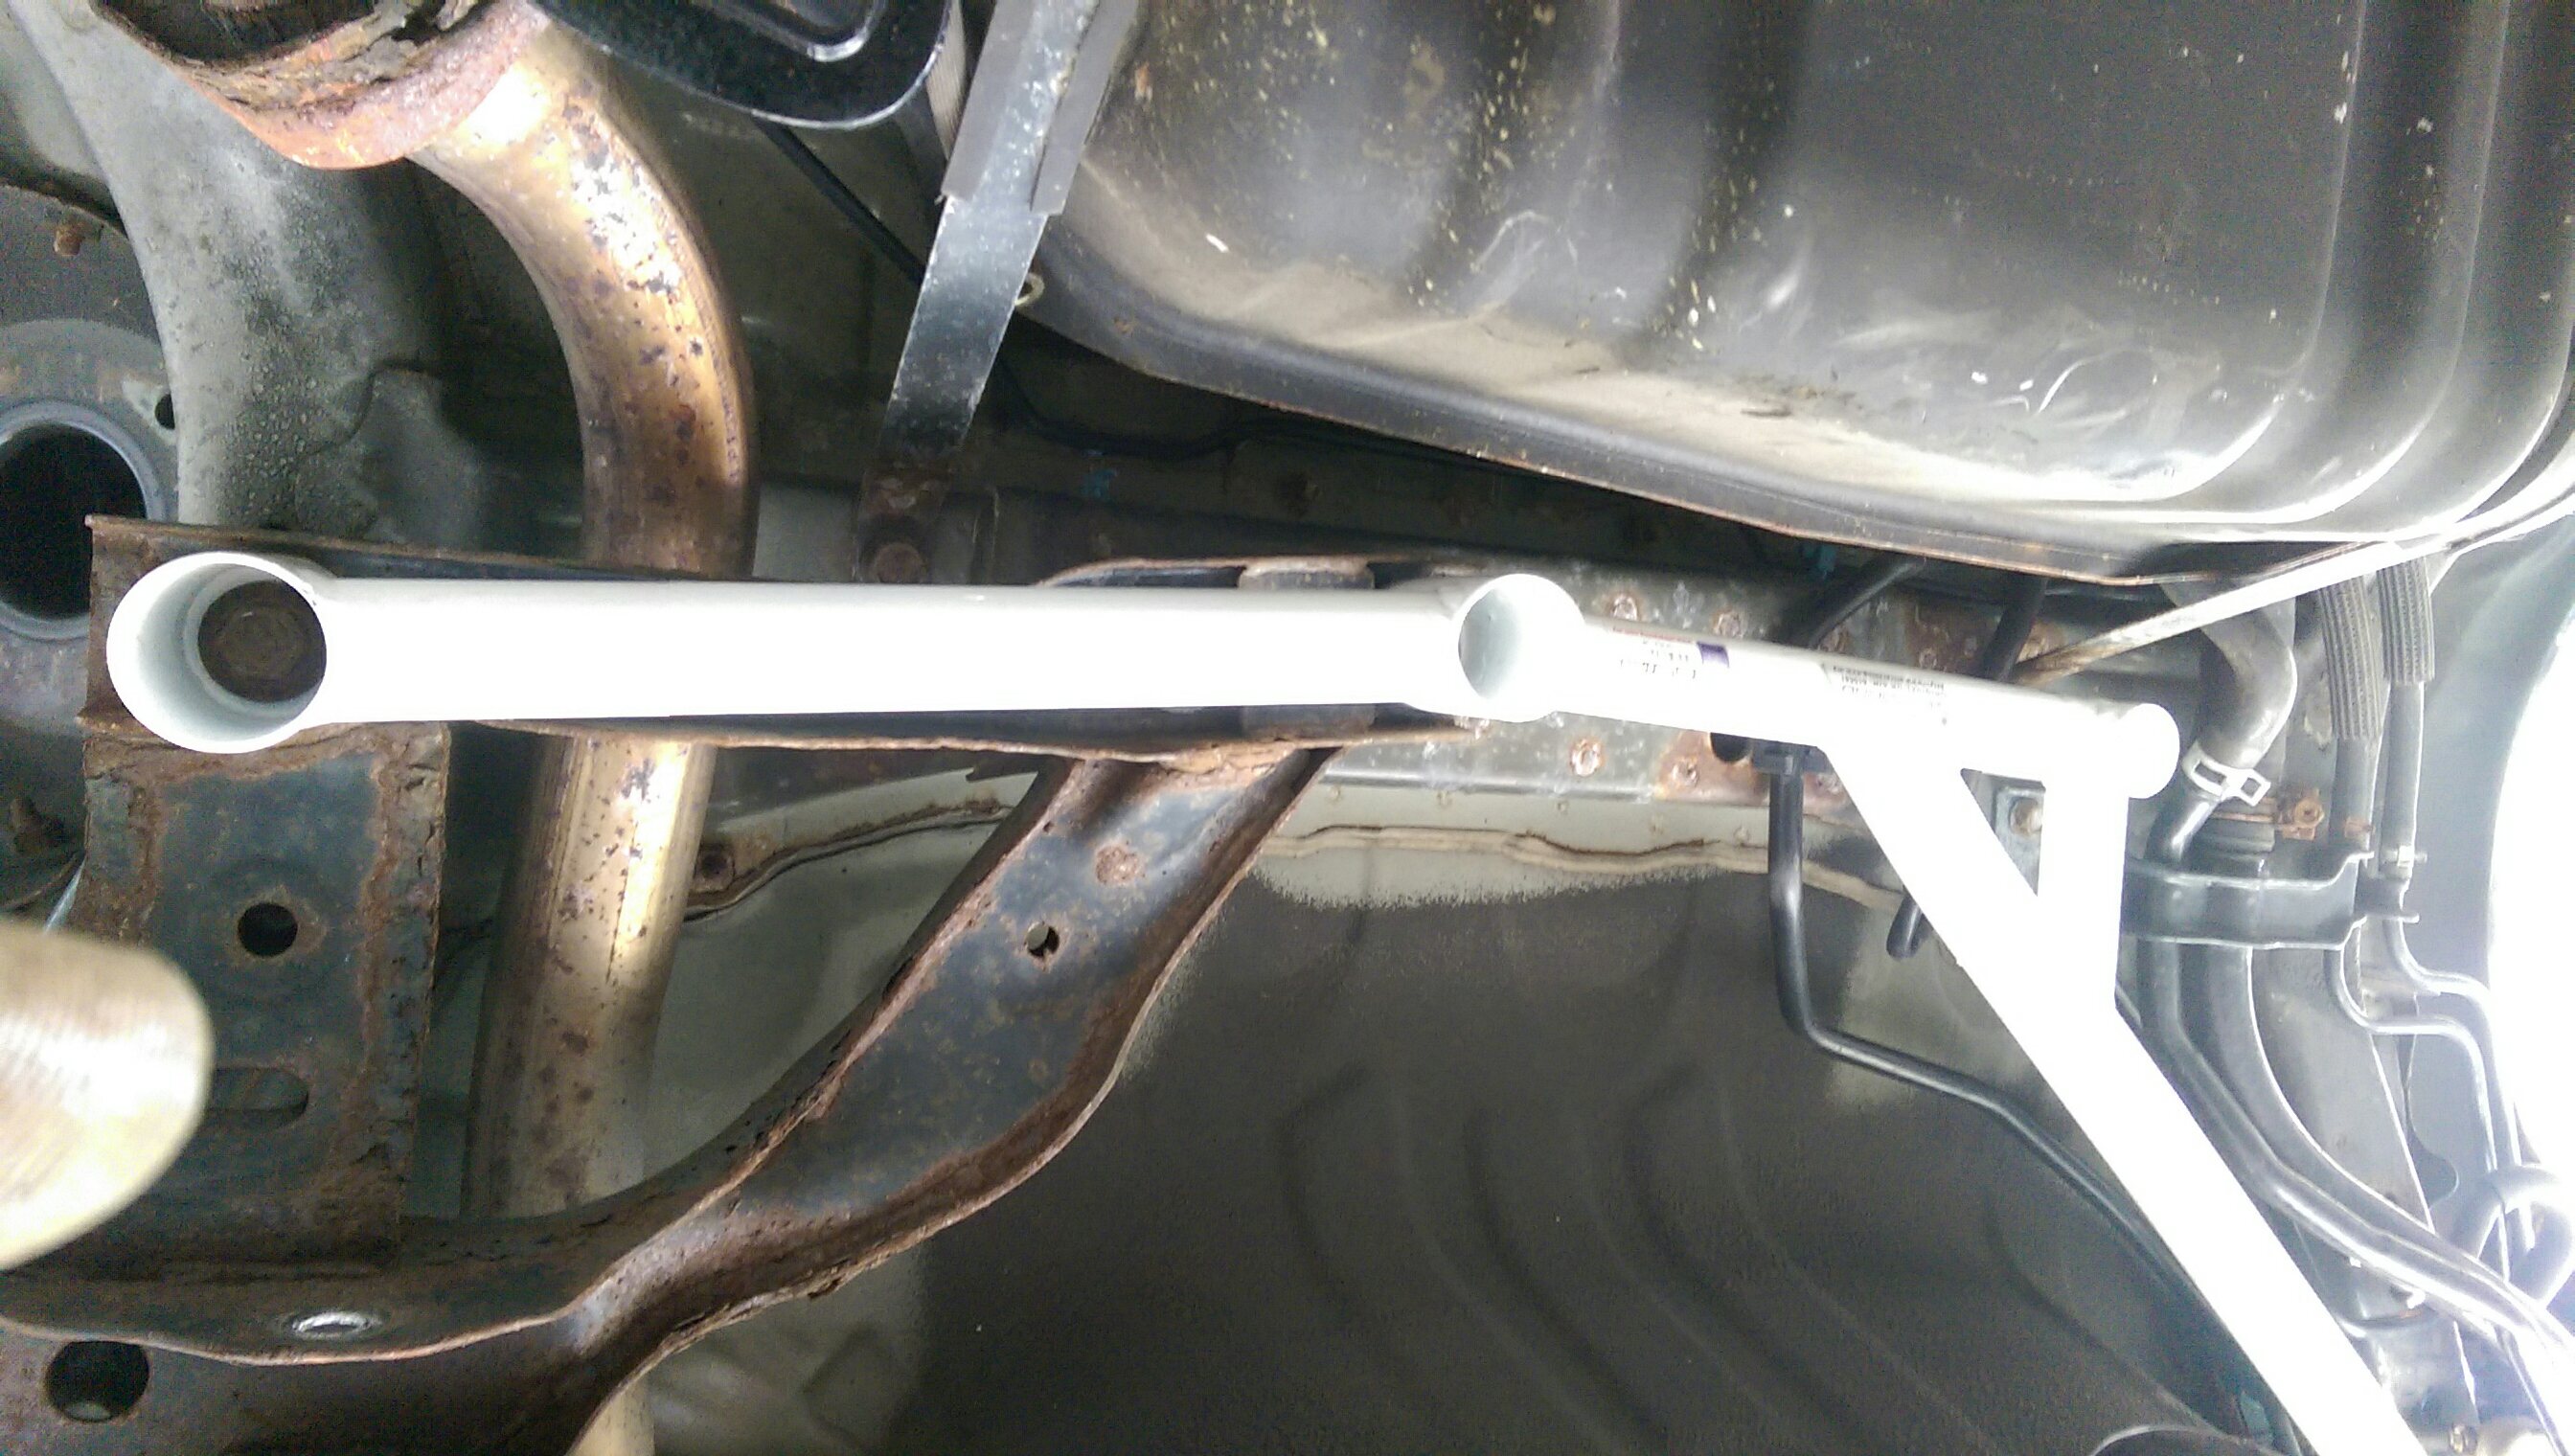
Installed pics first:
That bolt and the one next to it are sub-frame bolts, torqued at 80-85 ft/lbs IIRC.
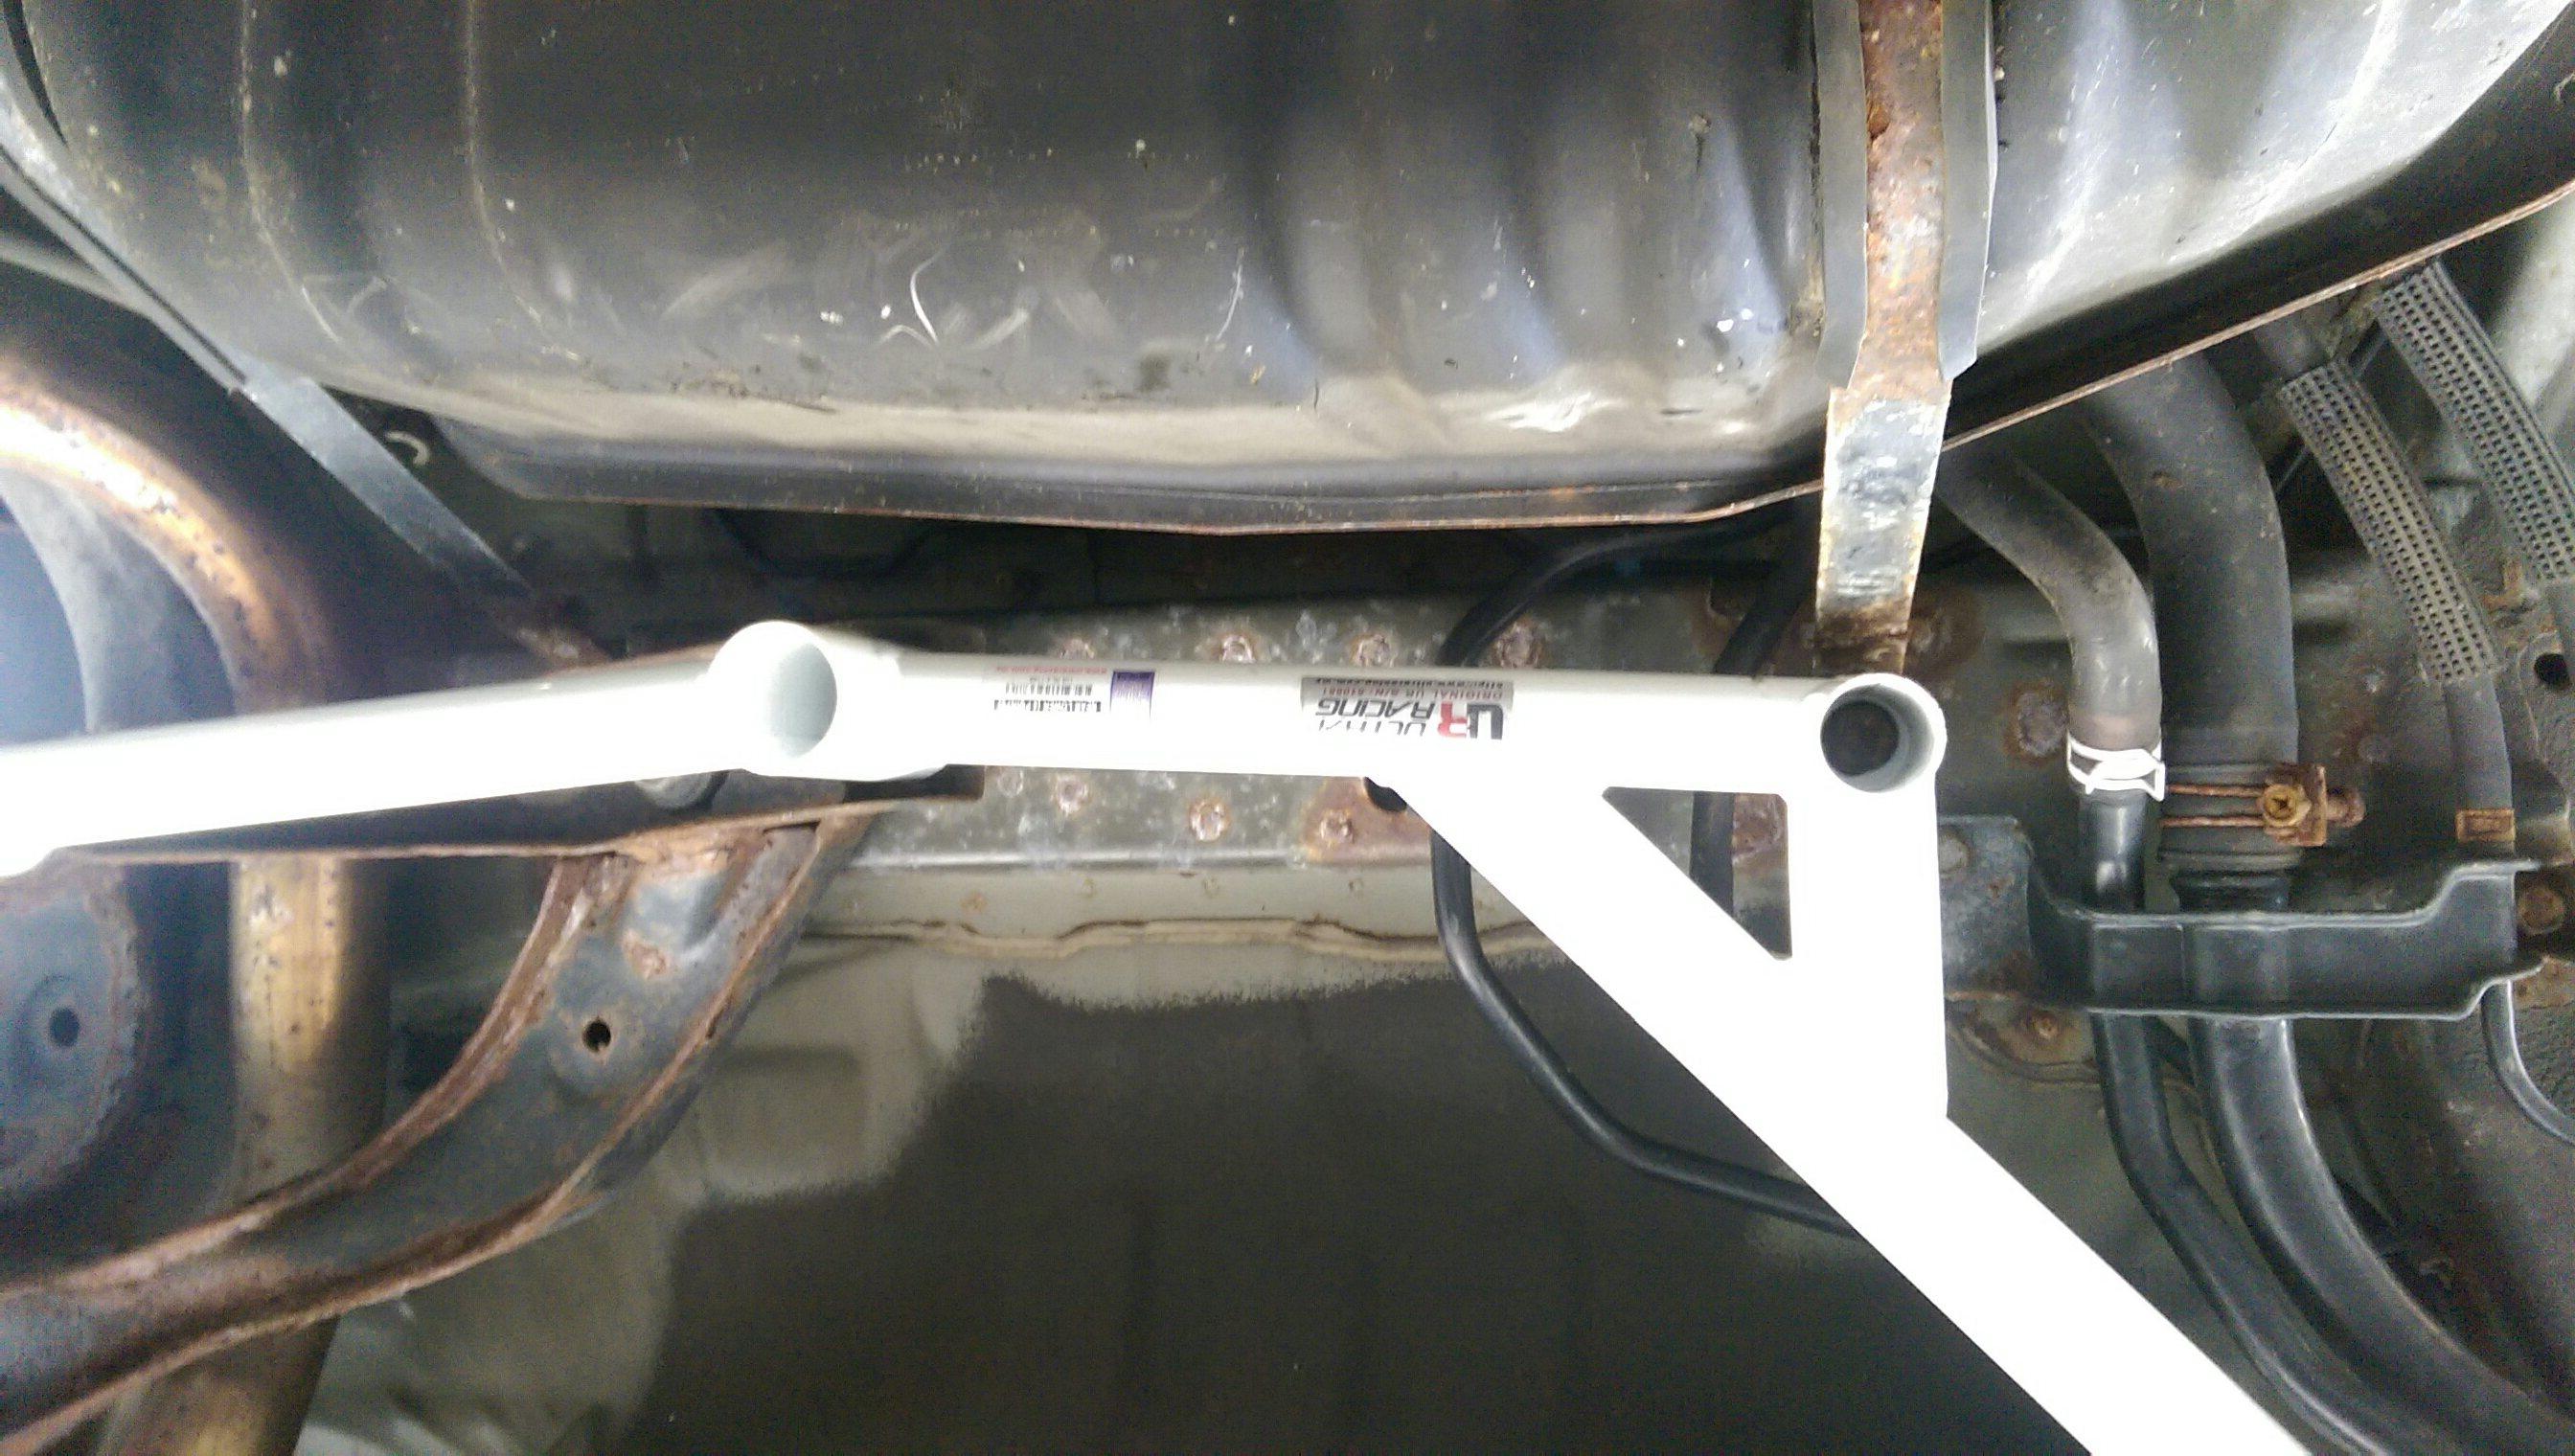
This bolt holds one of the two straps that holds the gas tank. I made the mistake of not checking the FSM at first while tightening......got to probably 50-60 ft/lbs before it felt like it was too much. Checked FSM and it's only like 30-35. Whoops. Had to re-do that one. I was so nervous that the gas tank was going to fall on me lol.
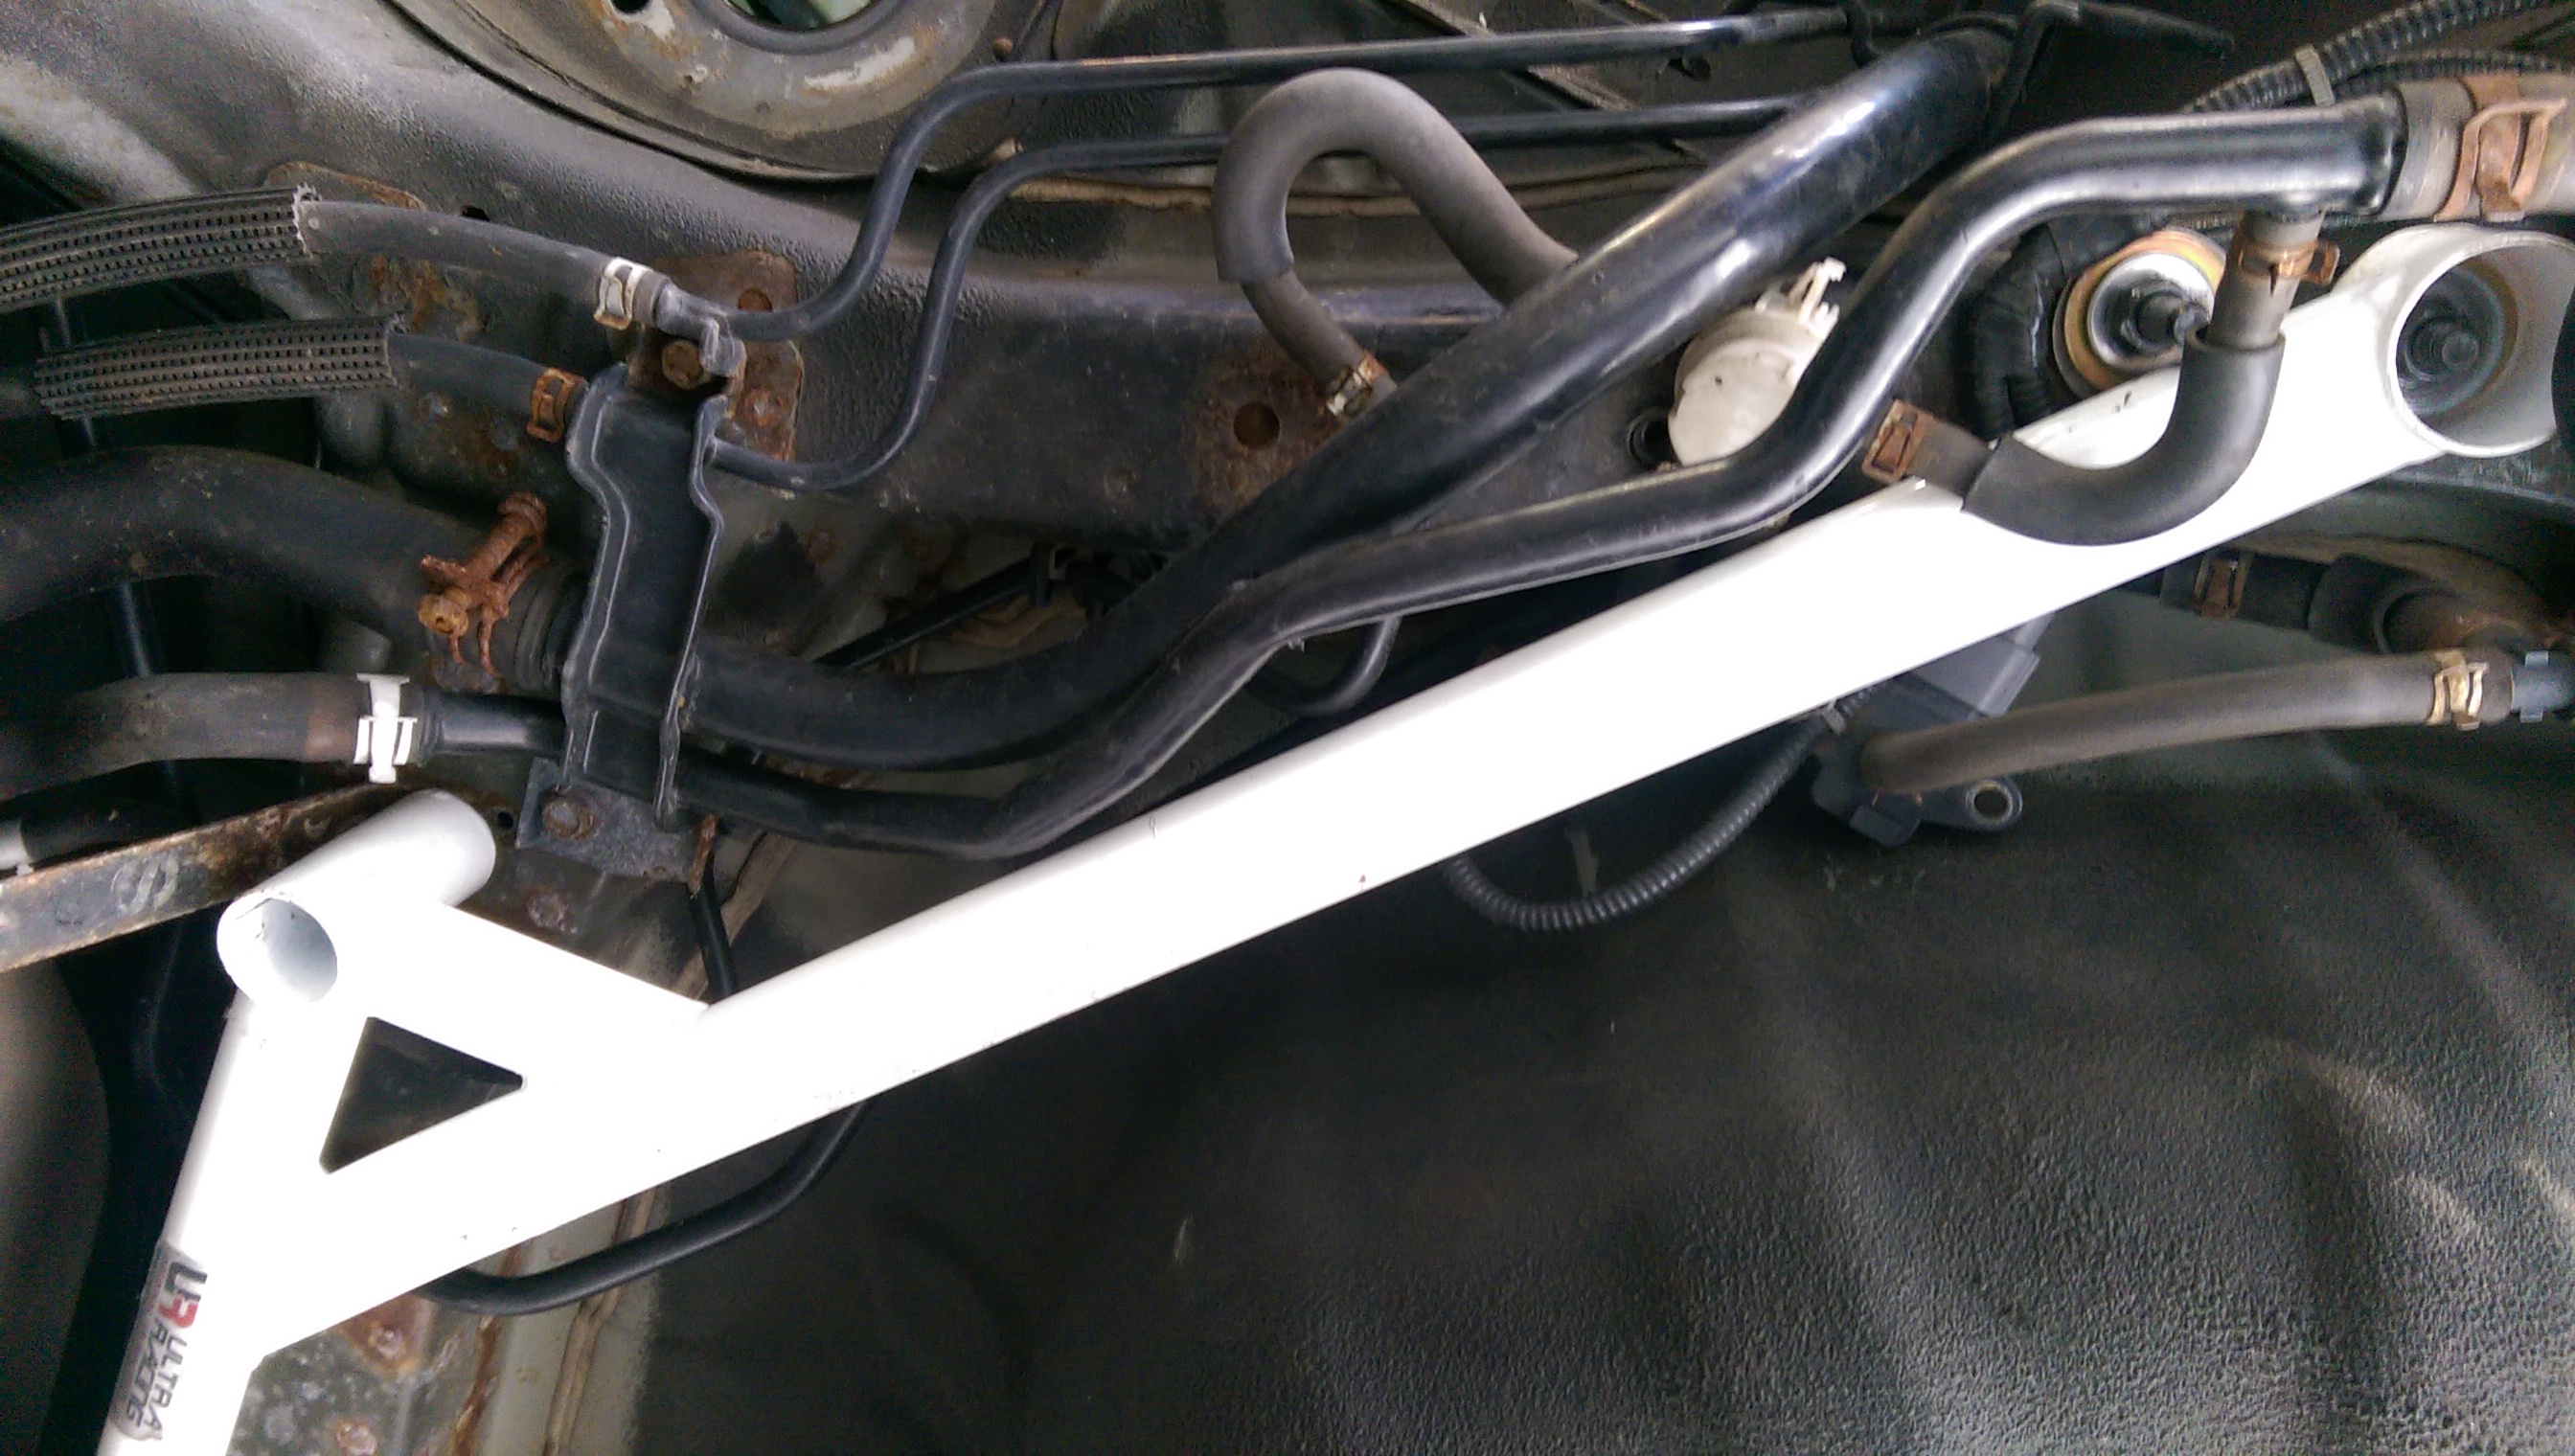
Those first 3 bolts were easy. This was the complicated part. Where the 4th bolt goes, there's a mess of vacuum hoses and a couple of wires & connectors bolted to a metal plate, right here:
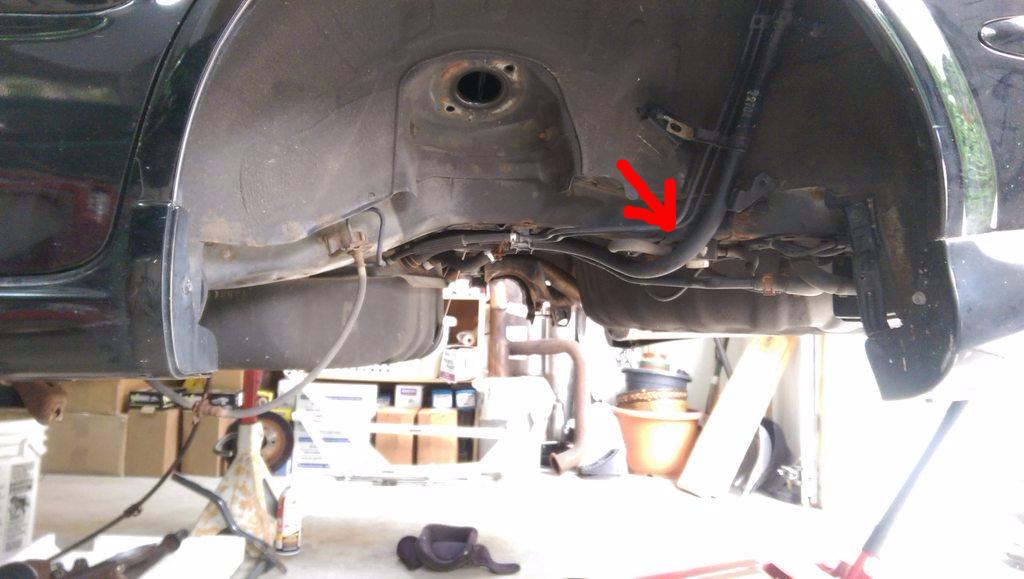
And you can't set up the bar in it's location until all that stuff is moved / adjusted. After staring at it for a while, I ended up just unplugging everything and removing the metal plate all together. I didn't see any way of keeping it. I re-connected all the hoses and wire connections after the bar was bolted on loosely.
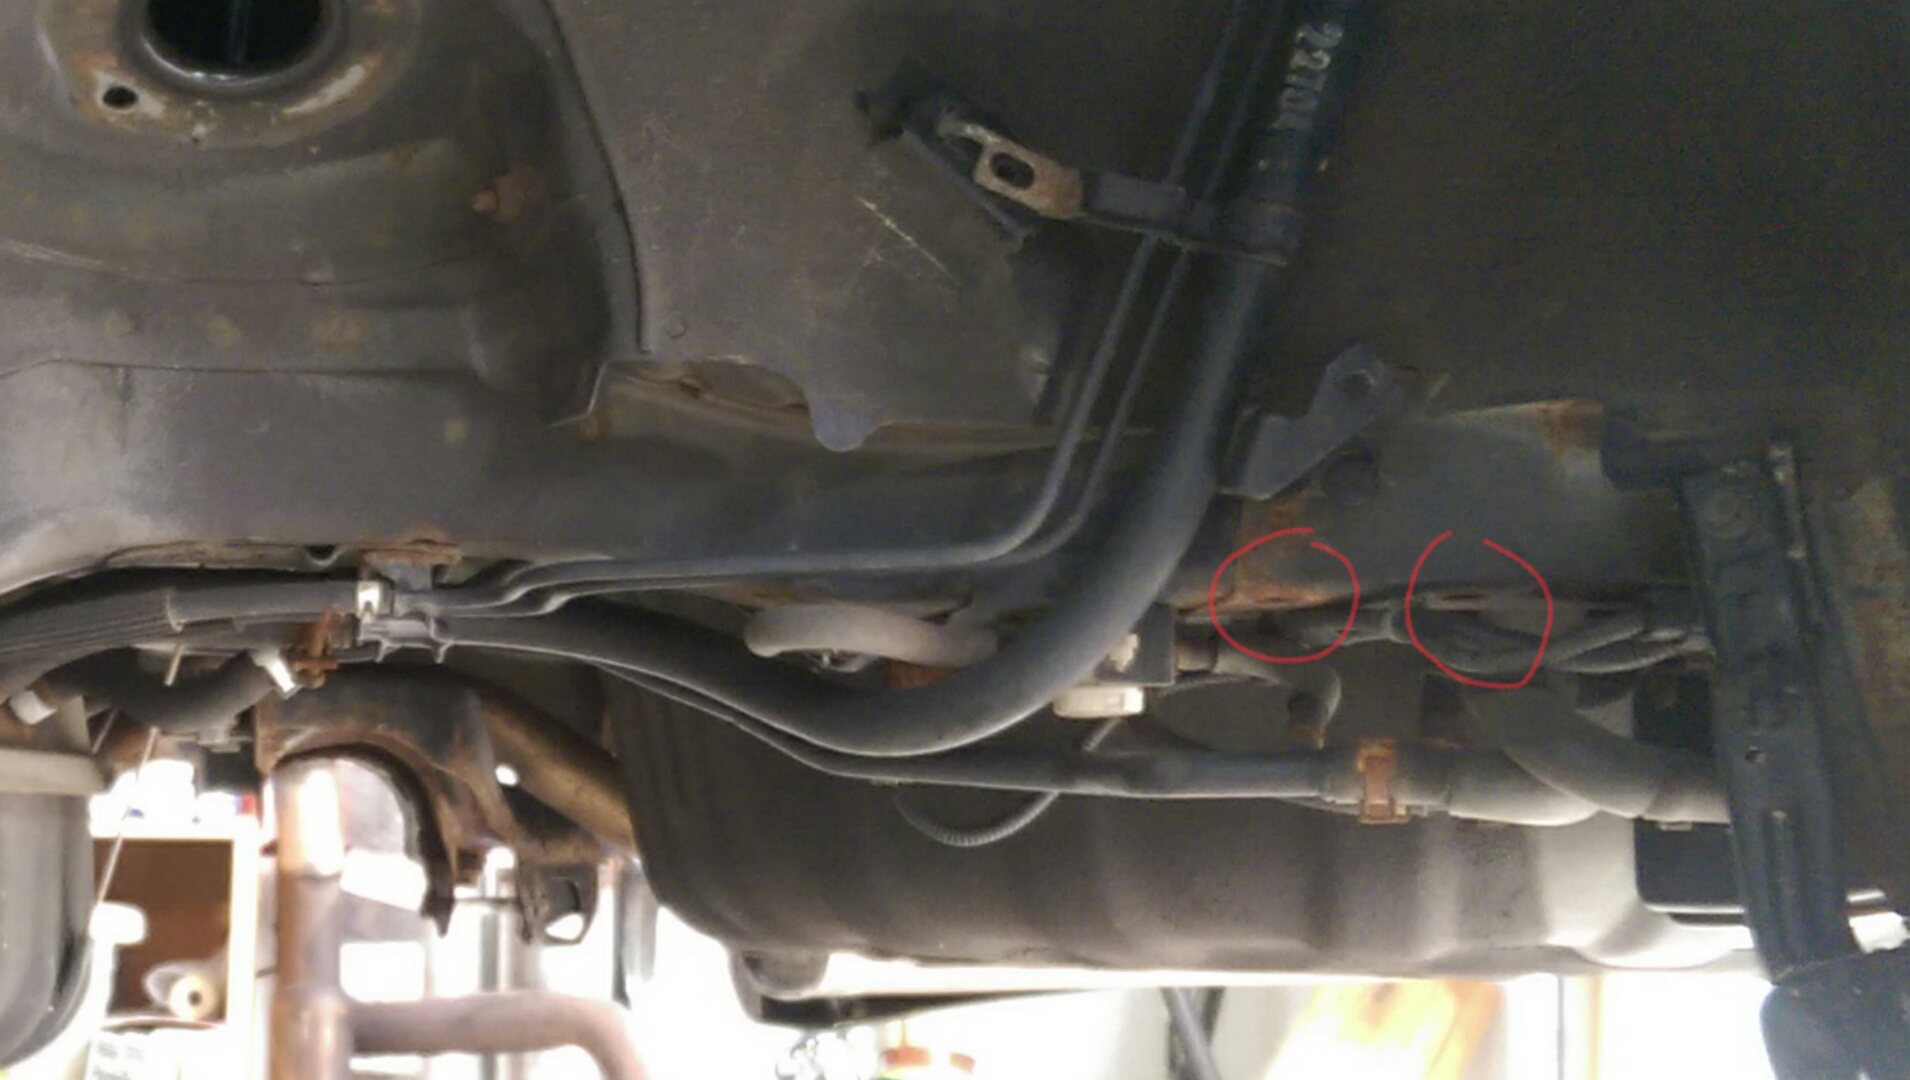
The kit comes with 2 more threaded bolts welded to a small piece of metal. Sorry didn't get any pics of it. It is meant to go into these two holes in the sub-frame:
However I had no idea how to get the thing inside the frame. More staring. Contemplating. Was a bit tough to figure out where the holes were from the bottom vs inside the trunk. Ended up chiseling away the black rubber matting under the trunk carpet, and cutting a hole through the trunk frame. Made it as small as possible. Just large enough to get the piece in there.
No way I could get even my fingers in there, and I was really worried I'd drop it and then have no way of getting it out......so I took a 3" deck screw and super-glued it to the middle of the piece. That allowed me to lower it into place from above. I realize that might not make any sense, but you'll see what I mean when you get there.
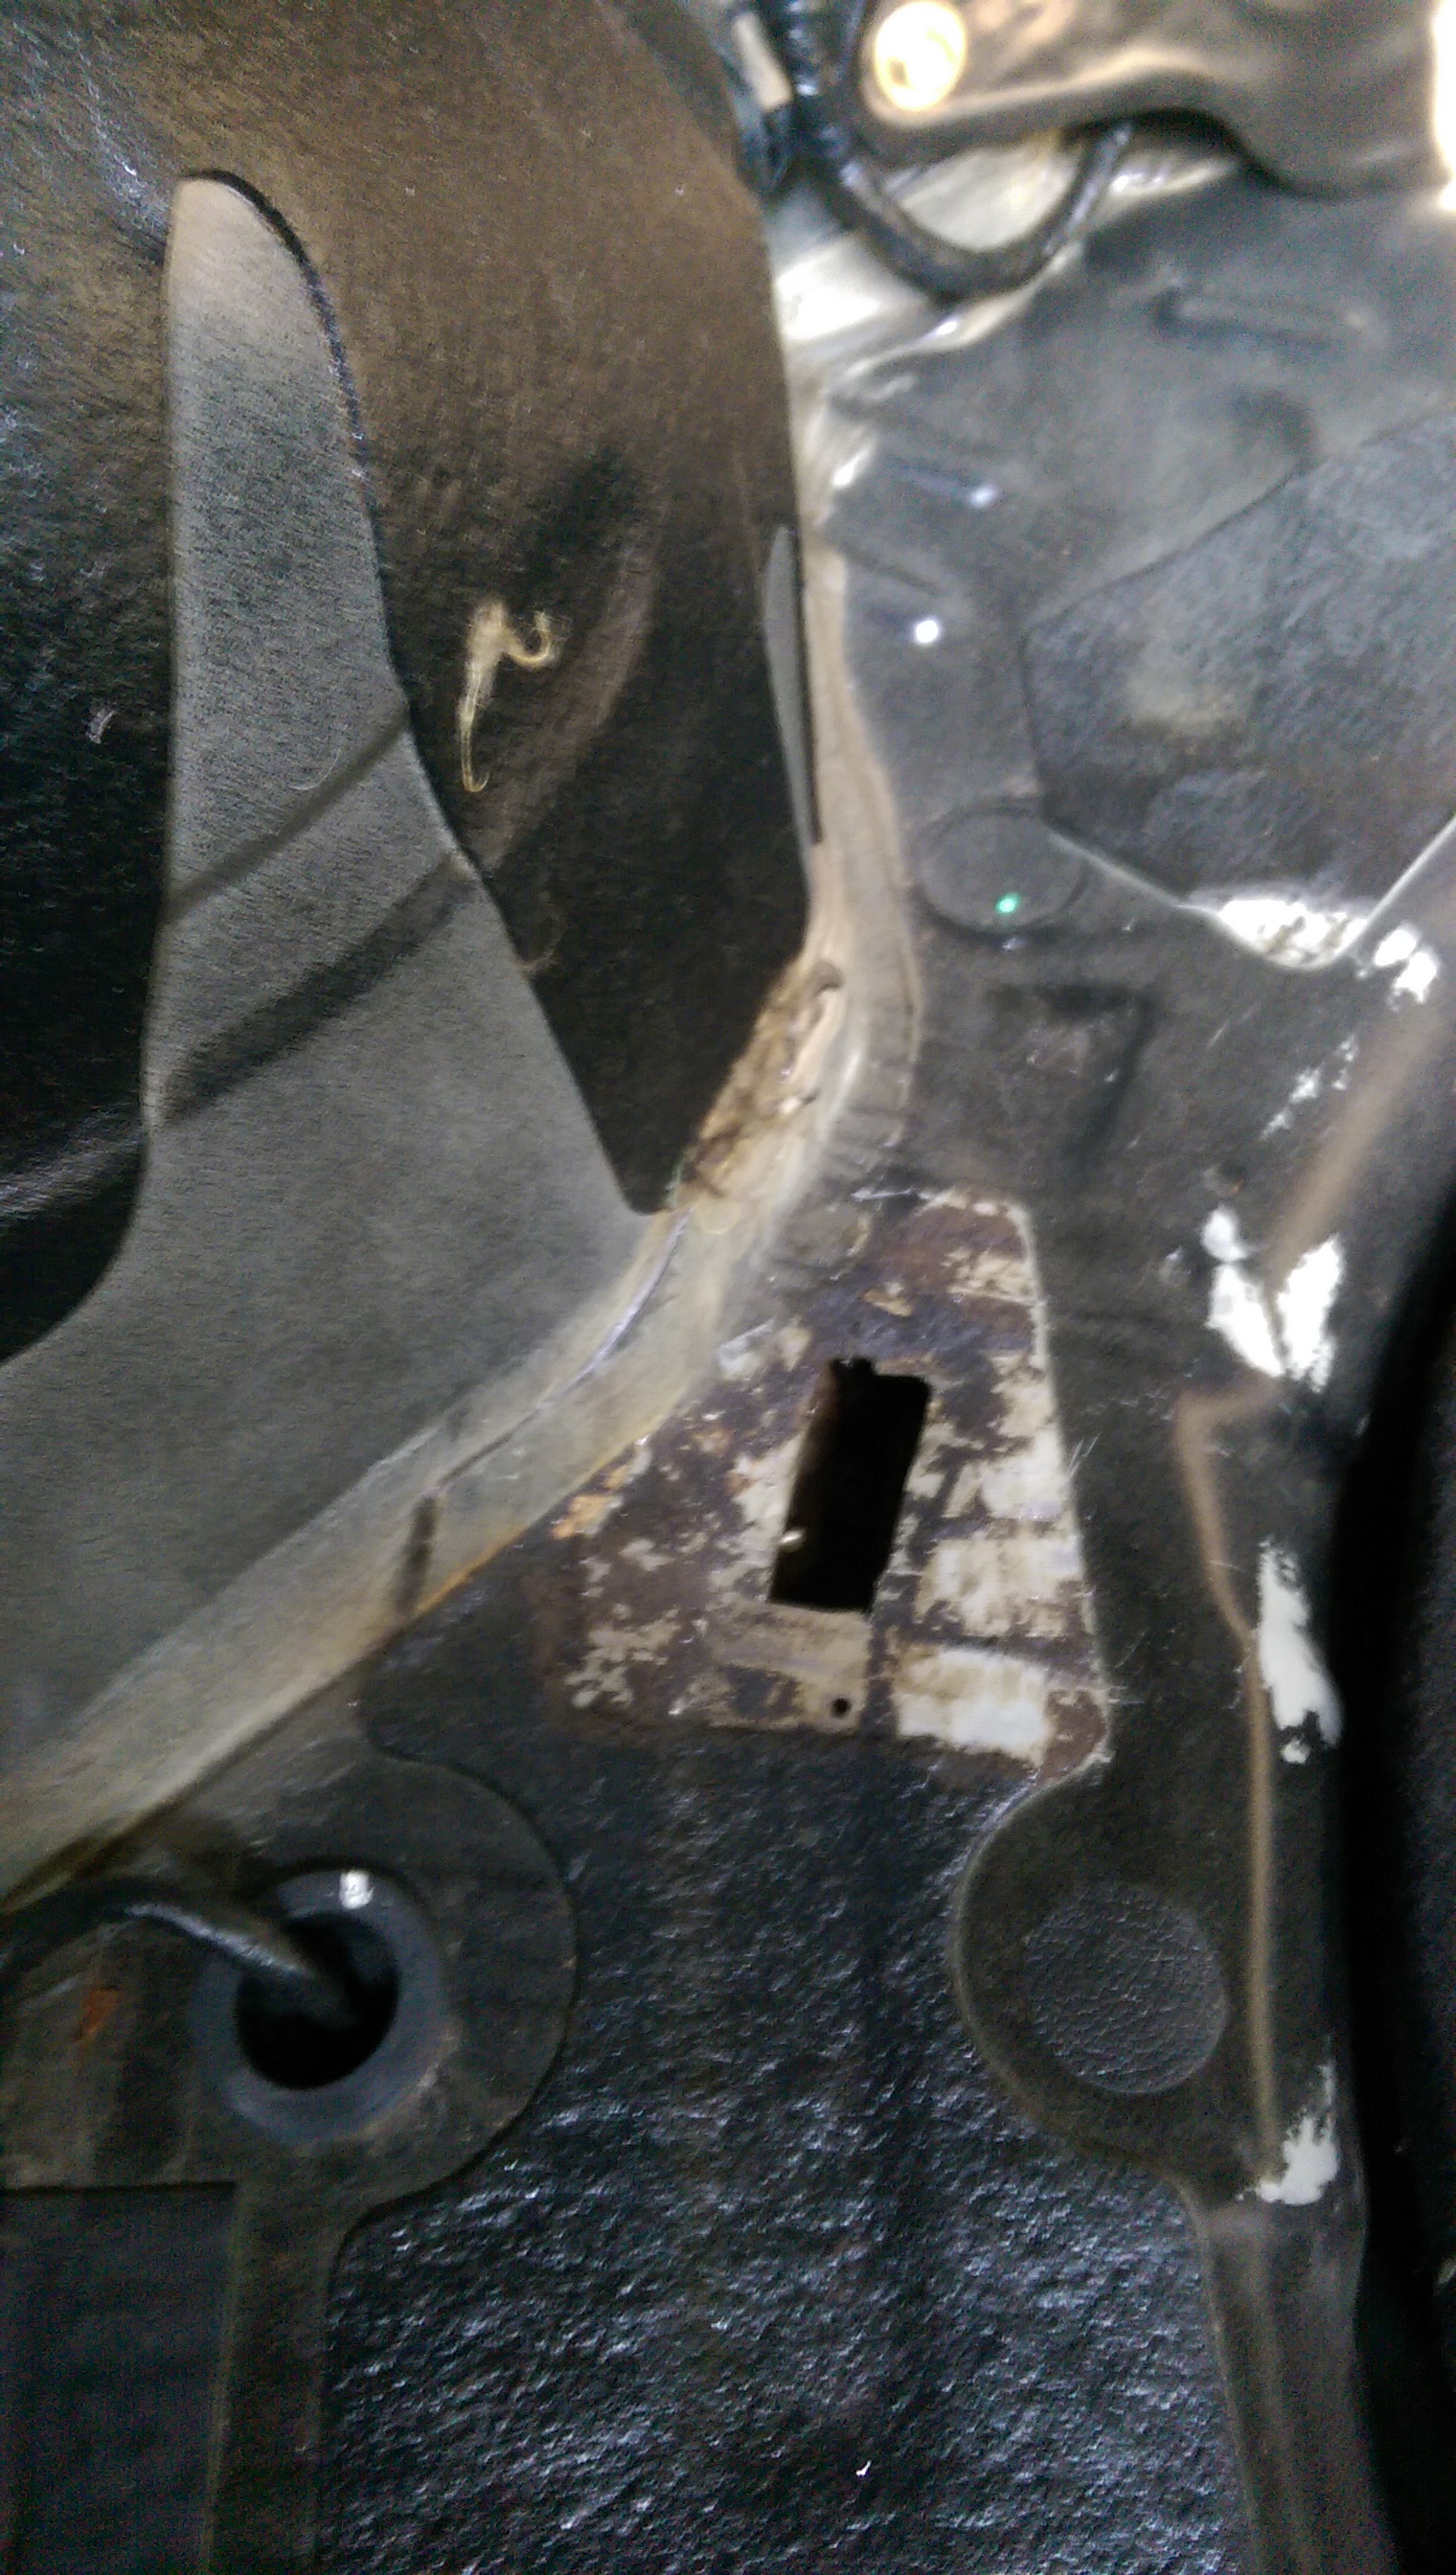
Of course, once I got it in there and broke off the screw holding the piece, I looked from underneath and the two threaded portions were just a hair too narrow for the two holes. Not quite centered. Which meant the metal piece wasn't being pulled all the way down towards the ground. Which meant those two nuts and washers wouldn't bolt on properly. So......... I had to re-superglue another 3" screw to the metal piece, and fish it back out from the hole. Then I took an angle grinder and opened the holes up in the frame just a little bit bigger (made the 2 holes slightly closer together).
From there I repeated the process, and was able to get the 1st set of washers and nut on. It was a bit tricky trying to get a couple washers plus a nut up onto the threaded bolt.....must have dropped them on my face at least 3 times. Then I re-did both nuts/washers a 2nd time as I forgot anti-seize the first time lol. Always goes faster the 2nd time around.
I thought I was done there, but nope. The bar was hitting the black metal tube that connects vacuum tubes to the gas tank. There are 2 tubes, and they are connected/joined by a 3"-4" piece of metal. So I took and angle grinder with a cutting wheel, and sliced them apart. From there, I just bent the tube out of the way by hand.
That was really the last piece of the puzzle. After that, the bar bolted right up.
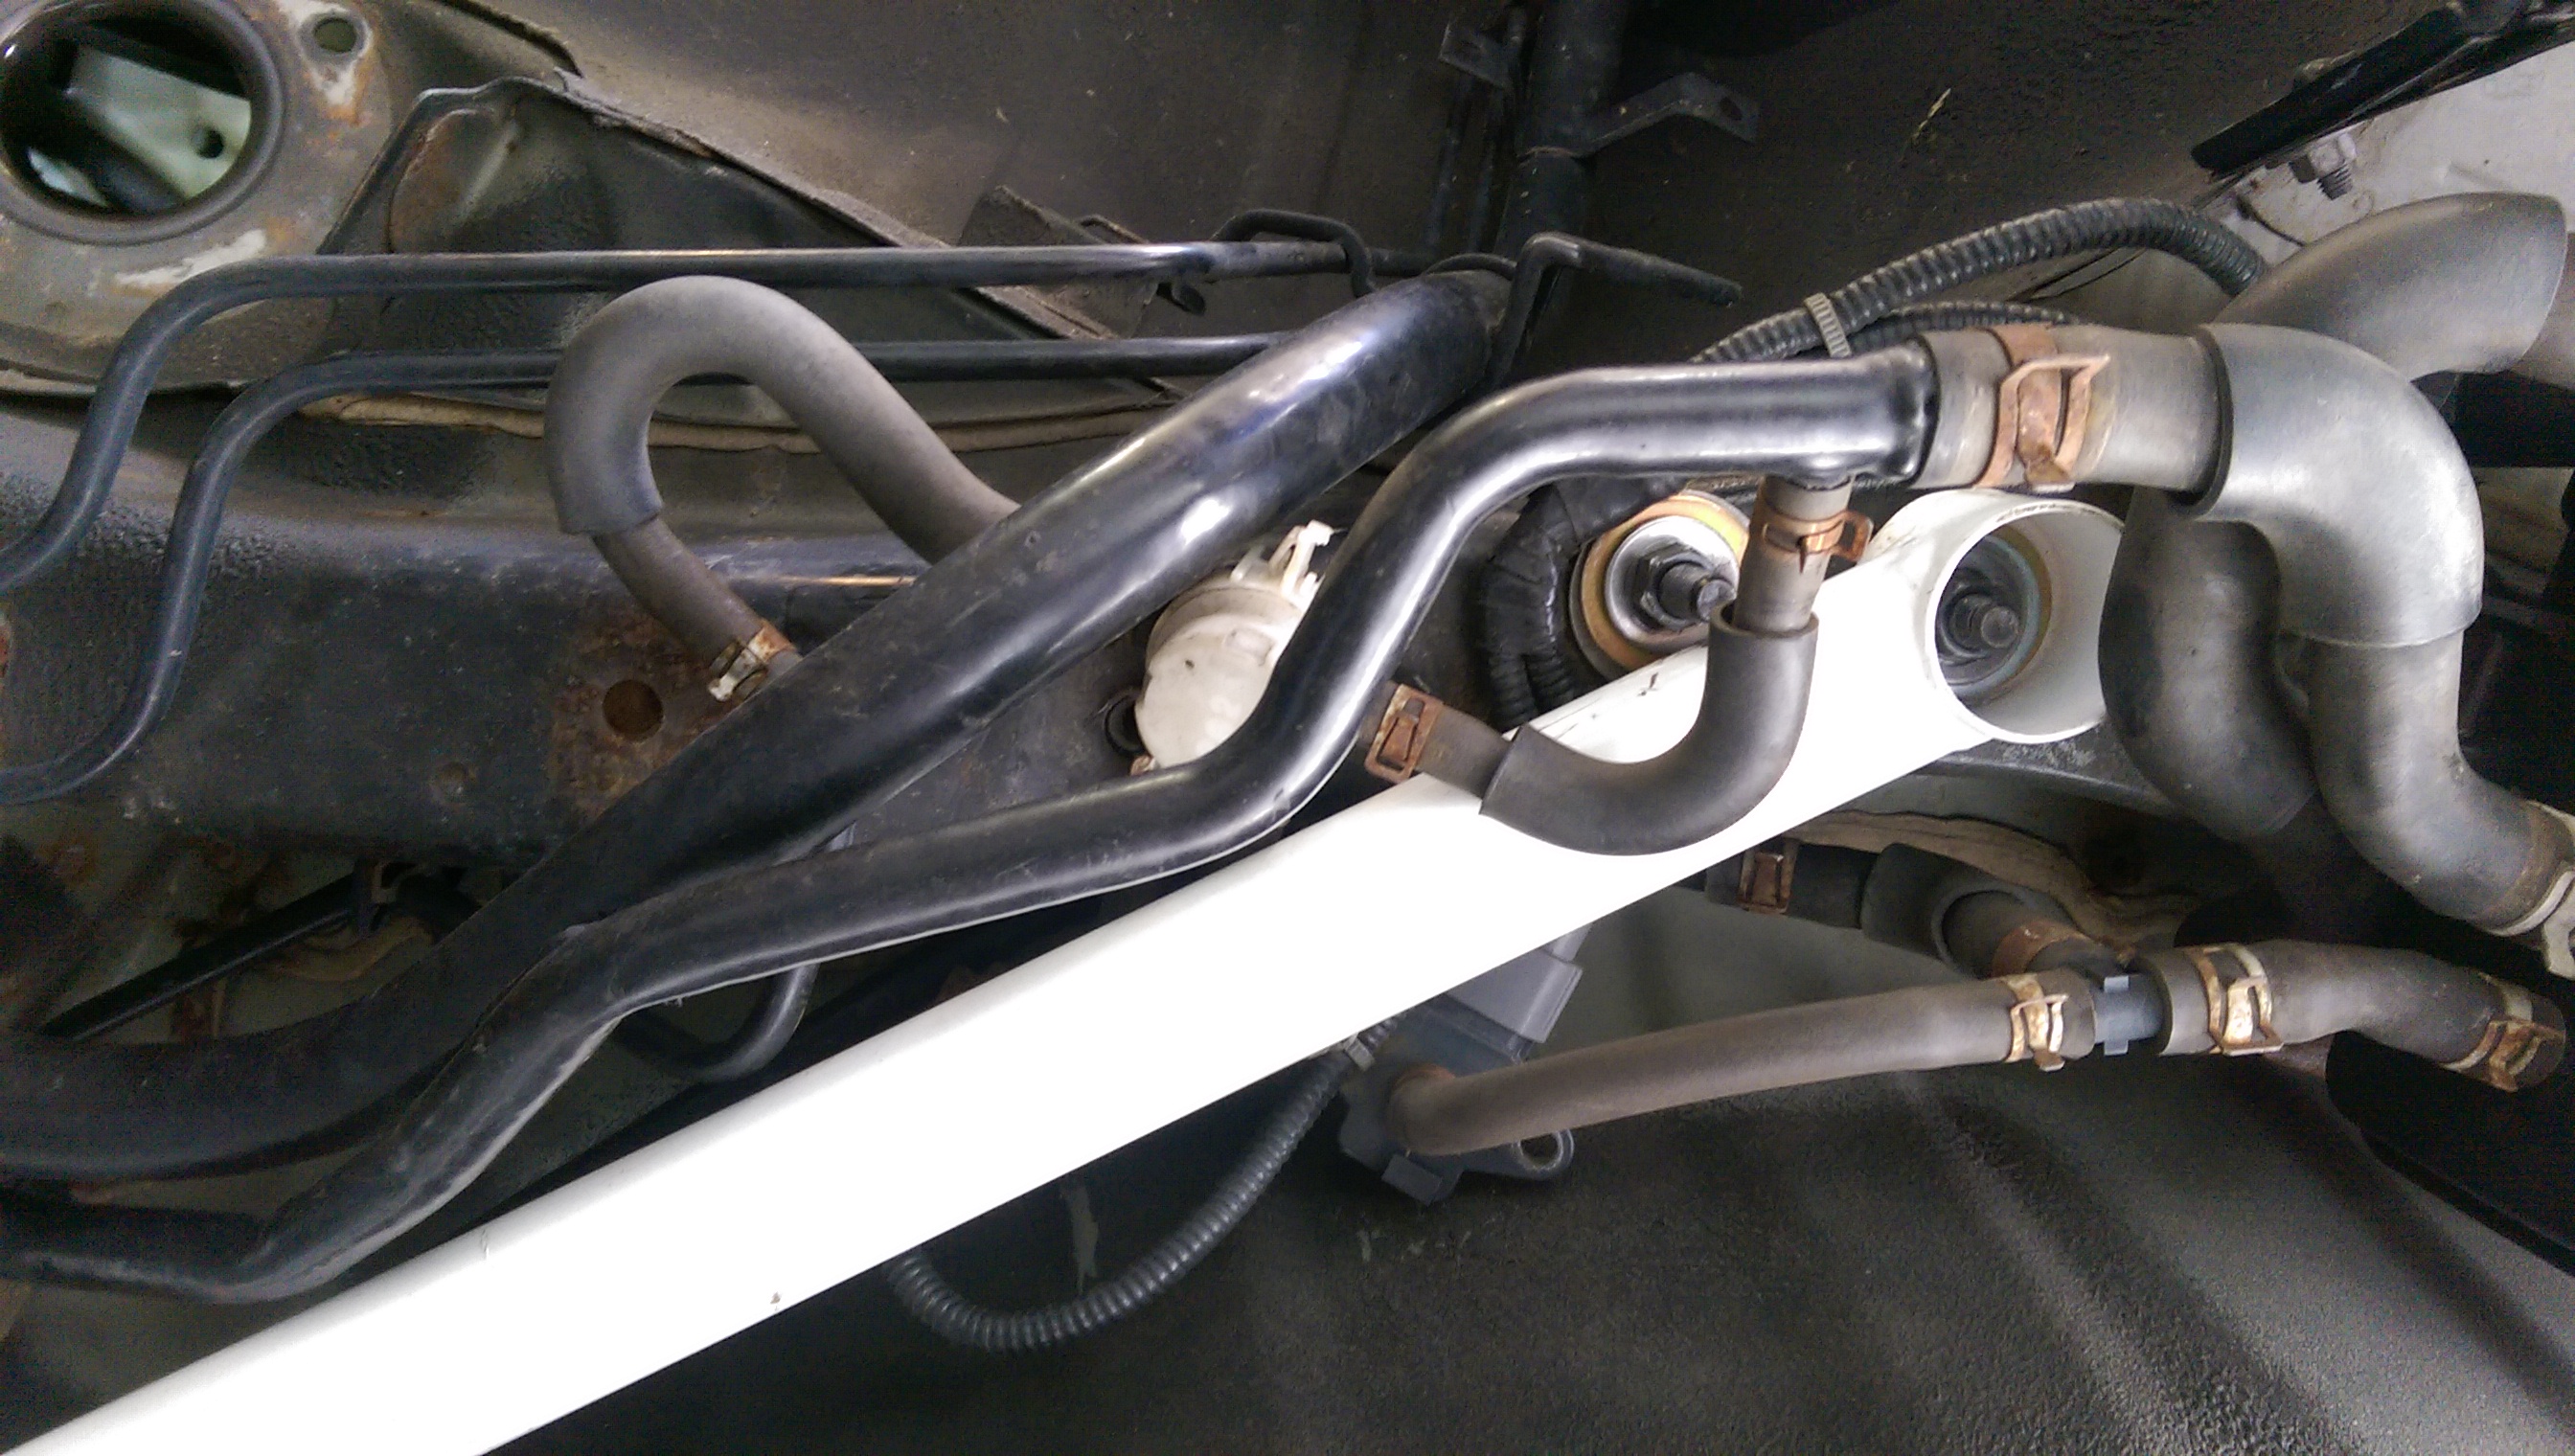
You can see how close that black metal tube is to the bar. And also that it's bent slightly under the other black metal tube. You can also see all the vacuum tubes and connections above the bar. I shoved as much of that stuff above it as I could. Figured better above than below. I'm not worried about the metal plate being gone, I don't think that stuff is going anywhere.
I probably should bend that metal tube a little farther away from the bar though......
So, yeah. That's it.
Car is still on stands and will be for a while yet, so no performance review for a while. It was fun putting it on though. I wouldn't hesitate to do it again.
I'm halfway done with the 4-pt trunk bar, will post pics of that next if anyone wants to see em.
09-27-2017, 04:39 AM
#33
thanks for the great right up man !! this would help any one thinking about it and trying to do it, you could even take this knowledge to a shop and have them do it. I actually had a shop install my Ultra Racing Lower Side bars. they came into small issues like you but nothing major. I remeber the special black self locking bolts that go into the subframe. There are no install instructions for our gen for these bars, and the shop was able to check out an install video of a civic, and learned how the black self locking bolts that rotate in place inside the subframe holes. ( i would have to draw it or look for my pre install pics for a better idea of these locking bolts)
this rear beam bar is very interesting !! thanks a ton for taking a chance and going for it, and props for getting it done . itseems right up my alley ! (love chassis stiffening, and these are nice because you can take them on and off)
def, post pics of any other bars if you can !
and honestly i am almost more interested in feed back ! what this thing does !!! hopefully you know your car well , and can notice the subtleties !
my side lower bars, have made my car so much better, solid, controlled, confident, and the rear (yes rear) feels way more connected to the front from the side lower bars
09-27-2017, 10:43 AM
#34
Junior Member
Join Date: May 2012
Location: Brandon, FL
Posts: 69
Thank you so much for doing this write-up! Your tips are very useful. I will be odering the rear bar probably very soon because you said it doesn't interfere with the exhaust in anyway. The pics are also very useful and I'm sure we all want to see pics and a write-up on the 4 point trunk beam! Thank you so much for sharing!!!! Can't wait to hear about feedback as well.
As for the 3 point side bars I hope they minor issues the shop went through to install the bar aren't that bad. Wish these parts came with instructions.
As for the 3 point side bars I hope they minor issues the shop went through to install the bar aren't that bad. Wish these parts came with instructions.
09-27-2017, 09:04 PM
#35
Hey guys no problem, it's fun sharing the info. Let us know if you decide to install it and how it goes for you. I'm very curious if you guys will notice any difference, especially since you already have other chassis stiffening bars.
For my car, I'm going from a 15 yr-old original oem suspension to everything brand new, all at once, so the difference that particular bar makes will be difficult to ascertain. However I'm guessing the overall difference will be drastic. I'm hoping I will like it lol.
I should mention, in the pics above I'm sure you've noticed that the rear beam is off the car (had it off to do the ES trailing arm bushings). But you can still install it with the rear beam on. I actually forgot to install the bar when I had the beam off, so I did it after I put the rear beam back on. It doesn't get in the way at all, just have to snake the bar in there at an angle, as the bar is pretty long.
I got the 4pt trunk bar installed tonight, so I'll post some pics of that install soon.

Thread
Thread Starter
Forum
Replies
Last Post
The Frye
7th Generation Maxima (2009-2015)
6
09-02-2021 11:03 AM
lowpost99
1st & 2nd Generation Maxima (1981-1984 and 1985-1988)
7
05-16-2021 11:18 AM
MaxLife17
8th Generation Maxima (2016-)
43
06-27-2019 01:37 PM