Rear Axle Beam/Trailing Arm Bushing Replacement So Far
 08-13-2012, 05:01 PM
#1
Junior Member
Thread Starter

Join Date: Oct 2010
Location: West Chester, PA
Posts: 87
Rear Axle Beam/Trailing Arm Bushing Replacement So Far
Like many, my TA bushings died. I decided to tackle the job myself. I bought a salvage yard beam and replaced the bushings - that was somewhat challenging but not too bad.
I then went to put it on my car...
First Hour - Wheels off, calipers off, brackets off, Shock bolts off and then.....
Hours 2 - 8 or so.....remove trailing arm bushing bolts. Holy **** has it has been a *****. The bolts were completely seized up. I used all the tricks I knew but they weren't enough. The bolts are inaccessible to an impact gun or air ratchet. I used a two foot breaker bar, torch, a gallon of PB Blaster and NADA!. Finally I had to saw them off with a sawzall. I must have used about ten blades getting both bolts out.
I still haven't tried to loosen the two bolts holding the beam to the lateral link - I'm hoping that goes a bit easier. At least they are a bit more accessible.
The other thing I noticed is that the rear calipers I replaced less than a year ago are already heading south quickly. WTF is it with the Maxima's rear brakes? It seems something allows them to rust up and seize up rather easily. Anyway - good luck if you choose to take this on, make sure you have a lot of tools and some experience with difficult fasteners.
 08-14-2012, 04:53 AM
#2

Thanks for the writeup. Good luck 
As for the rear calipers, my experience is that it's not the calipers themselves, it's the slide pins that go into the torque member that sieze up. I typically slim them up ever so slightly on a bench grinder, and problem solved
As for the rear calipers, my experience is that it's not the calipers themselves, it's the slide pins that go into the torque member that sieze up. I typically slim them up ever so slightly on a bench grinder, and problem solved
08-14-2012, 10:13 AM
#3
Junior Member
Thread Starter
Join Date: Oct 2010
Location: West Chester, PA
Posts: 87
Today I got the salvage beam with the new bushing put on, I just have to wait for the trailing arm bolts and nuts to arrive from Courtesy Parts.
Thus far I would say I have about 12-16 hours of time into this job. I could do it a lot faster the next time, but it still wouldn't be easy. I figure I saved myself between $700-$1000 doing it myself, so I guess I can look at it that way. Nissan obviously didn't think about the long term joy their bushing design would bring to us who still own the car ten years down the road....
08-14-2012, 10:24 AM
#4
Junior Member
Thread Starter
Join Date: Oct 2010
Location: West Chester, PA
Posts: 87
PS
Also, if anyone else wants an axle beam for the same purpose, I have the one I took off my car. It's in pretty good shape for the age but obviously you'll have to replace the bushings on it yourself. I'll sell it to you for half of what I paid for the salvage part ($70 is your cost). You need to be fairly local b/c I'm not shipping this thing.
08-16-2012, 04:56 AM
#5
Senior Member

Join Date: Feb 2012
Location: Bronx, NY
Posts: 973
Also, if anyone else wants an axle beam for the same purpose, I have the one I took off my car. It's in pretty good shape for the age but obviously you'll have to replace the bushings on it yourself. I'll sell it to you for half of what I paid for the salvage part ($70 is your cost). You need to be fairly local b/c I'm not shipping this thing.
08-16-2012, 06:00 AM
#6
Also, if anyone else wants an axle beam for the same purpose, I have the one I took off my car. It's in pretty good shape for the age but obviously you'll have to replace the bushings on it yourself. I'll sell it to you for half of what I paid for the salvage part ($70 is your cost). You need to be fairly local b/c I'm not shipping this thing.
08-16-2012, 06:16 AM
#7
Junior Member
Thread Starter
Join Date: Oct 2010
Location: West Chester, PA
Posts: 87
Also, I found out that the trailing arm bolts are back-ordered everywhere. My car is sitting on jack stands in the driveway and looks incredibly redneck. Oh well, my wife will have to understand that I saved us like $800 doing it myself. I'm off to a Fastenal store today to see if I can get replacement bolts without waiting any longer (I had to sawzall the original bolts as they were seized).
08-16-2012, 06:27 AM
#8
Should be a standard size/length/thread pitch. I've been able to find everything I need between Lowes, Home Depot, or Ace hardware if neither have it. Ace even has hardened hardware which is awesome.
08-16-2012, 08:08 AM
#9
Ace is the place! They have saved me time and again for fasteners on my Maxima. They have quite the assortment.
08-17-2012, 09:42 AM
#10

when i was working on my rear diffuser last weekend, I noticed my driver side Trailing arm bushing leaking.... ugh.. and after reading this thread it answered my immediate questions..on what was exactly leaking.
heres a few nice threads i found in 5 mins
http://forums.maxima.org/5th-generat...-bushings.html
http://forums.maxima.org/5th-generat...e-bushing.html
I have to ask what will happen if I let it go for a while?
I honestly haven't notice much of a difference driving. With illuminas set on 5 back there its... always stiff.
08-17-2012, 11:02 AM
#11
more nice threads while im at it.
http://www.digitalpolo.com/2002Maxim...hing%20Set.htm
http://forums.maxima.org/5th-generat...view-pics.html
someone asked my question there about letting it go, but it didnt get answered.
and a general ES install thread
http://forums.maxima.org/5th-generat...lled-pics.html (still can't believe he sold that car so quickly)
Dang... this problem has PITA written all over it. Though I am anxious to recognize any benefits on using the ES bushings.
Heres a very interesting approach that from irish which seems like a cheap & easy way out of actually replacing them
from this thread
http://forums.maxima.org/5th-generat...still-car.html
Any one have any insight on this liquid polyurethane hardener ?
http://www.digitalpolo.com/2002Maxim...hing%20Set.htm
http://forums.maxima.org/5th-generat...view-pics.html
someone asked my question there about letting it go, but it didnt get answered.
and a general ES install thread
http://forums.maxima.org/5th-generat...lled-pics.html (still can't believe he sold that car so quickly)
Dang... this problem has PITA written all over it. Though I am anxious to recognize any benefits on using the ES bushings.
Heres a very interesting approach that from irish which seems like a cheap & easy way out of actually replacing them
So I've been reading and reading, clearly I'm not the only one that has had this problem. Thanks to Nissan's engineering awesomeness, this part is not considered "servicable" so I'm looking at the ES aftermarket one's
The question is (and I've seen the question in other threads but no definitive answer):
Can these bushings be replaced without actually removing the entire axle/trailing arms?
The question is (and I've seen the question in other threads but no definitive answer):
Can these bushings be replaced without actually removing the entire axle/trailing arms?
short answer: anything can be done with enough ingenuity and tools.
long answer: no. You either need to get the bushing into a huge press, which would be difficult unless you have some kind of press that can go sideways, or you need to use the "burn and slash and chisel" method to get the bushing out of the collar - a big job even with the axle off the car and would be nearly impossible to do on the car.
It's not terribly difficult to take the axle off the car, so go get a cheap junkyard axle, spend a frustrating saturday getting the nasty old bushing out and pressing an Energy Suspension bushing in (they do make them), and then reinstall the axle. Get some buddies to help.
There is a how-to somewhere here on the org about how to do this, but you'd have to search to find it...it was a few years ago he posted it.
Other option that I haven't seen done on this part but could work: liquid poly/urethane. Since the original fluid has leaked out, you'd need to cut out some of the bushing and then pump in some liquid polyurethane that would then harden and turn the original bushing into a solid bushing rather than liquid.
This is the way that someone here (I forget who) makes upgraded 5th gen shifter bushings. Search around, I forget who it is.
http://forums.maxima.org/5th-generat...still-car.html
Any one have any insight on this liquid polyurethane hardener ?
08-17-2012, 11:29 AM
#12
As for letting it go, unless it gets REALLY bad where your trailing arm is clanking around, you probably won't notice it that much that it's not performing optimally.
However when you do eventually replace it, you'll feel a world of a difference. I'm a believer in ES's poly bushing lineup for our cars.
Liquid filling is a decent secondary approach to full ES bushings, however it's still a bushing that's partially rubber. And who knows if you'll be able to get the center hole perfectly centered within the bushing.
Last edited by djfrestyl; 08-17-2012 at 11:31 AM.
08-17-2012, 05:38 PM
#13
Junior Member
Thread Starter
Join Date: Oct 2010
Location: West Chester, PA
Posts: 87
As for letting it go, unless it gets REALLY bad where your trailing arm is clanking around, you probably won't notice it that much that it's not performing optimally.
However when you do eventually replace it, you'll feel a world of a difference. I'm a believer in ES's poly bushing lineup for our cars.
Liquid filling is a decent secondary approach to full ES bushings, however it's still a bushing that's partially rubber. And who knows if you'll be able to get the center hole perfectly centered within the bushing.
However when you do eventually replace it, you'll feel a world of a difference. I'm a believer in ES's poly bushing lineup for our cars.
Liquid filling is a decent secondary approach to full ES bushings, however it's still a bushing that's partially rubber. And who knows if you'll be able to get the center hole perfectly centered within the bushing.
I consider myself halfway decent mechanically and I have air tools, etc... and it took me a long time. Since it IS such a difficult job, it's best to buy a salvage beam and change the bushings on it rather than the one on your car.
A couple of things I did differently than the digital polo site write up...
* I didn't need to burn anything out, I was able to remove the original bushings by drill, shears and chisel, I then used a wire wheel to clean out the void and an air grinder to grind down the ridges on the edge of the the bushing seat.
*I didn't use the exact same method to press in my new bushings, you can get creative here. You WILL need a PVC pipe or some other cylinder that fits over the bushing so that the bushings can be pressed in & out.
*My car is still sitting on jack stands b/c as stated earlier in my thread I had to cut off the trailing arm bolts with a sawzall. The bolts are backordered at Courtesy Parts and you can expect to wait a over a week to get them in the mail. Luckily we have an "extra" car I can use while mine is laid up, otherwise that would have been a HUGE problem. I did check at Home Depot, Ace and Fastenal and nobody has a similiar bolt. The specs on those bolts are the following : Flange head, stainless steel. Specs are: 12M-1.25 x 90 (i think).
I'm guessing a mechanic will charge something close to $1000 to do it for you and maybe half that if you just have him swap out your repaired axle for the broken one. Any way you look at this situation it's no fun, but at least once it's done it's done....
Last edited by Maxident; 08-17-2012 at 05:40 PM.
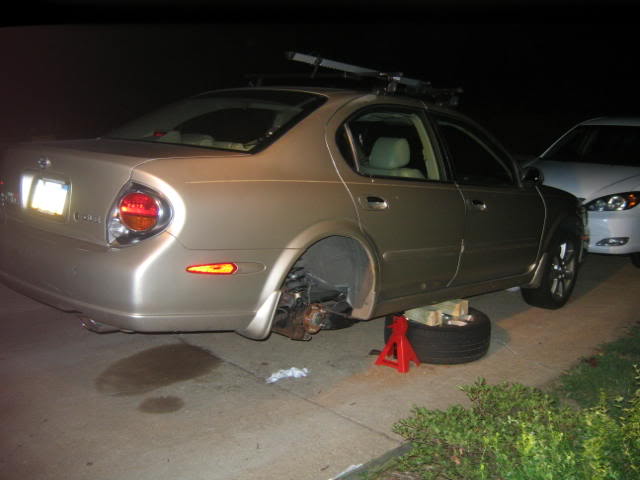 The pride of the neighborhood.
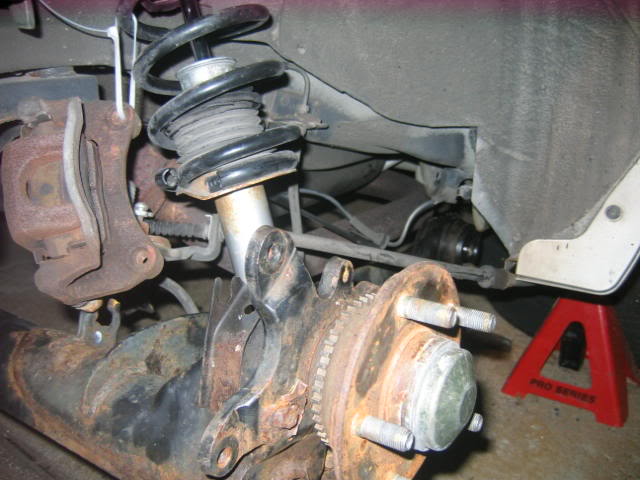
 08-20-2012, 08:24 AM
#19
Junior Member
Thread Starter
Join Date: Oct 2010
Location: West Chester, PA
Posts: 87
It's a nut splitter, I could have just broken the nuts off the bolts instead of sawing through the bolts. The bolts were ordered from Courtesy on 8/13, still haven't been mailed to me. Don't saw through the bolts if you're doing this job!
08-22-2012, 07:13 AM
#22
Junior Member
Thread Starter
Join Date: Oct 2010
Location: West Chester, PA
Posts: 87
Well, as I go on my 8th day of waiting for Courtesy Parts to even SHIP the bolts, I wish I had done the same. Of course I had never done this job before and had no idea I might have to cut them off. Live and learn I guess....
 08-22-2012, 10:29 AM
#24
Though the $1 cans are great (home depot also has em, and I too use them for random projects), for something like this I'd spring for something better than the $1 cans. Rustoleum would be my choice.
08-22-2012, 10:41 AM
#25
 Totally agree. Just want to stir peoples minds.
  08-22-2012, 04:02 PM
#26
Junior Member
Thread Starter
Join Date: Oct 2010
Location: West Chester, PA
Posts: 87
Might as well, it's going to be a few more days anyway.. Maybe I'll get some caliper paint and do those too - how about bright yellow?! Just kidding, the blandsmobile effect would be ruined if I used something like bright colors on it!
08-22-2012, 04:34 PM
#27
If you want something that'll last, spring for epoxy paint.
08-24-2012, 09:45 AM
#28

when you say ever so slightly, is it like 1/16" or not even that much, just barely enough to get the pin back in? i have the same problem. replaced both calipers last year and now the right is definitely dragging, and the left has a rust spot about 1/4" along the outer circumference.
08-25-2012, 12:36 AM
#30
Senior Member

Join Date: Jun 2001
Location: Colorado Springs
Posts: 497
Ugh. Just knowing that I'll be going through this same Hell soon enough just plain sucks. My left bushing started leaking months ago and it's starting to make more noise over large bumps now, especially when my kids are in the back seat adding weight. I printed out the instructions awhile back and they sit on my workbench in the garage, waiting for me. About the only thing I'm not concerned with is rust frozen bolts. The underside of my car still looks like new, and all the fasteners that seem to give people trouble on the forums come right off for me. Still, I'm not looking forward to this repair, mostly because I don't have another car to use while this one is on jacks.
08-25-2012, 08:42 AM
#31
Was there really a need to swap the beam? Seems like a whole lot of extra work and does not save any time.
I was the 4th gen guinea pig, using Superpro bushings, and I did not remove my beam. I did test fit the bushings in a wrecked beam, however, so I knew what I was in for.
I was the 4th gen guinea pig, using Superpro bushings, and I did not remove my beam. I did test fit the bushings in a wrecked beam, however, so I knew what I was in for.
08-26-2012, 11:16 PM
#32
Junior Member
Thread Starter
Join Date: Oct 2010
Location: West Chester, PA
Posts: 87
Was there really a need to swap the beam? Seems like a whole lot of extra work and does not save any time.
I was the 4th gen guinea pig, using Superpro bushings, and I did not remove my beam. I did test fit the bushings in a wrecked beam, however, so I knew what I was in for.
I was the 4th gen guinea pig, using Superpro bushings, and I did not remove my beam. I did test fit the bushings in a wrecked beam, however, so I knew what I was in for.
I bought a junk yard beam to try and minimize my downtime. It didn't work though b/c I had to cut through the TA bolts and it took forever to get new ones.
Car is good to go now though, I am going to run this car for about another 10 months and then buy a much newer car since I'm sick of the constant repairs this one seems to need...
09-10-2012, 01:48 PM
#33
Junior Member
Thread Starter
Join Date: Oct 2010
Location: West Chester, PA
Posts: 87
Update
Well,
A few weeks after getting the car back on the road I can tell you that the new bushings made a huge difference in how my car handles. I didn't realize how much slop there was in how my car handled dips, bumps, etc... until I did this. Those stock TA bushings are really bad, especially when they've ruptured.
I still need to get the beam centered, I don't have time to do it myself right now but otherwise it's all good...
10-19-2012, 07:56 AM
#36
Newbie - Just Registered

Join Date: Feb 2010
Location: N/A
Posts: 6
this is a great write-up! i'm planning on doing this upgrade too, and this write-up has given me a good sense of direction.
thanks to everyone who contributed.
now, let me ask this:
aren't there bushings on each side of the control rod and lateral link?
i can't seem to find anything for the control rod or lateral link through ES or Prothane.
any ideas / suggestions?
thanks in advance for any / all help!
thanks to everyone who contributed.
now, let me ask this:
aren't there bushings on each side of the control rod and lateral link?
i can't seem to find anything for the control rod or lateral link through ES or Prothane.
any ideas / suggestions?
thanks in advance for any / all help!
Last edited by Festus Portnoy; 10-19-2012 at 08:01 AM.
10-19-2012, 11:24 AM
#37
Supporting Maxima.org Member

iTrader: (3)
Join Date: Nov 2004
Location: Baton Rouge, LA
Posts: 5,432
As for the OP - I'm glad you were able to get the bolts off and the install was worth it. I need to do the same to my car very soon.
12-20-2012, 12:24 PM
#38
Junior Member

Join Date: May 2004
Location: Massachusetts
Posts: 25
My Experience with RTA Bushing Replacement
I am currently in the middle of replacing the Rear Trailing Arm bushings with the Energy Suspension bushings.
After replacing all the Struts and mounts which didn't solve my rearend clunking - my next step was the RTA Bushings.... Neither of them have leaked out or even have cracks - so I hope it solves my problem.
I did not remove the rear beam completely - but I did take off the lower bolt to the strut which helps with being able to move the beam and trailing arm a little easier. Started drilling around the metal insert in the bushing with a drill - but tried my rotozip with a drywall bit and it works pretty good - stinky smoke but you can cut a nice circle around the insert. Had to make circular cuts on both the inside and outside of the bushing, it can be pushed out easily. Some advice is to make the circular cut with as big as a circumfrence as possible because the metal sleeve has more mass inside the rubber bushing - it will make pushing it through easier.
I also used the rotozip to clean out the remaining rubber from the inside diameter of the trailing arm - it worked great for this as well. I suggest cutting the remaining rings with a hack saw or sawzall - they will pop right out. I got one side ready for the new bushign , which I will press in using a long hex bolt, washers, wood block and a PVC pipe section. Hopefully everything goes smoothly.
I've got around 3 hours into the job and should finish it in another 3 hours. With all the writeups and hints on this site - you should be able to handle this fix. One more last piece of wisdom - if you have a torch heat up the bolts a little so you don't snap them - Don't be a Jack*** like me.
If this doesn't solve my clunking noise - I don't know what else there is to do.....


