Replaced high pressure p/s hose ( pics )
 01-20-2012, 02:54 PM
#1
Senior Member
Thread Starter

Join Date: Feb 2010
Location: Florida
Posts: 621
Replaced high pressure p/s hose ( pics )
So i tackled this job today , and total it took me about 1 hour to replace and bleed the system.
Not a bad job by any means, i would compare it to replacing front brakes and rotors in difficulty level.
1st i cracked loose the banjo bolt on the pump, then placed my drain pan under to catch the fluid.
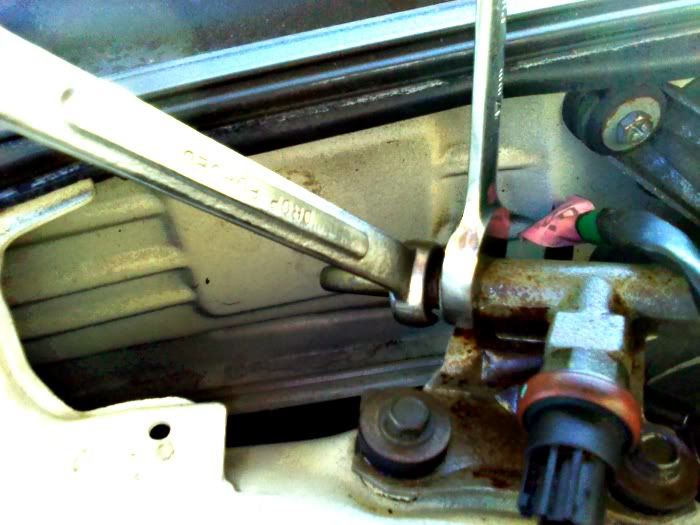
next i cracked loose the flare nut on the metal side using a crows foot 14 mm open ended wrench and using a 19 mm open end wrench i held the base in place and loosened the flare nut.
then i unbolted the 10 mm by the firewall and removed the bracket
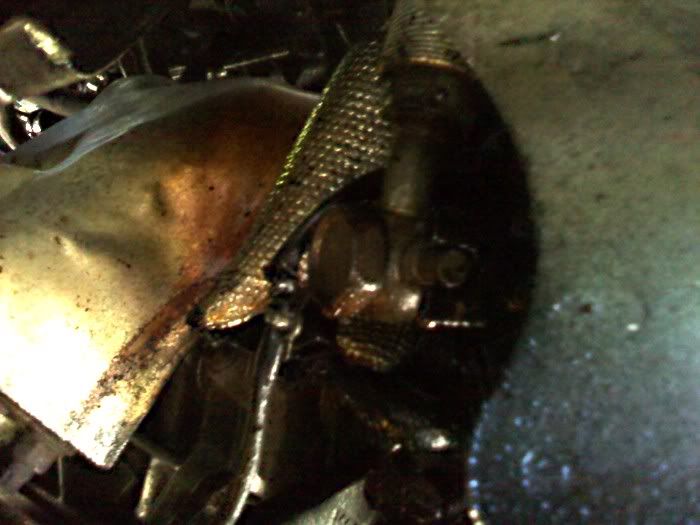
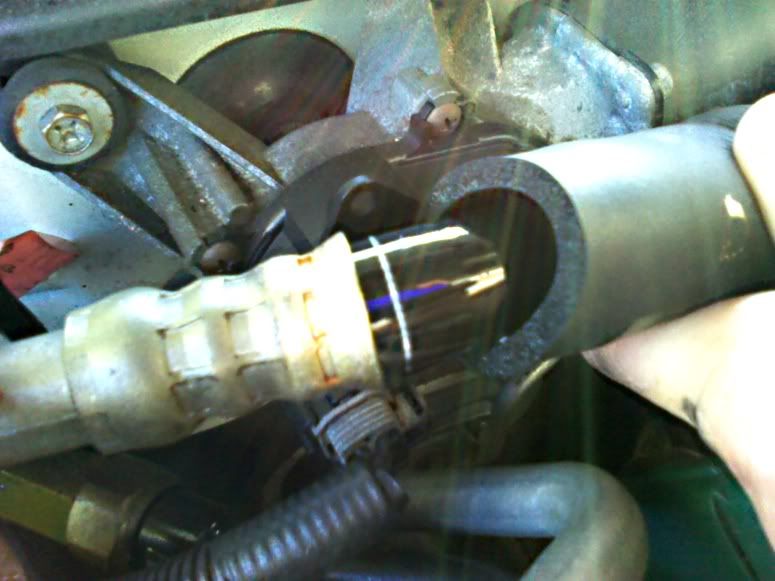
once the fluid drained into the pan ( took a good 10 minutes ) i removed the 2 10 mm bolts holding the bracket in place by the strut tower, then banjo bolt and with the hose removed and on the ground i heated up the p/s pressure sensor using a heat gun ( held it on there for about 10 minutes on the highest setting . ) and cracked loose the sensor using a 19 mm open ended wrench and held the base of the hose with some Vise Grips.
The hardest part was removing the p/s pressure sensor, had it been easy to remove the whole thing would have taken me about 45 minutes . i heated up the sensor using a heat gun for about 10 minutes and then cracked it loose with the 14 mm crows foot
then i did the dry bleed method and then the live bleed method. ( dry bleed=engine off turn steering wheel lock to lock , live bleed= engine on turn steering wheel lock to lock )
and for reference i used the Edlemann P/S hose from Rockauto. Part # 92037
And i get the buzz even after bleeding about a dozen times. It doesnt bother me because it's real faint and its better than having fluid drip all over my control arms and on the ground . I'll keep bleeding it periodically
old vs new for reference
here is where it was split and spewing out fluid
i would say on a difficulty level of 1-10 this was like a 4 with 1 being easiest
tools used
24 mm ( for banjo bolt )
19 mm ( for p/s sensor removal )
vise grips ( for holding the base of the hose when removing sensor )
10 mm socket ( for removing bracket at firewall and hose hold down bracket )
rags
drain pan
21 mm socket ( for removing wheel on RF )
14 mm Crow's Foot style of open ended wrench ( for removing flare nut )
heat gun ( for heating up the p/s pressure sensor for easier removal )
Not a bad job by any means, i would compare it to replacing front brakes and rotors in difficulty level.
1st i cracked loose the banjo bolt on the pump, then placed my drain pan under to catch the fluid.
next i cracked loose the flare nut on the metal side using a crows foot 14 mm open ended wrench and using a 19 mm open end wrench i held the base in place and loosened the flare nut.
then i unbolted the 10 mm by the firewall and removed the bracket
once the fluid drained into the pan ( took a good 10 minutes ) i removed the 2 10 mm bolts holding the bracket in place by the strut tower, then banjo bolt and with the hose removed and on the ground i heated up the p/s pressure sensor using a heat gun ( held it on there for about 10 minutes on the highest setting . ) and cracked loose the sensor using a 19 mm open ended wrench and held the base of the hose with some Vise Grips.
The hardest part was removing the p/s pressure sensor, had it been easy to remove the whole thing would have taken me about 45 minutes . i heated up the sensor using a heat gun for about 10 minutes and then cracked it loose with the 14 mm crows foot
then i did the dry bleed method and then the live bleed method. ( dry bleed=engine off turn steering wheel lock to lock , live bleed= engine on turn steering wheel lock to lock )
and for reference i used the Edlemann P/S hose from Rockauto. Part # 92037
And i get the buzz even after bleeding about a dozen times. It doesnt bother me because it's real faint and its better than having fluid drip all over my control arms and on the ground . I'll keep bleeding it periodically
old vs new for reference
here is where it was split and spewing out fluid
i would say on a difficulty level of 1-10 this was like a 4 with 1 being easiest
tools used
24 mm ( for banjo bolt )
19 mm ( for p/s sensor removal )
vise grips ( for holding the base of the hose when removing sensor )
10 mm socket ( for removing bracket at firewall and hose hold down bracket )
rags
drain pan
21 mm socket ( for removing wheel on RF )
14 mm Crow's Foot style of open ended wrench ( for removing flare nut )
heat gun ( for heating up the p/s pressure sensor for easier removal )
Last edited by Amave; 01-20-2012 at 06:14 PM.


 01-20-2012, 06:07 PM
#4
Senior Member
Thread Starter
Join Date: Feb 2010
Location: Florida
Posts: 621
nah its very easy to do..and lol @ hard brakes, i only can compare that to brakes because they take some time to do and this took about as long as replacing front brakes.
only thing i can see being a problem is those of you in the north salt states. I am lucky to be in Florida so rust isnt an issue ( i dont live by the ocean ) , and before cracking loose the flare nut i soaked it in PB blaster , if it was all rust i would have used a heat gun and held it in place for a good 20 minutes minimum, then tried to crack it loose.
Same with the p/s pressure sensor. But you may want to buy a new one if your hose is rusted up. I only say that because if you start to change the hose w/o a new p/s sensor you cannot drive unless you plug the hole or install a sensor, otherwise you will spew fluid all over the engine.
 01-21-2012, 09:32 PM
#6
Senior Member
Thread Starter
Join Date: Feb 2010
Location: Florida
Posts: 621
And forgot to add, that installation is the reverse of removal with a key detail, when you go to thread in the banjo bolt ( you should ALWAYS start with the banjo bolt installation ) make sure you don't cross thread and the way to make sure it isn't going in crooked, is once you start the bolt, wiggle it around while you turn it.
Wiggling it will help to seat the threads in and when you do wiggle the bolt while turning it , you will be able to feel if it goes in crooked, but if you start at the banjo bolt, then go to the flare nut 2nd you will get both of them to go in correctly .
I read here that some people were saying it was PITA to replace and yadda, but no way , it is super easy and you can use heat or PB Blaster to help you out .
Posting this more for the search engines as some people may not sign up just to read when they find out their HIGH PRESSURE POWER STEERING HOSE IS LEAKING. ( << The bold is for Google )
01-21-2012, 09:48 PM
#7
Senior Member

Join Date: Oct 2005
Location: Pullman, WA
Posts: 486
Well mainly what made it bad for me was my flare nut would not budge. Of course I also didn't realize the part about having a second wrench being rotated the opposite direction until I called in backup, that was what really made the project difficult. Personally I found the banjo bolt pretty easy
01-21-2012, 11:35 PM
#8
Senior Member
Thread Starter
Join Date: Feb 2010
Location: Florida
Posts: 621
Well mainly what made it bad for me was my flare nut would not budge. Of course I also didn't realize the part about having a second wrench being rotated the opposite direction until I called in backup, that was what really made the project difficult. Personally I found the banjo bolt pretty easy
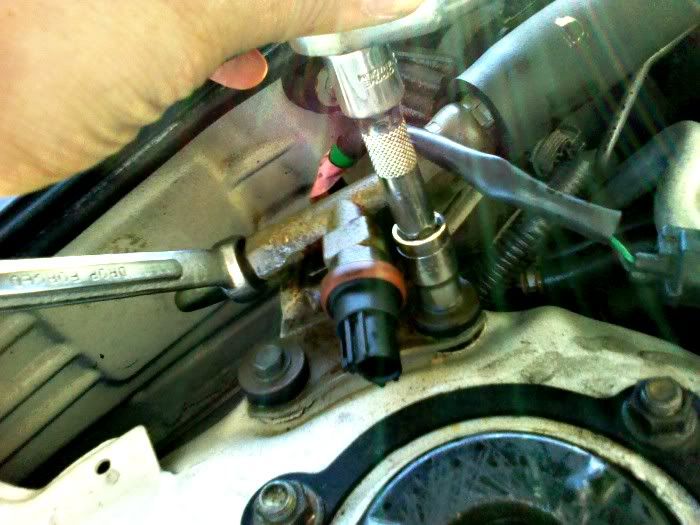
yeah if you don't have a 2nd wrench on the base of the hose trying to crack loose the flare nut, it will have too much play . The whole hose will just move and it will never crack loose.
A good PB Blaster soak and maybe some heat using either a torch or a heat gun held on for awhile could do the trick along with a 19 mm open ended wrench. as seen in the 2nd picture .
01-22-2012, 01:11 AM
#9
Member

Join Date: Jan 2012
Posts: 155
I tackled this same job today except I also replaced the rear valve cover also which made the bracket (which I hear is the worst part) very easy to get to. The only other thing I would add to the write up is when I put in the banjo bolt, it really helped to use that numb as the compass on how to line it up... get the nub into place and the bolt threads right in.
01-22-2012, 06:41 AM
#11
Senior Member
Thread Starter
Join Date: Feb 2010
Location: Florida
Posts: 621
Oh yeah i did it during the day ( Florida ) , it was a nice 75 degrees out , low humidity.
01-22-2012, 08:48 AM
#12

Nice job! I had mine done over the summer, it blew on my trip to Cali. I added fluid as needed to make it back. I took mine to the mechanic as I needed other maintenance on the car... lol
01-26-2012, 04:11 AM
#13

That Oem replacement looks like a Powermasters Special! Almost as expensive as a Nissan Oem and my Oem lasted 10 yrs and they all break in the same spot due to erosion of the interior and thinning of the material til it ruptures or splits! Powermasters product is rumored to make noises during vehicle operation.....
01-26-2012, 05:44 PM
#14
Senior Member
Thread Starter
Join Date: Feb 2010
Location: Florida
Posts: 621
That Oem replacement looks like a Powermasters Special! Almost as expensive as a Nissan Oem and my Oem lasted 10 yrs and they all break in the same spot due to erosion of the interior and thinning of the material til it ruptures or splits! Powermasters product is rumored to make noises during vehicle operation.....
it was the Edlemann hose got it from Rockauto and yup i get the whirring noise too.
I will be bleeding the air out in the next few weeks, but so far so good, no leaks and my control arm is finally dry
 02-04-2012, 05:10 PM
#16
Senior Member
Thread Starter
Join Date: Feb 2010
Location: Florida
Posts: 621
02-04-2012, 07:13 PM
#17
Junior Member

Join Date: Oct 2006
Posts: 75
Coming out was fine. It was the going in that got the banjo bolt striped. Turn by hand wasn't doing it, and I wrestled to get it back in square for a while but couldn't due rigidity of the edlemann hose. Turned it with a wrench which I thought was going fine and tight. When starting the car, PS fluid was squirting everywhere...
OK, I got replacement PS pump from advance auto...it turned out that the banjo portion was missing...fcking A...gotta figure the rest out tomorrow, hopefully before kickoff
OK, I got replacement PS pump from advance auto...it turned out that the banjo portion was missing...fcking A...gotta figure the rest out tomorrow, hopefully before kickoff
02-04-2012, 07:23 PM
#18
Junior Member
Join Date: Oct 2006
Posts: 75
Coming out was fine. It was the going in that got the banjo bolt striped. Turn by hand wasn't doing it, and I wrestled to get it back in square for a while but couldn't due rigidity of the edlemann hose. Turned it with a wrench which I thought was going fine and tight. When starting the car, PS fluid was squirting everywhere...
OK, I got replacement PS pump from advance auto...it turned out that the banjo portion was missing...fcking A...gotta figure the rest out tomorrow, hopefully before kickoff
OK, I got replacement PS pump from advance auto...it turned out that the banjo portion was missing...fcking A...gotta figure the rest out tomorrow, hopefully before kickoff
02-04-2012, 09:47 PM
#19

Wait...how do we bleed the system. I did this a couple months ago with the oem part and I never bled the system. Fml?
Was it just a matter of turning the wheel lock to lock and making sure the reservoir stays filled?
Was it just a matter of turning the wheel lock to lock and making sure the reservoir stays filled?
02-05-2012, 06:28 AM
#20
Senior Member
Thread Starter
Join Date: Feb 2010
Location: Florida
Posts: 621
Coming out was fine. It was the going in that got the banjo bolt striped. Turn by hand wasn't doing it, and I wrestled to get it back in square for a while but couldn't due rigidity of the edlemann hose. Turned it with a wrench which I thought was going fine and tight. When starting the car, PS fluid was squirting everywhere...
OK, I got replacement PS pump from advance auto...it turned out that the banjo portion was missing...fcking A...gotta figure the rest out tomorrow, hopefully before kickoff
OK, I got replacement PS pump from advance auto...it turned out that the banjo portion was missing...fcking A...gotta figure the rest out tomorrow, hopefully before kickoff
I'm going to guess you bolted the flare nut at the top first? Always , always, always start with the banjo bolt FIRST, that way you can move around the hose and line up as needed , but being careful not to let the crush washers fall or come off.
Dead bleed with both wheels off the ground turning lock to lock with the p/s reservoir open, do that about 1/2 dozen times , then start engine with wheels still off the ground turning lock to lock until you see no more bubbling in the fluid when you turn the wheels
02-05-2012, 11:38 AM
#21
Junior Member
Join Date: Oct 2006
Posts: 75
I'm going to guess you bolted the flare nut at the top first? Always , always, always start with the banjo bolt FIRST, that way you can move around the hose and line up as needed , but being careful not to let the crush washers fall or come off.
Try calling a junkyard or use www.car-part.com to search or try ebay.
Dead bleed with both wheels off the ground turning lock to lock with the p/s reservoir open, do that about 1/2 dozen times , then start engine with wheels still off the ground turning lock to lock until you see no more bubbling in the fluid when you turn the wheels
I did tried to screw banjo bolt first. since the hose was dropping on me, i threaded one of the bracket bolt on. there was still enough wiggle room for the hose fitting to thread it on...but i guess it's just wasn't my day yesterday.
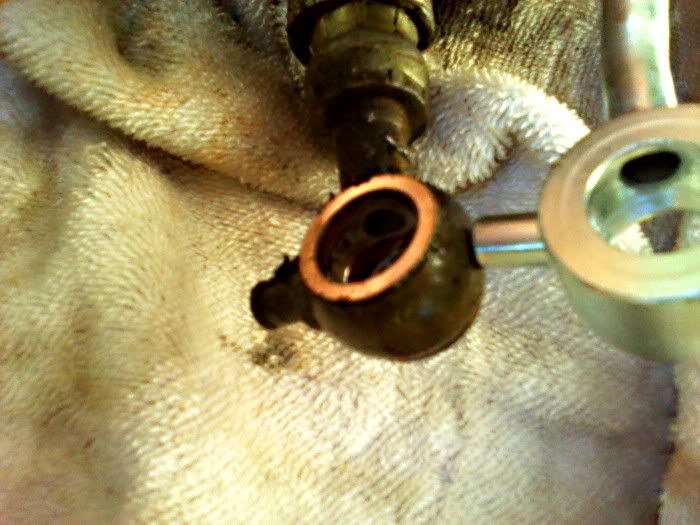
Anyways, here's the aftermath of the connector with striped thread.

the pump seems fine. so worse case, i might just go get a new banjo connector and bolt to fix this...taking apart the pump was a real PITA due to tight space and not having a lift.
02-05-2012, 02:33 PM
#22
Senior Member
Thread Starter
Join Date: Feb 2010
Location: Florida
Posts: 621
it's sunday and superbowl sunday...all junkyard are closed.
I did tried to screw banjo bolt first. since the hose was dropping on me, i threaded one of the bracket bolt on. there was still enough wiggle room for the hose fitting to thread it on...but i guess it's just wasn't my day yesterday.
Anyways, here's the aftermath of the connector with striped thread.
the pump seems fine. so worse case, i might just go get a new banjo connector and bolt to fix this...taking apart the pump was a real PITA due to tight space and not having a lift.
I highlighted the reason why you cross threaded the threads , while i know it may seem like a good idea to try and secure the hose itself so it doesn't move, that IS part of the reason why that happened. If you would have started the banjo bolt by hand first, you would have been able to feel if it was going in crooked or ok. One method i have used ( also in the case of my own replacement was i wiggled the bolt back and forth and side to side while turning it and that seem to help seat the threads in correctly.
That cross threading looks crazy! I have seen some flare nuts go in crooked that way too and those are just as bad , and even worse.
My advice is, do not secure the hose of any kind on any thing, start the banjo 1st and if need be, move the hose around to get a better position, then thread the bolt by hand and if it feels like there is any kind of resistance, back it out and start again.
Also be careful not to let the crush washers fall off of the bolt , otherwise you will start to thread the bolt in and it will feel fine and it will never seal .
03-08-2012, 09:20 PM
#23
Newbie - Just Registered

Join Date: Mar 2012
Posts: 3
Hey guys, I need some help. I started this project today and I'm having trouble loosening the flange nut. I have a flare nut wrench and a vise grip that I was using but the flange nut is starting to get rounded. Is heat the best thing to do in this case? I'm assuming I would apply to the female portion of the high pressure hose and not the flange nut itself. Also would you recommend sticking with the flare nut wrench or should I turn to a vise grip wrench for the flange nut for more torque. Any advice would be appreciated
03-09-2012, 04:16 AM
#24
Member

Join Date: Feb 2012
Location: Murfreesboro TN
Posts: 261
I replacedc mine a few wks ago with an autozone replacement $120. 45min job that is straight forward and fairly easy.
Maximillion I would use the flare nut wrench and an adjustable wrench....you want to try and align the two wrenches close together so you can squeeze them together with both hands and it will loosen. Also keeping the unit all bolted down helps keep it in place. Heat would help too.
Maximillion I would use the flare nut wrench and an adjustable wrench....you want to try and align the two wrenches close together so you can squeeze them together with both hands and it will loosen. Also keeping the unit all bolted down helps keep it in place. Heat would help too.
03-09-2012, 06:27 AM
#25
Senior Member
Thread Starter
Join Date: Feb 2010
Location: Florida
Posts: 621
I replacedc mine a few wks ago with an autozone replacement $120. 45min job that is straight forward and fairly easy.
Maximillion I would use the flare nut wrench and an adjustable wrench....you want to try and align the two wrenches close together so you can squeeze them together with both hands and it will loosen. Also keeping the unit all bolted down helps keep it in place. Heat would help too.
Maximillion I would use the flare nut wrench and an adjustable wrench....you want to try and align the two wrenches close together so you can squeeze them together with both hands and it will loosen. Also keeping the unit all bolted down helps keep it in place. Heat would help too.
try using a heat gun and soak it in PB Blaster too.
the rust is usually concentrated around the flare nut so once you soak it in PB Blaster and use heat to expand the metal it should crack loose fairly easy .
 03-11-2012, 09:52 AM
#28
Junior Member

Join Date: Feb 2012
Posts: 39
Just did mine, not sure why anyone would really remove the wheel or the inner fender well or .....anything else for that matter. Took about 30-45 mins with my bro in law. Its really 5 bolts...nothing more.
What sux is we noticed when I pulled out to get air out of the system... we somehow dropped one of the brass o rings...so we will have to pull that bolt out one more time and put that one in so there are no future leaks. but as of now it is not leaking at all. Or is there only 1 crush washer?? If so we are golden lol. He did all the work down low and I did the work up top
Very simple job...the hardest part honestly was the damn engine bracket in the middle..major PITA to get to fit right lol
03-11-2012, 10:59 AM
#29
Senior Member
Thread Starter
Join Date: Feb 2010
Location: Florida
Posts: 621
Just did mine, not sure why anyone would really remove the wheel or the inner fender well or .....anything else for that matter. Took about 30-45 mins with my bro in law. Its really 5 bolts...nothing more.
What sux is we noticed when I pulled out to get air out of the system... we somehow dropped one of the brass o rings...so we will have to pull that bolt out one more time and put that one in so there are no future leaks. but as of now it is not leaking at all. Or is there only 1 crush washer?? If so we are golden lol. He did all the work down low and I did the work up top
Very simple job...the hardest part honestly was the damn engine bracket in the middle..major PITA to get to fit right lol
What sux is we noticed when I pulled out to get air out of the system... we somehow dropped one of the brass o rings...so we will have to pull that bolt out one more time and put that one in so there are no future leaks. but as of now it is not leaking at all. Or is there only 1 crush washer?? If so we are golden lol. He did all the work down low and I did the work up top
Very simple job...the hardest part honestly was the damn engine bracket in the middle..major PITA to get to fit right lol
it uses 2 crush washers. one on the inside of the bolt and one on the outside .
if it isnt leaking it may leak once it builds pressure.
and the engine bracket in the back is optional
 03-11-2012, 12:04 PM
#30
Junior Member
Join Date: Feb 2012
Posts: 39
So far so good...but I really think what happened is this...got to looking at the washer..its old. Prolly fell out when he pulled the old one out. Almost positive both are in, been driving it and not a drop of fluid leaking so we are probably good.
I damn near didnt hook up that bracket in the back but we got it lol. Thought bout using a zip tie! haha
I damn near didnt hook up that bracket in the back but we got it lol. Thought bout using a zip tie! haha
03-30-2012, 10:40 AM
#31
Junior Member

Join Date: Mar 2010
Location: Florida
Posts: 24
I had my P/S pressure hose repaired locally
After reading through these forums about whether to get OEM or aftermarket, I had my pressure hose repaired locally. I took it to Amazon Hose & Rubber here in Tampa, FL. They had it done in a couple hours, I had them cut me a suction hose as well, I was out the door for under $100 and as good as OEM.
03-30-2012, 10:48 AM
#32
Junior Member
Join Date: Mar 2010
Location: Florida
Posts: 24


 05-12-2012, 09:04 AM
#36
Junior Member

Join Date: Apr 2007
Posts: 32
f&ck this
I tried this today and the flare nut WOULD NOT BUDGE, it was making my crow end 14mm open up and it wanted to round off the corners.
Then I sprayed PB blast on it and let is soak while I attempted the banjo nut. Thats one tough som***** to get to and I could not get it loose either.
I tried the flare nut again, no go.
To the local mechanic it will go monday.
Then I sprayed PB blast on it and let is soak while I attempted the banjo nut. Thats one tough som***** to get to and I could not get it loose either.
I tried the flare nut again, no go.
To the local mechanic it will go monday.
05-13-2012, 06:08 AM
#37
Senior Member
Thread Starter
Join Date: Feb 2010
Location: Florida
Posts: 621
I tried this today and the flare nut WOULD NOT BUDGE, it was making my crow end 14mm open up and it wanted to round off the corners.
Then I sprayed PB blast on it and let is soak while I attempted the banjo nut. Thats one tough som***** to get to and I could not get it loose either.
I tried the flare nut again, no go.
To the local mechanic it will go monday.
Then I sprayed PB blast on it and let is soak while I attempted the banjo nut. Thats one tough som***** to get to and I could not get it loose either.
I tried the flare nut again, no go.
To the local mechanic it will go monday.
a heat gun or hair dryer until the metal got really hot would have helped.
If you held the heat gun close to the threads on the flare nut for around 10 minutes and then immediately cracked it lose after spraying PB blaster, it may have done the trick.
It's what your mechanic is most likely going to do ( or use a torch instead of a heat gun ) .
But if you feel uncomfortable then by all means take it to a pro.
 05-13-2012, 07:38 AM
#39
Senior Member
Thread Starter
Join Date: Feb 2010
Location: Florida
Posts: 621
both wheels off the ground, engine off, turn the steering wheel side to side, lock to lock with the p/s reservoir cap off.
once you stop seeing air bubble up, start the engine and do the same , keep going until the pump gets quieter, then check fluid level and top off if needed.
