02-06 3.5vq thermal spacers - 3pc kit Install
 11-03-2011, 02:34 PM
#1

02-08 3.5vq thermal spacers - 3pc kit Install
DISCONNECT THE BATTERY FIRST!
Removal of the upper intake manifold is required
This would be great time to change the spark plugs
once the manifold has been removed as shown in the picture
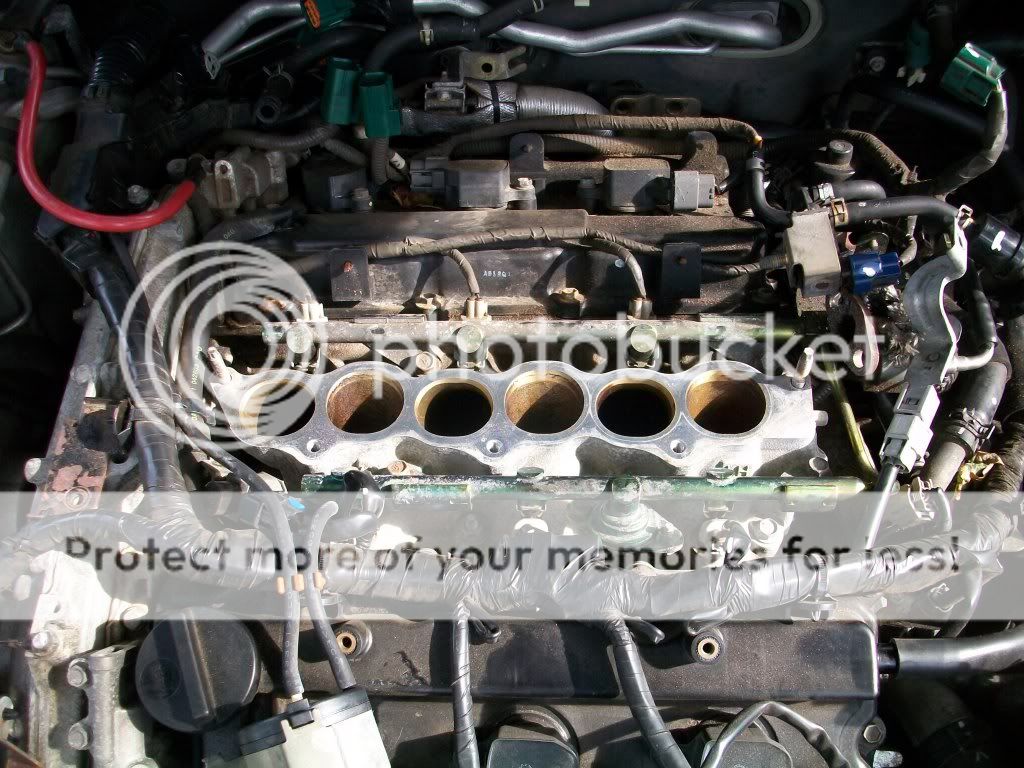
STOP EVERYTHING! PLACE RAGS INTO THE CHAMBERS.

If a bolt is dropped into there you have big problems.
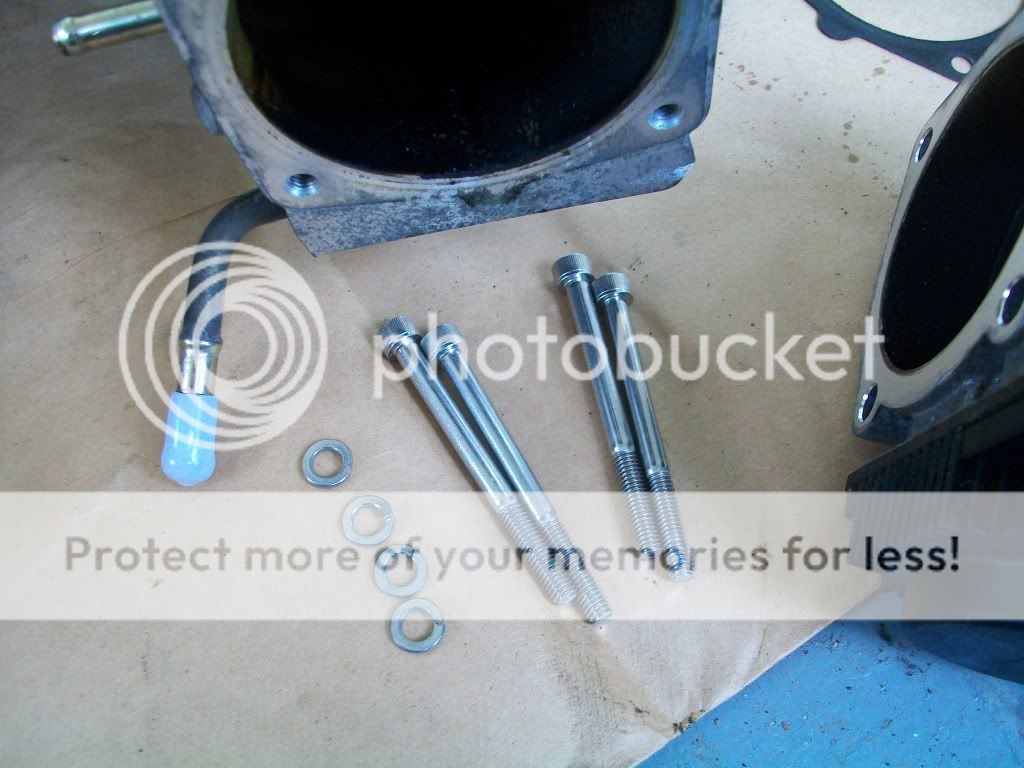
using a 6mm socket , remove the intake studs on both sides
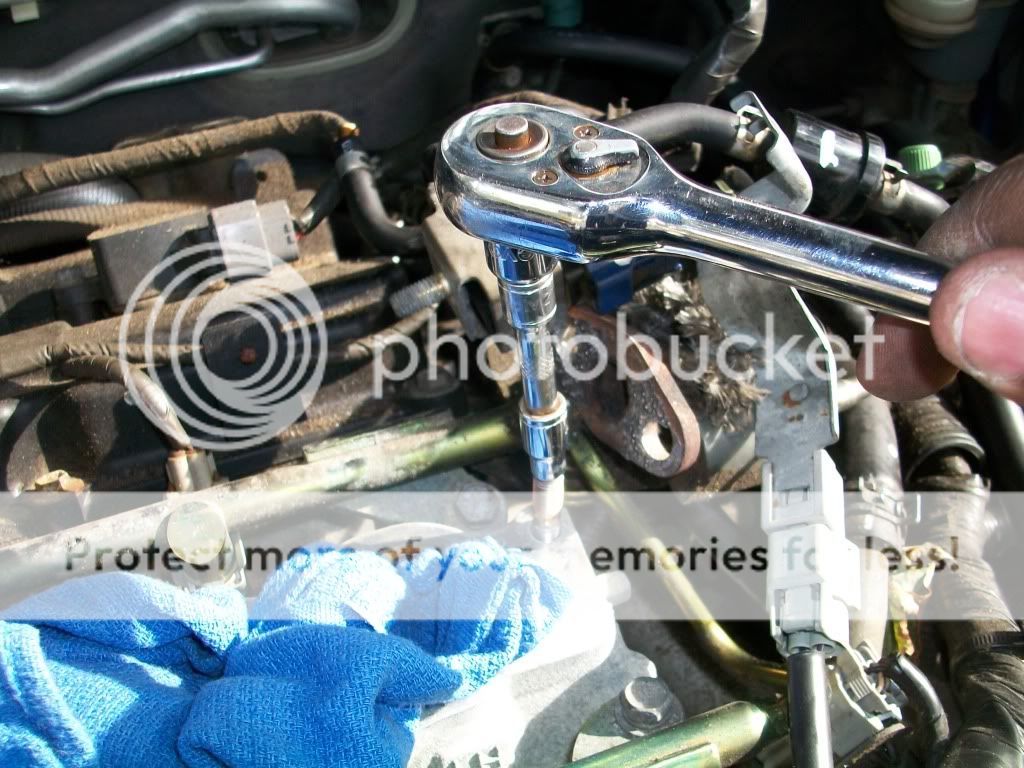
using a 3mm allen head bit install the new intake studs provided with the kit

proceed to the two hoses that were removed from the throttle body. using the brass hose mender join the hoses as shown to perform a throttle body bypass. this will help in removing unwanted heat produced from the hot coolant out of the throttle body


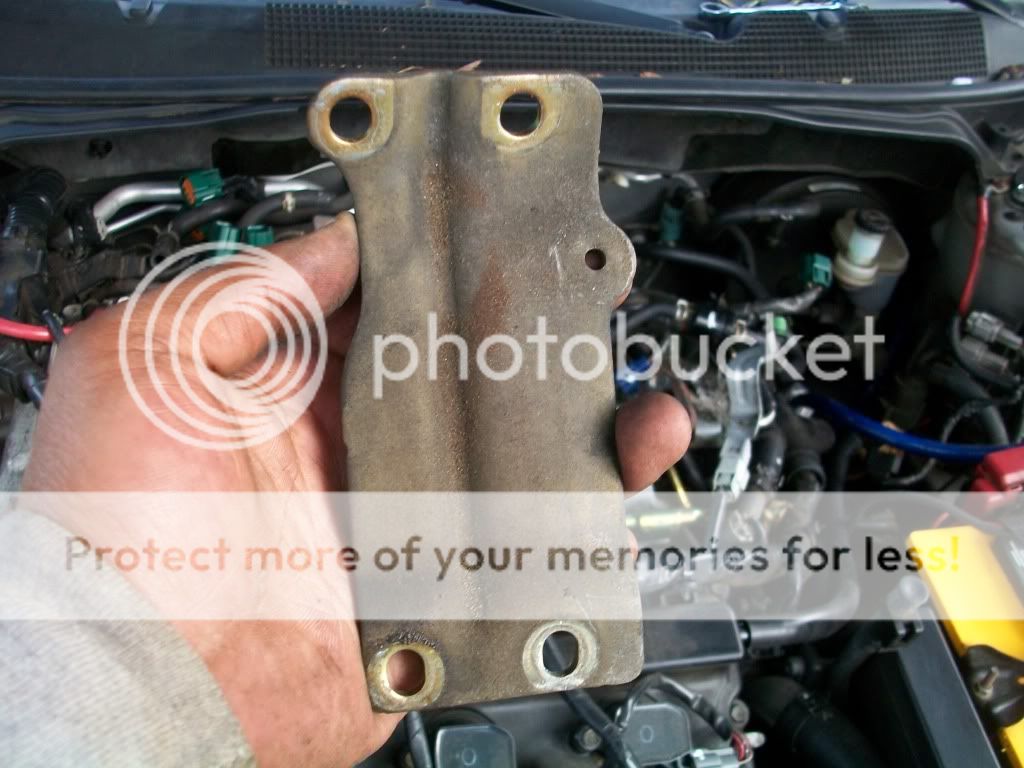
due to the increase width from the spacers the rear manifold stay bracket must be removed using a 12mm socket and rachet

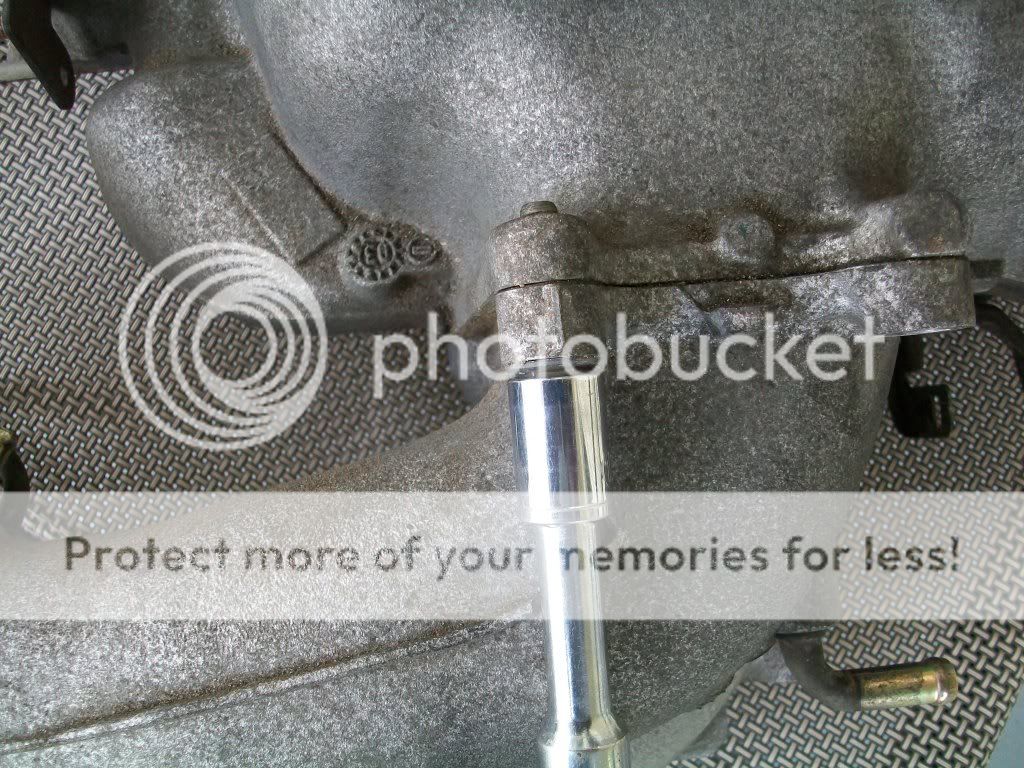
using a 12mm socket remove elbow and stock gasket from the manifold

Removal of the upper intake manifold is required
This would be great time to change the spark plugs
once the manifold has been removed as shown in the picture
STOP EVERYTHING! PLACE RAGS INTO THE CHAMBERS.
If a bolt is dropped into there you have big problems.
using a 6mm socket , remove the intake studs on both sides
using a 3mm allen head bit install the new intake studs provided with the kit
proceed to the two hoses that were removed from the throttle body. using the brass hose mender join the hoses as shown to perform a throttle body bypass. this will help in removing unwanted heat produced from the hot coolant out of the throttle body
due to the increase width from the spacers the rear manifold stay bracket must be removed using a 12mm socket and rachet
using a 12mm socket remove elbow and stock gasket from the manifold
Last edited by CXJ Performance; 11-03-2011 at 03:05 PM.
 11-03-2011, 02:35 PM
#2
apply the thickness of a nickle coin of rtv gasket maker to both sides of the elbow spacer and reinstall using the 4 hex head bolts and lock washers provided in the kit.


move on to the throttle body spacer
using the white caps provided in the kit , cap off the 2 metal pipes going into the throttle body as shown

using a 5mm allen head bit , remove the throttle body from the elbow. do not touch the valves on the throttle body. this will cause a idle malfunction and check engine light that can only resetted by the nissan dealership.


remove oem gasket and apply the rtv gasket maker to both sides of the throttle body spacer. reinstall using the allen head bolts and lock washer as shown. remember the location of the bracket that was removed from the throttle body

onto the main manifold spacer
apply rtv gasket maker to both sides of the spacer and center the manifold onto it. the intake studs will guide you. using the 3 hex bolts and lock washers tighten the manifold


Reuse the oem intake stud nut and apply them onto the new intake studs on both sides

Check that everything looks as shown


Wait 45 mins for the rtv gasket maker to set.
Reconnect all the hardware and connectors that was removed to uninstall the upper manifold.
Reconnect the battery.
Peform an ECU Reset by following these steps
1. Turn ignition switch on and wait about 3 seconds.
Repeat the following steps (2a and 2b) procedures quickly five times within 5 seconds.
2a. Fully depress the accelerator pedal (HARD).
2b. Fully release the accelerator pedal.
3. Wait 7 seconds, fully depress the accelerator pedal and keep it for approx. 10 seconds until the CEL starts blinking.
4. Fully release the accelerator pedal
5. Wait about 10 second.
6. Fully depress the accelerator pedal and keep it for more than 10 seconds.
7. Fully release the accelerator pedal
8. Turn ignition switch to “OFF” position and now you can start the car.
Perform an idle relearn by follwing these steps
Make sure that accelerator pedal is fully released.
Turn ignition switch 'ON' and wait at least 2 seconds.
Turn ignition switch 'OFF' wait at least 10 seconds.
Turn ignition switch 'ON' and wait at least 2 seconds.
Turn ignition switch 'OFF' wait at least 10 seconds.
Perform "Throttle Valve Closed Position Learning" .
Make sure that accelerator pedal is fully released.
Turn ignition switch 'ON'.
Turn ignition switch 'OFF' wait at least 10 seconds.
Make sure that throttle valve moves during above 10 seconds by confirming the operating sound.
Start engine and warm it up to normal operating temperature.
Turn ignition switch 'OFF' and wait at least 10 seconds.
Confirm that accelerator pedal is fully released, turn ignition switch 'ON' and wait 3 seconds.
Repeat the following procedure quickly five times within 5 seconds.
Fully depress the accelerator pedal.
Fully release the accelerator pedal.
Wait 7 seconds, fully depress the accelerator pedal and keep it for approx. 20 seconds until the MIL stops blinking and turned ON.
Fully release the accelerator pedal within 3 seconds after the MIL goes off.
Start engine and let it idle.
Wait 20 seconds.
Rev up the engine two or three times and make sure that idle speed and ignition timing are within the specifications.
If idle speed and ignition timing are not within the specification, the result will be incomplete.
Enjoy
Cory
move on to the throttle body spacer
using the white caps provided in the kit , cap off the 2 metal pipes going into the throttle body as shown
using a 5mm allen head bit , remove the throttle body from the elbow. do not touch the valves on the throttle body. this will cause a idle malfunction and check engine light that can only resetted by the nissan dealership.
remove oem gasket and apply the rtv gasket maker to both sides of the throttle body spacer. reinstall using the allen head bolts and lock washer as shown. remember the location of the bracket that was removed from the throttle body
onto the main manifold spacer
apply rtv gasket maker to both sides of the spacer and center the manifold onto it. the intake studs will guide you. using the 3 hex bolts and lock washers tighten the manifold
Reuse the oem intake stud nut and apply them onto the new intake studs on both sides
Check that everything looks as shown
Wait 45 mins for the rtv gasket maker to set.
Reconnect all the hardware and connectors that was removed to uninstall the upper manifold.
Reconnect the battery.
Peform an ECU Reset by following these steps
1. Turn ignition switch on and wait about 3 seconds.
Repeat the following steps (2a and 2b) procedures quickly five times within 5 seconds.
2a. Fully depress the accelerator pedal (HARD).
2b. Fully release the accelerator pedal.
3. Wait 7 seconds, fully depress the accelerator pedal and keep it for approx. 10 seconds until the CEL starts blinking.
4. Fully release the accelerator pedal
5. Wait about 10 second.
6. Fully depress the accelerator pedal and keep it for more than 10 seconds.
7. Fully release the accelerator pedal
8. Turn ignition switch to “OFF” position and now you can start the car.
Perform an idle relearn by follwing these steps
Make sure that accelerator pedal is fully released.
Turn ignition switch 'ON' and wait at least 2 seconds.
Turn ignition switch 'OFF' wait at least 10 seconds.
Turn ignition switch 'ON' and wait at least 2 seconds.
Turn ignition switch 'OFF' wait at least 10 seconds.
Perform "Throttle Valve Closed Position Learning" .
Make sure that accelerator pedal is fully released.
Turn ignition switch 'ON'.
Turn ignition switch 'OFF' wait at least 10 seconds.
Make sure that throttle valve moves during above 10 seconds by confirming the operating sound.
Start engine and warm it up to normal operating temperature.
Turn ignition switch 'OFF' and wait at least 10 seconds.
Confirm that accelerator pedal is fully released, turn ignition switch 'ON' and wait 3 seconds.
Repeat the following procedure quickly five times within 5 seconds.
Fully depress the accelerator pedal.
Fully release the accelerator pedal.
Wait 7 seconds, fully depress the accelerator pedal and keep it for approx. 20 seconds until the MIL stops blinking and turned ON.
Fully release the accelerator pedal within 3 seconds after the MIL goes off.
Start engine and let it idle.
Wait 20 seconds.
Rev up the engine two or three times and make sure that idle speed and ignition timing are within the specifications.
If idle speed and ignition timing are not within the specification, the result will be incomplete.
Enjoy
Cory
Last edited by CXJ Performance; 11-04-2011 at 05:20 AM.
 11-03-2011, 07:20 PM
#7
Junior Member

Join Date: Oct 2009
Posts: 36
Are they thicker than "other" spacers? I had a discussion with knight_yyz a while back and he mentioned that with an increase in thickness there should be an increase in the unique "turbo" like sound these spacers seem to also provide.
Other than that great writeup, which RTV gasket do you recommend? Looking forward to some member reviews. I am eyeing the kit but need to make a decision if it is worth it with an engine that is already burning oil.
Other than that great writeup, which RTV gasket do you recommend? Looking forward to some member reviews. I am eyeing the kit but need to make a decision if it is worth it with an engine that is already burning oil.
11-03-2011, 07:28 PM
#8

Are they thicker than "other" spacers? I had a discussion with knight_yyz a while back and he mentioned that with an increase in thickness there should be an increase in the unique "turbo" like sound these spacers seem to also provide.
Other than that great writeup, which RTV gasket do you recommend? Looking forward to some member reviews. I am eyeing the kit but need to make a decision if it is worth it with an engine that is already burning oil.
Other than that great writeup, which RTV gasket do you recommend? Looking forward to some member reviews. I am eyeing the kit but need to make a decision if it is worth it with an engine that is already burning oil.
11-03-2011, 09:42 PM
#9
Are they thicker than "other" spacers? I had a discussion with knight_yyz a while back and he mentioned that with an increase in thickness there should be an increase in the unique "turbo" like sound these spacers seem to also provide.
Other than that great writeup, which RTV gasket do you recommend? Looking forward to some member reviews. I am eyeing the kit but need to make a decision if it is worth it with an engine that is already burning oil.
Other than that great writeup, which RTV gasket do you recommend? Looking forward to some member reviews. I am eyeing the kit but need to make a decision if it is worth it with an engine that is already burning oil.
currently to date i make the thickest thermal spacers for the maxima 3.5vqde motor
i cant say for certain if the increase of the spacers will produce a higher " turbo like sound" because i have no experience with other spacer kits other than mine to compare
i recommend using this rtv gasket maker for my spacer kit

on another note these engines do burn alot of oil and its not uncommon to see about a quart of oil loss between oil changes but there maybe other problems that you may not be aware of. still the kit will have no added effect to the oil burning or loss your going thru
hope this helps
Cory
11-03-2011, 09:43 PM
#10
11-04-2011, 12:26 AM
#11
 11-04-2011, 01:47 AM
#12
Are they thicker than "other" spacers? I had a discussion with knight_yyz a while back and he mentioned that with an increase in thickness there should be an increase in the unique "turbo" like sound these spacers seem to also provide.
Other than that great writeup, which RTV gasket do you recommend? Looking forward to some member reviews. I am eyeing the kit but need to make a decision if it is worth it with an engine that is already burning oil.
Other than that great writeup, which RTV gasket do you recommend? Looking forward to some member reviews. I am eyeing the kit but need to make a decision if it is worth it with an engine that is already burning oil.
11-04-2011, 05:04 AM
#13

My video of the whistle with "other" spacers 
http://www.youtube.com/watch?v=2i9_T4Z54q4
Maybe we can try compare the sound here with a video of the CXJ performance spacers... even if it's hard to reproduce the real life sound with a camera/computer speakers...
http://www.youtube.com/watch?v=2i9_T4Z54q4
Maybe we can try compare the sound here with a video of the CXJ performance spacers... even if it's hard to reproduce the real life sound with a camera/computer speakers...
11-04-2011, 05:38 AM
#14
When he first posted that he was going to make a thermal spacer kit he took some flak and IIRC the thread was locked. So I emailed him and said to make them thicker because I don't believe the gains seen by adding spacers are solely based on the temperature reductions, but mostly due to the added runner length. And it would make them different than the other brand. I would like to see a dyno to see if there is more horsepower than the other kit. To prove my hypothesis. As for the whistle that some people notice, it may be a hint louder
It may compromise some FSTB set-ups, but really... between phenolic spacers and a FSTB, the spacers should come out on top of that choice.
11-04-2011, 06:08 AM
#15
Until you pointed this out, I hadn't realized Cory's spacers were 1/8" thicker than the (traditional) 1/4" design. That certainly introduces a unique quality to this 3-piece kit.
It may compromise some FSTB set-ups, but really... between phenolic spacers and a FSTB, the spacers should come out on top of that choice.
It may compromise some FSTB set-ups, but really... between phenolic spacers and a FSTB, the spacers should come out on top of that choice.
thanks rochester
actually the spacer increase still allows clearance for a fstb
 11-04-2011, 06:55 AM
#17
Clearance varies from car to car, and from one FSTB to another. I'm guessing the condition of engine mounts also come into play, and maybe AT vs. MT. Either way Cory, where you have your fingers isn't the issue. It's the nub where the UIM connects to the intake from the TB... see pic below, where the little red line is. That's where clearance comes into play.
Stillen actually writes in their FSTB instructions that you can grind a few mm off that nub for added clearance. And the comment I'm making here is that a 3/8" phenolic spacer *may* be problematic for some FSTB configurations. My larger point is that it really doesn't matter with respect to priorities, because Spacers > FSTB, any day.
Anyway, I've got 1/4" spacers, and the same Racingline FSTB as you, and there's only (approximately) 1/4" clearance in my car.

OAN... holy crap, your UIM is filthy! But then, so was mine when I took that ^^^ photo 2 years ago.
Get yourself some metal polish.
Stillen actually writes in their FSTB instructions that you can grind a few mm off that nub for added clearance. And the comment I'm making here is that a 3/8" phenolic spacer *may* be problematic for some FSTB configurations. My larger point is that it really doesn't matter with respect to priorities, because Spacers > FSTB, any day.
Anyway, I've got 1/4" spacers, and the same Racingline FSTB as you, and there's only (approximately) 1/4" clearance in my car.
OAN... holy crap, your UIM is filthy!
But then, so was mine when I took that ^^^ photo 2 years ago.Get yourself some metal polish.
Last edited by Rochester; 11-04-2011 at 01:57 PM.
11-04-2011, 07:00 AM
#18
^ For anyone with the "old" variation of the CustomMaxima FSTB, there will be clearance issues. I actually had to grind a notch out of mine to clear the clutch bleed line in my 6MT. And it had less than 1/2" clearance over the intake manifold without any sort of spacers.
11-04-2011, 09:13 AM
#19
Protip: Use an OEM gasket between upper and lower intake manifold when installing spacers for ease of spark plug replacements in the future.
The rtv sealant can get 'sealed' somewhat under repeated heat, making the upper/lower removal harder in the future.
The rtv sealant can get 'sealed' somewhat under repeated heat, making the upper/lower removal harder in the future.
11-04-2011, 09:32 AM
#20
Is that stuff THAT hard to get off once it's settled in?
11-04-2011, 09:43 AM
#21
DO NOT DO BUSINESS WITH THIS MEMBER - OWES PEOPLE MONEY
iTrader: (7)

Join Date: Jan 2008
Location: Greensboro, NC
Posts: 3,468
Increasing runner length is known to move the power curve to the left... This is the main reason for the lowend/midrange gains of the NWP spacers. However many of us aim for that 5-7k powerband, so it's not always a good thing. And more may not be better, depending on your personal goals for the car.
If this was like a 350Z spacer that increased plenum volume, then more would definitely be better!
If this was like a 350Z spacer that increased plenum volume, then more would definitely be better!
11-04-2011, 09:48 AM
#22
11-04-2011, 09:59 AM
#23
Increasing runner length is known to move the power curve to the left... This is the main reason for the lowend/midrange gains of the NWP spacers. However many of us aim for that 5-7k powerband, so it's not always a good thing. And more may not be better, depending on your personal goals for the car.
If this was like a 350Z spacer that increased plenum volume, then more would definitely be better!
If this was like a 350Z spacer that increased plenum volume, then more would definitely be better!
 Surely CXJ Performance spent months testing various height spacers, with numerous dynamometer comparisons, before coming to the studied opinion that 3/8" was optimal... right?
Right?

Of course, I kid, and we'll find out eventually after sifting through the hearsay, butt-dyno's and hyperbole that is sure to come. I think this whole thing just got interesting after realizing Cory's spacers are 3/8" rather than 1/4".
11-04-2011, 10:12 AM
#24
DO NOT DO BUSINESS WITH THIS MEMBER - OWES PEOPLE MONEY
iTrader: (7)
Join Date: Jan 2008
Location: Greensboro, NC
Posts: 3,468
Tamping down expectations with reason and experience again, Sparks? Surely CXJ Performance spent months testing various height spacers, with numerous dynamometer comparisons, before coming to the studied opinion that 3/8" was optimal... right?
Right?
Of course, I kid, and we'll find out eventually after sifting through the hearsay, butt-dyno's and hyperbole that is sure to come. I think this whole thing just got interesting after realizing Cory's spacers are 3/8" rather than 1/4".
Surely CXJ Performance spent months testing various height spacers, with numerous dynamometer comparisons, before coming to the studied opinion that 3/8" was optimal... right?Right?
Of course, I kid, and we'll find out eventually after sifting through the hearsay, butt-dyno's and hyperbole that is sure to come. I think this whole thing just got interesting after realizing Cory's spacers are 3/8" rather than 1/4".
It's very hard to detect any top end losses with the 1/4" spacer that has been on sale for so long because of the other things that the spacer helps with. Mainly temperature decreases and port matching. The increase in velocity and smoother airflow from gasket matching can be worth several horsepower, enough to eclipse the small topend losses.
Now keep making the spacer bigger because bigger is better and it's going to start being noticeable... Not to say it's a bad thing for your average daily driver to have more bottom end, but it would definitely discourage those who want the best top end possible.
11-04-2011, 10:14 AM
#25
DO NOT DO BUSINESS WITH THIS MEMBER - OWES PEOPLE MONEY
iTrader: (7)
Join Date: Jan 2008
Location: Greensboro, NC
Posts: 3,468
Is this going to turn into a OBX vs cattman type thing? Has clashez or ghustle endorsed cjx yet?
11-04-2011, 12:54 PM
#26
My 1/4" spacers netted me 18-25 whp from 2k to redline. With my other mods. Adding a spacer to the back of the plenum adds a few cubic inches to the plenum volume, so a thicker spacer would increase plenum volume again.
Last edited by knight_yyz; 11-04-2011 at 12:59 PM.
11-04-2011, 01:19 PM
#28
 ... sarcasm is strong in this one.

 11-04-2011, 08:43 PM
#33

")
Anybody can make spacers but until your spacers actually prove they make power based on various factors your product means ****.
I usually support when people make products for us BUT a product with no real "backup" other then I believe doesn't impress me.
And I'm the same guy who bought products that knight and fishtale made!
11-05-2011, 06:13 AM
#35
Products are out there untested? Wooooooow.
And how do we know u won't be using another companies product n place of yours?
And what kind of dyno? Before runs? Remove manifold, install spacers? Dyno?
What is the process u are following?
And how do we know u won't be using another companies product n place of yours?
And what kind of dyno? Before runs? Remove manifold, install spacers? Dyno?
What is the process u are following?
11-05-2011, 06:29 AM
#36
I say go to the dyno, do a run before installing, then install it in the parking lot and dyno again. Easy as pie.
A dyno is needed to see where the power is being put! Hopefully it's more on the upper end...I bet this would go good with SSIM
A dyno is needed to see where the power is being put! Hopefully it's more on the upper end...I bet this would go good with SSIM
11-05-2011, 07:02 AM
#37
 its pretty common knowledge that longer runners are tuned to produce torque at low rpms, and that shorter runners are designed to boost horsepower at higher rpms. by increasing the thickness of aarons spacers he has now set himself up to make spacers that make LESS HP THAN NWP but im in for results.
Whats this mean? that the "orignator/other companies" should show better topend gains, his should show better lowend. Ill stick to my topend bump, especially as my map is built to 7k. thx cxj i believe

 11-05-2011, 01:50 PM
#40
my testing was done before making these available for sale. with all of my products i have yet to recieve 1 single bad review
i wanted to be very sure about what i am stamping my name onto. my 3/8 spacers show a gain of 17hp with 10 increase in torque.The spacers decreased the upper manifold temperature by 33-34 degrees colder than stock.My spacers produce the highest numbers of a spacer kit available
it seems that i am receiving a passion of the christ beating for making products available to maxima owners.
i have been the only other person who has went into making these and to date will be the only company providing real data to show customers what r&d has been done.
i am sorry i didnt release this information sooner but i have also 5 other products that require testing as well. in particular testing for the 7th gen thermal spacers which i am the only person to date who has designed and produced along with the 7thgen bop plates.
bear with me i am the new kid on the block.


before spacers
http://www.youtube.com/watch?v=eUqU29oqTSk
after spacers
http://www.youtube.com/watch?v=7Wz31SvDVZM
i can not provide more proof than this.
i wanted to be very sure about what i am stamping my name onto. my 3/8 spacers show a gain of 17hp with 10 increase in torque.The spacers decreased the upper manifold temperature by 33-34 degrees colder than stock.My spacers produce the highest numbers of a spacer kit available
it seems that i am receiving a passion of the christ beating for making products available to maxima owners.
i have been the only other person who has went into making these and to date will be the only company providing real data to show customers what r&d has been done.
i am sorry i didnt release this information sooner but i have also 5 other products that require testing as well. in particular testing for the 7th gen thermal spacers which i am the only person to date who has designed and produced along with the 7thgen bop plates.
bear with me i am the new kid on the block.
before spacers
http://www.youtube.com/watch?v=eUqU29oqTSk
after spacers
http://www.youtube.com/watch?v=7Wz31SvDVZM
i can not provide more proof than this.
Last edited by CXJ Performance; 11-05-2011 at 09:06 PM.