My newest protoype
 01-08-2012, 07:47 AM
#401
From the pictures; It looks like the problem is the AT body mount bracket is narrower than the MT body mount bracket. Due to the tabs that interfere with the angled part of the Wrayth urethane bushing. As soon as I get the time I'll take off the airbox, get out my calipers, and give you measurements. Bracket width, pin length, bushing lengths etc.


 01-08-2012, 07:48 AM
#402
Senior Member

Join Date: Dec 2008
Location: NYC
Posts: 1,779
01-08-2012, 08:15 AM
#403

I will keep you in mind. Right now I'm actually contemplating installing the remaining mount especially since the six speeds seem to not encounter the same fitment issue chris had. I'm waiting to feel if the current mount will "settle in" and change with a little time.
01-08-2012, 09:19 AM
#404

Unless its not actually 86 mm wide and the mount spreads it apart a little bit? Idk but even installing a stock mount I always use a pry bar to line it up as I raise the transmission from the bottom.
01-08-2012, 11:09 AM
#405
On a side note it looks like the damn tow truck did almost as much damage to my car as the frikkin idiot who rammed me! My front passenger wheel bearing was toast, 120cdn to replace, my front control arm is damaged, (the part the king pin holds is oval right now) and my side skirt is crushed in at the front wheel well. Looks like he didn't line everything up before he rammed the axle cradle under the front wheels, and it looks like my front bumper is sagging. My front engine splash shield is ruined, and the side engine shield that protects the pulleys and oil filter is gone...
01-08-2012, 11:34 AM
#406
Sorry been away, kids and all!
No, I do not have the ES bushings, but I have replaced my front electric mount (again, I am auto) for a manual transmission front mount. Also, I know cars and engines are different, but I have all four mounts on my '89 turbo poured solid polyurethene and it has significantly less vibration and cabin noise than my 2003 with both Wrayth mounts. I would suggest though, there is a reason Nissan went with electronic mounts on the auto version of these cars! Clearly at idle they are prone to crazy vibration which ecos into the cabin.
I want to be clear, my comments are not intended to degrade the quality of the Wrayth mounts.....I hope I've already mentioned my positive thoughts and impressions of the product. I also want to say that these mounts were originally designed just for the engine mount...that aside from matching the measurements, Ray had no access to further R/D on actual cars, specifically not an auto. So, I knew it was a chance from the get go.
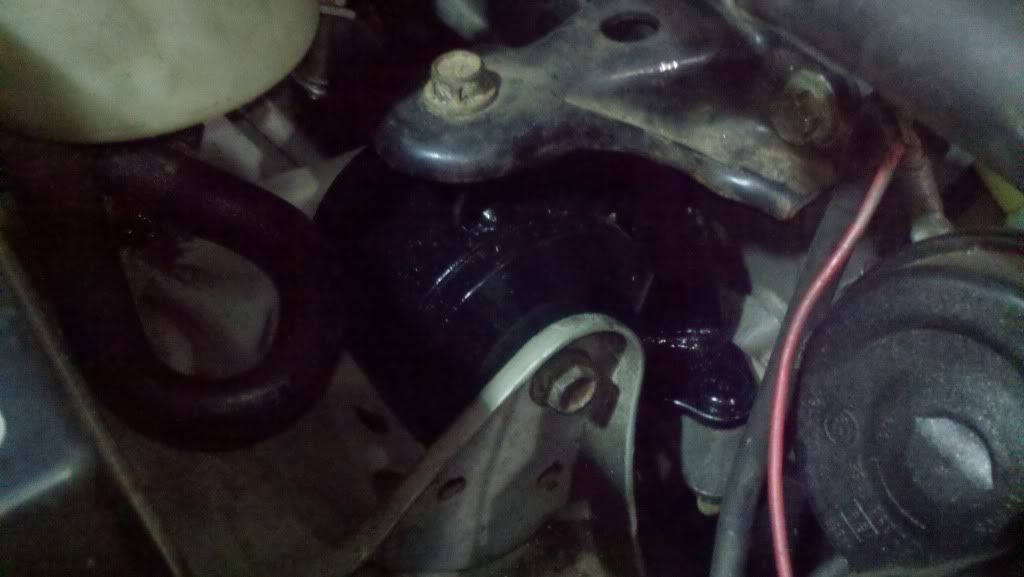
Now, I've looked at this again. Although I couldn't put a ruler to it at the time, I am certain that the body bracket on the car is angled. To clarify, it looks like the bracket is wider where it receives the mount and pin than where it is welded to the body/frame. As solid as the Wrayth mounts are, any reduction in width is going to make it difficult to push the inserts into place. I will try to confirm this visual observation, but if anothe auto is out doing the install, I'd hope they go ahead and get measurements at the tip and at the frame to verify if a difference actually exists and to what extent.
I want to also again mention, I strongly believe a great deal of the vibration and noise is becuase of the amount of contact/how firm the inserts push against the body bracket. I of course just couldn't say to what degree the volume and vibration would change if the inserts were not so tight.
I think if the inserts, once installed in the mount, were cut to the side facing the driver's wheel, just cut a little away from where the pin goes through and just cut that remaining 1/2 off, the mount would fit perfect. I'm just not willing to do that.
No, I do not have the ES bushings, but I have replaced my front electric mount (again, I am auto) for a manual transmission front mount. Also, I know cars and engines are different, but I have all four mounts on my '89 turbo poured solid polyurethene and it has significantly less vibration and cabin noise than my 2003 with both Wrayth mounts. I would suggest though, there is a reason Nissan went with electronic mounts on the auto version of these cars! Clearly at idle they are prone to crazy vibration which ecos into the cabin.
I want to be clear, my comments are not intended to degrade the quality of the Wrayth mounts.....I hope I've already mentioned my positive thoughts and impressions of the product. I also want to say that these mounts were originally designed just for the engine mount...that aside from matching the measurements, Ray had no access to further R/D on actual cars, specifically not an auto. So, I knew it was a chance from the get go.
Now, I've looked at this again. Although I couldn't put a ruler to it at the time, I am certain that the body bracket on the car is angled. To clarify, it looks like the bracket is wider where it receives the mount and pin than where it is welded to the body/frame. As solid as the Wrayth mounts are, any reduction in width is going to make it difficult to push the inserts into place. I will try to confirm this visual observation, but if anothe auto is out doing the install, I'd hope they go ahead and get measurements at the tip and at the frame to verify if a difference actually exists and to what extent.
I want to also again mention, I strongly believe a great deal of the vibration and noise is becuase of the amount of contact/how firm the inserts push against the body bracket. I of course just couldn't say to what degree the volume and vibration would change if the inserts were not so tight.
I think if the inserts, once installed in the mount, were cut to the side facing the driver's wheel, just cut a little away from where the pin goes through and just cut that remaining 1/2 off, the mount would fit perfect. I'm just not willing to do that.
01-08-2012, 12:19 PM
#407
Is the chassis bracket removable on the auto? The 6 speed seems to be held in by 4 bolts. Maybe the chassis bracket can be swapped? I don't have access to an Auto right now, I am so busy with getting ready for Mexico, making arrangements for the multitude of pets we have, and repairing the car today to make it drivable again I don't think I will be able to look at an Auto until I get back at the end of the month
01-08-2012, 08:44 PM
#409

Maybe the bracket for the AT trans mount is wider where the inserts sit thus since the inserts have a lip they sit further out, meaning the center is not actually touching but there is a slight space. The design of the inserts rests on the reasoning that the width of the mount is the same as twice the part of the insert after the lip on the insert. If the AT bracket is slightly larger in width this would cause both sides of the mount to sit out further then they are supposed to.
Someone needs to measure the width of the AT and MT mount brackets.
Someone needs to measure the width of the AT and MT mount brackets.
01-09-2012, 01:37 AM
#410
I have both brackets. They are 51mm wide, and both are 86mm wide with the inserts. We need to find out the width of the chassis bracket.
If that chassis bracket is welded on, how do you do a 6 speed swap?
If that chassis bracket is welded on, how do you do a 6 speed swap?
01-09-2012, 05:07 AM
#411

On the auto, the chassis bracket is welded on to the frame. On the 6spd, it is bolted onto the frame. You have to remove the spot welds to remove the chassis bracket, grind the frame smooth, drill new holes, and then bolt on the manual mount.
Anyway I am interested in a set of mounts for a 2k2 6spd. Let me know when you get enough people to produce another set.
Anyway I am interested in a set of mounts for a 2k2 6spd. Let me know when you get enough people to produce another set.
01-09-2012, 08:42 AM
#412
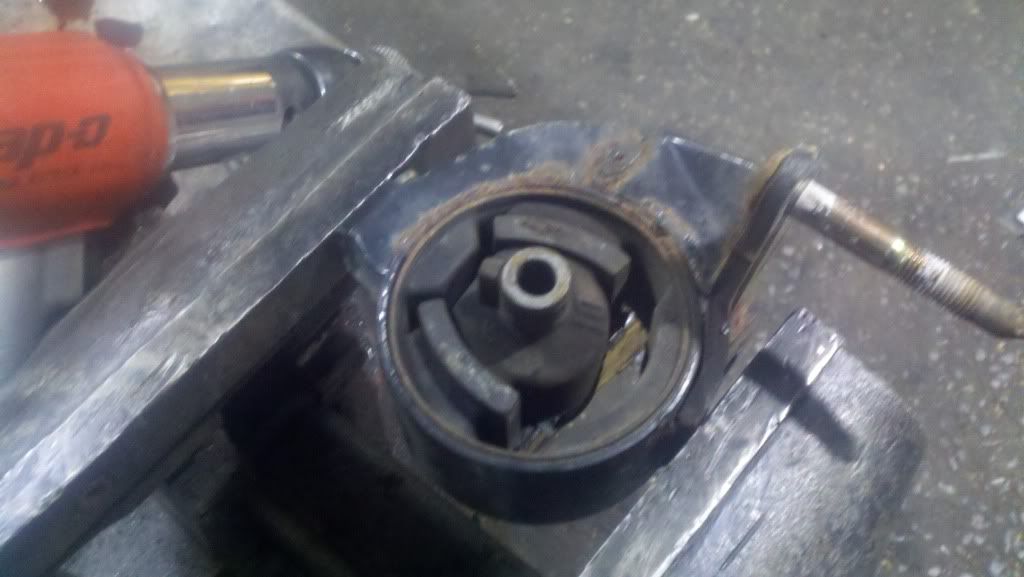
A few pictures and notes to supplement Chris's How to for just the passenger mount.
Here is a picture of the stock mount removed. The first step is to remove the metal plate that attached to the top of the mount.
1. It is one 14mm bolt in the middle of the mount and two 14mm bolts that attach to top plate to the engine.
2. Now that the top plate is removed, use a deep 14mm socket to remove the nut from the permanent threads you see between the left body mount and engine.
3. As Chris said the only difficult nut to get to for this mount is the one facing down. The nut you removed from the left side is the same as the nut you have to remove from the right side except it is upside down. Go under the car, use a 14mm deep six point socket with about 12-18 inches worth of extensions. Be careful with this nut. Do not rush and strip it. It may help to add a swivel joint and remove the side engine cover so you can get clean contact but I did not do either. You are going to squeeze the socket between the pulleys and the side engine cover (or body if the cover is removed).
4. Now remove the Long bolt that runs through the mount and the two holes you see on the body tabs. I used a 14mm socket on the right side and a 14mm small ratcheting wrench on the other side under the power steering pump reservoir. You may need to pull that long bolt out with pliers or vice grips.
5. The last bolt is the 14mm in the middle that was under that top metal piece you removed in the beginning. By now you should have a mount you can pull out to the right of the mounting tabs.

Here is are pictures of the stock mount. As you can see there is a gap to allow movement of the rubber insert. Unfortunately there is a trade off. This gap causes a reduction in vibration and therefore noise in the cabin but this also allows for loss of power to the wheels because the inertia is being absorbed by the mount movement.


These steps are to remove the stock mount. Now you can either pay someone to press the mount out or do what I did, but it is up to you.
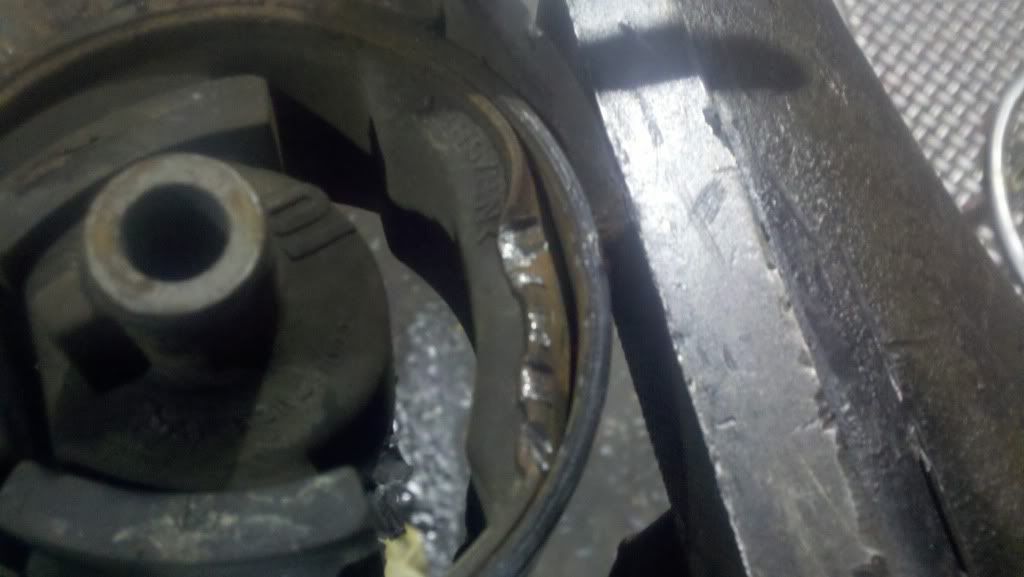
1. I used an air chisel to remove the main rubber insert but I think a regular chisel (possibly large flat head screwdriver) and mallet will be enough to knock the rubber out.
2. I used a dremmel tool with a cutting wheel to simple cut a line in the metal part of the mount. BE CAREFUL not to cut too much, meaning only cut the insert mount metal NOT the mount bracket too.

3. Even if you did not cut completely through the mount insert metal it should be thin enough to pry up from the bracket like pictured below. This will allow for the metal to easily be pushed out. I just had to tap it with the same screwdriver and mallet.


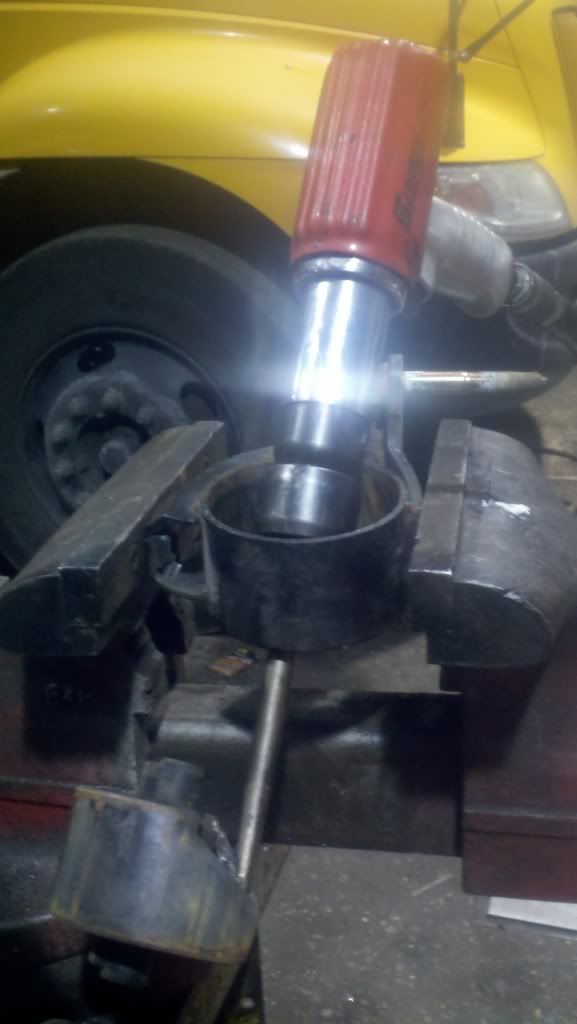
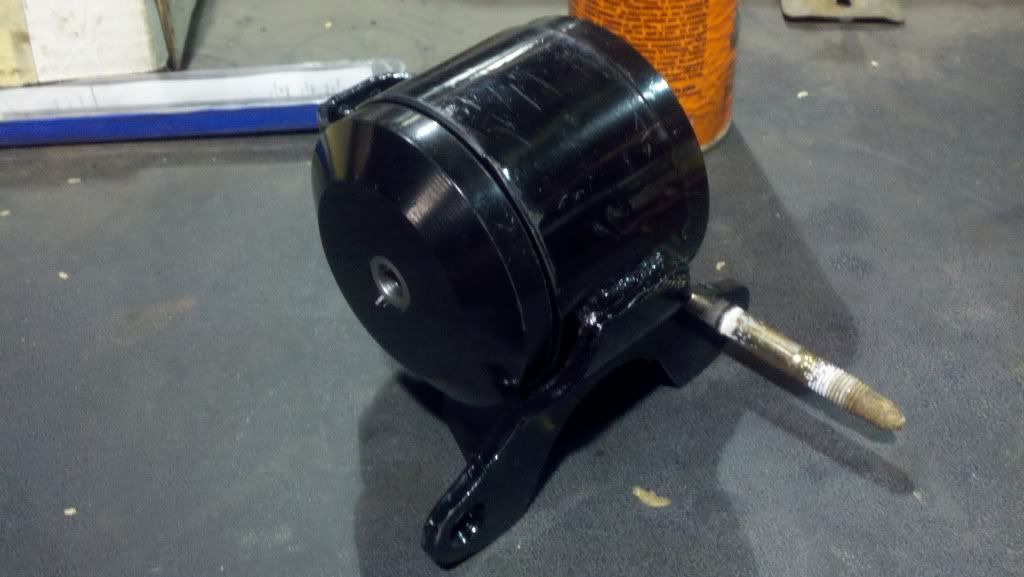
The next part is simple. Since Knight made a perfect fitting mount I was able to press in the new mount inserts with my hands and a couple of love taps with the mallet. Now, lube up the metal insert for the bolt hole and tap it in with a mallet (a little more love is needed for this one). This is what you have:

To install the mount is a little tricky.
1. The first bolt I installed was the through bolt that attaches the mount to the body.
2. I then attached the nuts to the long stationary threads but on threaded them on slightly. You may need to coerce the engine with a large pry bay in order to get some of these nuts/bolts started but do take care in what you are prying against. If you do not have Sasquatch hands then you should be able to start threading the downward facing nut.
3. Start threading the middle bolt and then once they have all been started, tighten them.
4. Install the top metal plate and enjoy your new mount.

As I have stated before. My first impressions are great. There is a noticeable but very slight vibration at idle and acceleration. The engine noise is transmitted more throughout the chassis. I actually had a small buzzing in my rear deck at idle but have since resolved it. When cruising none of the attributes mentioned above are heard of felt. I can say for certain that more power is delivered to the ground and that some of the first gear bucking has subsided. (The bucking you get when you take first gear up to about 15mph and then let off). Also in between shifts are much smoother. I have heard from other members that what I am experiencing closely resembles that of installed ES front and rear mount inserts (which I currently do not have). I also think it is very similar to what I have read the torque link feels like. For changing just one mount I am very impressed and I am sure that the mount still needs a little time to settle so I expect some of the noted vibration and noise to subside. Good luck and enjoy.
Here is a picture of the stock mount removed. The first step is to remove the metal plate that attached to the top of the mount.
1. It is one 14mm bolt in the middle of the mount and two 14mm bolts that attach to top plate to the engine.
2. Now that the top plate is removed, use a deep 14mm socket to remove the nut from the permanent threads you see between the left body mount and engine.
3. As Chris said the only difficult nut to get to for this mount is the one facing down. The nut you removed from the left side is the same as the nut you have to remove from the right side except it is upside down. Go under the car, use a 14mm deep six point socket with about 12-18 inches worth of extensions. Be careful with this nut. Do not rush and strip it. It may help to add a swivel joint and remove the side engine cover so you can get clean contact but I did not do either. You are going to squeeze the socket between the pulleys and the side engine cover (or body if the cover is removed).
4. Now remove the Long bolt that runs through the mount and the two holes you see on the body tabs. I used a 14mm socket on the right side and a 14mm small ratcheting wrench on the other side under the power steering pump reservoir. You may need to pull that long bolt out with pliers or vice grips.
5. The last bolt is the 14mm in the middle that was under that top metal piece you removed in the beginning. By now you should have a mount you can pull out to the right of the mounting tabs.
Here is are pictures of the stock mount. As you can see there is a gap to allow movement of the rubber insert. Unfortunately there is a trade off. This gap causes a reduction in vibration and therefore noise in the cabin but this also allows for loss of power to the wheels because the inertia is being absorbed by the mount movement.
These steps are to remove the stock mount. Now you can either pay someone to press the mount out or do what I did, but it is up to you.
1. I used an air chisel to remove the main rubber insert but I think a regular chisel (possibly large flat head screwdriver) and mallet will be enough to knock the rubber out.
2. I used a dremmel tool with a cutting wheel to simple cut a line in the metal part of the mount. BE CAREFUL not to cut too much, meaning only cut the insert mount metal NOT the mount bracket too.
3. Even if you did not cut completely through the mount insert metal it should be thin enough to pry up from the bracket like pictured below. This will allow for the metal to easily be pushed out. I just had to tap it with the same screwdriver and mallet.
The next part is simple. Since Knight made a perfect fitting mount I was able to press in the new mount inserts with my hands and a couple of love taps with the mallet. Now, lube up the metal insert for the bolt hole and tap it in with a mallet (a little more love is needed for this one). This is what you have:
To install the mount is a little tricky.
1. The first bolt I installed was the through bolt that attaches the mount to the body.
2. I then attached the nuts to the long stationary threads but on threaded them on slightly. You may need to coerce the engine with a large pry bay in order to get some of these nuts/bolts started but do take care in what you are prying against. If you do not have Sasquatch hands then you should be able to start threading the downward facing nut.
3. Start threading the middle bolt and then once they have all been started, tighten them.
4. Install the top metal plate and enjoy your new mount.
As I have stated before. My first impressions are great. There is a noticeable but very slight vibration at idle and acceleration. The engine noise is transmitted more throughout the chassis. I actually had a small buzzing in my rear deck at idle but have since resolved it. When cruising none of the attributes mentioned above are heard of felt. I can say for certain that more power is delivered to the ground and that some of the first gear bucking has subsided. (The bucking you get when you take first gear up to about 15mph and then let off). Also in between shifts are much smoother. I have heard from other members that what I am experiencing closely resembles that of installed ES front and rear mount inserts (which I currently do not have). I also think it is very similar to what I have read the torque link feels like. For changing just one mount I am very impressed and I am sure that the mount still needs a little time to settle so I expect some of the noted vibration and noise to subside. Good luck and enjoy.
Last edited by 02whitemaximase; 01-09-2012 at 09:15 AM.
01-09-2012, 08:54 AM
#413
FTR, If you have the ES torque mounts you don't have to man handle the engine. They are strong enough to hold thine in place. for the DIY guys with no lower urethane bushings you could try to support the engine with a jack
01-09-2012, 09:05 AM
#414
Do you feel like getting the ES inserts will take stress off of your side mount? Based on your post I get the feeling that your mount has taken some of the sagging out out the motor therefore making the front and rear mount sit higher than stock. Does this mean that the front and rear mounts are not holding their fair share of the motor weight, causing the engine to essentially sit ever so slightly lop sided (higher on the passenger side)?
01-09-2012, 10:33 AM
#415
I don't have the ES bushings and did not have to support the engine for either side. Although I had a jack under there if needed, I actually initially tried to do the mounts with some jack supporting the engine, but it actually threw things out of wack. Once I removed the jack, I was able to budge the engine enough by hand to line up the bolt through the insert. I just had the car sitting on level ground. Same thing for tranny side, no support when doing that mount, just lined up the bolt through the pin first, then dropped the bolts through the mount plate and tightened her right down to the transmission.
I won't answer for Ray, but I'm certain good motor mounts (or ES) take stress off the torque mounts....I also believe this works conversly as well. One thing I learned with my 1989 turbo was that the torque and stress from the engine was effectively absorbed by the motor mounts. This is why (in part) on the 3rd gen, the crossmember is prone to snapping at the front. If the 3rd gen had a torque mount on the front of the engine, I'm confident those cross members would not have been so prone to failure. My point here is that naturally such force takes a significant toll on the mounts. I think this is a good point to connect why Aaron indicates the torque link is not a substitute for replacing old/worn/damaged mounts.
I won't answer for Ray, but I'm certain good motor mounts (or ES) take stress off the torque mounts....I also believe this works conversly as well. One thing I learned with my 1989 turbo was that the torque and stress from the engine was effectively absorbed by the motor mounts. This is why (in part) on the 3rd gen, the crossmember is prone to snapping at the front. If the 3rd gen had a torque mount on the front of the engine, I'm confident those cross members would not have been so prone to failure. My point here is that naturally such force takes a significant toll on the mounts. I think this is a good point to connect why Aaron indicates the torque link is not a substitute for replacing old/worn/damaged mounts.
01-09-2012, 10:48 AM
#416

That side mount looks a ton easier to install then the front ES bushings. I think it took a friend and I about 6 hours to do front and rear ES motor mount bushings at an auto hobby shop that included the press.
Poly mounts are worthwhile and I highly recommend swapping.
Poly mounts are worthwhile and I highly recommend swapping.
01-09-2012, 11:09 AM
#419
Possibly, but not very much. You have 3 other mounts in there. The oem mounts are made to sag to the middle of the bracket. Urethane is still extremely pliable even at high durometer ratings. It will still squash under load
01-09-2012, 01:52 PM
#423
Anyone who's worried about vibration then this is not for you everyone should already know when you go with more solid mounts other than oem you will experience this so vibration should not be an issue
Vibration with my es mounts doesn't bother me at all
Vibration with my es mounts doesn't bother me at all
01-10-2012, 10:00 PM
#424

Another install of the (timing cover) side mount. I used an air chisel to take the stock mount out.

The mount feels great (my old one was shot), I dont feel any increase in vibration at idle or driving, the car is manual and has ES torque mounts. Driving I can feel the engine being held better, letting off and getting back on the gas in gear feels much smoother. Hopefully I have some time soon to do the tranny mount.
The mount feels great (my old one was shot), I dont feel any increase in vibration at idle or driving, the car is manual and has ES torque mounts. Driving I can feel the engine being held better, letting off and getting back on the gas in gear feels much smoother. Hopefully I have some time soon to do the tranny mount.
01-11-2012, 03:30 PM
#425
 01-11-2012, 06:14 PM
#426
I think that is part of it. You were much more technical in your response, but i eluded to your comment (although genericly) in talking about Nissan's use of electronic motor mounts, which soften at idle.
Keep in mind that the vibration and noise is still significant in park and neutral for my car. Soon I'll be able to comment on the difference with removing the transmission mount
BTW, perhaps I've missed it, but am I the only one who has even installed the transmission mount (auto or manual) at this point?
I wonder if Chris's vibration problem has to do with an AT always being driven by the engine via the torque converter's fluid coupling, vs. an MT which isn't driven with the clutch disengaged. Prehaps the firmer Wrayth tranny mount will constantly transmit vibration through the AT. But only through the MT when moving and that's minimal compared to an AT being stopped by holding the converter stationary with the brakes. Not to mention the hydraulics that run regardless of forward motion.
01-12-2012, 07:12 AM
#429
Supporting Maxima.org Member

iTrader: (1)

Join Date: Nov 2002
Location: Montreal, QC,Canada
Posts: 253
No time lately
Too busy with work for the moment...slim chance I might get to it this weekend. Refresh my memory, is the transmission mount easier to get in and out than the passenger side mount? Previously I found with the passenger side mount I had to access one bolt from underneath, but I seem to recall reading the Trans mount can be done from the top. If someone can please confirm that's the case I'll do my best to change it Saturday.
Cheers
Cheers
01-12-2012, 07:16 AM
#430
The 6spd trans mount bolts are all from the top. 4 bolts hold the bracket to the trans and one single long bolt goes through the center of the mount. And the mount is held to the frame with 2 more bolts.
01-12-2012, 08:19 AM
#432
Supporting Maxima.org Member
iTrader: (1)
Join Date: Nov 2002
Location: Montreal, QC,Canada
Posts: 253
Thanks shift_Max . 02white...6 speed. I'm very familiar with the passenger side replacement, having done stock replacements previously. I've never done the transmission mount, thus my question.
01-12-2012, 10:58 AM
#433
I would do mine if I can source someone or a way to punch out the old inserts. My car is currently undriveable though so I'll only be able to do a review on the install.
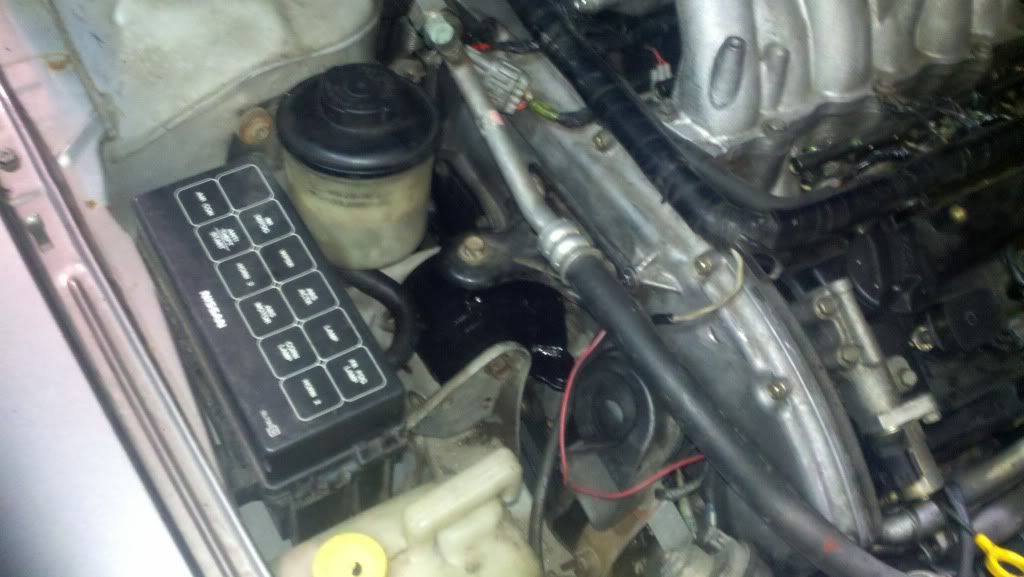
Btw I was working on my car yesterday and noticed my trans mount doesn't look like the ones in the pics posted in this thread. It was a quick glance but it quickly caught my attention that it was different.
Btw I was working on my car yesterday and noticed my trans mount doesn't look like the ones in the pics posted in this thread. It was a quick glance but it quickly caught my attention that it was different.
01-12-2012, 02:45 PM
#435
I'm getting lots of inquiries about the next batch. If you are interested, please start up a new list. I am leaving for mexico on Saturday for two weeks. I don't think I will have internet access, so we'll see how things are looking when I get back. Need ten guys per batch.
01-12-2012, 04:52 PM
#436
Quick review of passenger mount: awesome.
On a sadder note, the six speed mount is going to have problems similar to those stated by Chris. I removed mine completely from the car, got some info for Knight, ran a tap through a few bolt holes that had some ugly threads, and reinstalled the old mount.
Knight: I've got some measurements and photos for you. I PM'd you my email address.
01-12-2012, 05:55 PM
#437
Quick review of passenger mount: awesome.
On a sadder note, the six speed mount is going to have problems similar to those stated by Chris. I removed mine completely from the car, got some info for Knight, ran a tap through a few bolt holes that had some ugly threads, and reinstalled the old mount.
Knight: I've got some measurements and photos for you. I PM'd you my email address.
On a sadder note, the six speed mount is going to have problems similar to those stated by Chris. I removed mine completely from the car, got some info for Knight, ran a tap through a few bolt holes that had some ugly threads, and reinstalled the old mount.
Knight: I've got some measurements and photos for you. I PM'd you my email address.
01-12-2012, 07:18 PM
#438
My Apologies guys, but after seeing pictures, it looks like i ****ed this up. The only thing i can think of to do right now is I have been getting inquiries to sell more of these. So if it is ok with those that have bought them, I suggest that you sell the pair of pucks that wont fit on the drivers side, and i will go back to the drawing board and redesign that side. If you guys sell the pair for 65 shipped, you will break even and then we'll work something out for the drivers side when i get some time.
I'm not sure what went wrong, but if you guys can wait for a while I will correct this. From the looks of the pictures i have seen, it looks like both the 6mt and the auto need some tabs ground off the chassis bracket, and I have to make the pucks a little thinner. The 6mt tabs are hidden and pretty well impossible to see until the rubber mount is removed.
So for now, guys, if you want to purchase a set of my mounts, please contact the guys who have bought them, (see the list) and arrange for payment. When I get some time I will redesign the drivers side and make sure they fit on my car before putting them "on the market"
1. BobPezz.
2. Chris Gregg
3. 2000_MAXIMA_KING
4. Cant_Get_Ryte
5. mbdemonte
6. StevieB
7. nelledge
8. 2kayznmaxima
9. 02whitemaximase
10. zero2sixtyZ
On a side note for Bob, I don't use metric most of the time when I machine. If i get a metric drawing i convert it to imperial. But for stating sizes and such in here it was easier to say 86 mm rather than 3.385" as it isn't a fraction Even when i made the prototype, i new the size in metric, then converted to imperial, then added the percentage to compensate for shrinkage, then rounded up to a nice even number. LOL then I machined it to the imperial size.
The new prototype might just be as simple as making the flange a lot more narrow, or I will change the angle of the taper, and the thickness. But I need to remove a chassis bracket and measure it up with a vernier off the car.
I'm not sure what went wrong, but if you guys can wait for a while I will correct this. From the looks of the pictures i have seen, it looks like both the 6mt and the auto need some tabs ground off the chassis bracket, and I have to make the pucks a little thinner. The 6mt tabs are hidden and pretty well impossible to see until the rubber mount is removed.
So for now, guys, if you want to purchase a set of my mounts, please contact the guys who have bought them, (see the list) and arrange for payment. When I get some time I will redesign the drivers side and make sure they fit on my car before putting them "on the market"
1. BobPezz.
2. Chris Gregg
3. 2000_MAXIMA_KING
4. Cant_Get_Ryte
5. mbdemonte
6. StevieB
7. nelledge
8. 2kayznmaxima
9. 02whitemaximase
10. zero2sixtyZ
On a side note for Bob, I don't use metric most of the time when I machine. If i get a metric drawing i convert it to imperial. But for stating sizes and such in here it was easier to say 86 mm rather than 3.385" as it isn't a fraction
Even when i made the prototype, i new the size in metric, then converted to imperial, then added the percentage to compensate for shrinkage, then rounded up to a nice even number. LOL then I machined it to the imperial size. The new prototype might just be as simple as making the flange a lot more narrow, or I will change the angle of the taper, and the thickness. But I need to remove a chassis bracket and measure it up with a vernier off the car.
Last edited by knight_yyz; 01-12-2012 at 07:24 PM.
01-12-2012, 07:41 PM
#439
Ok thanks for the update knight, its unfortunate this had to happen. I would really hate to sell mine, can you figure out a way to make it fit? or can I ship it back to you (on my expense) you "modify it" to make it work and ship it back (on your expense that way we are even)?
If this idea isn't really practical, I'll just sell it.
If this idea isn't really practical, I'll just sell it.
01-12-2012, 07:45 PM
#440
For now, I'm not sure what needs to be done to modify it. I really hate machining urethane, it always looks like crap when it is done. But give me some time to take a look at it when i get back from my holidays.

