Gutting cat bug...
 09-28-2011, 03:18 PM
#1
Member
Thread Starter

Join Date: Sep 2009
Posts: 211
Gutting cat bug...
I caught that crap today...
Too bad i live in the midwest and my bolts are very rusted..
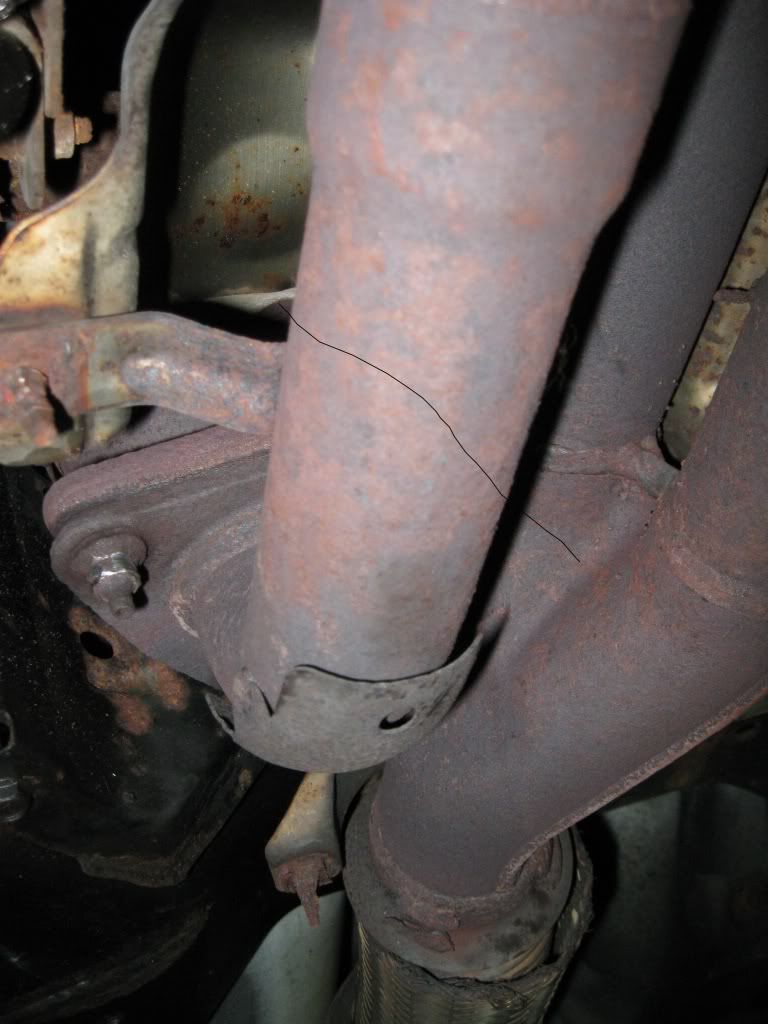
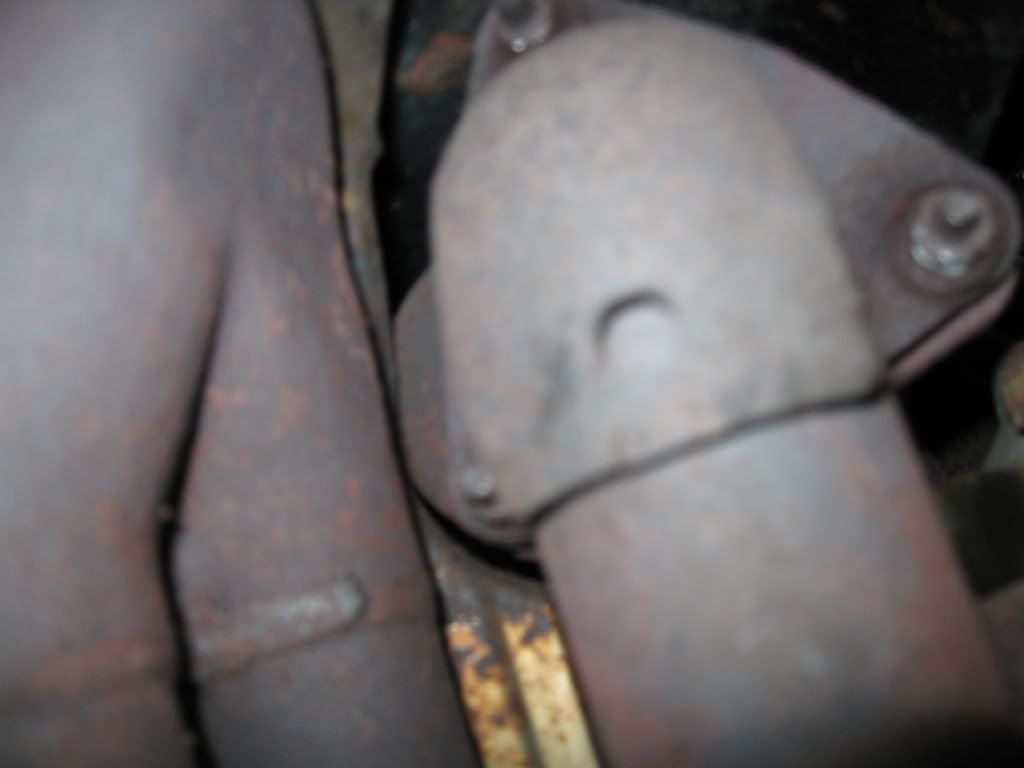
Looks like i have to cut those bolts off the y pipe that comes down from the rear cat because i spun two of them.. Also, my grinder cant fit in that tight place so do they make a cutting wheel that can fit in that tight area? Thanks..
Too bad i live in the midwest and my bolts are very rusted..
Looks like i have to cut those bolts off the y pipe that comes down from the rear cat because i spun two of them.. Also, my grinder cant fit in that tight place so do they make a cutting wheel that can fit in that tight area? Thanks..


 09-28-2011, 04:41 PM
#5

 09-28-2011, 05:39 PM
#7
Member
Thread Starter
Join Date: Sep 2009
Posts: 211
Its not really about power, just want to get rid of the precats.. I searched around and seen many benefits in doing this, but my main goal is the better gas mileage(maybe).. BTW, any suggestions on the cutting of the bolts? Would a angle grinder get in there to shave off the bolts? 
09-28-2011, 07:17 PM
#8
you can put a too small socket on and utilize a ratchet. basically an old trick for when you lose your wheel lock key. basically the 14mm, beat a 133 with a hammer. or you can use PB Blaster to loosen it hopefully. Only other way would be an air hammer. I have one in the garage lol, but you aint local lol
09-28-2011, 07:51 PM
#9
Member
Thread Starter
Join Date: Sep 2009
Posts: 211
you can put a too small socket on and utilize a ratchet. basically an old trick for when you lose your wheel lock key. basically the 14mm, beat a 133 with a hammer. or you can use PB Blaster to loosen it hopefully. Only other way would be an air hammer. I have one in the garage lol, but you aint local lol

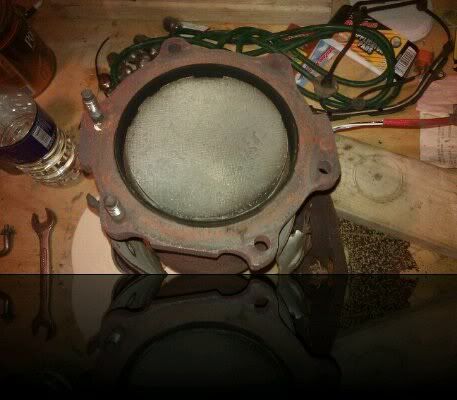
 pieces of the mesh missing from the front cat..
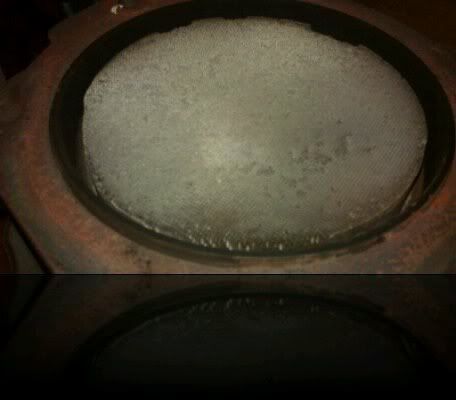 10-04-2011, 09:13 PM
#15
Junior Member

Join Date: Oct 2009
Posts: 36
Did you end up using a sawzall to remove those bolts?
As for the threads, if the oxygen sensor threads are mangled you can use a universal thread repair tool (you will need to measure pitch etc of the thread). If it's the read cat hole you need something like a Helicoil kit.
As for the threads, if the oxygen sensor threads are mangled you can use a universal thread repair tool (you will need to measure pitch etc of the thread). If it's the read cat hole you need something like a Helicoil kit.
10-05-2011, 02:54 AM
#16
Member
Thread Starter
Join Date: Sep 2009
Posts: 211
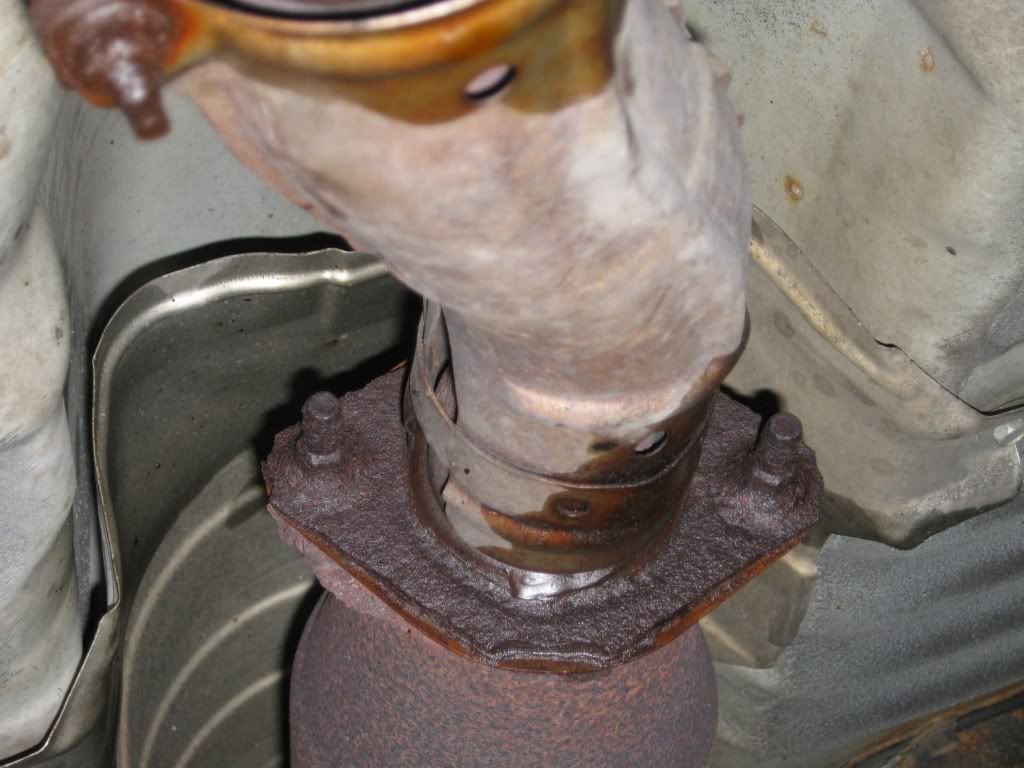
I used the sawzall on three bolts for the rear cat (firewall side) and for the main cat.. Bolts where too rusted to even heat loose..
Helicoil kit? I will look into that. Thanks.. 
 10-12-2011, 03:41 PM
#18
It should be 20691 8J100. It's depicted as a flat gasket in the parts catalog, but it should be a ring. Your local dealer will probably have it in stock.
10-12-2011, 04:03 PM
#19
Member
Thread Starter
Join Date: Sep 2009
Posts: 211
Thanks for the response... I guess i will have to go to the dealer and get screwed because i would hate to order a gasket and it doesnt fit.. My stealership wanted to charge me $13 for the gasket that goes between the main cat and the stock y pipe..
10-12-2011, 05:14 PM
#20

I re-used my old one with no leaks but i also gutted the cats on a whim so i didn't have gaskets but i might have just been lucky.I looked on courtesy parts.com and couldn't find that ring but i guess if you brought your pre-cat in to the stealership's parts dept and show them the missing gasket they may be able to find it for you.The diagram of the a33b exhaust on courtesy's site isn't right
10-12-2011, 05:17 PM
#21
 10-12-2011, 05:23 PM
#22
Member
Thread Starter
Join Date: Sep 2009
Posts: 211
 me b4 they do me. $20 ring gasket fo sure..
 10-12-2011, 05:51 PM
#24

i baught my "crush rings" when i did my cats from napa.... There is actually 2 crush rings total 1 on the y pipe section and one on the rear cat....they costt me about 4 dollars a peice....they also had the manifold gaskets for 14 bucks and the rear main cat gaskets for around 4 a peice also...if your thinking about going that route then i might be able to find the wrapper that the gaskets came in for the part #'s
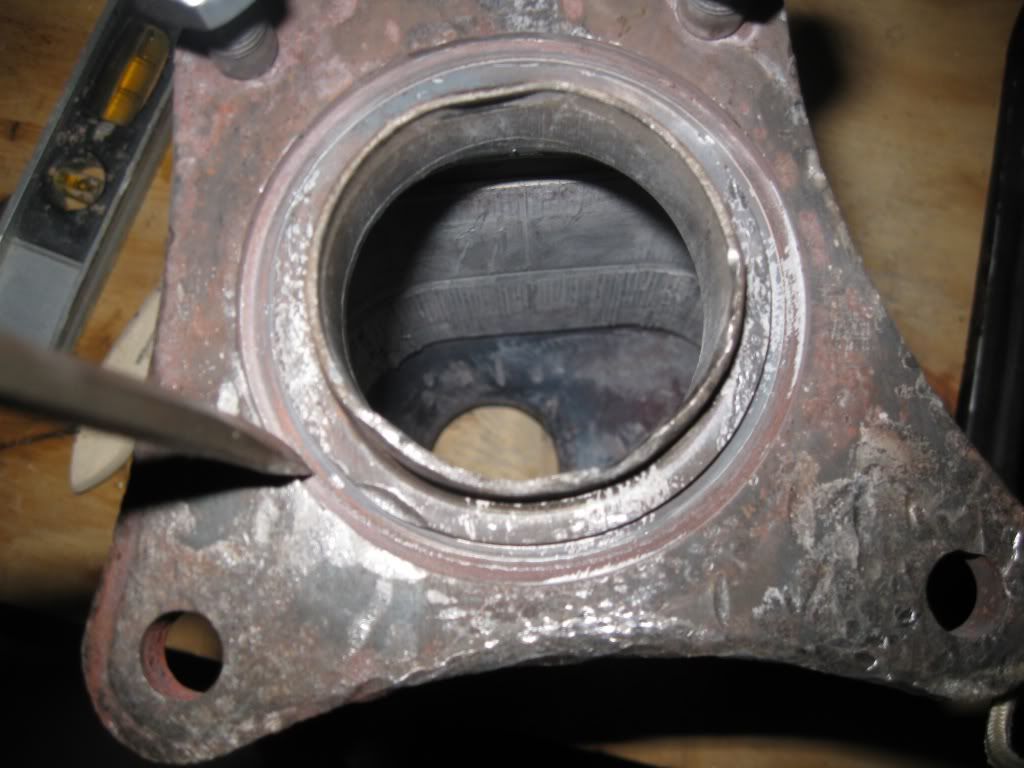
o and btw i also stripped the threads out of my 02 sensor getting it off...i played hell trying to get the sensor to screw into the anti fouler and then getting that whole thing into the stripped out y pipe...so i got it in as much as possible and jb welded around all the threads...its on there pretty damn tight but only problem is when i was trying to get the sensor off i some how i think damaged it and i heard rattling inside of the sensor...and i am throwing a ses light right now i believe its the p0430...
o and btw i also stripped the threads out of my 02 sensor getting it off...i played hell trying to get the sensor to screw into the anti fouler and then getting that whole thing into the stripped out y pipe...so i got it in as much as possible and jb welded around all the threads...its on there pretty damn tight but only problem is when i was trying to get the sensor off i some how i think damaged it and i heard rattling inside of the sensor...and i am throwing a ses light right now i believe its the p0430...
Last edited by 1991Maxima1991; 10-12-2011 at 05:57 PM.
 10-12-2011, 06:48 PM
#26
Member
Thread Starter
Join Date: Sep 2009
Posts: 211
if u can find the part# for the ring that is between the manifold and cat..o and btw i also stripped the threads out of my 02 sensor getting it off...i played hell trying to get the sensor to screw into the anti fouler and then getting that whole thing into the stripped out y pipe...so i got it in as much as possible and jb welded around all the threads...its on there pretty damn tight but only problem is when i was trying to get the sensor off i some how i think damaged it and i heard rattling inside of the sensor...and i am throwing a ses light right now i believe its the p0430...
10-24-2011, 05:36 PM
#28
Member
Thread Starter
Join Date: Sep 2009
Posts: 211
Well I finally got everything back together and figured i would post my personal results of gutting the precats..
With everything stock, on start up the car is noticeably louder than before. It has a gurgle that wasnt there before, but not raspy like some have posted they experienced.. Now the drive is when things get interesting.. First thing I noticed is a "moan" at around 2-3k rpm which turns into a "wooshing" sound as you lay into the trottle.. The wooshing is coming from the gutted precats i assume due to the large hollowed area.
As far as power gains is cocerned. I dont know if you would call it a gain or a power recovery, but it is noticeably quicker than before and pulls hard as heak all the way to redline.. It actually gets the 'slip' light going when punching it to redline in 2nd, just overall better in all rpm ranges to me than before.. I think i have to realign the y pipe to the rear cat because i can hear a rushing sound at wot in that area.
Im using the anti-foulers for my down stream sensors and the only code im getting is a p0057, one of codes i had before the job. I had a p0057 p0037 and p0138 (sensor on the ubend in the ypipe) and i replaced sensor so now just the lonely p0057. If anyone can help out would be most appreciated.
Overall i love the mod, just a lil too loud for my taste inside of the car...
With everything stock, on start up the car is noticeably louder than before. It has a gurgle that wasnt there before, but not raspy like some have posted they experienced.. Now the drive is when things get interesting.. First thing I noticed is a "moan" at around 2-3k rpm which turns into a "wooshing" sound as you lay into the trottle.. The wooshing is coming from the gutted precats i assume due to the large hollowed area.
As far as power gains is cocerned. I dont know if you would call it a gain or a power recovery, but it is noticeably quicker than before and pulls hard as heak all the way to redline.. It actually gets the 'slip' light going when punching it to redline in 2nd
, just overall better in all rpm ranges to me than before.. I think i have to realign the y pipe to the rear cat because i can hear a rushing sound at wot in that area. Im using the anti-foulers for my down stream sensors and the only code im getting is a p0057, one of codes i had before the job. I had a p0057 p0037 and p0138 (sensor on the ubend in the ypipe) and i replaced sensor so now just the lonely p0057. If anyone can help out would be most appreciated.
Overall i love the mod, just a lil too loud for my taste inside of the car...
10-24-2011, 06:39 PM
#30
Member
Thread Starter
Join Date: Sep 2009
Posts: 211
 I love that part.. Has a real nice tone to it.. I need to tighten up my exhuast pipe more because its real unstable from the center section back and i think that is causing some resonance.. Real strong mod no the less.. I guess this is how the mod snowball effect starts out?
10-24-2011, 06:41 PM
I love that part.. Has a real nice tone to it.. I need to tighten up my exhuast pipe more because its real unstable from the center section back and i think that is causing some resonance.. Real strong mod no the less.. I guess this is how the mod snowball effect starts out?
10-24-2011, 06:41 PM
#31

This what I found using a google search as you said you were using anti fowlers I found it odd that your still getting a O2 sensor code.
P0057 NISSAN Description
Oxygen Sensors (O2S) or Heated Oxygen Sensors (HO2S) need to reach a minimum operating temperature of 750 degrees F to produce an accurate voltage signal. The faster the heated oxygen sensor reaches that temperature the faster the sensor will start sending an accurate signal to the Engine Control Module (ECM).
In order to achieve the require temperature, a heater element is included inside the heated oxygen sensor. The ECM controls the heated oxygen sensor heater element based on signals from the engine coolant temperature and engine load. The ECM controls the heater element circuit by allowing current flow to ground.
The ECM monitors the voltage signal received through the heater element circuit and determines the state of the circuit by comparing the voltage detected with the factory specifications.
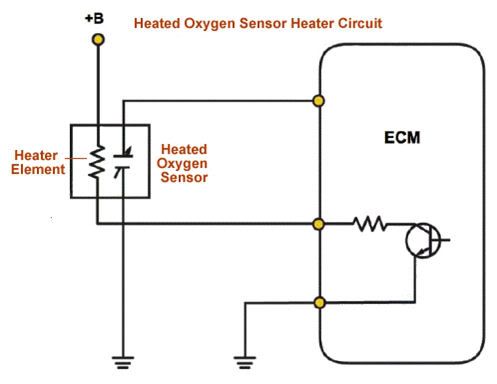
Symptoms
- Engine Light ON (or Service Engine Soon Warning Light)
Possible causes
- Heated Oxygen Sensor (H2OS) Bank 2 Sensor 2 circuit open shorted to ground
- Heated Oxygen Sensor (H2OS) Bank 2 Sensor 2 circuit poor electrical connection
- Faulty Heated Oxygen Sensor (H2OS) Bank 2 Sensor 2 circuit
- Heated Oxygen Sensor (H2OS) Bank 2 Sensor 2 circuit fuse
- Faulty Engine Control Module (ECM)
When is the code detected?
The P0057 is set when the ECM detects an excessively low voltage through the heated oxygen sensor heater circuit
Tech notes
The code means that there is a problem with the heater element circuit of the heated oxygen sensor. Water getting inside the heated oxygen sensor connector can caused the heated oxygen sensor fuse to blow, which is a very common problem for this type codes. Before replacing the sensor, check for the condition of the heated oxygen sensor fuse and connectors.
The tech note seems to be a good place to start, check to make sure you don't have water getting into the sensor and of course check any possible blown fuses. The other note of interest would be the engines coolant temperature.
P0057 NISSAN Description
Oxygen Sensors (O2S) or Heated Oxygen Sensors (HO2S) need to reach a minimum operating temperature of 750 degrees F to produce an accurate voltage signal. The faster the heated oxygen sensor reaches that temperature the faster the sensor will start sending an accurate signal to the Engine Control Module (ECM).
In order to achieve the require temperature, a heater element is included inside the heated oxygen sensor. The ECM controls the heated oxygen sensor heater element based on signals from the engine coolant temperature and engine load. The ECM controls the heater element circuit by allowing current flow to ground.
The ECM monitors the voltage signal received through the heater element circuit and determines the state of the circuit by comparing the voltage detected with the factory specifications.
Symptoms
- Engine Light ON (or Service Engine Soon Warning Light)
Possible causes
- Heated Oxygen Sensor (H2OS) Bank 2 Sensor 2 circuit open shorted to ground
- Heated Oxygen Sensor (H2OS) Bank 2 Sensor 2 circuit poor electrical connection
- Faulty Heated Oxygen Sensor (H2OS) Bank 2 Sensor 2 circuit
- Heated Oxygen Sensor (H2OS) Bank 2 Sensor 2 circuit fuse
- Faulty Engine Control Module (ECM)
When is the code detected?
The P0057 is set when the ECM detects an excessively low voltage through the heated oxygen sensor heater circuit
Tech notes
The code means that there is a problem with the heater element circuit of the heated oxygen sensor. Water getting inside the heated oxygen sensor connector can caused the heated oxygen sensor fuse to blow, which is a very common problem for this type codes. Before replacing the sensor, check for the condition of the heated oxygen sensor fuse and connectors.
The tech note seems to be a good place to start, check to make sure you don't have water getting into the sensor and of course check any possible blown fuses. The other note of interest would be the engines coolant temperature.
Last edited by Ghost_54; 10-24-2011 at 06:55 PM.
11-02-2011, 08:07 AM
#33
Member

Join Date: Jan 2004
Location: Ottawa, Canada
Posts: 104
cmax1, can you please give a more detailed explanation on how did you remove the 6 nuts that attach the y-pipe to the manifold and the 2 bolts that attach it to the catalytic converter. Was any drilling and re-tapping involved as well. My car is in it's 16th year in Ontario and my y-pipe is almost severed at the flex section, so I have to change it soon. I looked at it last night and my bolts all look like yours - can't even see any thread on them. I need to know if you cut the studs to the manifold, did you have enough space for the sawzall (especially at the rear manifold) and if you cut them, how do you attach the pipe to the manifold after that. Please explain in detail.
Thanks,
Tony
Thanks,
Tony
Last edited by svezarov; 11-02-2011 at 08:44 AM.
 11-03-2011, 08:34 PM
#35
Member
Thread Starter
Join Date: Sep 2009
Posts: 211
cmax1, can you please give a more detailed explanation on how did you remove the 6 nuts that attach the y-pipe to the manifold and the 2 bolts that attach it to the catalytic converter. Was any drilling and re-tapping involved as well. My car is in it's 16th year in Ontario and my y-pipe is almost severed at the flex section, so I have to change it soon. I looked at it last night and my bolts all look like yours - can't even see any thread on them. I need to know if you cut the studs to the manifold, did you have enough space for the sawzall (especially at the rear manifold) and if you cut them, how do you attach the pipe to the manifold after that. Please explain in detail.
Thanks,
Tony
Thanks,
Tony
Once every thing is out you can use a pipe wrench to remove the damaged bolts from the pre and rear cat then replace with store bought nuts and bolts...
Ivy usmc, i will post a clip over the weekend for you...
11-04-2011, 03:16 AM
#36
Senior Member

Join Date: Apr 2011
Location: Ontario, Canada
Posts: 539
It's not loud at all, if you still have a main cat and stock muffler, it will barely change. I did a Cattman y aswell an the unequal length caused a bit of a rumble at idle and when down revving, besides that it sounds mostly stock still

Thread
Thread Starter
Forum
Replies
Last Post
My Coffee
New Member Introductions
15
06-06-2017 02:01 PM
Justin Kroll
5th Generation Maxima (2000-2003)
7
09-02-2015 11:06 AM