Got a how to on CV/Axle replacement
 04-17-2010, 11:32 AM
#41
Senior Member

Join Date: Oct 2009
Location: Atlanta
Posts: 1,222
Finally had the passenger side Axle replaced (which is the harder side to replace). Good that I took it to a shop. If you do this on the garage, it will be a real PIA!
I have taken pics and will post. Seeing how it was done, I can probably do it if I need to the next time. Since the axles are warranted for life, sometime down the road, if it fails, I can change it myself.
The additional steps as stated earlier were not necessary. The pictures/steps did the job. Granting nothing has been rusted and stuck.
Good luck to those who want to try this. The hardest thing is laying on the floor and yanking stuff. If the car is on a lift, shoud be a 30 miute job.
Last edited by mandyfig; 04-17-2010 at 12:32 PM.

 02-21-2011, 07:36 AM
#52
Senior Member

Join Date: Mar 2004
Posts: 497
Can you give the part number from AAP? Are the following parts correct?
GSP New CV Axle Shaft Assembly Part No. NCV53106 New; Left; Front; AT; Except 20th Anniversary Edition; Torque Spec: 203 ft. lbs.; Wrench Size: 1-3/8 $70.00
Similar part for the right side NCV53107.
Thanks,
- Vikas
http://shop.advanceautoparts.com/web...7_524502426___


GSP New CV Axle Shaft Assembly Part No. NCV53106 New; Left; Front; AT; Except 20th Anniversary Edition; Torque Spec: 203 ft. lbs.; Wrench Size: 1-3/8 $70.00
Similar part for the right side NCV53107.
Thanks,
- Vikas
http://shop.advanceautoparts.com/web...7_524502426___
Last edited by sontakke; 02-21-2011 at 07:40 AM.
02-27-2011, 07:41 AM
#53
Newbie - Just Registered

Join Date: Aug 2005
Location: Seekonk, MA
Posts: 8
This thread is a life saver. I am the Boston area and it is 31 degrees with 2 inches of snow on the ground and I am in my driveway trying to knock out the passengerside. Thanks for the recommendation on the 12mm gearwrench to remove the 3 carrier bearing bolts - they were a breeze. Would have taken forever with a standard box wrench. Got to imagine that with 11 New England winters under its belt that the axle isn't just going to slip out of the carrier bracket...wish me luck.
02-28-2011, 12:47 PM
#55
Newbie - Just Registered
Join Date: Aug 2005
Location: Seekonk, MA
Posts: 8
... Bearing was frozen to the carrier bracket so had to take the long way home. Was not a bad job at all if you take out the snow and rain I had to deal with. Axle slipped in with no trouble, and I didn't have any extra bolts left over so I think I put it back together right.
One tip for anyone trying to remove the axel with the carrier bearing bracket still attached: rotate the entire bracket counter-clockwise (towards the back of the car) BEFORE you attempt to slide the axle out. I had to re-seat the axel in order to swing the bracket out of the way of engine, and then pull it back out again.
One tip for anyone trying to remove the axel with the carrier bearing bracket still attached: rotate the entire bracket counter-clockwise (towards the back of the car) BEFORE you attempt to slide the axle out. I had to re-seat the axel in order to swing the bracket out of the way of engine, and then pull it back out again.
Last edited by pocyrus; 02-28-2011 at 12:50 PM.
12-19-2011, 09:39 AM
#57

Final Word On AutoZone Axles??
I'm gonna bump this thread...
Seems the day has finally come, 10 yrs and only 90k miles of ownership -- that my CV boots have finally bitten the dust.
So, I know that Raxles only offers a DRIVER side replacement for my 02 6spd - and that is $219.
So, most guys are going the CHEAP route of AdvanceAuto (GSP) or Autozone (Cardone).
But after reading a TON of old posts, MANY guys mention a mysterious vibration after install thru the driveline, and AT Speed.
Some attribute this to a "balancing weight" being absent from their aftermarket replacement Axles...some not so sure.
So question is this: For you guys out there who chose the CHEAP route to replacement axles....How are they Holding-up?
And also, how many times did you have to replace your "new" axles due to manf's defect or other problems?! Balancing issues??
Just needs some advice and the BEST ones to buy.
If I have to get CHEAP, no sense in buying Raxles with only a DRIVER side option avail.
I'm not going to keep this car FOREVER.
thanks guys.
gr
12-19-2011, 09:46 AM
#58

I'm gonna bump this thread...
Seems the day has finally come, 10 yrs and only 90k miles of ownership -- that my CV boots have finally bitten the dust.
So, I know that Raxles only offers a DRIVER side replacement for my 02 6spd - and that is $219.
So, most guys are going the CHEAP route of AdvanceAuto (GSP) or Autozone (Cardone).
But after reading a TON of old posts, MANY guys mention a mysterious vibration after install thru the driveline, and AT Speed.
Some attribute this to a "balancing weight" being absent from their aftermarket replacement Axles...some not so sure.
So question is this: For you guys out there who chose the CHEAP route to replacement axles....How are they Holding-up?
And also, how many times did you have to replace your "new" axles due to manf's defect or other problems?! Balancing issues??
Just needs some advice and the BEST ones to buy.
If I have to get CHEAP, no sense in buying Raxles with only a DRIVER side option avail.
I'm not going to keep this car FOREVER.
thanks guys.
gr
Seems the day has finally come, 10 yrs and only 90k miles of ownership -- that my CV boots have finally bitten the dust.
So, I know that Raxles only offers a DRIVER side replacement for my 02 6spd - and that is $219.
So, most guys are going the CHEAP route of AdvanceAuto (GSP) or Autozone (Cardone).
But after reading a TON of old posts, MANY guys mention a mysterious vibration after install thru the driveline, and AT Speed.
Some attribute this to a "balancing weight" being absent from their aftermarket replacement Axles...some not so sure.
So question is this: For you guys out there who chose the CHEAP route to replacement axles....How are they Holding-up?
And also, how many times did you have to replace your "new" axles due to manf's defect or other problems?! Balancing issues??
Just needs some advice and the BEST ones to buy.
If I have to get CHEAP, no sense in buying Raxles with only a DRIVER side option avail.
I'm not going to keep this car FOREVER.
thanks guys.
gr
I used my 5mt Axle for the d/s until it just gave out on me in March (started vibrating+clicking too much)
Then I got another used 4th gen axle (auto) which gave out on me in July (vibrating and clicking), and my 3rd used 4th gen axle (auto) which I'm going to ditch (Broke both boots) and get a MasterPro (O'Reillys) for the d/s.
What am I saying? I've been through 3 used OEM axles and my GSP has made it through all of the abuse, yet the boots have not been torn yet, nor have I had vibrations from that axle.
And yes, my sig, that was done with the GSP axle, the chassis was making more noise than the drivetrain, no wobbling, no nuffin.
I will make an updated post in the other GSP axles suck thread, I do not have the dampenener like I said in the past.
D/S = Driver Side
P/S = Passenger Side
Last edited by aackshun; 12-19-2011 at 09:52 AM.
12-19-2011, 12:42 PM
#59

I have an 02 6spd and put replaced both axles with GSP. There is a noticalbe vibration on acceleration. The axles have held up well besides that for going on 25,000 miles and 3 years. I have a drop on eibachs and I think a few creaking sounds I get when fully turning the car may have something to do with these axles. GSP sells the passenger side axle for the 6 speed as the same for the AT. The 6 speed has a slightly longer shaft so they are incorrect but obviously still works.
12-21-2011, 03:58 PM
#60

you could check the threads about the GSP axles
Some people find them to be a good aftermarket replacement and I remember reading about MoncefA33's experience which wasn't that good. That was about 6 month ago or a bit more, but I might be wrong.
I'm running Autozone's axles (not sure if Cardone is the brand name) and got one boot cracked about 3 month ago. It's not leaking, but I already have a new boot sitting in the house and with a bit warmer conditions outside it will be replaced. Besides that - no other issues with axles
EDIT: I have 01 AE AT(with LSD), Moncef has 01 AE 5MT
found a thread - http://forums.maxima.org/5th-generat...axle-help.html
Last edited by shaks; 12-21-2011 at 06:35 PM.
12-23-2011, 10:11 PM
#61
Newbie - Just Registered

Join Date: Dec 2011
Posts: 1
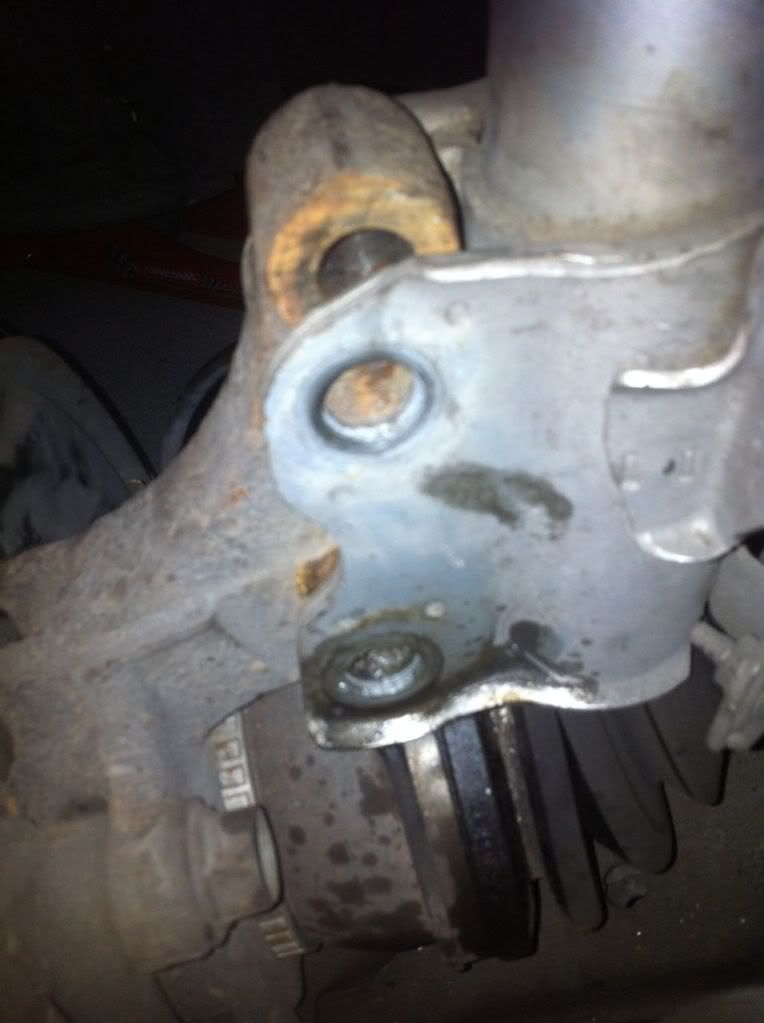
Passenger side axle replacement
Recently replaced passenger side axle in my 2003 Maxima. Aside from a little force to get the steady bearing assembly moving out of housing pretty straight forward. Now I've got a sort of grinding noise going on. It oscillates.
I am wondering if the new CV joint wasn't assembled right or was dry from the factory. I hate to throw in anew one and find I have the same problem. It's just noticeable enough to irritate me. Any suggestions.
I am wondering if the new CV joint wasn't assembled right or was dry from the factory. I hate to throw in anew one and find I have the same problem. It's just noticeable enough to irritate me. Any suggestions.
01-06-2012, 05:36 PM
#62

Replacing passenger side Axle
so i decided to replace my control arm and i have done a great job installing it, while i was at it, i noticed my passenger side axle is broken so, i took out the 3-12 mm bolts holding the mid shaft and the cv axle, When i purchased axles for my car i only purchased the actual axles without the mid shaft like in the picture below,
Can someone tell me how can i separate the mid shaft from the worn axle, i have tried all possible methods but i just couldnt separate them!
This is what i have now but the worn axle is attached to the shaft as in the picture below
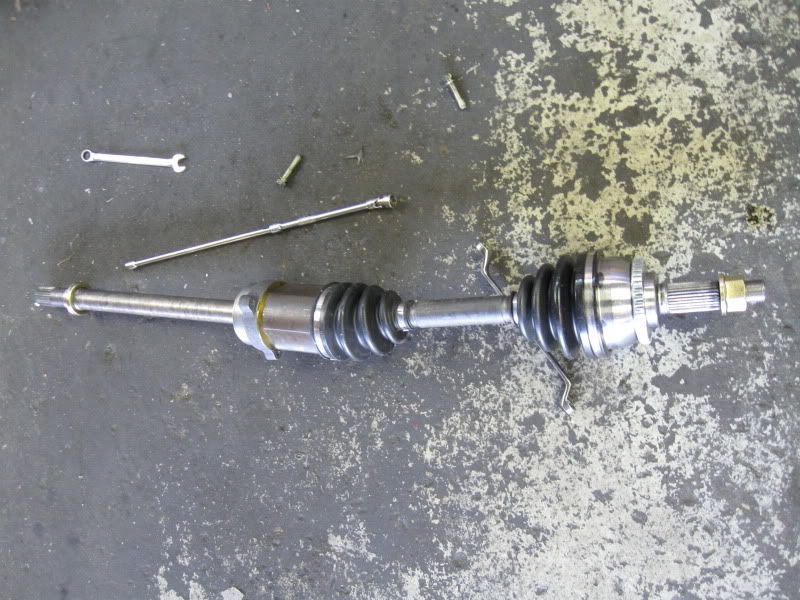
The axle bought is a NAPA brand and looks similiar to this
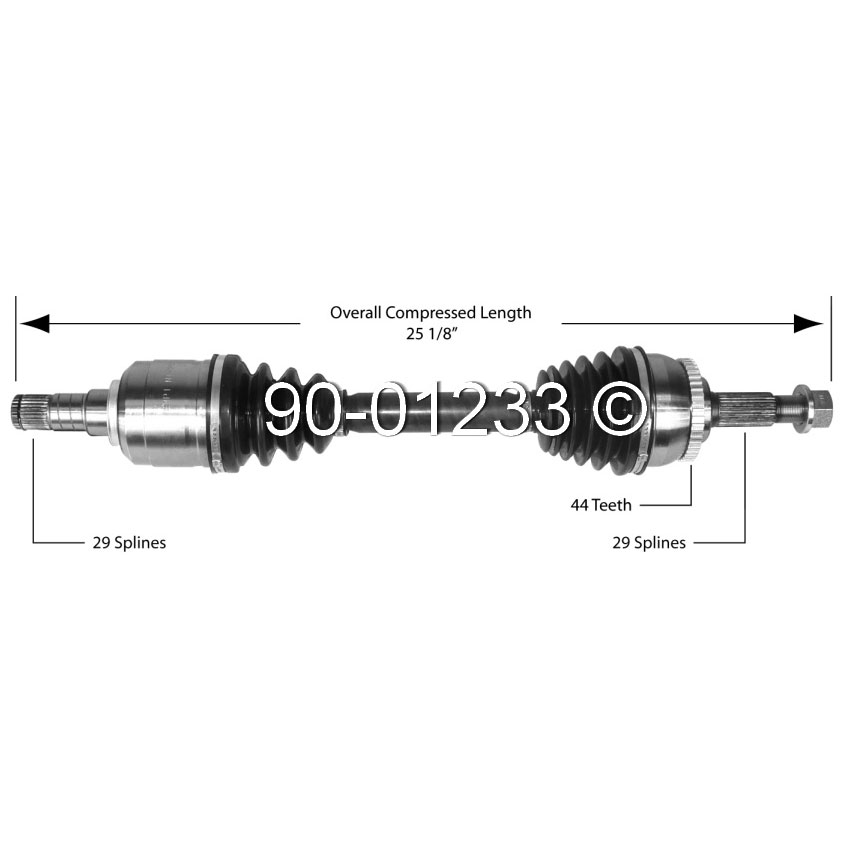
Any help is greatly appreciated.
Can someone tell me how can i separate the mid shaft from the worn axle, i have tried all possible methods but i just couldnt separate them!
This is what i have now but the worn axle is attached to the shaft as in the picture below
The axle bought is a NAPA brand and looks similiar to this
Any help is greatly appreciated.
01-07-2012, 03:05 PM
#63
Junior Member

Join Date: Oct 2006
Posts: 75
so i decided to replace my control arm and i have done a great job installing it, while i was at it, i noticed my passenger side axle is broken so, i took out the 3-12 mm bolts holding the mid shaft and the cv axle, When i purchased axles for my car i only purchased the actual axles without the mid shaft like in the picture below,
Can someone tell me how can i separate the mid shaft from the worn axle, i have tried all possible methods but i just couldnt separate them!
This is what i have now but the worn axle is attached to the shaft as in the picture below
The axle bought is a NAPA brand and looks similiar to this
Any help is greatly appreciated.
01-07-2012, 07:10 PM
#64

 08-22-2012, 08:47 PM
#66
Newbie - Just Registered

Join Date: Oct 2010
Location: Queens, NY
Posts: 12
 08-22-2012, 10:14 PM
#68
Newbie - Just Registered
Join Date: Oct 2010
Location: Queens, NY
Posts: 12
I see. when you did this did you only have one side of the car up? Cause I only have one side of the car up I have a feeling the whole front needs to be raise up not only one side. I'm goin to raise the whole front tomorrow see if that works of not then I'll remove the strut how did you get it back in? I know dumb question. thanks for the help though
08-18-2013, 08:37 AM
#69
Newbie - Just Registered

Join Date: Aug 2013
Posts: 2
Both Side Axle Replacement - How To
Here is how I replaced my 2000 Maxima front axles with Automatic Transmission.
Raise and secure the front end using jack stands and a back up jack or blocks underneath the frame for safety. Remove the front wheels and spray PB Blaster penetrating spray on the axle nut, the two lower strut bolts and the steering tie rod end castle nut. Spread a large tarp under the vehicle to work on because you will be crawling underneath the car.
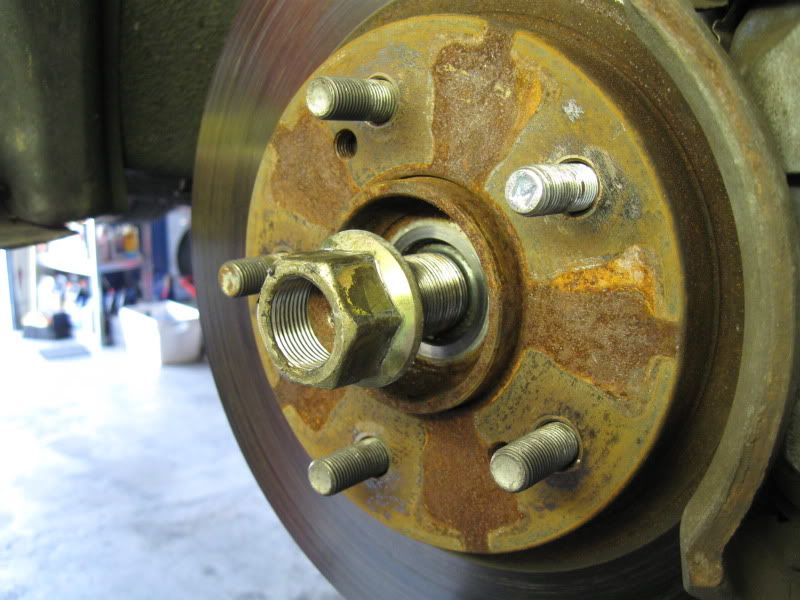
Insert a large screwdriver into the brake rotor as a holding pin, remove the cotter pin and axle nut. This nut may be 32mm or 35mm depending on the axle manufacture, I used a large breaker bar that I bought from Harbor Freight Tools that came with a lifetime warranty. If it breaks you get a new one free, not bad for $15 bucks. I bought the largest one they had because you will need every inch of it to get the axle nut off which is torqued to 217 ft pounds. With the brake rotor secured from turning I stood on the breaker bar and after a few bounces with my 200 pound body weight the nut broke loose. This is why you want to secure the vehicle on sturdy jack stands, it took a lot of energy to break the axle nut loose. You can do the same by keeping the car on the ground and removing the center cap on the wheel and securing the parking brake to get the same effect.
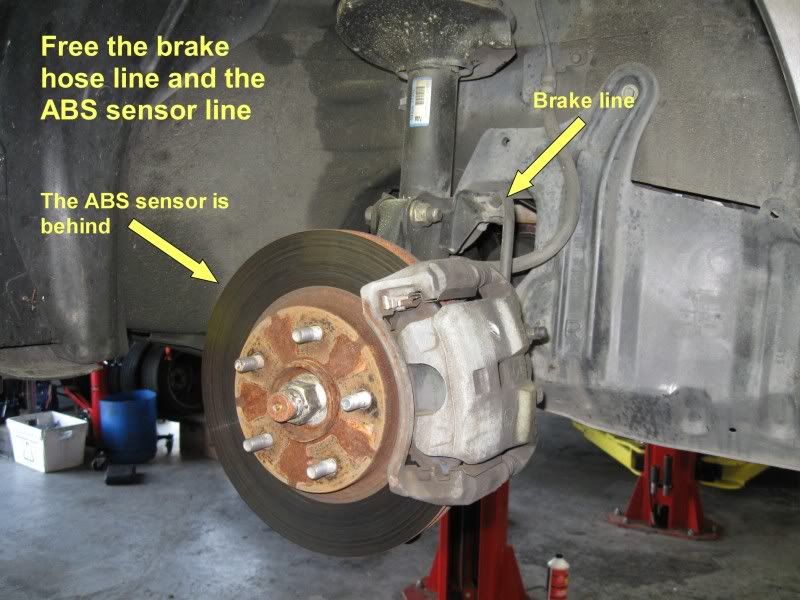
The passenger side axle is the hardest to replace so I started with this one first. I was doing a brake job at the same time so I removed the brake caliper assembly and wired it to the coil spring to get it out of the way. Remove the cotter pin and castle nut at the steering tie rod end, again PB Blaster was used to lubricate and free all bolts easily. I used a tie rod separator puller that I bought from Harbor Freight, they have the same tool at Autozone and both places are priced around $15 bucks. I then removed the tie rod end with the tool, if you are reusing the tie rod end you may want to thread back on the castle nut so you don�t damage the threads of the tie rod, you can always replace the castle nut if it gets damaged. Be careful when tightening the tool to be sure it is centered and secure on the tie rod end, use steady pressure and you will hear a pop when it breaks free and that�s a good sound. You can also use a pickle fork but you will probably end up damaging the boots. I removed my ABS wheel sensor at this point too, not worth damaging the wire or assembly so I took it loose from the wheel hub, cleaned it and hung it out of the way.
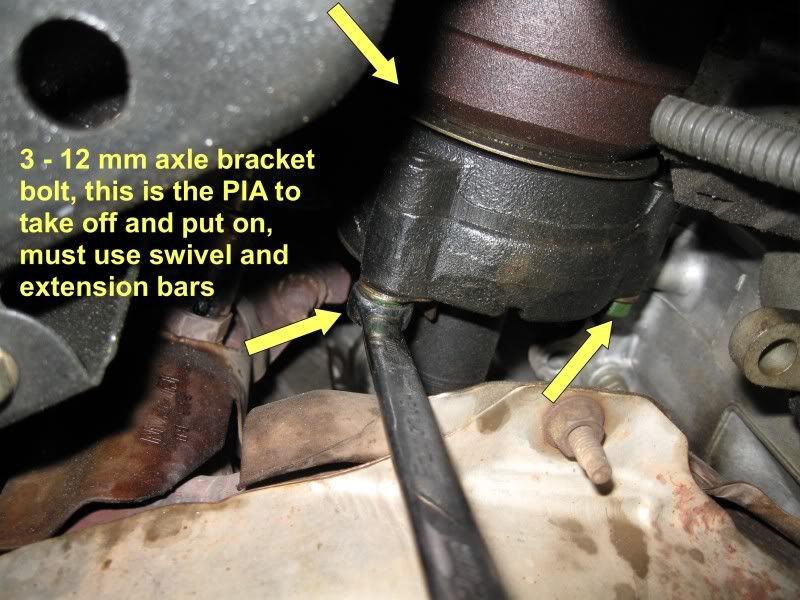
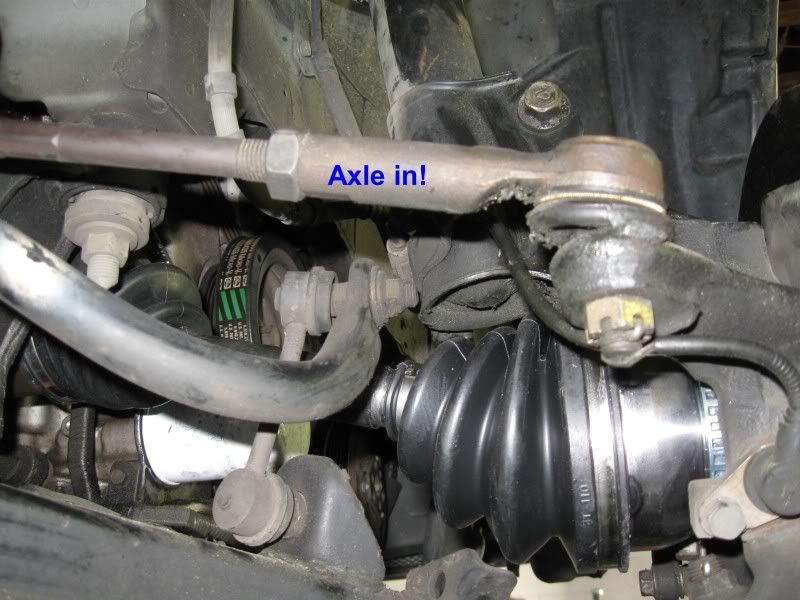
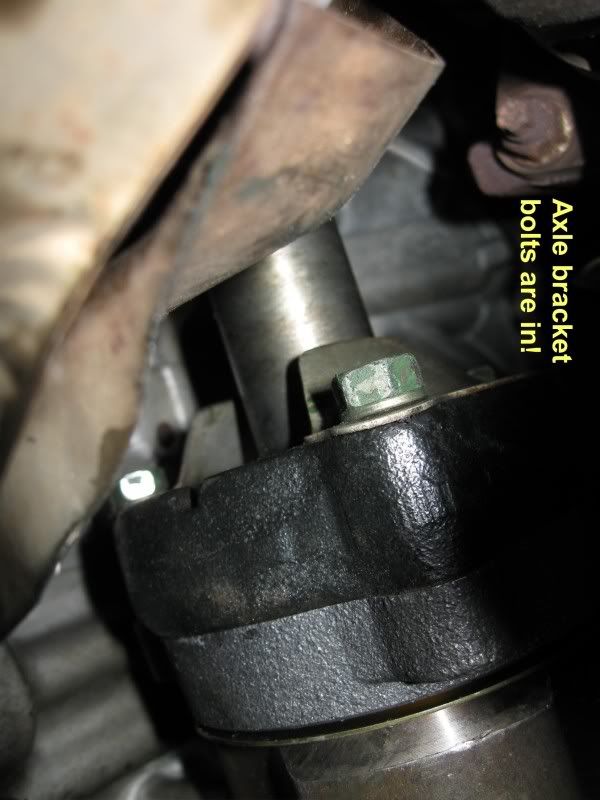
Once the steering tie rod is free, you can now loosen the two 19mm large bolts at the bottom of the strut. I first tapped the end of the axle with a rubber mallet to free it from the hub, mine was easy to free up in fact when I removed the axle nut I could see it move back into the hub. If yours is stubborn, use the PB Blaster in the axle to hub area and re-thread the axle nut back on so that you can hit the end of the axle with a block of wood and a hand held sledge hammer or dead blow hammer to free it. It only has to move � inch before it frees itself from the hub. Once the axle is free and loose from the hub, remove the two bolts from the lower strut and carefully lower the wheel hub assembly, you can remove the axle from the hub at this point, I left it in for now because it should be supported in order to remove the three 12mm bolts that hold the mid part of the axle to the motor/trans. Removing these three bolts is the time consuming fun part. There is a small amount of room for a small box end wrench but eventually I was able to remove these bolts laying underneath the car and taking my time. After removing the bolts, there is a metal flange piece with a slit to remove it from around the axle. With the three 12mm bolts and flange piece removed and the axle can now be removed from the wheel hub and the axle is ready to come out. I placed a small drain pan underneath the transmission to catch any transmission fluid once the axle is removed. Laying underneath the car and hanging on to both ends of the axle to support it, carefully remove the axle from the transmission. Be super careful when removing the axle, you do not want to catch or damage the seals inside the transmission, this is why supporting each end of the axle is important and removing it carefully. Use your fingers to support the axle next to the transmission side and the other hand toward the wheel end of the axle and pull. Pull it out strait and easy and it will come right out. Very little if any transmission fluid came out of mine, I was parked on a slight incline.
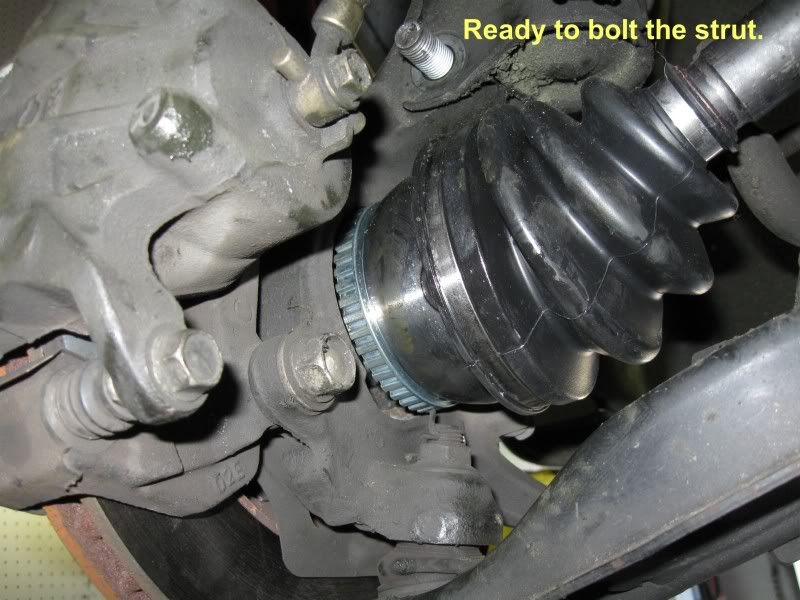
Inspect the old axle assembly and compare it with the new one. I rubber banded cardboard around the new axle boots so that I wouldn�t accidentally tear them when installing. I greased the splines and seal race area around the transmission side of the axle assembly. Assembly is in exact reverse order, get underneath and hold the new axle in both hands and carefully slide it into position. Slide it into the transmission, while underneath you can use your fingers to position it into the transmission. Be really careful not put too much weight on the seals, then center it and guide it in. You may have to rotate it slightly to get the splines to engage and push it in as far as it will go. You will know when the axle is all of the way in because the mount where the three 12mm bolts are will line up and become flush. Rotate the collar so that the three 12mm bolt holes line up, slide the split metal flange around the new axle and put one of the 12mm bolts in finger tight to hold it in place. Slide the wheel hub around the other end of the axle and you are home free. Finish bolting the remaining two 12mm bolts and carefully tighten all three of them. At this point you can remove the cardboard boot covers and start putting the front hub assembly back on. Align the two 19mm strut bolts and insert them as well as the steering tie rod end. The boots on my tie rod ends were torn but still had grease in them so the tie rod ends were still good. I replaced the boots with ones from the Autozone �help� rack, they were only $5 per pair and they worked perfectly. I used a razor blade to cut the old boots from the steering tie rod ends and cleaned and re-greased the tie rod ends and slid the new boots on. The new boots once compressed seal around the tie rod end so don�t worry about it not attaching directly to the rod itself like the factory boot. I use �Never Seize� compound on everything including a small smear in the area where the tie rod slips into the hole. Thread on the castle nut and tighten it down firmly until it bottoms, you will see the boot compress and seal perfectly when tightened. Install a new cotter pin, I never re-use an old pin and make sure the new pin is the same size as the old pin.
I use Never Seize compound where the axle race meets the wheel hub to make it easy to remove �if� there is a next time.
The driver�s side axle is much easier to do. Removal is basically in the same order with the only exception, no three 12mm bolts to hold it in place. What holds the axle in place is a circlip in the spline area of the transmission side of the axle, you can see this circlip on your new axle. I was able to remove the wheel hub from the wheel side of the axle and then by grabbing the axle and using it as kind of a slide hammer I just sharply yanked on it and it freed itself from the transmission. Others have used a crowbar or a large screwdriver between the transmission and the large collar on the axle, this didn�t work for me at all. I found that by pulling directly on the axle by grabbing the spline area where the outer axle bolt goes and pull sharply it should be enough force to free the circlip from the inside transmission and the axle should come right out. Same as the first side, take care not to damage the axle seal inside of the transmission when removing the axle.
When installing the new axle, compare it to the old axle for size and fit. Grease the transmission spline area and circlip. I also greased the race area where the seal rides on the axle. When installing the new axle, take precaution to protect the new CV boots so that they don�t tear on something when installing. Slide in the new axle and pop it into place so that the new circlip clicks in its groove firmly. You can either hear it or feel it when it clicks and there will be resistance if you try to pull back on the axle. If the axle pulls out easily, the circlip has not fully engaged in its mount, try it again until it locks into place and the axle does not pull out. Re assemble the remainder of the parts just like the other side, installing checking and re-checking all of the components.
Final check and test is to double check all bolts for proper torque, check cotter pins, tie rod ends and retighten the wheel hub axle bolt back to its 217 lb spec and put in a new correctly sized cotter pin. I installed new brake pads and rotors at the same time because it was well overdue, re install the wheels and lower the car and test drive. If you didn�t replace the tie rod ends or change the toe in or toe out adjustment your front end alignment shouldn�t really have changed all that much. You may want to consider having the front end re-aligned to double check, we have a place in town that will do it for $49 bucks so it may be worth it just to be sure.
Raise and secure the front end using jack stands and a back up jack or blocks underneath the frame for safety. Remove the front wheels and spray PB Blaster penetrating spray on the axle nut, the two lower strut bolts and the steering tie rod end castle nut. Spread a large tarp under the vehicle to work on because you will be crawling underneath the car.
Insert a large screwdriver into the brake rotor as a holding pin, remove the cotter pin and axle nut. This nut may be 32mm or 35mm depending on the axle manufacture, I used a large breaker bar that I bought from Harbor Freight Tools that came with a lifetime warranty. If it breaks you get a new one free, not bad for $15 bucks. I bought the largest one they had because you will need every inch of it to get the axle nut off which is torqued to 217 ft pounds. With the brake rotor secured from turning I stood on the breaker bar and after a few bounces with my 200 pound body weight the nut broke loose. This is why you want to secure the vehicle on sturdy jack stands, it took a lot of energy to break the axle nut loose. You can do the same by keeping the car on the ground and removing the center cap on the wheel and securing the parking brake to get the same effect.
The passenger side axle is the hardest to replace so I started with this one first. I was doing a brake job at the same time so I removed the brake caliper assembly and wired it to the coil spring to get it out of the way. Remove the cotter pin and castle nut at the steering tie rod end, again PB Blaster was used to lubricate and free all bolts easily. I used a tie rod separator puller that I bought from Harbor Freight, they have the same tool at Autozone and both places are priced around $15 bucks. I then removed the tie rod end with the tool, if you are reusing the tie rod end you may want to thread back on the castle nut so you don�t damage the threads of the tie rod, you can always replace the castle nut if it gets damaged. Be careful when tightening the tool to be sure it is centered and secure on the tie rod end, use steady pressure and you will hear a pop when it breaks free and that�s a good sound. You can also use a pickle fork but you will probably end up damaging the boots. I removed my ABS wheel sensor at this point too, not worth damaging the wire or assembly so I took it loose from the wheel hub, cleaned it and hung it out of the way.
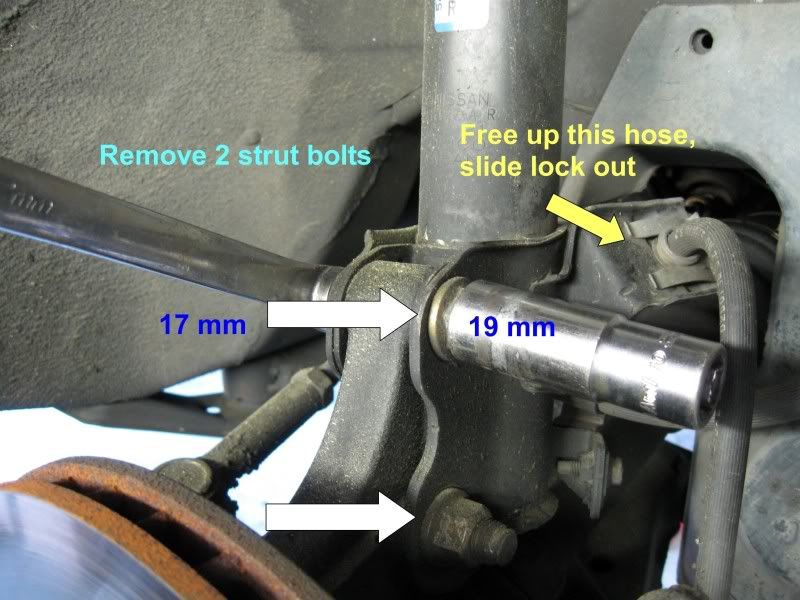
Once the steering tie rod is free, you can now loosen the two 19mm large bolts at the bottom of the strut. I first tapped the end of the axle with a rubber mallet to free it from the hub, mine was easy to free up in fact when I removed the axle nut I could see it move back into the hub. If yours is stubborn, use the PB Blaster in the axle to hub area and re-thread the axle nut back on so that you can hit the end of the axle with a block of wood and a hand held sledge hammer or dead blow hammer to free it. It only has to move � inch before it frees itself from the hub. Once the axle is free and loose from the hub, remove the two bolts from the lower strut and carefully lower the wheel hub assembly, you can remove the axle from the hub at this point, I left it in for now because it should be supported in order to remove the three 12mm bolts that hold the mid part of the axle to the motor/trans. Removing these three bolts is the time consuming fun part. There is a small amount of room for a small box end wrench but eventually I was able to remove these bolts laying underneath the car and taking my time. After removing the bolts, there is a metal flange piece with a slit to remove it from around the axle. With the three 12mm bolts and flange piece removed and the axle can now be removed from the wheel hub and the axle is ready to come out. I placed a small drain pan underneath the transmission to catch any transmission fluid once the axle is removed. Laying underneath the car and hanging on to both ends of the axle to support it, carefully remove the axle from the transmission. Be super careful when removing the axle, you do not want to catch or damage the seals inside the transmission, this is why supporting each end of the axle is important and removing it carefully. Use your fingers to support the axle next to the transmission side and the other hand toward the wheel end of the axle and pull. Pull it out strait and easy and it will come right out. Very little if any transmission fluid came out of mine, I was parked on a slight incline.
Inspect the old axle assembly and compare it with the new one. I rubber banded cardboard around the new axle boots so that I wouldn�t accidentally tear them when installing. I greased the splines and seal race area around the transmission side of the axle assembly. Assembly is in exact reverse order, get underneath and hold the new axle in both hands and carefully slide it into position. Slide it into the transmission, while underneath you can use your fingers to position it into the transmission. Be really careful not put too much weight on the seals, then center it and guide it in. You may have to rotate it slightly to get the splines to engage and push it in as far as it will go. You will know when the axle is all of the way in because the mount where the three 12mm bolts are will line up and become flush. Rotate the collar so that the three 12mm bolt holes line up, slide the split metal flange around the new axle and put one of the 12mm bolts in finger tight to hold it in place. Slide the wheel hub around the other end of the axle and you are home free. Finish bolting the remaining two 12mm bolts and carefully tighten all three of them. At this point you can remove the cardboard boot covers and start putting the front hub assembly back on. Align the two 19mm strut bolts and insert them as well as the steering tie rod end. The boots on my tie rod ends were torn but still had grease in them so the tie rod ends were still good. I replaced the boots with ones from the Autozone �help� rack, they were only $5 per pair and they worked perfectly. I used a razor blade to cut the old boots from the steering tie rod ends and cleaned and re-greased the tie rod ends and slid the new boots on. The new boots once compressed seal around the tie rod end so don�t worry about it not attaching directly to the rod itself like the factory boot. I use �Never Seize� compound on everything including a small smear in the area where the tie rod slips into the hole. Thread on the castle nut and tighten it down firmly until it bottoms, you will see the boot compress and seal perfectly when tightened. Install a new cotter pin, I never re-use an old pin and make sure the new pin is the same size as the old pin.
I use Never Seize compound where the axle race meets the wheel hub to make it easy to remove �if� there is a next time.
The driver�s side axle is much easier to do. Removal is basically in the same order with the only exception, no three 12mm bolts to hold it in place. What holds the axle in place is a circlip in the spline area of the transmission side of the axle, you can see this circlip on your new axle. I was able to remove the wheel hub from the wheel side of the axle and then by grabbing the axle and using it as kind of a slide hammer I just sharply yanked on it and it freed itself from the transmission. Others have used a crowbar or a large screwdriver between the transmission and the large collar on the axle, this didn�t work for me at all. I found that by pulling directly on the axle by grabbing the spline area where the outer axle bolt goes and pull sharply it should be enough force to free the circlip from the inside transmission and the axle should come right out. Same as the first side, take care not to damage the axle seal inside of the transmission when removing the axle.
When installing the new axle, compare it to the old axle for size and fit. Grease the transmission spline area and circlip. I also greased the race area where the seal rides on the axle. When installing the new axle, take precaution to protect the new CV boots so that they don�t tear on something when installing. Slide in the new axle and pop it into place so that the new circlip clicks in its groove firmly. You can either hear it or feel it when it clicks and there will be resistance if you try to pull back on the axle. If the axle pulls out easily, the circlip has not fully engaged in its mount, try it again until it locks into place and the axle does not pull out. Re assemble the remainder of the parts just like the other side, installing checking and re-checking all of the components.
Final check and test is to double check all bolts for proper torque, check cotter pins, tie rod ends and retighten the wheel hub axle bolt back to its 217 lb spec and put in a new correctly sized cotter pin. I installed new brake pads and rotors at the same time because it was well overdue, re install the wheels and lower the car and test drive. If you didn�t replace the tie rod ends or change the toe in or toe out adjustment your front end alignment shouldn�t really have changed all that much. You may want to consider having the front end re-aligned to double check, we have a place in town that will do it for $49 bucks so it may be worth it just to be sure.
11-05-2014, 12:06 PM
#70
Newbie - Just Registered

Join Date: Oct 2008
Posts: 4
Right CV Axle Replacement
I just replaced the rt CV axle on my 2000 Maxima GLE with auto transmission. I would like to relate my experience:
1. My boot was torn on right side, so decided on replacement axle. I chose the SURTRACK NI8094 from Rockauto. It cost $54.32 including shipping and got to So. Calif in two days from Fresno CA.
2. After I ordered the right side, I checked the left side, and saw that the boot was cracked. I then ordered the left side(drivers) and it also got here in two days and cost $53.10.
3. When I got them, I first noticed they were made in China, so was a little worried. I then opened them up, and looked at them. They seemed pretty good quality, and the boots seemed pliable but strong and thick enough.
4. I then decided to make a few measurements of the dimensions of the spline. I measured the diameter of the inner and outer splines of both axles and got the following:
Rt Front inner spline OD 1.173 in.
Rt Front outer spline OD 1.170 in.
Lt. Front inner spline OD 1.165 in.
Lt. Front outer spline OD 1.170 in.
So there was a max of 0.008 between all the OD measurements, andI thought that was a big tolerance.
5. I then went on the internet to check out Trakmotive.com. It turns out thay make over 1100 CV axles, so they are a big ourfit. I then call their Technical Service in Springfield MO, and asked them if they know the specs on the spline diameter. They did not have that information. I then asked if they had knowledge of any returns of this NI8094 or NI8095 axle being returned because they did not fit. They had no record of that. So in reality, technical service did not help. They did have the spec on the diameter of the sealing surfaces, and those dimensions were very close to what I had measured.
6. I then decided to try and replace the rt front axle. I followed the steps in this thread, but modified them slightly.
a. I remove the clips holding the brake line and the ABS line to allow more movement of the steering knuckle without damaging the lines.
b. I removed the two lower strut bolts, turned the steering wheel all the way to the right, and then after lightly tapping the end of the axle to break it free, I was able to get the axle out of the steering knuckle. I then put the steering knuckle back into the strut bracket, and put a drift pin to hold the steering knuckle while I worked on removing the rest of the axle.
7. I then measured the OD of the spline on the original axle and got 1.176, which was larger than any diameter I had measured on the new axles, so I thought there was a good chance the splines would fit.
8. I removed the three 12mm bolts holding the carrier bearing in place. That was a real PITA. I used an open end wrench, inside a little longer piece of metal tubing to break them loose. Then just the 12 mm open end wrench. (I do have a gearwrench. ) It took a good 1/2 hourt to get them all out.
9. I then could remove the axle.
10. I oiled the new axle spline and seal surfaces, and started to install the new axle. It was another PITA to get the new axle into the spline on the transmission, and another PITA to get the three bolts holding the carrier bearing in place.
11. I could not get the axle back into the steering knuckle, so I had to remove the tie rod end from the steering knuckle, and then I could get the axle back through the steering knuckle.
12. I put everything back together and have run it for a few days. No noise, and no leaks so far.
So in summary, I think the SURTRACK axles will fit and are acceptable for the Maxima. Only time will tell how long the boots last, but they felt pliable and strong.
Maxgle from CA
04-17-2016, 08:44 PM
#71
Newbie - Just Registered

Join Date: Dec 2013
Posts: 1
I Couldn't get my Driver side on cus of that C clip on the end. I tried every way possible but no luck. I looked up a thread and it said it would be fine to take it off so i did but its loose now it doesn't want to lock. I know i fd up . How can i fix it now? The clip is already to expanded for me to put it back
05-28-2016, 01:19 PM
#72
Senior Member

Join Date: Oct 2006
Posts: 604
could somebody direct me info on the passenger side axle seal? Looking on rockauto and they have 3 and I am confused which one to get. For $8-10 it is worth it to me to have it just in case it needs it during axle replacement or I rip it or something.
Thks.
http://www.rockauto.com/en/catalog/n...haft+seal,2336
Thks.
http://www.rockauto.com/en/catalog/n...haft+seal,2336
10-04-2020, 08:49 PM
#73
Member

Join Date: May 2017
Location: NYC
Posts: 125
I am on my 3rd Driver Side Axle. This time I purchased a unit from Rock Auto as suggested by many here on the forum. I used some information from this post and my Hanes Manual to complete the job.
Thanks!
I posted some footage from the job.
Thanks!
I posted some footage from the job.
Last edited by 2k2albatross; 10-05-2020 at 07:34 AM.
10-05-2020, 09:26 AM
#74
Senior Member

Join Date: Dec 2008
Location: NYC
Posts: 1,779
I am on my 3rd Driver Side Axle. This time I purchased a unit from Rock Auto as suggested by many here on the forum. I used some information from this post and my Hanes Manual to complete the job.
Thanks!
I posted some footage from the job.
https://youtu.be/SnO57HgGEgw
Thanks!
I posted some footage from the job.
https://youtu.be/SnO57HgGEgw
10-05-2020, 10:23 AM
#75
Member
Join Date: May 2017
Location: NYC
Posts: 125
TallTom,
I ordered the APWI NI8261A from Rockauto. I am still running on the original Passenger Side CV Axle. The old axle boot was ripped and the clicking noise started showing up on some sharp turns. I wanted to get this out of the way before the winter.
I ordered the APWI NI8261A from Rockauto. I am still running on the original Passenger Side CV Axle. The old axle boot was ripped and the clicking noise started showing up on some sharp turns. I wanted to get this out of the way before the winter.
10-21-2020, 08:32 PM
#76
I wanted to do a bump on the rest of this axle's life...
PS. I wish I could still buy this axle... doing the dirt @ stock height with Advance Auto Parts 6mt axles did NOT hold up on my i35, it was a yearly change... I think I moved to Orielys on my current TE and well I think that axle has play in it already.... Was installed in Decemberish when my Axle blew up...... But my TE is lowered.... Doesn't see anywhere near the amount of action my previous cars did but still... Lowered.....
I've heard bad things about the ebay brand axle w/ the balancer installed.....
I've did find a local shop that regreases and re-boots axles... Been doing that to my used OEMs that I recently put in the Red 99 and my 08.... So far so good.. But both of those cars are stockish height.... They will be abused.... But at stockish height..
I brought one GSP p/s axle for my 6mt swap back in January, been fine ever since.
-Continued to use this axle for quite some time, idk what happened to it after I sold the white nightmare in 2012.
I used my 5mt Axle for the d/s until it just gave out on me in March (started vibrating+clicking too much)
....blah blah.....
What am I saying? I've been through 3 used OEM axles and my GSP has made it through all of the abuse, yet the boots have not been torn yet, nor have I had vibrations from that axle.
;...blah blah....
D/S = Driver Side
P/S = Passenger Side
I've heard bad things about the ebay brand axle w/ the balancer installed.....
I've did find a local shop that regreases and re-boots axles... Been doing that to my used OEMs that I recently put in the Red 99 and my 08.... So far so good.. But both of those cars are stockish height.... They will be abused.... But at stockish height..
Last edited by aackshun; 10-21-2020 at 08:38 PM.
10-22-2020, 06:37 AM
#77
Senior Member

Join Date: Dec 2012
Location: Kissimmee FL
Posts: 994
great write up. due to 3 throwout bearings going bad, bad dual mass flywheel, and bad input shaft bearing I have pulled my transmission out 5 times over the past 8 years of ownership so doing these axles now is super easy.
one thing I must add when it comes to the 6 speed is to make sure they give you an axle that fits tightly into the seal. on one occasion I had a leak and it turned out that the axle wasn't the right one. that's what lead to the bad input shaft bearing, I got lazy...
one thing I must add when it comes to the 6 speed is to make sure they give you an axle that fits tightly into the seal. on one occasion I had a leak and it turned out that the axle wasn't the right one. that's what lead to the bad input shaft bearing, I got lazy...
Last edited by uptownsamcv; 10-22-2020 at 06:40 AM.

Thread
Thread Starter
Forum
Replies
Last Post
supergondi
4th Generation Maxima (1995-1999)
26
04-06-2020 12:45 PM
Violator
4th Generation Maxima (1995-1999)
9
03-23-2017 04:44 PM