Battery Relocation / True Cold Air Intake
 07-22-2007, 06:31 PM
#1
$$ Ballin on a Budget $$

Thread Starter
iTrader: (47)
Join Date: Mar 2006
Location: North FL.
Posts: 2,189
Battery Relocation / True Cold Air Intake
This is the battery relocation for the 2002/2003 Nissan Maxima. However, I'm sure it will work for the other gens too since it's basically the same. I did this on my 5.5 and my boys 5.5 gen Max.
This set up is for people that already have a aftermarket intake. If you are running the Injen intake, like I was, then you can use it. Using your Injen intake you will need to get another midpipe ( berk, frankencar etc...) and another coupling.
Tools:
Sharpie.
Dremel.
Drill with 17/64 drill bit.
10mm Socket / Wrench.
Screw Driver / Flate head, Phillips head.
Pliers
(1) 17/64th sized bolt.
How To: Relocating your batter and fuse box.
1) First of all turn your wheel all the way to the right.
2) Remove your Intake and next you need to remove your battery.
3) Remove the plastic cover, this will expose the (3) screws holding down
the battery tray. Take those out.

4) After removing the screws you will need to remove the fuse box. It is
held in place by two screws.

5) Looking at the tray you will see that the Positive terminal cable is
attached. Just pinch the zip tie and push it out. You should be able to
pull the tray out.
6) When you pull the tray out you'll see that it has mounting points for the
fuse box, the positive terminal mounts and where the tray mounted to
the car. ALL of these need to be cut off. Use your dremel to accomplish
this. Now is the time for this kid to get his sanding and painting skills on.
7) Looking at where the tray was you'll see a raised piece. This needs to
get cut off to make the surface flat. Just use the dremel to cut it off. If
you look close you'll see small circle's. This is the tack weld, lightly cut
over that circle and wedge your screw driver and pry it up. Take your
pliers and start turning it in a circle motion and it will pop right off.


This set up is for people that already have a aftermarket intake. If you are running the Injen intake, like I was, then you can use it. Using your Injen intake you will need to get another midpipe ( berk, frankencar etc...) and another coupling.
Tools:
Sharpie.
Dremel.
Drill with 17/64 drill bit.
10mm Socket / Wrench.
Screw Driver / Flate head, Phillips head.
Pliers
(1) 17/64th sized bolt.
How To: Relocating your batter and fuse box.
1) First of all turn your wheel all the way to the right.
2) Remove your Intake and next you need to remove your battery.
3) Remove the plastic cover, this will expose the (3) screws holding down
the battery tray. Take those out.
4) After removing the screws you will need to remove the fuse box. It is
held in place by two screws.
5) Looking at the tray you will see that the Positive terminal cable is
attached. Just pinch the zip tie and push it out. You should be able to
pull the tray out.
6) When you pull the tray out you'll see that it has mounting points for the
fuse box, the positive terminal mounts and where the tray mounted to
the car. ALL of these need to be cut off. Use your dremel to accomplish
this. Now is the time for this kid to get his sanding and painting skills on.
7) Looking at where the tray was you'll see a raised piece. This needs to
get cut off to make the surface flat. Just use the dremel to cut it off. If
you look close you'll see small circle's. This is the tack weld, lightly cut
over that circle and wedge your screw driver and pry it up. Take your
pliers and start turning it in a circle motion and it will pop right off.
Last edited by Orgullo; 04-23-2010 at 12:28 PM.
 07-22-2007, 06:31 PM
#2
$$ Ballin on a Budget $$
Thread Starter
iTrader: (47)
Join Date: Mar 2006
Location: North FL.
Posts: 2,189
8) Place your battery tray to sit parallel on the mounting point. You will use on of the existing holes to mount this.

9) Once you have it aligned slightly pick up the tray and you'll see where the other screw will go. Use your sharpie to mark the spot in relation to the tray on the tray. Once this is marked take your tray off and drill out the spot where you just marked. Use the 17/64th drill bit to drill out the spot.
After you drill it out lay it in place to make sure it lines up perfectly. If it does then straight, if not check your alignment and drill it out. This is enough to secure the weight of the battery with NO problems. Do not secure the battery tray down just yet.


Next is aligning the fuse box.
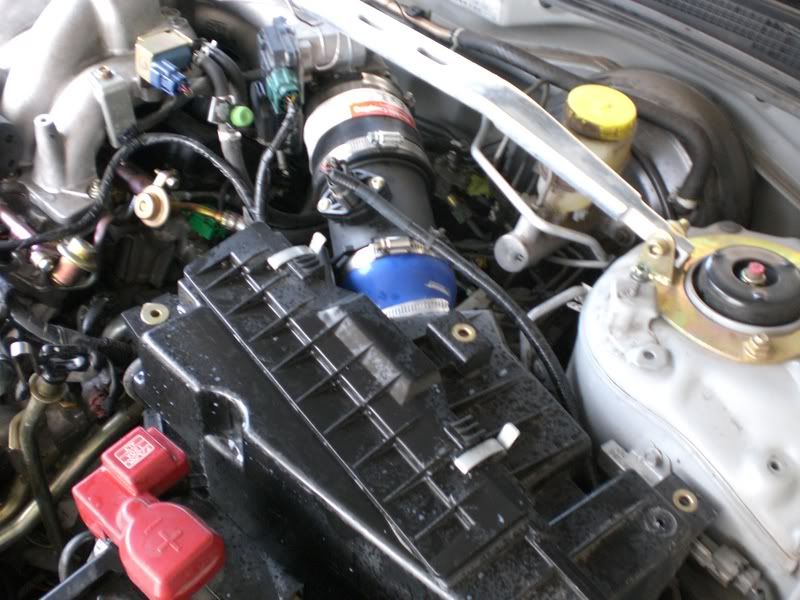
10) Parallel the fuse box and push it snuggly against the battery tray. You will see where the original mounting point on the fuse box was. You are going to use it again. Take your sharpie, mark the spot and move it to the side. Take your drill and 17/64th drill bit and drill out the hole. Don't worry there is nothing there but space. Put the fuse box in place and use your 17/64th bolt to secure it down.

This is what it should look like when you are done.

9) Once you have it aligned slightly pick up the tray and you'll see where the other screw will go. Use your sharpie to mark the spot in relation to the tray on the tray. Once this is marked take your tray off and drill out the spot where you just marked. Use the 17/64th drill bit to drill out the spot.
After you drill it out lay it in place to make sure it lines up perfectly. If it does then straight, if not check your alignment and drill it out. This is enough to secure the weight of the battery with NO problems. Do not secure the battery tray down just yet.
Next is aligning the fuse box.
10) Parallel the fuse box and push it snuggly against the battery tray. You will see where the original mounting point on the fuse box was. You are going to use it again. Take your sharpie, mark the spot and move it to the side. Take your drill and 17/64th drill bit and drill out the hole. Don't worry there is nothing there but space. Put the fuse box in place and use your 17/64th bolt to secure it down.
This is what it should look like when you are done.
Last edited by Orgullo; 04-23-2010 at 12:32 PM.
07-22-2007, 06:32 PM
#3
$$ Ballin on a Budget $$
Thread Starter
iTrader: (47)
Join Date: Mar 2006
Location: North FL.
Posts: 2,189
Now turn your INJEN WAI into a CAI. You will need a new midpipe and coupler to make this happen.
You have all this space to work with. Up underneath is open space. You will take your dremel and cut out a triangle shape, smiley face, whatever you like. J/K cut out a circle large enough for your piping to go through.
1) DO NOT go beyond this red line, you will be cutting into the frame. I found it easier to use a drill and drill holes, then take the dremel and cut the lines. Take your pliers and catch a corner and start turning in a circle. It will role up and come out easier. You can take your dremel and clean up the edges when you have finished.


2) Assemble your intake set up. Coupling, new midpipe, coupling, MAF, coupling, Long elbow of the Injen intake, coupling. You will assemble the Injen midpipe and filter inside the fender.

3) The Injen midpipe has a line for the vacuum. You will need to block this. I used some gasket making material. Also, on the long piping of the Injen there is the mounting point that you will need to cut off. You don't have to but it looks better.

4) Place your intake set up in place.

You have all this space to work with. Up underneath is open space. You will take your dremel and cut out a triangle shape, smiley face, whatever you like. J/K cut out a circle large enough for your piping to go through.
1) DO NOT go beyond this red line, you will be cutting into the frame. I found it easier to use a drill and drill holes, then take the dremel and cut the lines. Take your pliers and catch a corner and start turning in a circle. It will role up and come out easier. You can take your dremel and clean up the edges when you have finished.
2) Assemble your intake set up. Coupling, new midpipe, coupling, MAF, coupling, Long elbow of the Injen intake, coupling. You will assemble the Injen midpipe and filter inside the fender.
3) The Injen midpipe has a line for the vacuum. You will need to block this. I used some gasket making material. Also, on the long piping of the Injen there is the mounting point that you will need to cut off. You don't have to but it looks better.
4) Place your intake set up in place.
Last edited by Orgullo; 04-23-2010 at 01:02 PM.
07-22-2007, 06:32 PM
#4
$$ Ballin on a Budget $$
Thread Starter
iTrader: (47)
Join Date: Mar 2006
Location: North FL.
Posts: 2,189
5) After extending the piping into the fender you will need to pull the fender plastic towards you. You will see the piping coming down. You will then connect the Injen midpipe and filter to the piping coming in. This completes your intake set up.

note: Make sure all your couplers have been tightened down. Also, make sure you hook the vacuum line back up.
6) Everything is finished. Put your battery tray back on, secure it in place.
7) Put your fuse box in place and bolt it down.
8) Connect your battery negative and positive and your set.
It should look like this!!!


Running it short ram.

note: Make sure all your couplers have been tightened down. Also, make sure you hook the vacuum line back up.
6) Everything is finished. Put your battery tray back on, secure it in place.
7) Put your fuse box in place and bolt it down.
8) Connect your battery negative and positive and your set.
It should look like this!!!
Running it short ram.
Last edited by Orgullo; 04-23-2010 at 01:12 PM.
07-22-2007, 07:31 PM
#5
$$ Ballin on a Budget $$
Thread Starter
iTrader: (47)
Join Date: Mar 2006
Location: North FL.
Posts: 2,189
If you guys have any questions let me know. It took me about 2 hours to do this. Performance gained... meh... Don't really know yet. I do know that CAI is better then WAI.
Thanks for your time.
Thanks for your time.


 07-22-2007, 07:58 PM
#16
Originally Posted by NiSmOVQ35
i did this like last year LOL. But hey i guess everones catching on slowly.
BTW, you weren't the first to do it either, sorry to tell you. And you thought you were special.....


 07-22-2007, 10:58 PM
#20

Sweet thanks for the write up!  I might do this one day, when I get not so scared of cutting into the car lol.
Does the intake really stay dry down there?
Kind of scared of anything splashing up into it, but I mean hell right now it's right in front of the radiator anyways.
I might do this one day, when I get not so scared of cutting into the car lol.Does the intake really stay dry down there?
Kind of scared of anything splashing up into it, but I mean hell right now it's right in front of the radiator anyways.
 07-23-2007, 05:58 AM
#23
Originally Posted by platinum03SE
what do you mean
http://forums.maxima.org/showthread.php?t=528750
 07-23-2007, 08:35 AM
#25

https://maxima.org/modules.php?name=CAI
granted it's a 97, and the battery/fuse box were removed only to be replaced in the same spot. but i'm sure it's possible for 5th gen.
granted it's a 97, and the battery/fuse box were removed only to be replaced in the same spot. but i'm sure it's possible for 5th gen.
07-23-2007, 09:11 AM
#26
Nightmare = Reality
Join Date: Nov 2005
Location: Waterford, MI
Posts: 718
my reservation about this particular write-up is that you now have no support of the intake(at least in front of the MAF) and with that wide hole and variety of roads most of us see, this could lead to ruining what most people have probably overpaid for in the first place...just to fix it :P
07-23-2007, 10:49 AM
#27
$$ Ballin on a Budget $$
Thread Starter
iTrader: (47)
Join Date: Mar 2006
Location: North FL.
Posts: 2,189
Either post a wtb thread for a midpipe in the general and gen threads and see what comes up. I found one for 30.00 shipped. However, the car that I did this on he got his from Pepboys. It is just a straight 6" long tube. I had to cut a hole for the vacuum line and I sealed it with hi temp sealent. You can probably use the Fujita intake ( 6th gen ). I'm not sure if it's too long but I don't think it would be by much.
After you tighten the intake to the TB and the long piping going into the fender it basically supports itself. I've got a support under the MAF, I'll get some pics later today and post them up. It's just a matter of fabricating something up.
Before any of you do this mod turn your wheel to the right. Pull the fender guard towards you and look inside. It's is completely covered inside and stays nice and dry. So, regardless of road conditions etc... you don't have anything to worry about. That is unless you submerge your whole car in water then you might have something to worry about.
As for the hole, it's a choice. I did a diamond shape. You can cut a exact hole or whatever. There is enough space to do what you want. If you are planning on reselling your vehicle then no worries. I'm sure whomever buys your car would appreciate a cai as oppose to the wai. If not then take it back to stock then you can't see the hole at all.
Note: If you are willing to drive to Jacksonville, FL. I will be more then happy to do this mod for you. At a cost of course. PM me if you are interested.
07-23-2007, 03:20 PM
#29
$$ Ballin on a Budget $$
Thread Starter
iTrader: (47)
Join Date: Mar 2006
Location: North FL.
Posts: 2,189
Originally Posted by Teufelhunden
if you already have a mid pipe or a short ram intake with a decent filter, you can get the obx cai (injen knock off) for like 65 bucks on ebay. thinking about doing this....hmmm...
Thanks...
07-23-2007, 05:11 PM
#30

Another option for those who want to keep low-end torque and not have a superloud intake. Leave the stock helmholtz resonator in place with MAF attached to it, then feed the piping down to the fender opening.
Basically, keep stock from TB to MAF, then CAI from MAF to fender.
Currently, I have the resonator in place and just added a adapter plate and conical filter to the MAF. WAI. This writeup is actually giving me some nifty ideas.
Basically, keep stock from TB to MAF, then CAI from MAF to fender.
Currently, I have the resonator in place and just added a adapter plate and conical filter to the MAF. WAI. This writeup is actually giving me some nifty ideas.
07-23-2007, 05:15 PM
#31
Originally Posted by nismopc
Another option for those who want to keep low-end torque and not have a superloud intake.
 07-23-2007, 05:21 PM
#32
o, yeah forgot to mention thanks for taking your time for a great write up!
link to obx cai http://cgi.ebay.com/ebaymotors/OBX-C...40842392QQrdZ1
all you need is the two pipes if you already have a mid pipe, like me.
or
if you already have a injen cai, you can get this....
http://cgi.ebay.com/ebaymotors/Nissa...40910371QQrdZ1
link to obx cai http://cgi.ebay.com/ebaymotors/OBX-C...40842392QQrdZ1
all you need is the two pipes if you already have a mid pipe, like me.
or
if you already have a injen cai, you can get this....
http://cgi.ebay.com/ebaymotors/Nissa...40910371QQrdZ1
07-23-2007, 06:43 PM
#33
Great write-up.
Also if you want to just move the battery to the trunk Here is a Write-up for that
Also if you want to just move the battery to the trunk Here is a Write-up for that
07-23-2007, 06:47 PM
#34
Originally Posted by NmexMAX
This is how you keep great power, smoothness, and beautiful sound.
So Basically you have: coupler, MAF, coupler, stock peice??? Also do you have the very front piece on also like the one that look like it sucks air directly under the hood???
07-23-2007, 06:58 PM
#35
Newbie - Just Registered

Join Date: Jul 2007
Posts: 6
Originally Posted by soonerfan
he drives a neon and is trying to PW to get to 15 posts 
 dont forget your parting gift.
My GF has the Maxima, Im just lookin for some cool mods I can do for her to put that smile back on her face when she hits the go pedal, she;s kinda board with it since I've gotten my lil ol' neon.
07-23-2007, 07:58 PM
#36
Originally Posted by pimpin02max
So Basically you have: coupler, MAF, coupler, stock peice??? Also do you have the very front piece on also like the one that look like it sucks air directly under the hood???

 proof?