Post your HID retrofit how-to HERE
 07-01-2007, 02:20 PM
#1
retired moderator

Thread Starter
iTrader: (38)

Join Date: Oct 2003
Location: Burke, VA
Posts: 27,289
Post your HID retrofit how-to HERE
The 5th gen moderators (and others) have decided that it is now OK to post up the HID retrofit instructions now, for several reasons:
1. Most Maxima HID thefts are for the ballasts, which will be used in Hondas, Toyotas, etc.....Most of the time the housings are broken (at least the tabs) and are more or less useless for Maximas anyhow.
2. If someone is willing to steal headlights to retro into their MAXIMA, they probably have the resourcefulness to retrofit them WITHOUT a how-to on maxima.org
3. If people are going to steal them, they're going to steal them. Whether or not we have a writeup on retro'ing them has not a damn thing to do with it. We don't have a ban on posting how to install head units or amps or subs....and they get stolen ALOT more than HIDs do.
4. Entire replica HID lights for the maxima are all over ebay...and the price of new ballasts is going down. There seem to be ALOT less thefts these days compared to a couple years ago (at least based on the posts around the org).
Because of the above points, it is now allowable to post your HID retrofit how-to here if you have one. So go ahead:
EDIT: PLEASE READ:
From here on out, any posts in this thread that are not directly on-topic to the posted thread title (HID retrofit how-to questions or answers) will get the person who posts it a 1-week ban. This applies to veterans and noobs equally, and no additional warnings will be given. Note to veterans: This includes "funny" responses to THIS post.
Try me. You may be able to ***** up other peoples' threads, but you will not be whoring up mine, trust me.
Last edited by irish44j; 10-25-2007 at 08:07 PM.
 07-02-2007, 12:20 PM
#2
First off, you have to select the equipment you want based on the upgrade you want. For the sake of time, I'll just talk about retrofitting the 02/03 OEM/DEPO lights into a 00/01, as this is (about) the route I took. The easiest way to do this is to simply purchase the 02/03 headlights, complete with bulbs and ballasts, buy the headlight wiring kit from Dave B (with the headlight clips), and you're good to go. Then, you simply need to acquire the wiring instructions from someone that has them (proof of purchase, such as Paypal receipts, work well for this), wire them up, and enjoy massively improved lighting!
Another route to go is retrofitting xenon projectors into the 00-03 Ebay projector headlights. One prime example of this is here. Since the 00-03 projectors already have a bracket installed, you simply need to open the lights, remove the H3 projector, and install the projector of your choice. You can either not use the H3 high-beam and instead use a bi-xenon projector or use a low-beam only projector. For my retrofit referenced above, I went with E55 bi-xenon from a 04 Maxima and had a "running light" installed in the high-beam reflector. Popular projector choices for this type of retro are E46 (single-xenon, low beam only), TSX, and E55.
Another way to go is to simply remove the H4 bulb on the 00/01 and replace it with a bi-xenon projector. This can be difficult (at least it was when I attempted it), as you must cut out part of the reflector bowl itself and mount the projector (bi-xenon unless you like not having high-beams) into the bowl. Then, you have to ensure that it is level. But this will require the least work when it comes time to wire them up.
Now for the fun part: how to open up the headlights. You have 2 options: a heat gun or an oven. I used a gas oven when I opened several headlights. What temperature and how long varies from oven to oven, but most agree on about 200-250 for 10 or more minutes. I used 275 for 25 minutes (my oven sucks), with the headlight on a water-soaked towel placed on a baking sheet (specifically, for cupcakes). Before you heat up the headlight, there are 2 screws along the outer side that you must remove, IIRC. Then, you stick the headlight in the oven, bake it, pull it out, and use a screwdrive or some other flat tool to gently pry up the plastic sides, as now the glue is soft. You may want to use something disposable, as the damn glue will get all over the tool you use to pry them open.
Once you've got them open, you need to separate the front lense from the rear plastic, remove the bracket (if necessary), and go to work.
There's plenty of stuff I can add later, I'm just too lazy to type it all now. I'm not expert on the subject, but I've done a hell of a lot of reading about it, as well as planning like crazy. First off, start here. Register for HID Planet's forums, go into the HID University section and READ. After you've read everything, re-read it. Then again. Then, start browsing the General HID forum and read some more. I can't stress it enough, READ EVERYTHING YOU CAN.
07-02-2007, 12:59 PM
#3

 The key is reading and research. Here is a my ebay projector retrofit project. I should be updating the page within the next few days and will post highlights on this thread.
07-02-2007, 09:35 PM
The key is reading and research. Here is a my ebay projector retrofit project. I should be updating the page within the next few days and will post highlights on this thread.
07-02-2007, 09:35 PM
#5
Originally Posted by irish44j
I was kind of talking about someone posting up the wiring instructions to put the 02-03 OEM HIDs into the 00-01. It's no secret how to open them up...
07-03-2007, 07:09 AM
#6

here is a write up i got an ASSIT with from one of the .orgers here....i cant remember his user ID, but i have his email address.
Tools Needed:
- Wire Cutter
- Splicing Tool
- Flat Screwdriver
- 10mm Socket w/ Ratchet
- Black Electrical Tape
1. Removing Headlights:
- Disconnect negative terminal (-) from your battery.
- Undo top two screws of headlights. Each one holds one bracket of headlights.
- Remove all the plugs from back of the headlights
- Pull the headlight assembly out. It took a really good pull to pop those headlights out.
2. Preparing the Wires:
- Cut the H4 plug and Turning Signal plug. Cut few inches away from the plug just in case you want to go back to your old headlights.
- The following wiring code is for a 2k1 Maximum. I'm not sure about 2k Maxima. It might be the same; it might not be the same. As long as it's US version Maxima, wires should be the same. Canadian is different because they have daytime running lights.
Here are the breakdowns of colored wires:
Turning Signal Wires:
Red/Yellow - parking lights
Black - ground
Green/Yellow - turn signal blinker
H4 Wires (Driver Side):
Green/Yellow - ground (low beam)
Blue/White - Ground (high beam)
Pink/Blue - 12 Volts
H4 Wires (Passenger Side):
Blue/Black - ground (low beam)
Green/Black - ground (high beam)
Orange/Black - 12 Volts
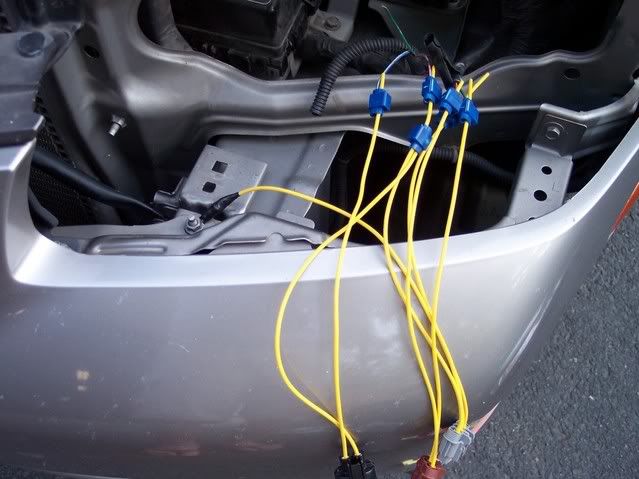
3. Connecting the Wires:

- Using the color code given above, connect the wires together. Use a crimping tool or something. Don't just tie the wires together and wrap w/ electrical tape. Make sure the wires are secure and that they won't get wet if water gets in. Remember, just line up the wires; as you can see in the picture, green/white wire is left most, so left most wire of the harness should be the same (green/white) and so forth.
- Make sure middle wire of harness is grounded to car. That way, when you turn on your high beams, your low HID beams will still be on!
- High beams have two wires. Connect one wire to Blue/White or Green/Black factory wire. The other wire is connected to Pink/Blue or Orange/Black factory wire. So, Pink/Blue or Orange/Black wires are connected to 2 other wires (total of 3 wires). All the other wires are connected to 1 other wire. Remember to use the color wire table in page 1.

4. Finishing Up:
- Remove the white clip that holds the bottom of the headlights to the car. I used a big flat head screwdriver and prayed that thing out. It's ok if you break it cause 2k2 or 2k3 headlights use different clip. If you have new clips, put it in, if not, go get a set. Headlights can still be installed w/out the clips but I recommend getting those soon.

- Double make sure each wire is connected secure and connected to correct set of wire. After that, bring headlights close to the body of car, plug everything in, and then install the headlights. I tried to plug in everything after I put my headlights back in. I didn't have enough room to move my hands around so plug everything before you put your new headlights in.
- Connect the battery. You are all done.
I have a word document for it, with the pics all integrated into it....if you need it PM your email address...also photos in the word document i have are a bit cleaner
Tools Needed:
- Wire Cutter
- Splicing Tool
- Flat Screwdriver
- 10mm Socket w/ Ratchet
- Black Electrical Tape
1. Removing Headlights:
- Disconnect negative terminal (-) from your battery.
- Undo top two screws of headlights. Each one holds one bracket of headlights.
- Remove all the plugs from back of the headlights
- Pull the headlight assembly out. It took a really good pull to pop those headlights out.
2. Preparing the Wires:
- Cut the H4 plug and Turning Signal plug. Cut few inches away from the plug just in case you want to go back to your old headlights.
- The following wiring code is for a 2k1 Maximum. I'm not sure about 2k Maxima. It might be the same; it might not be the same. As long as it's US version Maxima, wires should be the same. Canadian is different because they have daytime running lights.
Here are the breakdowns of colored wires:
Turning Signal Wires:
Red/Yellow - parking lights
Black - ground
Green/Yellow - turn signal blinker
H4 Wires (Driver Side):
Green/Yellow - ground (low beam)
Blue/White - Ground (high beam)
Pink/Blue - 12 Volts
H4 Wires (Passenger Side):
Blue/Black - ground (low beam)
Green/Black - ground (high beam)
Orange/Black - 12 Volts
3. Connecting the Wires:

- Using the color code given above, connect the wires together. Use a crimping tool or something. Don't just tie the wires together and wrap w/ electrical tape. Make sure the wires are secure and that they won't get wet if water gets in. Remember, just line up the wires; as you can see in the picture, green/white wire is left most, so left most wire of the harness should be the same (green/white) and so forth.
- Make sure middle wire of harness is grounded to car. That way, when you turn on your high beams, your low HID beams will still be on!
- High beams have two wires. Connect one wire to Blue/White or Green/Black factory wire. The other wire is connected to Pink/Blue or Orange/Black factory wire. So, Pink/Blue or Orange/Black wires are connected to 2 other wires (total of 3 wires). All the other wires are connected to 1 other wire. Remember to use the color wire table in page 1.

4. Finishing Up:
- Remove the white clip that holds the bottom of the headlights to the car. I used a big flat head screwdriver and prayed that thing out. It's ok if you break it cause 2k2 or 2k3 headlights use different clip. If you have new clips, put it in, if not, go get a set. Headlights can still be installed w/out the clips but I recommend getting those soon.

- Double make sure each wire is connected secure and connected to correct set of wire. After that, bring headlights close to the body of car, plug everything in, and then install the headlights. I tried to plug in everything after I put my headlights back in. I didn't have enough room to move my hands around so plug everything before you put your new headlights in.
- Connect the battery. You are all done.
I have a word document for it, with the pics all integrated into it....if you need it PM your email address...also photos in the word document i have are a bit cleaner

 07-03-2007, 12:10 PM
#9
^^its intended for installing the 2002-2003 HID OEM headlights INTO the 2000-2001 standard H4 headlights...basically the wiring is different, and with the write up it allows you to spice the 2k2 headlight wiring into your 2k or 2k1 wiring
07-03-2007, 09:40 PM
#13
http://www.cardomain.com/ride/539334/5
THIS HOW-TO WAS DONE BY "dafertilizer"
http://forums.maxima.org/member.php?u=63530
Passenger side light overall wiring
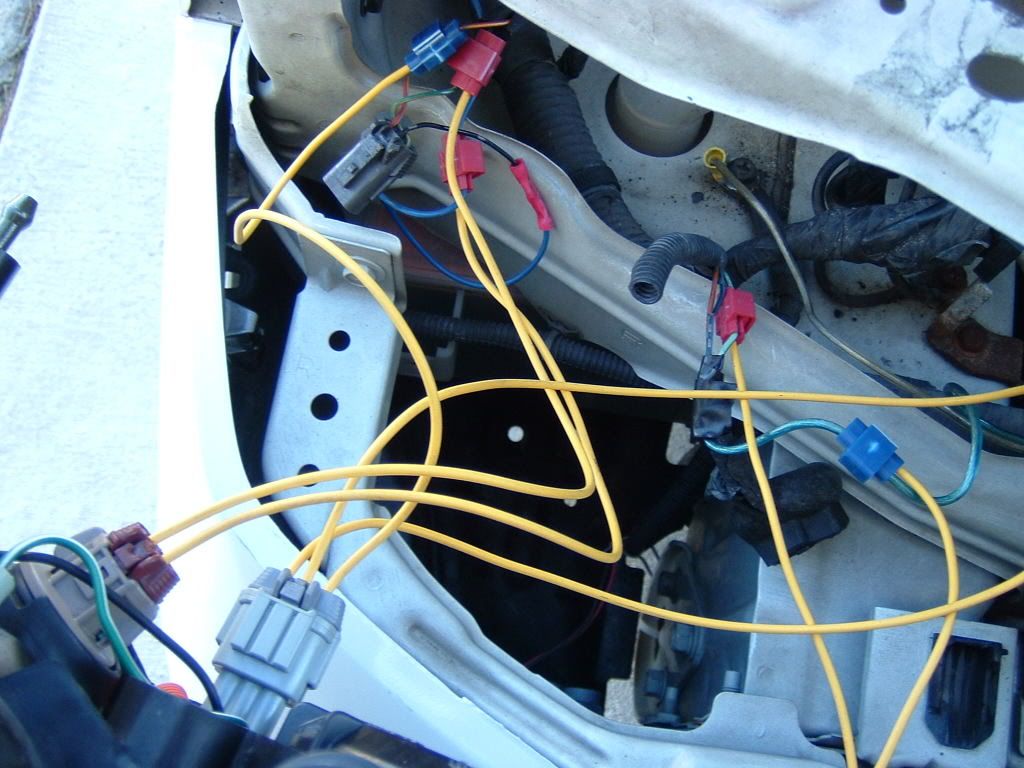
High Beam
red connector is connected to the 2k harness green wire as shown in the next photo
The blue connector is wired to the blue wire that I put there, it is the power wire from the 2k harness, it powers both the high beam and the HID.
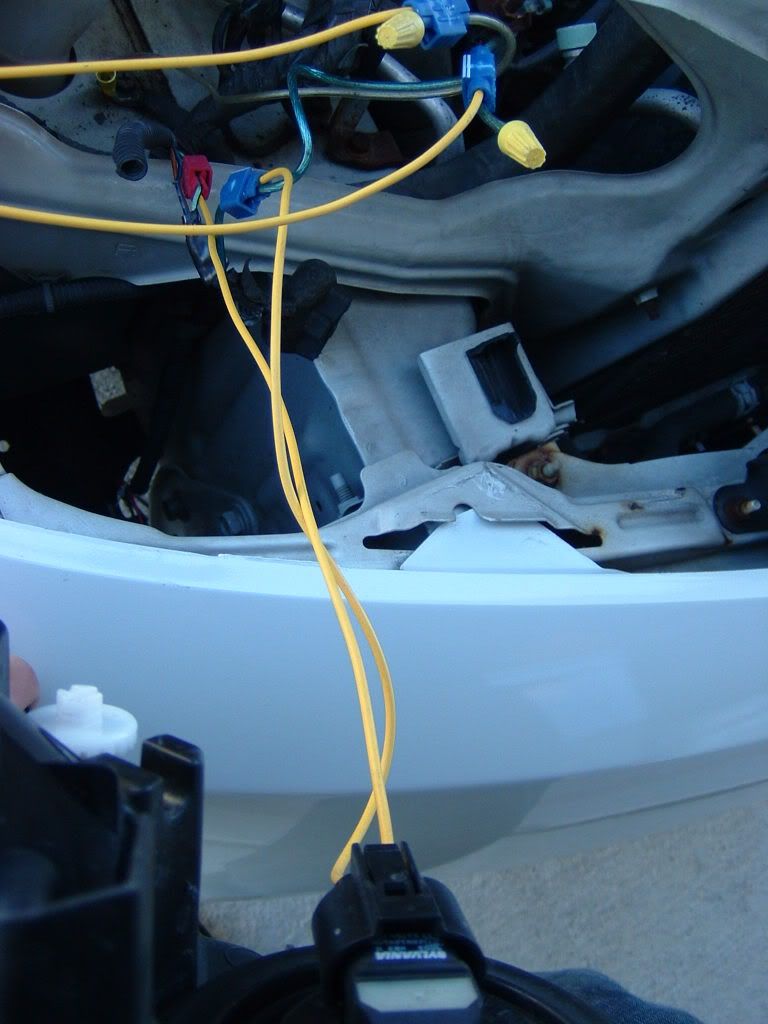
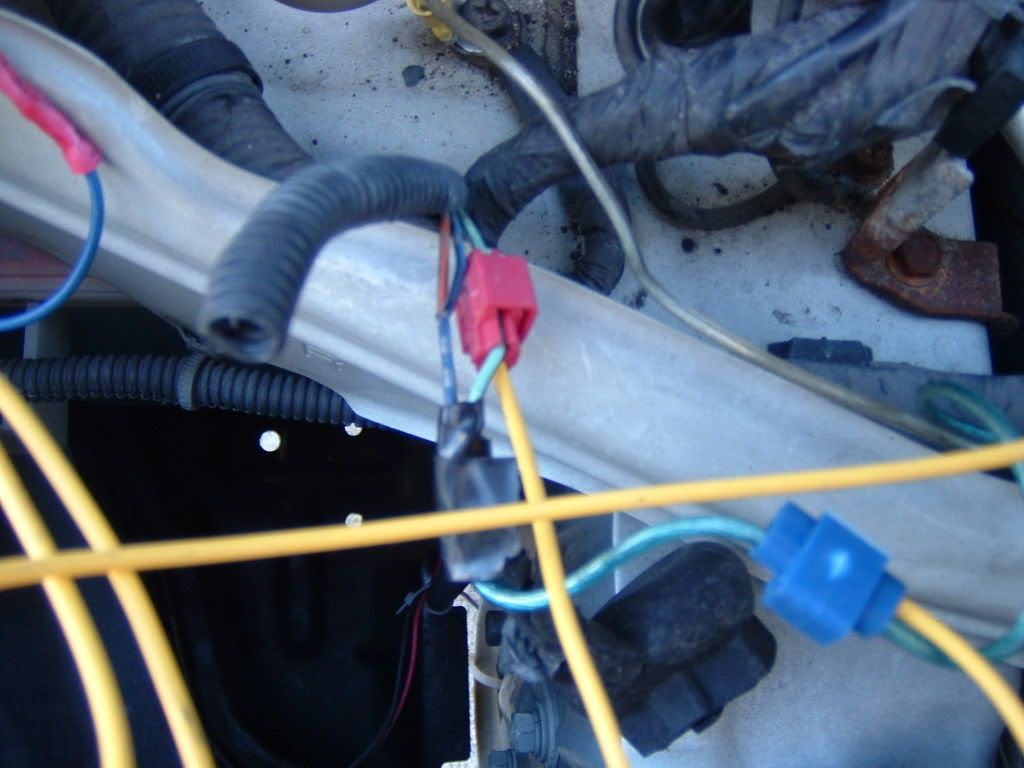
Turn Signal:
the right side wire from the Grey plug on headlight, is for the running light, and connects to the brown/red wire in the turnsignal plug
the right side wire of the brown turn signal plug connects to the ground (black wire) on the car turn signal plug, and the left side wire of the brown turn signal plug connects to the green power wire on the car plug.
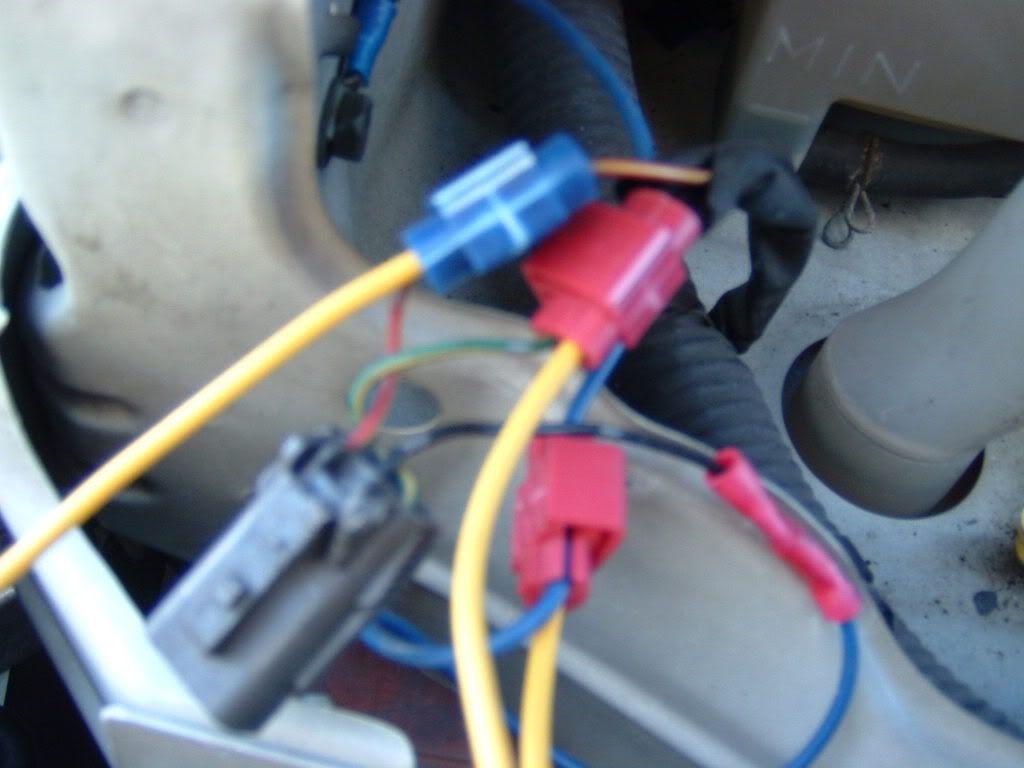
the middle wire comming out of the the center grey plug is connected to a chassis ground, and the picture got cut off, so you cannot see the left wire of the grey plug is connected to the same blue power wire that the high beam light is connected to here:
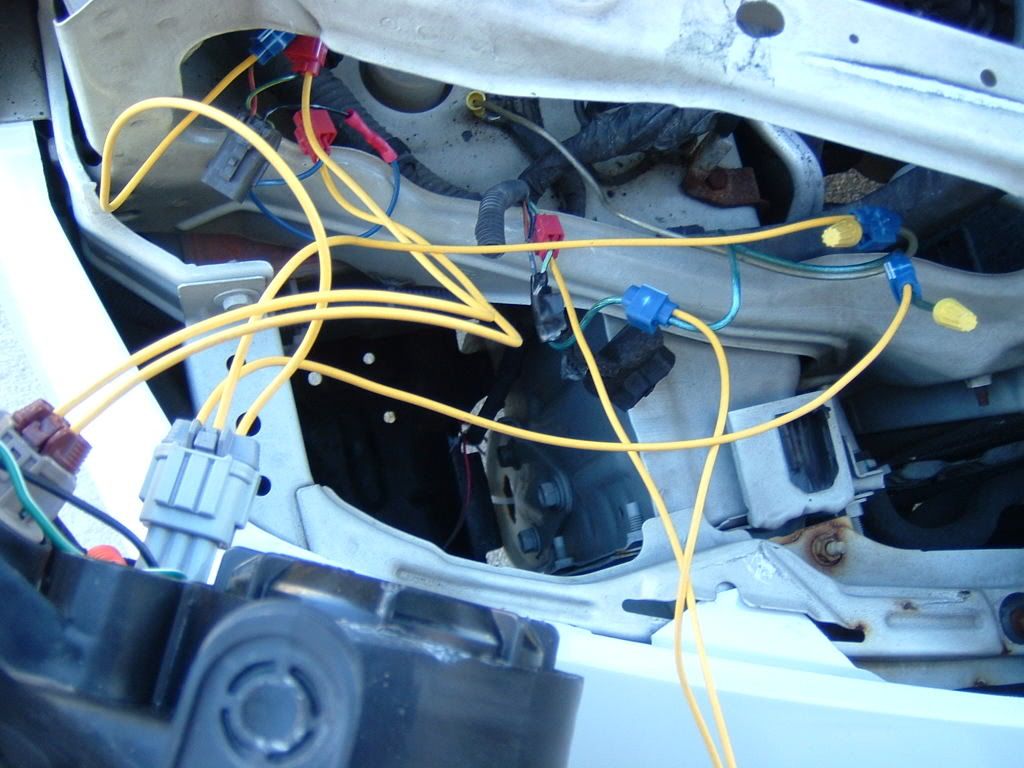
the right side wire from the Grey plug on headlight, is for the running light, and connects to the brown/red wire in the turnsignal plug
the right side wire of the brown turn signal plug connects to the ground (black wire) on the car turn signal plug, and the left side wire of the brown turn signal plug connects to the green power wire on the car plug.
THIS HOW-TO WAS DONE BY "dafertilizer"
http://forums.maxima.org/member.php?u=63530
Passenger side light overall wiring
High Beam
red connector is connected to the 2k harness green wire as shown in the next photo
The blue connector is wired to the blue wire that I put there, it is the power wire from the 2k harness, it powers both the high beam and the HID.
Turn Signal:
the right side wire from the Grey plug on headlight, is for the running light, and connects to the brown/red wire in the turnsignal plug
the right side wire of the brown turn signal plug connects to the ground (black wire) on the car turn signal plug, and the left side wire of the brown turn signal plug connects to the green power wire on the car plug.
the middle wire comming out of the the center grey plug is connected to a chassis ground, and the picture got cut off, so you cannot see the left wire of the grey plug is connected to the same blue power wire that the high beam light is connected to here:
the right side wire from the Grey plug on headlight, is for the running light, and connects to the brown/red wire in the turnsignal plug
the right side wire of the brown turn signal plug connects to the ground (black wire) on the car turn signal plug, and the left side wire of the brown turn signal plug connects to the green power wire on the car plug.
07-03-2007, 10:49 PM
#14
Originally Posted by heresmymind
ew ive had em for almost a week and their almost done.
Thanks, Stardust! I'll be sure to follow this... Unless someone makes an easy-to-follow drawing, I will in the next few weeks (after I get my retro back!
 ).
).
 07-04-2007, 10:14 AM
#16
How hard is it to complete the retrofit process of fitting 02/03 headlights into a 00/01? I personally don't have much experience with wiring but have mechanic skills. And thank you for the wiring instructions, I hope to perform the retrofit sometime soon
07-04-2007, 08:52 PM
#19
Originally Posted by Kyle00
How hard is it to complete the retrofit process of fitting 02/03 headlights into a 00/01? I personally don't have much experience with wiring but have mechanic skills. And thank you for the wiring instructions, I hope to perform the retrofit sometime soon
well let me put it this way....I havent gotten around to do my retrofit yet, but BEFORE hand...it seemed damned complicated, but when i think about it, and the more and more you look at the "how to" it really makes sense...if you want, i can send you the word document ive got so you can print it out and make better sense of it yourself. Also you are in Maryland, maybe after i get mine together sometime in the next couple weeks i can assist you with doing it if it still seems a bit overwhelming.
07-05-2007, 04:41 AM
#20
Originally Posted by Trurida18
well let me put it this way....I havent gotten around to do my retrofit yet, but BEFORE hand...it seemed damned complicated, but when i think about it, and the more and more you look at the "how to" it really makes sense...if you want, i can send you the word document ive got so you can print it out and make better sense of it yourself. Also you are in Maryland, maybe after i get mine together sometime in the next couple weeks i can assist you with doing it if it still seems a bit overwhelming.
07-05-2007, 05:15 AM
#21
detailed instruction w/ pictures. Right click and save as...
http://home.comcast.net/~wangjebi/2k2.pdf
http://home.comcast.net/~wangjebi/2k2.pdf
07-05-2007, 05:33 AM
#22
Originally Posted by Kyle00
Thank you, a word document would be very helpful. And once I get things going with the process, I'll let you know how things go, I might take you up on the offer to help. Thanks again
no problem man glad to help, when you get a chance, PM me your preffered email address so i can go ahead and forward that word document to you.
EDIT: better yet, i just checked out that PDF document, and its almost identical to the word document i recieved.... but i can still send it if you want it
07-05-2007, 12:35 PM
#23
Senior Member

Join Date: Nov 2006
Location: Tampa
Posts: 333
Wire Harness
I know i will have to call Dave B now but why dont the dealerships around town know or have any idea about the wire harness for the headlights. All i get is i would have to get the engine harness and cut out from it and what is Dave B's number. Is it something that only courtesyparts in texas has.
 08-03-2007, 07:54 AM
#25
I installed the HID's last night
Just some personnal input...
I used Dixit Suthar's write up on how to install the lights. One thing I found was different was in his paper it states the turn signal blinker is GREEN/Yellow. On my 2000 max, the DRVER"S SIDE turn signal blinker was GREEN/Black but my passenger side turn signal blinker was the correct GREEN/Yellow as it was described in the how to paper. Overall, this project is not hard at all. As a precaution, i used heat shrink (no soldering) butt splices. I do not trust the quick connect splice as water can get in and totally destroy the splice. Even with electrical tape, I've seen them go to crap pretty quickly. The heat shrink allows for a more watertight application and won't require electrical tape, just loom up your wires! And as for the grounding of the low beam, i used a spot that is located just inside the headlight cut out in the bumper. This had a post with a 10mm nut on it, so i removed the nut and cleaned the area up to insure a good ground. If anyone has questions concerning the install, let me know and I can try to help.
 08-03-2007, 10:33 PM
#29
Originally Posted by SilverGLE
^ Nice... You also could've used one of the 2 headlight mounting bolts as a ground. I may actually use yours... I've got to tidy up my headlights and remount the ballasts!
whats wrong with the ballasts in their stock location??
08-04-2007, 01:23 AM
#30
I've got a 2000, so no nice mounting points like the 02/03 Max's headlights... 
heresmymind: I'll get some adjusted pics tonight... Just spent multiple hours playing around with the wiring for the headlights and installing my grounding kit.
heresmymind: I'll get some adjusted pics tonight... Just spent multiple hours playing around with the wiring for the headlights and installing my grounding kit.
08-04-2007, 03:39 AM
#31
Guest
Posts: n/a
I am doing another retrofit with my lights putting e55s with 4300k for my lows and highs. and a single xenon e55 with the 3000k into the high-beam slot for fog. tomorrow i do a set in a pair of 97 maxima headlights for another .org member. picks of course just in the different section

 10-19-2007, 10:48 PM
#34

The pdf file above did not work for me.. anyone else have it? I'm trying to get an idea of how hard the wiring is. I feel kind of silly - a degree in Mechanical Engineering but I've never spliced a wire in my life. Also, who is this DaveB character and how does his kit work (and for how much $$)?
10-20-2007, 06:38 AM
#35
10-20-2007, 06:39 AM
#36
 10-20-2007, 09:34 AM
#37
However, my question was about his kit, and how it works. I don't necessarily feel like calling him on a Saturday morning to ask about that.
So, as helpful as you may think you are by calling someone an idiot and linking them to a post that implies that they should be banned for not reading the defective stickies, it's actually not that helpful. I understand that you folks get a LOT of newbs here who aren't willing to do their due diligence. But that's no reason to be rude to all new members. I've been a member on vintagemustangs forum and a CBR600RR forum for a long time and am very accustomed with the "search before you ask method," but the bottom line is that this forum is 1) harder to search for information in its current state, and 2) harder to get answers from people because a lot are unwilling to help newbs.
I don't understand this "us against them" (veterans against newbies) mindset that is going on here.
10-20-2007, 09:41 AM
#38

I'd like to point out that the sticky, referenced by this link you provided, does not work directly. However, when you change "showpost" to "oldpost" you do get linked to the third page of the sticky, then you can scroll down and find a post stating that DaveB's phone number is 1-888-254-6060.
However, my question was about his kit, and how it works. I don't necessarily feel like calling him on a Saturday morning to ask about that.
So, as helpful as you may think you are by calling someone an idiot and linking them to a post that implies that they should be banned for not reading the defective stickies, it's actually not that helpful. I understand that you folks get a LOT of newbs here who aren't willing to do their due diligence. But that's no reason to be rude to all new members. I've been a member on vintagemustangs forum and a CBR600RR forum for a long time and am very accustomed with the "search before you ask method," but the bottom line is that this forum is 1) harder to search for information in its current state, and 2) harder to get answers from people because a lot are unwilling to help newbs.
I don't understand this "us against them" (veterans against newbies) mindset that is going on here.

he is a nissan parts person


