motor mount swap....
 07-24-2006, 04:34 PM
#1
Supporting Maxima.org Member

Thread Starter
iTrader: (4)
Join Date: Oct 2003
Location: Port st Lucie
Posts: 2,536
motor mount swap....
for a 5th gen on a scale of 1-10 how hard is it? does it require more than one person, what toold are required and or preffered to do it? i am going to be tackling my mounts this week and replacign them with es inserts, so i was curious
 07-25-2006, 07:45 AM
#2

You can do it yourself, but it's going to better with 2 people. Basically you put the car on jackstands, put a hydraulic jack under the oil pan (with a wood block) and one under the tranny so that the weight is supported from the bottom. jack the motor up a bit until the pressure is off the mounts. Unbolt the 3 bolts from each mount (total of 6) and slip the mounts out. you're going to have to keep the hydraulic jacks under the motor until you get the mounts back in. Technically if the beam is still bolted to the frame, the motor is not going to drop on you, so don't worry about that.
Another way of doing it would be to get an engine lift and somehow figure out how to bolt it to the motor so that you can lift the motor ever so slightly...but I don't know where you'd bolt it to. You'll have to figure that out yourself. You might be able to get a few longer bolts for the tranny and stick them in place of a few of the top bolts, that way you'll have that side of the motor covered. The other side, on the other hand, will be a bit more difficult. I don't reccomend bolting the chains to the timing cover bolts (the two big ones on top of the side mount) because it's not technically bolted straight to the block. If you can get them on the actual side mount bolts, then I'd say you can get the motor supported properly. Next time your up my way I'll show you where you can put the bolts if you have a hoist. Better yet, bring your car to my house and we can do it there if you can come up one saturday morning. I have an engine hoist in my garage still.
Another way of doing it would be to get an engine lift and somehow figure out how to bolt it to the motor so that you can lift the motor ever so slightly...but I don't know where you'd bolt it to. You'll have to figure that out yourself. You might be able to get a few longer bolts for the tranny and stick them in place of a few of the top bolts, that way you'll have that side of the motor covered. The other side, on the other hand, will be a bit more difficult. I don't reccomend bolting the chains to the timing cover bolts (the two big ones on top of the side mount) because it's not technically bolted straight to the block. If you can get them on the actual side mount bolts, then I'd say you can get the motor supported properly. Next time your up my way I'll show you where you can put the bolts if you have a hoist. Better yet, bring your car to my house and we can do it there if you can come up one saturday morning. I have an engine hoist in my garage still.
07-25-2006, 01:32 PM
#3
Easy, did it on my car and bro's 2k and another org member. 1 person job, relatively quick to remove and install. I suggest removing the centerbolt from each front and rear (technically left and right) mounts, then removing the cross member bar (with mounts still attached). Of course, support the engine as noted above. Oh to get to the rear/right/firewall mount, remove the driver side wheel and splashguard.
The next challenge is getting the old rubber mount out of the metal casing. There are various "creative" ways of doing that at home. Of course safest thing is using a press with the correct size drift.
Good luck, just post questions if you get stuck at any stage.
Jae
The next challenge is getting the old rubber mount out of the metal casing. There are various "creative" ways of doing that at home. Of course safest thing is using a press with the correct size drift.
Good luck, just post questions if you get stuck at any stage.
Jae
07-25-2006, 01:41 PM
#4
Supporting Maxima.org Member
Thread Starter
iTrader: (4)
Join Date: Oct 2003
Location: Port st Lucie
Posts: 2,536
i will most likely be tackling this tomorrow in the day time after i get home from work for the bolts on the mounts, would i require that deep sockets or would normal sockets work also how big of an extension do i require to get in there and when re-torquing the bolts how much should i tighten?
07-25-2006, 02:34 PM
#6

Originally Posted by panda_1
i will most likely be tackling this tomorrow in the day time after i get home from work for the bolts on the mounts, would i require that deep sockets or would normal sockets work also how big of an extension do i require to get in there and when re-torquing the bolts how much should i tighten?
 IM me later...
07-25-2006, 02:37 PM
IM me later...
07-25-2006, 02:37 PM
#7
Originally Posted by panda_1
anybody have any ideas on how to find a shop that would have a hydraulic press to do it?
When we did mine, Tilley just torched all the rubber out of the old ones and then we used a Sawzall to cut the metal sleeve out of the stock mounts. He then used spring compressor and some Crisco to press the ES mounts in.

 07-25-2006, 03:00 PM
#10
Originally Posted by Puppetmaster
Btw, as long as the side mounts are still in, the motor won't fall on you, even if you drop the entire cross member. We didn't prop the motor or tranny up at all.
 07-25-2006, 08:17 PM
#11
Junior Member

Join Date: Oct 2005
Posts: 40
I'm also doing the swap in the next day or two,so just leave the side mounts do front and back ones then do the side ones?
will I be able to get at them without removing the cross member?
should I get factory replacements or get aftermaket ones? my front mount is totaly shot.
thanks.
will I be able to get at them without removing the cross member?
should I get factory replacements or get aftermaket ones? my front mount is totaly shot.
thanks.
07-25-2006, 08:22 PM
#12
Supporting Maxima.org Member
iTrader: (15)

Join Date: Oct 2003
Location: Indianapolis, IN
Posts: 744
i pressed in my motor mount with two 2" pressure treated pieces of wood i had in our garage and a galvanized steel bolt/nut that i used to pull them together. it got the job done, i dont think a machine press is needed. i will try to find the pic of the setup, an easy job for sure
07-25-2006, 08:51 PM
#13
I dropped my crossmember on my own (only 4 bolts for the 3.5L). As far as finding a shop I called around and ended up going to an independent shop with a press for $20 cash which I thought was great.
07-26-2006, 05:51 AM
#14
Originally Posted by Patrick.R
I'm also doing the swap in the next day or two,so just leave the side mounts do front and back ones then do the side ones?
will I be able to get at them without removing the cross member?
should I get factory replacements or get aftermaket ones? my front mount is totaly shot.
thanks.
will I be able to get at them without removing the cross member?
should I get factory replacements or get aftermaket ones? my front mount is totaly shot.
thanks.
For the front and rear mounts, its much easier remove the cross member and then the motor mount brackets, in order to press the inserts out.
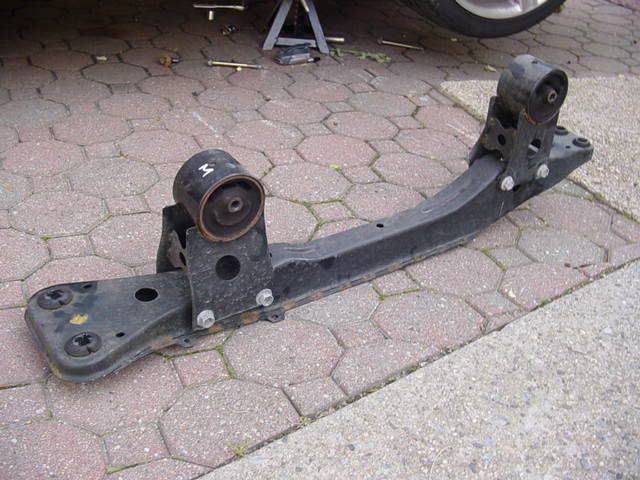
Here are some of Polo's pics:
Cross member with motor mounts and stock inserts:
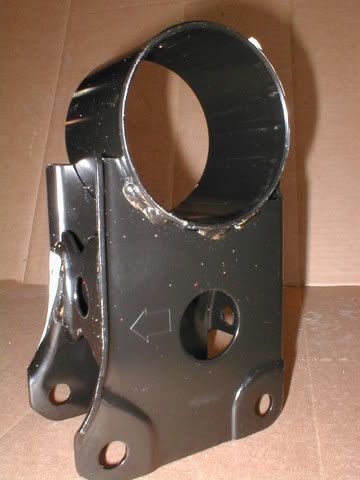
Motor mount with no inserts:
Cross member with Energy Suspension inserts in the motor mounts:
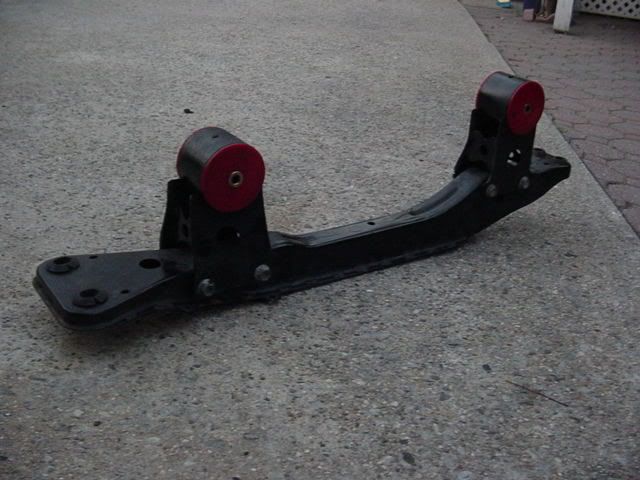
As for replacements, the stiffer Energy Suspension motor mount inserts will cause slightly more vibration in the cabin, but will reduce flexing for more throttle response and more efficient power delivery. Not sure if that's what you want.
07-26-2006, 05:56 AM
#15
Btw, for those of you with extra cash to spare, another way of doing this is to:
1. Get new motor mounts, either with no inserts or already with new stock inserts depending on whether you want aftermarket or stock.
2. Press the new inserts in, if applicable.
3. Swap the motor mounts on the cross member without having to worry about pressing the old ones out.
1. Get new motor mounts, either with no inserts or already with new stock inserts depending on whether you want aftermarket or stock.
2. Press the new inserts in, if applicable.
3. Swap the motor mounts on the cross member without having to worry about pressing the old ones out.
07-26-2006, 06:00 AM
#17
Originally Posted by maxspeedse02
I dropped my crossmember on my own (only 4 bolts for the 3.5L). As far as finding a shop I called around and ended up going to an independent shop with a press for $20 cash which I thought was great.
 07-26-2006, 06:02 AM
#19
Originally Posted by Deckdout2
Nismology - post some insight please. You as well Joel. I'm going to do this soon, and want more ideas to decipher what would be easier for me and what I have to work with.

 07-26-2006, 07:07 AM
#23
Originally Posted by ShIft_uR FacE
worth the time or not?
the other improvement, which has nothing to do with much, is the fact that the OEM mounts placed their hole off center about 1/2". the ES mounts are dead in the middle, so the engine actually lowers about 1/2". this helps those who have struts bars that hit the manifold AND it helps if anyone plans on putting on spacers, as the extra clearance is necesary.
i dont' feel the vibrations that most speak of. still feels great to me, or maybe i'm just so used to it that i don't feel it.
edit: reason i say supposedly is because i swapped out the motor mounts and changed from ground controls to cattman coils to h&r/tokico's, so my ride and feel has changed throughout the time i've owned the car.
07-26-2006, 07:16 AM
#25
There is definitely a difference in the vibration factor. Going from stock to these is a huge difference with my tein coilovers. I've been told though that most of the vibration goes away after a month or so though. Takeoff with the VQ35 is very nice as well. No wheel hop with tein coilovers and these mounts.
07-26-2006, 08:16 AM
#26
Originally Posted by Puppetmaster
Go find your mailman and figure out what happened with my stuff. 
 07-26-2006, 08:31 AM
#27
Originally Posted by Deckdout2
I looked for it last night as well. Maybe the postman put it in his ride so he can tune it and deliver mail faster.
When are you doing the mounts? Just call around for places with a good machine press. What sucks about these Nissan mounts is that the edges of the motor mount are so thin, it can be tough to keep anything locked onto it when trying to press the inserts out.
07-26-2006, 08:36 AM
#28
Originally Posted by Puppetmaster
Pwnt by USPS... whatever.
When are you doing the mounts? Just call around for places with a good machine press. What sucks about these Nissan mounts is that the edges of the motor mount are so thin, it can be tough to keep anything locked onto it when trying to press the inserts out.
When are you doing the mounts? Just call around for places with a good machine press. What sucks about these Nissan mounts is that the edges of the motor mount are so thin, it can be tough to keep anything locked onto it when trying to press the inserts out.
07-26-2006, 08:45 AM
#29
Originally Posted by Deckdout2
Probably in the next couple of weeks. Haydn is out of town this weekend, and i'm out next weekend. I figured the edges would give a little issue, but I could clamp it and take a chisle to it couldn't I?
07-26-2006, 08:50 AM
#30
Originally Posted by Puppetmaster
If you want to do it that way, you'll need to first saw through the rubber insert (its messy because of the fluid) and then once you've sawed through to the metal, you need to cut through another thin metal sleeve. And be careful not to cut the actual motor mount. Once the sleeve is cut, you can then use a hammer and chisel to get it out. Its a PITA if you're going to do it this way.
 07-26-2006, 08:51 AM
#31

Originally Posted by panda_1
anybody have any ideas on how to find a shop that would have a hydraulic press to do it?
07-26-2006, 09:26 AM
#32
Junior Member
Join Date: Oct 2005
Posts: 40
So the aftermarket ones cause slight vibration,yeah I'm not looking fo that.
What are you guys in the states paying for inserts and the actuall motor mounts?(my front one is so bent up theres so much gap between that mount and insert)
I think I might have to just give dave.b a call.
What are you guys in the states paying for inserts and the actuall motor mounts?(my front one is so bent up theres so much gap between that mount and insert)
I think I might have to just give dave.b a call.
07-26-2006, 09:34 AM
#33
Originally Posted by Patrick.R
So the aftermarket ones cause slight vibration,yeah I'm not looking fo that.
What are you guys in the states paying for inserts and the actuall motor mounts?(my front one is so bent up theres so much gap between that mount and insert)
I think I might have to just give dave.b a call.
What are you guys in the states paying for inserts and the actuall motor mounts?(my front one is so bent up theres so much gap between that mount and insert)
I think I might have to just give dave.b a call.
07-26-2006, 09:56 AM
#34
Don't forget, if you auto guys have electronically controlled mounts, the ES inserts won't work for your car. You need to verify that you have the non-electronically controlled mounts, or buy some old mounts from a junkyard.
07-26-2006, 10:04 AM
#35
actually, to be more precise, if you're an auto, it's electronically controlled, if it's manual, it's not.
and to add to that, you can get manual tranny mounts, and just zip tie the sensor that's int he liquid filled ones. you won't get a light, and you'll have the benefits of ES mounts.
and to add to that, you can get manual tranny mounts, and just zip tie the sensor that's int he liquid filled ones. you won't get a light, and you'll have the benefits of ES mounts.
07-26-2006, 01:22 PM
#36
Won't get a light if the harness isn't plugged in? Didn't kno that, gonna look in the FSM tonight.
Flamin the rubber out sounds toxic.
On a 5th gen, we tried leaving the cross member in, but took forever to get the mount out cuz there wasn't much clearance for the front, even when we removied teh radiator fan. It can be done, just requires some 3d spacialization.
Jae
Flamin the rubber out sounds toxic.
On a 5th gen, we tried leaving the cross member in, but took forever to get the mount out cuz there wasn't much clearance for the front, even when we removied teh radiator fan. It can be done, just requires some 3d spacialization.
Jae
07-26-2006, 01:51 PM
#38
Originally Posted by ThurzNite
Won't get a light if the harness isn't plugged in? Didn't kno that, gonna look in the FSM tonight.
Flamin the rubber out sounds toxic.
On a 5th gen, we tried leaving the cross member in, but took forever to get the mount out cuz there wasn't much clearance for the front, even when we removied teh radiator fan. It can be done, just requires some 3d spacialization.
Jae
Flamin the rubber out sounds toxic.
On a 5th gen, we tried leaving the cross member in, but took forever to get the mount out cuz there wasn't much clearance for the front, even when we removied teh radiator fan. It can be done, just requires some 3d spacialization.
Jae
07-26-2006, 09:31 PM
#39
Ok, checked it out from the FSM. The harness has 3 wires. 1 goes to the battery for power. 2 goto the ECM. Of the 2 wires that goto the ECM, they are 1-way paths, from ECM --> mount. They are not sensory. Therefore, disconnecting the harness won't throw a MIL, or change anything else.
The W/L wire is used to soften the mount at idle, and the W/R wire stiffens the mount when driving.
Jae
The W/L wire is used to soften the mount at idle, and the W/R wire stiffens the mount when driving.
Jae
07-27-2006, 02:18 AM
#40
Originally Posted by ThurzNite
Ok, checked it out from the FSM. The harness has 3 wires. 1 goes to the battery for power. 2 goto the ECM. Of the 2 wires that goto the ECM, they are 1-way paths, from ECM --> mount. They are not sensory. Therefore, disconnecting the harness won't throw a MIL, or change anything else.
The W/L wire is used to soften the mount at idle, and the W/R wire stiffens the mount when driving.
Jae
The W/L wire is used to soften the mount at idle, and the W/R wire stiffens the mount when driving.
Jae
now what i also heard is that physically the mounts are bigger for auto's, so they'd have to purchase OEM MT mounts, and then gut them out. placement is still the same and all should mount accordingly.