Timing Cover Removal Tip
 04-03-2014, 08:37 PM
#1
Senior Member
Thread Starter

Join Date: Jan 2011
Location: Central AR
Posts: 3,041
Timing Cover Removal Tip
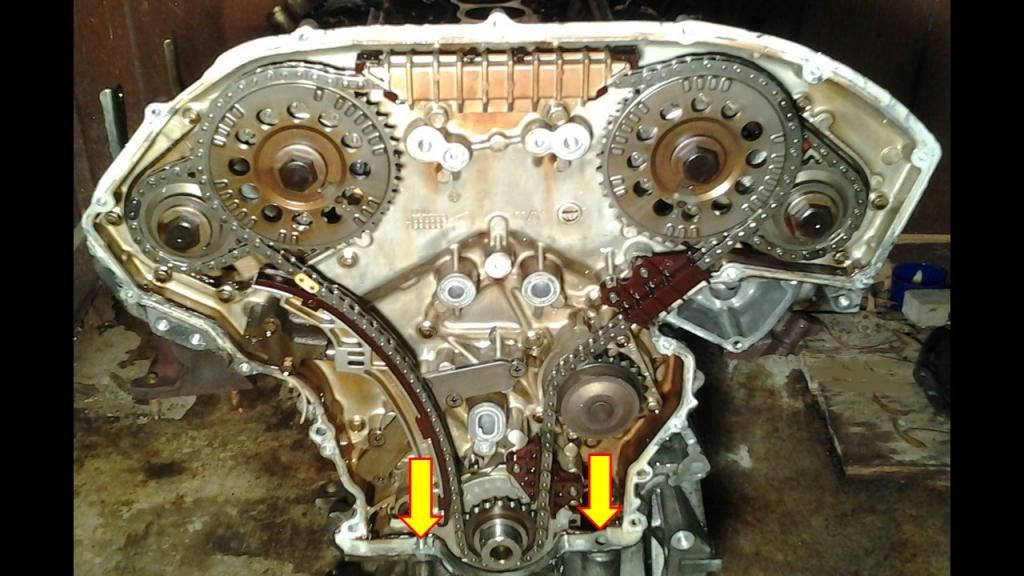
In viewing several internet postings and videos that show how to remove a VQ30DE Timing Cover (TC). Unfortunately only a few explain the two bolts inside the oil pan area that are required for TC removal.
Next week when I remove another TC on the 99 Max, I will start with removing by removing the bolts inside the oil pan.
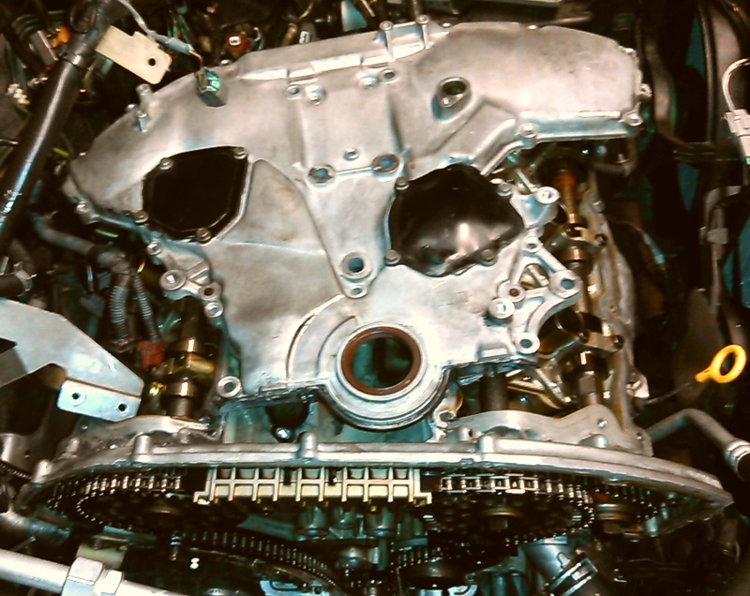
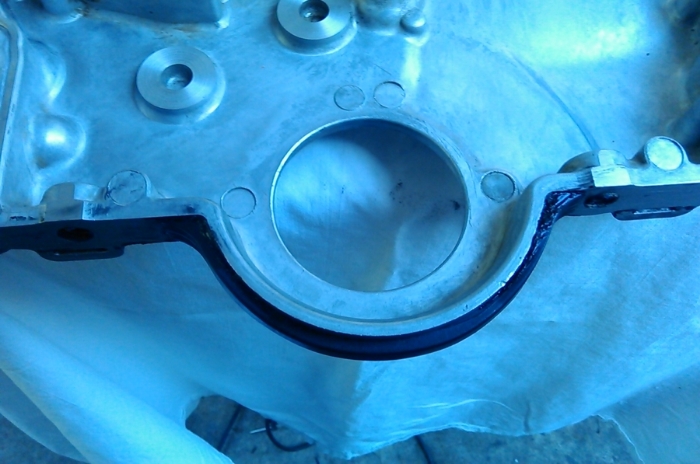
The first picture shows how the engine looks with the timing cover removed and the inside area where the two bolts connect with the cover with the two yellow arrows.
Read The Thread Following Thread First: Yep - I found the upper oil pan will need to be removed to properly seat the TC half moon.
http://forums.maxima.org/4th-generat...n-removal.html
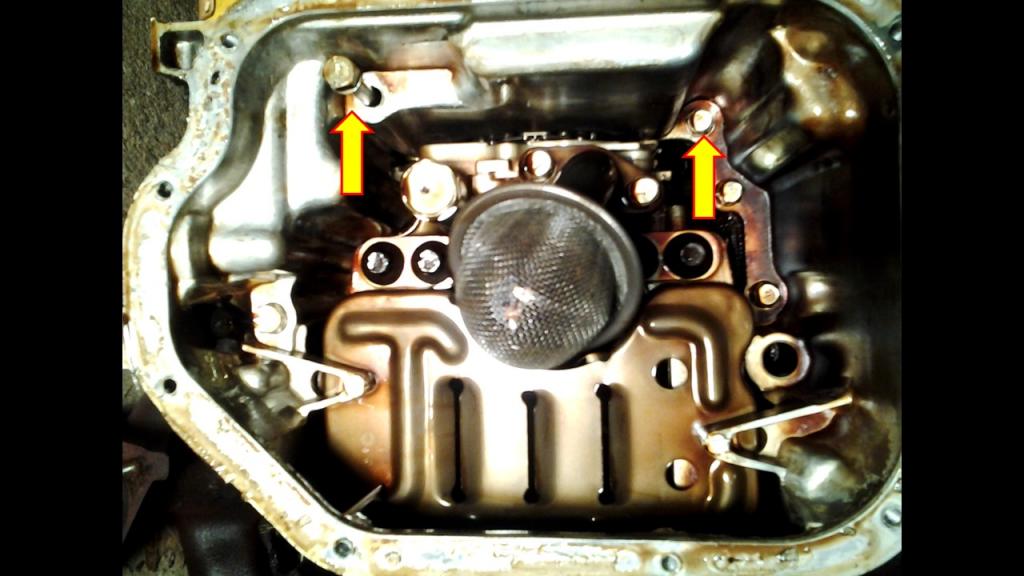
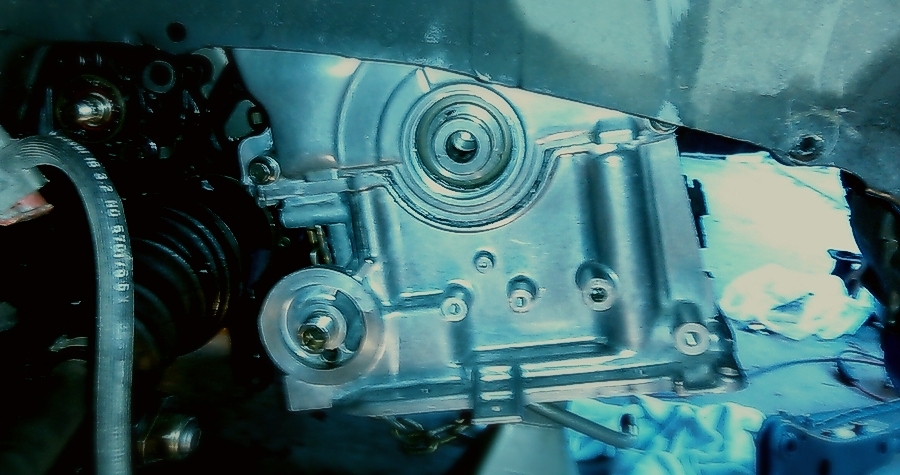
This picture shows the bolts from looking inside the oil pan area from below the engine. I removed one bolt (left) before I snapped the picture.
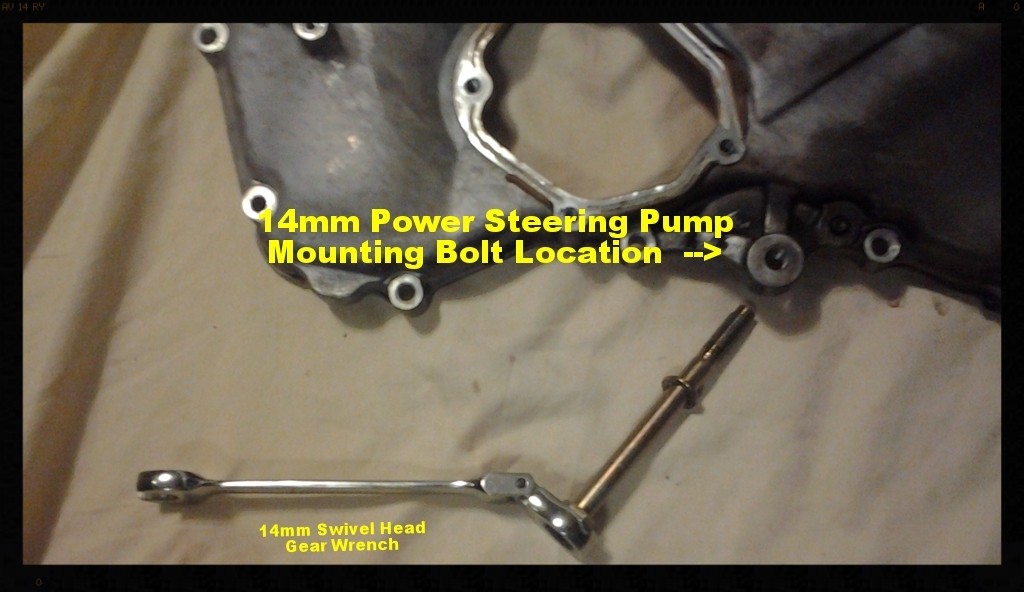
Here's a picture of the 14mm Power Steering Pump mounting bracket that is threaded into the TC lower left bolt hole. I found the 14mm Gear Wrench to make short work of loosening the bolt for removing the TC.
This 14mm bolt is removed from the rear side of the Power Steering Pump.
I hope this helps another VQ30DE owner in the future.
Another recent good reference thread for timing chain lineup is at the following link.
If you need to remove the timing chains to remove the rear timing cover, remember to position at Top Dead Center before you start.
https://maxima.org/forums/4th-genera...questions.html
.
Next week when I remove another TC on the 99 Max, I will start with removing by removing the bolts inside the oil pan.
The first picture shows how the engine looks with the timing cover removed and the inside area where the two bolts connect with the cover with the two yellow arrows.
Read The Thread Following Thread First: Yep - I found the upper oil pan will need to be removed to properly seat the TC half moon.
http://forums.maxima.org/4th-generat...n-removal.html
This picture shows the bolts from looking inside the oil pan area from below the engine. I removed one bolt (left) before I snapped the picture.
Here's a picture of the 14mm Power Steering Pump mounting bracket that is threaded into the TC lower left bolt hole. I found the 14mm Gear Wrench to make short work of loosening the bolt for removing the TC.
This 14mm bolt is removed from the rear side of the Power Steering Pump.
I hope this helps another VQ30DE owner in the future.
Another recent good reference thread for timing chain lineup is at the following link.
If you need to remove the timing chains to remove the rear timing cover, remember to position at Top Dead Center before you start.
https://maxima.org/forums/4th-genera...questions.html
.
Last edited by CS_AR; 01-07-2015 at 02:57 AM.


 04-05-2014, 08:52 AM
#4
Senior Member
Thread Starter
Join Date: Jan 2011
Location: Central AR
Posts: 3,041
04-05-2014, 01:05 PM
#5

Yep ... nice piece of info.
I'd researched the hell outta that job as well.
I knew those bolts were there but honestly the picture I had in my head was NOT what your pictures show.
Nice piece of reference material.
Should definitely be a sticky in the How To.
I'd researched the hell outta that job as well.
I knew those bolts were there but honestly the picture I had in my head was NOT what your pictures show.
Nice piece of reference material.
Should definitely be a sticky in the How To.
04-06-2014, 02:10 PM
#6

I just did my upper oil pan and I noticed there's a leak at the rear timing cover and man I don't really feel like it but I'll do it in the car if possible but we all know, out of the car is easier and quicker! The seals are flattened that fit between the engine block and the rear timing cover and leaking apparently........When I do go into this I'll have a whole new timing kit to replace all the 247,000 timing components with.....lol!
04-07-2014, 05:27 AM
#7
I just did my upper oil pan and I noticed there's a leak at the rear timing cover and man I don't really feel like it but I'll do it in the car if possible but we all know, out of the car is easier and quicker! The seals are flattened that fit between the engine block and the rear timing cover and leaking apparently........When I do go into this I'll have a whole new timing kit to replace all the 247,000 timing components with.....lol!
While I agree that TC removal from a pulled engine is easier and quicker, that statement doesn't take into account the process of engine removal.
Although it will be a pain, I think based on my reading and research, the in-car TC removal will be less painful.
04-07-2014, 12:26 PM
#8
Senior Member
Thread Starter
Join Date: Jan 2011
Location: Central AR
Posts: 3,041
Thanks CMax and Turbo for the info and comments. The pictures are to supplement other information I found around the Net.
This week I will be removing the TC cover to remove the heads for a valve job and cylinder/piston inspection. I will start the TC removal process with the oil pan and the two bolts in the picture.
I used the old engine in the picture for a "practice run" before tearing apart the engine in the actual car.
04-07-2014, 12:32 PM
#9
Thanks CMax and Turbo for the info and comments. The pictures are to supplement other information I found around the Net.
This week I will be removing the TC cover to remove the heads for a valve job and cylinder/piston inspection. I will start the TC removal process with the oil pan and the two bolts in the picture.
I used the old engine in the picture for a "practice run" before tearing apart the engine in the actual car.
This week I will be removing the TC cover to remove the heads for a valve job and cylinder/piston inspection. I will start the TC removal process with the oil pan and the two bolts in the picture.
I used the old engine in the picture for a "practice run" before tearing apart the engine in the actual car.
As you've stated, this is a project where detailed info is quite lacking and the fill-in of some informational and procedural holes would be much appreciated as this is something all of us will be faced with sooner or later.
04-07-2014, 03:20 PM
#10
Senior Member
Thread Starter
Join Date: Jan 2011
Location: Central AR
Posts: 3,041
If you do the TC removal with the engine in car, please either photo document the process or do a/some video(s).
As you've stated, this is a project where detailed info is quite lacking and the fill-in of some informational and procedural holes would be much appreciated as this is something all of us will be faced with sooner or later.
As you've stated, this is a project where detailed info is quite lacking and the fill-in of some informational and procedural holes would be much appreciated as this is something all of us will be faced with sooner or later.
Another procedure that I would like to document is how to do a valve adjustment. If I can get some coaching on the shim replacement process that will be great. I ordered a set of Nissan valve adjustment tools from eBay over the weekend that look like the "suitable tools" referenced in the FSM. I'll need to pick up a Micrometer from the local HF. The last time I did a valve adjustment on twin-cam a car with shims was in on a 1974 Fiat 124 Spider when I worked evenings and summers during high-school at a local Fiat, Saab, and Subaru dealership. Now that was an odd trio of import products to support.

- Craig
04-09-2014, 07:10 AM
#14

 04-09-2014, 08:12 AM
#15
Senior Member
Thread Starter
Join Date: Jan 2011
Location: Central AR
Posts: 3,041
Side note: I have a 99 I30 with over 260,000 miles that runs GREAT. Sadly, the previous owner (for the first 220,000 miles) was not good about changing the oil or caring for other essential maintenance items.
The only timing chain related item that required replacement on the 99 I30 at ~250,000 miles was the timing chain tensioner. The lower crankshaft chain tensioner, as shown (lower left) can be replaced through an access door in the timing chain cover.
The symptoms associated with a weak lower crankshaft chain tensioner is a clattering noise that lasted a couple of minutes when the car had been sitting overnight.
At the time I had the tensoner replaced, I was working ~80 hours a week so I outsourced the job to an Infiniti tech that I trust. I think I paid him $200 (included a tip) to replace the tensioner with a new one I purchased from an internet parts seller that usually offers 28 to 29 percent off Nissan list price.
The engine in the picture was recently replaced on my 99 Maxima 5-speed due to valve leakage and scored cylinder issues that were present when I purchased the car at ~168,000 miles. Unfortunately, the car's previous owner liked to get it serviced at his favorite Pontiac Buick GMC dealer.
04-09-2014, 08:05 PM
#16
Junior Member

Join Date: Aug 2004
Posts: 81
Pretty heavy leak behind the inner timing cover. I'm about 100% positive that's where the leak is. Needs the O-ring replacement and a re-seal.
Edit: Actually, I need to verify the location of the leak, because it could be the cover plate for the tensioner. I had that out to replace a water pump, and was never happy with the reseal I did to it. I have a UV leak detection kit sitting right next to me.
I obviously really hope it's just that cover. That'd take an hour (for you, or 3 for me).
Last edited by mikeyen; 04-09-2014 at 08:08 PM.
04-10-2014, 05:09 AM
#17
 04-10-2014, 10:58 AM
#18
Junior Member
Join Date: Aug 2004
Posts: 81
The O-ring that I have heard needs replacing goes between the block and the inner cover. It looks to me as though the leak is behind the timing cover... The O-rings are to the far right in your illustration (I can see it in the Courtesy Nissan diagrams).
At this point, I think it is, unfortunately, those O-rings.
However, now that I'm looking more closely at where the tensioner mates, I wonder if I did something wrong when I installed it when I did the water pump. Yes, I was aware of the TSB for timing-chain clatter, and mine clatters for maybe 1 second upon cold-start. So, of course, now I'm wondering if changing just the tensioner and guide with the updated versions would fix it. That's an outer TC cover, something I think I'm pretty capable of at this point. Do do that, I'd take off the front TC (changing the water pump while I'm at it), use the gasket that comes with the newer tensioners, re-seal the small front plates (which both seep), and reassemble. It's risky, I know... But taking off an outer TC is much easier than a rear.
At least that way, I'd be able to leave the pans alone. Or does the outer cover require the lower pan removal?
04-10-2014, 11:17 AM
#19
Junior Member
Join Date: Aug 2004
Posts: 81
I don't know if anyone knows a shortcut for this, but according to what I'm reading from the FSM and AllData, they want me to take off the pans to get to even the outer cover. Now that I've had an upper pan off myself already, I can see why; the half-moon near the harmonic balancer would probably leak if I don't. Just wondering if someone can verify or refute that.
04-10-2014, 04:32 PM
#23
Senior Member
Thread Starter
Join Date: Jan 2011
Location: Central AR
Posts: 3,041
04-10-2014, 09:12 PM
#24
Senior Member
Thread Starter
Join Date: Jan 2011
Location: Central AR
Posts: 3,041
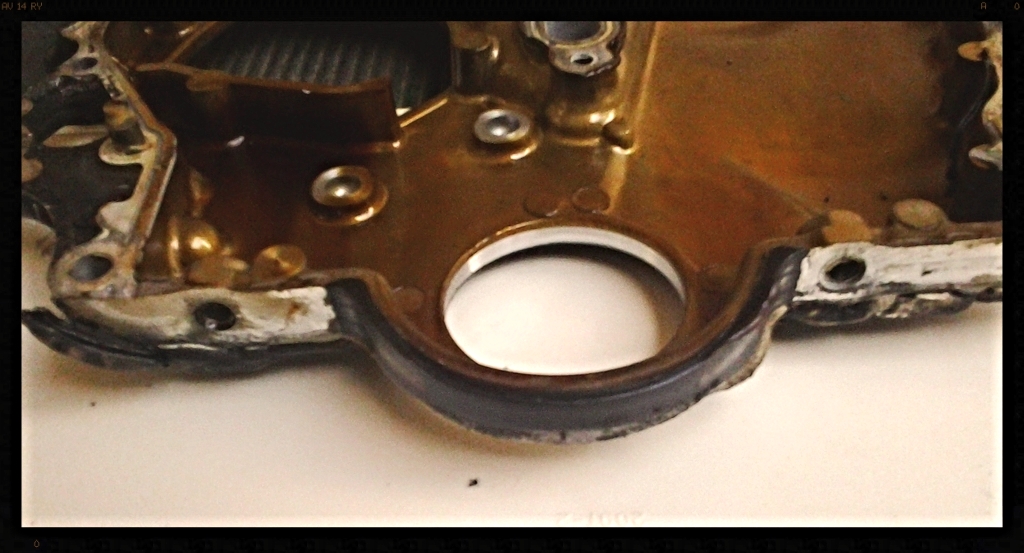
The Half Moon gasket appears to be "glued" to the TC with a brown RTV looking material that is different from the gray RTC used to seal other engine components.
It appears Half Moon gasket is so well bonded with the timing cover in the picture that will need to be separated with a scraper.
It appears Half Moon gasket is so well bonded with the timing cover in the picture that will need to be separated with a scraper.
04-11-2014, 05:17 AM
#26
Senior Member
Thread Starter
Join Date: Jan 2011
Location: Central AR
Posts: 3,041
Hey Turbo, Today I'll be taking the cover in the off the "in car" engine while I photograph the final steps.
I used the engine in the pictures for a "practice run" to build up my own knowledge for documenting the "in car" pictorial instructions set. However, the PS pump bolt in the OP update is from my removing it last night.
The FSM in section EM24 item (16) says to remove the PS belt and "pump assembly". Last night's mission was to determine if removing the PS "pump assembly" is actually required.
I'll start another thread once I'm finished removing the "in car" TC cover to detail all the steps. This thread is turning into the "Cliff Notes" version. I bet I now have over 100 pictures now to go through to find the best 10 to re-sample, crop, and annotate for a full instruction thread.
Last edited by CS_AR; 04-11-2014 at 05:33 AM.
04-11-2014, 03:10 PM
#27
Junior Member
Join Date: Aug 2004
Posts: 81
I really appreciate everyone's hard work and advice here. Thank you all.
I'm off to Mexico for a week, so I obviously won't be able to touch this.
Last night, though, I ordered the 1996-1+ tensioner and guide, plus the gasket for the tensioner, plus the 2 O-rings that go between the block and the inner cover. I only bought the 2 O-rings because Courtesy's shipping isn't cheap, and it made sense to combine them into the order. I'm hoping I won't need them.
The front half-moon seal is very new (a couple weeks), so I hope I don't need to replace that. If I do, I'll source it locally.
See you in 10 days or so. Again, thanks for all the help and the photos. And even then, it might take me until June to get to this job.
Last night, I went to Home Depot to buy a 2' by 2' piece of shelf board to absorb the oil this thing drips. It's 2-3 drips/minute for the first 5 minutes, then it calms down when it's warm. About 1 quart of oil for every tank of gas; it's horrendous.
Last edited by mikeyen; 04-11-2014 at 03:13 PM.
04-11-2014, 07:31 PM
#28
Senior Member
Thread Starter
Join Date: Jan 2011
Location: Central AR
Posts: 3,041
I really appreciate everyone's hard work and advice here. Thank you all.
I'm off to Mexico for a week, so I obviously won't be able to touch this.
Last night, though, I ordered the 1996-1+ tensioner and guide, plus the gasket for the tensioner, plus the 2 O-rings that go between the block and the inner cover. I only bought the 2 O-rings because Courtesy's shipping isn't cheap, and it made sense to combine them into the order. I'm hoping I won't need them.
The front half-moon seal is very new (a couple weeks), so I hope I don't need to replace that. If I do, I'll source it locally.
See you in 10 days or so. Again, thanks for all the help and the photos. And even then, it might take me until June to get to this job.
Last night, I went to Home Depot to buy a 2' by 2' piece of shelf board to absorb the oil this thing drips. It's 2-3 drips/minute for the first 5 minutes, then it calms down when it's warm. About 1 quart of oil for every tank of gas; it's horrendous.
I'm off to Mexico for a week, so I obviously won't be able to touch this.
Last night, though, I ordered the 1996-1+ tensioner and guide, plus the gasket for the tensioner, plus the 2 O-rings that go between the block and the inner cover. I only bought the 2 O-rings because Courtesy's shipping isn't cheap, and it made sense to combine them into the order. I'm hoping I won't need them.
The front half-moon seal is very new (a couple weeks), so I hope I don't need to replace that. If I do, I'll source it locally.
See you in 10 days or so. Again, thanks for all the help and the photos. And even then, it might take me until June to get to this job.
Last night, I went to Home Depot to buy a 2' by 2' piece of shelf board to absorb the oil this thing drips. It's 2-3 drips/minute for the first 5 minutes, then it calms down when it's warm. About 1 quart of oil for every tank of gas; it's horrendous.
Have a safe trip.
Tonight I removed the TC. At the end I removed the alternator because the rear mounting bracket bolt threads into the TC. However, I did not need to remove the PS pump; only the 14mm mounting bolt that threads into the TC.
Since it was dark outside and I was working from my garage florescent light, I had to use a telescoping mechanics mirror to look around the TC outer edge to locate a couple of the 10mm bolt heads around the PS pump that I had difficulty seeing.
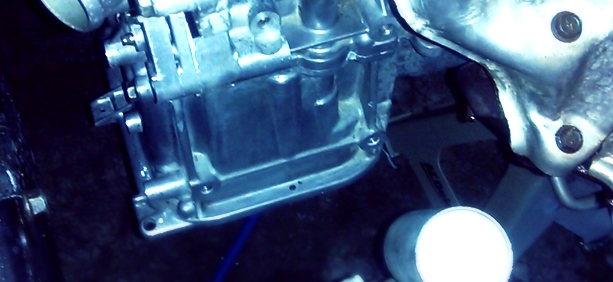
To separate the front TC from the rear, I placed two large screwdrivers into the top two TC opening slots then used a putty knife to cut away the RTV. The front TC separated from the rear without brute force. Once I had the front TC separated from the rear, I had to lower the TC enough to remove the engine mount bolt from the wheel opening area that faces the strut. After removing the mount bolt, I was able to lift the TC out from the top. As you can see from the picture, it is not necessary to remove the tensioner and water pump covers.
I took at another 50 pictures tonight for the instruction guide. My goal was to develop as many shortcuts on this project as I could reasonably find without having the luxury of an automotive lift or professional shop tools.
Here's proof that I was able to remove the TC tonight in the picture below.
More to be released next week. Tomorrow, I aim to remove the heads for sending them out to a local machine shop.
Last edited by CS_AR; 04-12-2014 at 07:58 AM.
04-19-2014, 05:00 PM
#30
Senior Member
Thread Starter
Join Date: Jan 2011
Location: Central AR
Posts: 3,041
It looks like I will need to remove the upper pan to get the Timing Cover back on. I had one unsuccessful attempt at trying to put the cover on this afternoon. The problem is it needs more lower clearance to line up the cover over the bolt holes and pins.
04-19-2014, 07:49 PM
#31
Senior Member
Thread Starter
Join Date: Jan 2011
Location: Central AR
Posts: 3,041
I think the problem is from the half moon RTV not being set and it moved around on me while I was trying to position the timing cover. Tonight I reapplied RTV to the half moon gasket then clamped down the corners. Hopefully, the RTV will set up over night so I can do a dry run test tomorrow to see if this approach will work.
04-20-2014, 06:34 AM
#32
Senior Member
Thread Starter
Join Date: Jan 2011
Location: Central AR
Posts: 3,041
The using RTV to set the half moon didn't work. The new half moon is just tall enough to require pressure (from underneath) after the TC is mounted.
Since I will be installing a new WS Y-pipe anyway, then "off with the upper oil pan" get it all sealed up properly from underneath. SrgScott's upper oil pan post came along at the right time.
Updating OP with this link below.
http://forums.maxima.org/4th-generat...n-removal.html
:
:
Since I will be installing a new WS Y-pipe anyway, then "off with the upper oil pan" get it all sealed up properly from underneath. SrgScott's upper oil pan post came along at the right time.
Updating OP with this link below.
http://forums.maxima.org/4th-generat...n-removal.html
:
:
Last edited by CS_AR; 04-20-2014 at 06:41 AM.
04-27-2014, 08:41 AM
#33
Senior Member
Thread Starter
Join Date: Jan 2011
Location: Central AR
Posts: 3,041
Here's a update from this weekend's work.
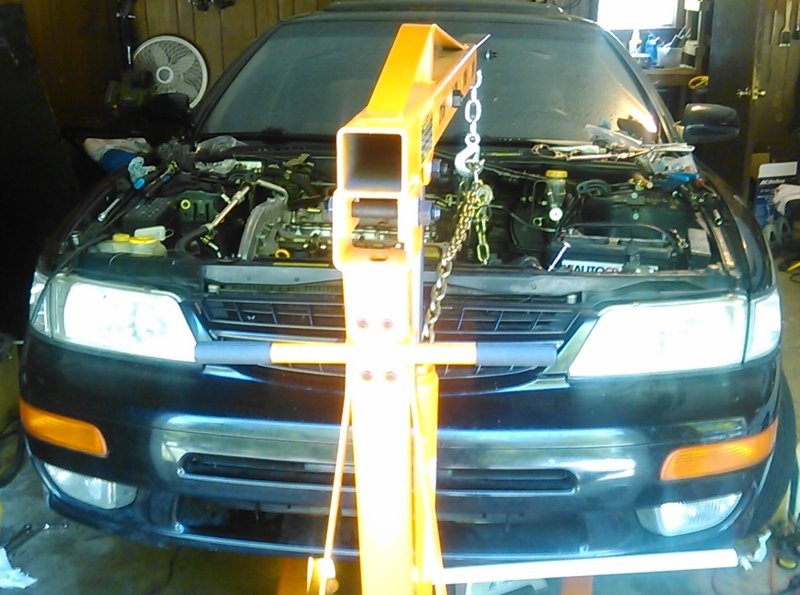
1) I had to get serious on this job and break out the engine hoist. It sure makes removing the cross member and engine mounts easier. The floor jack and it just got in the way. Here comes yet another Black 4DSC 5-speed..
2) Temporary TC Installation Handle
After a couple of practice runs for installing the TC, I decided to make a temporary handle for positioning the cover in place with RTV. If you have ever installed a TC by yourself, then you'll know where I'm coming from with this temporary handle.

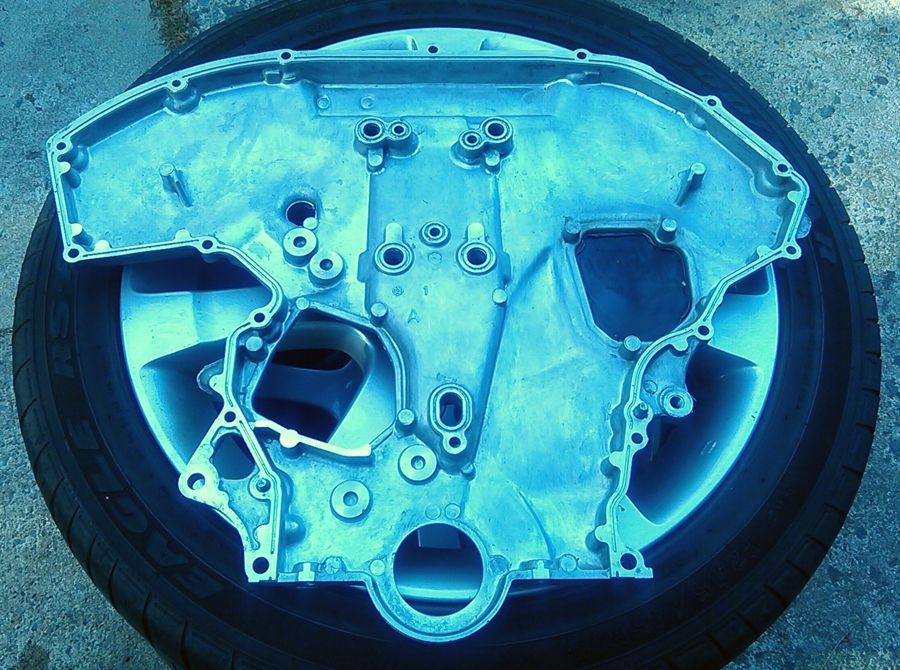
3) RTV Ready
Do your best to get the TC cleaned up for the new RTV. Once I've brushed and picked out the grooves, I use acetone to clean the surface areas. No I didn't clean it on the 18" Maxima wheel.. The wheel is for display purposes only.. :-)
4) Timing Cover Back In Place
Last night I installed the Timing Cover. Today I will the front main seal and the upper oil pan with half moons. When I removed the upper oil pan, the rear half moon fell out and landed on the garage floor. The mechanic that did the engine installation decided not to use RTV on the rear half moon like the factory. However, he did use a lot of RTV on the front. Anyway, I'm way glad that I decided to rework this job as I think the rear half moon may have caused trouble sooner than later.
1) I had to get serious on this job and break out the engine hoist. It sure makes removing the cross member and engine mounts easier. The floor jack and it just got in the way. Here comes yet another Black 4DSC 5-speed..
2) Temporary TC Installation Handle
After a couple of practice runs for installing the TC, I decided to make a temporary handle for positioning the cover in place with RTV. If you have ever installed a TC by yourself, then you'll know where I'm coming from with this temporary handle.
3) RTV Ready
Do your best to get the TC cleaned up for the new RTV. Once I've brushed and picked out the grooves, I use acetone to clean the surface areas. No I didn't clean it on the 18" Maxima wheel.. The wheel is for display purposes only.. :-)
4) Timing Cover Back In Place
Last night I installed the Timing Cover. Today I will the front main seal and the upper oil pan with half moons. When I removed the upper oil pan, the rear half moon fell out and landed on the garage floor. The mechanic that did the engine installation decided not to use RTV on the rear half moon like the factory. However, he did use a lot of RTV on the front. Anyway, I'm way glad that I decided to rework this job as I think the rear half moon may have caused trouble sooner than later.
Last edited by CS_AR; 04-27-2014 at 08:49 AM.
 05-01-2014, 03:27 AM
#35
Senior Member
Thread Starter
Join Date: Jan 2011
Location: Central AR
Posts: 3,041
Here are some final pics from wrapping up the TC and Upper Oil Pan job below.
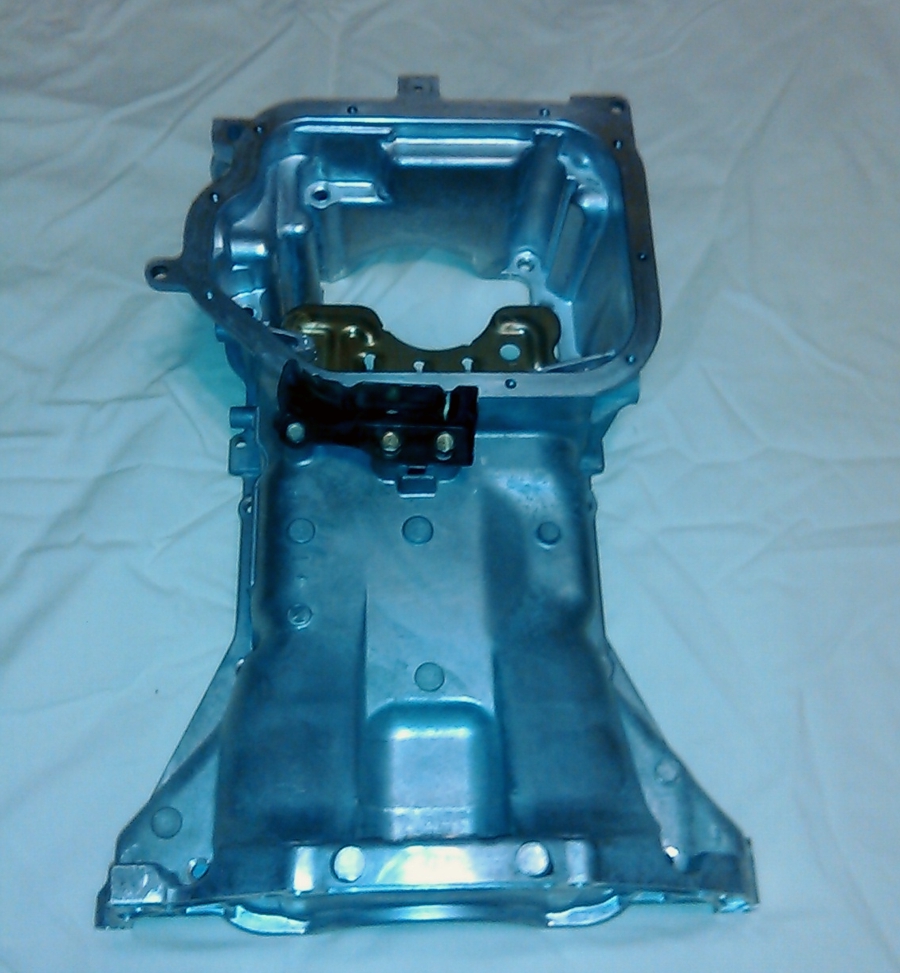
Here's a picture of the new half moon mounted on the Timing Cover with the recommended amount of RTV as described in the FSM. I had to remove the Upper Oil Pan to properly install the new half moon.
 [/URL]
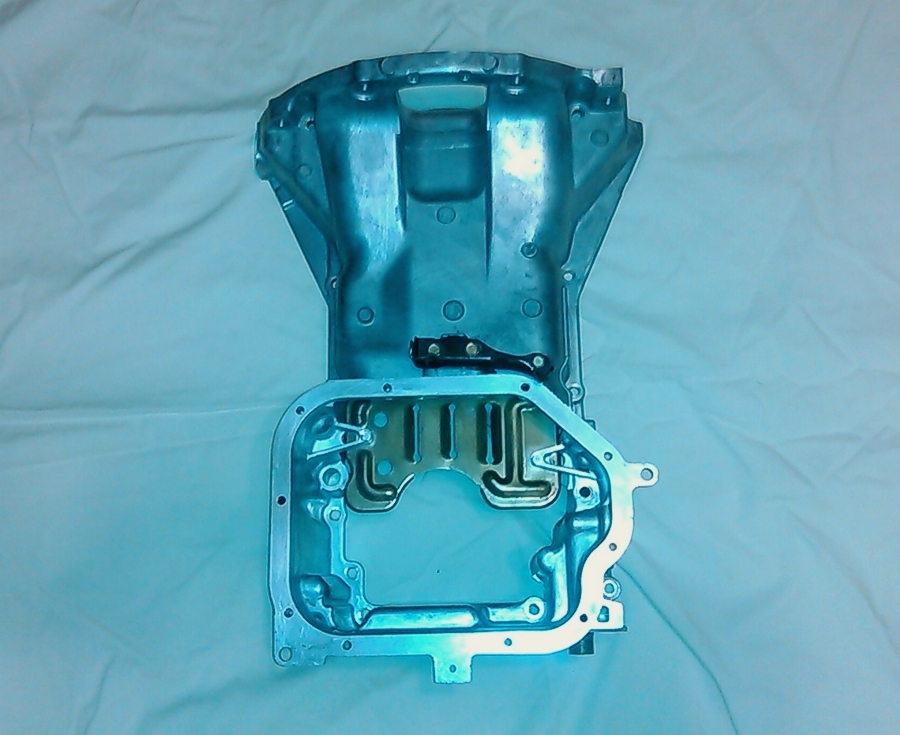
Here's a picture of the Upper Oil Pan installed from the front view. I used a small amount of RTV to coat the half moon mating surfaces. I hope it works out.
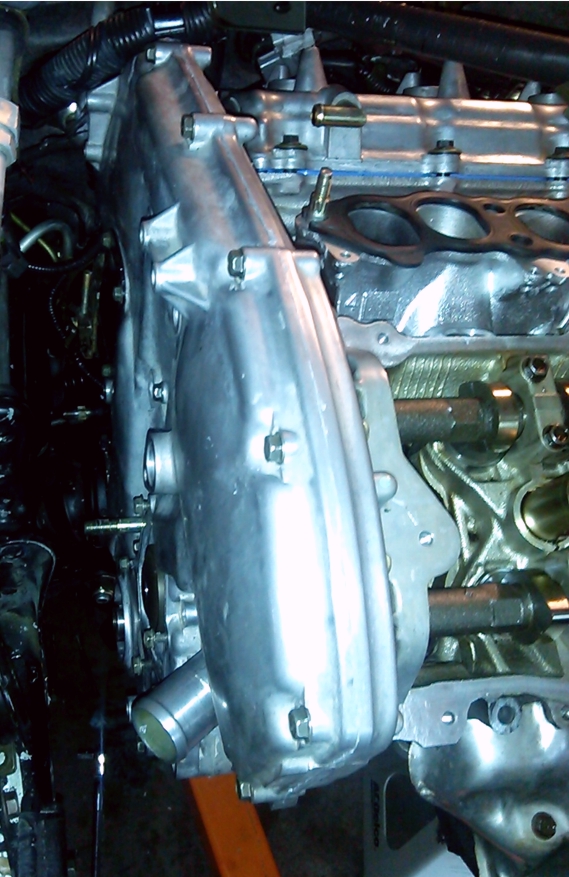
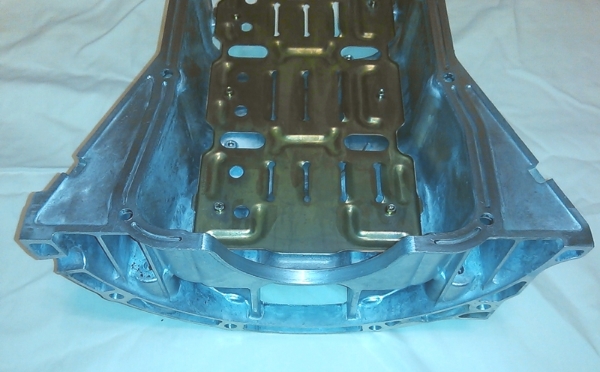
Upper Oil Pan Side View
Upper Oil Pan Miscellaneous Pictures
 05-11-2014, 07:38 PM
#36
Senior Member
Thread Starter
Join Date: Jan 2011
Location: Central AR
Posts: 3,041
In attempting to remount the Power Steering pump this evening, I though I had finally lost it. Ha!
The pump body was too wide to fit in mounting bracket area after re-installing the TC.
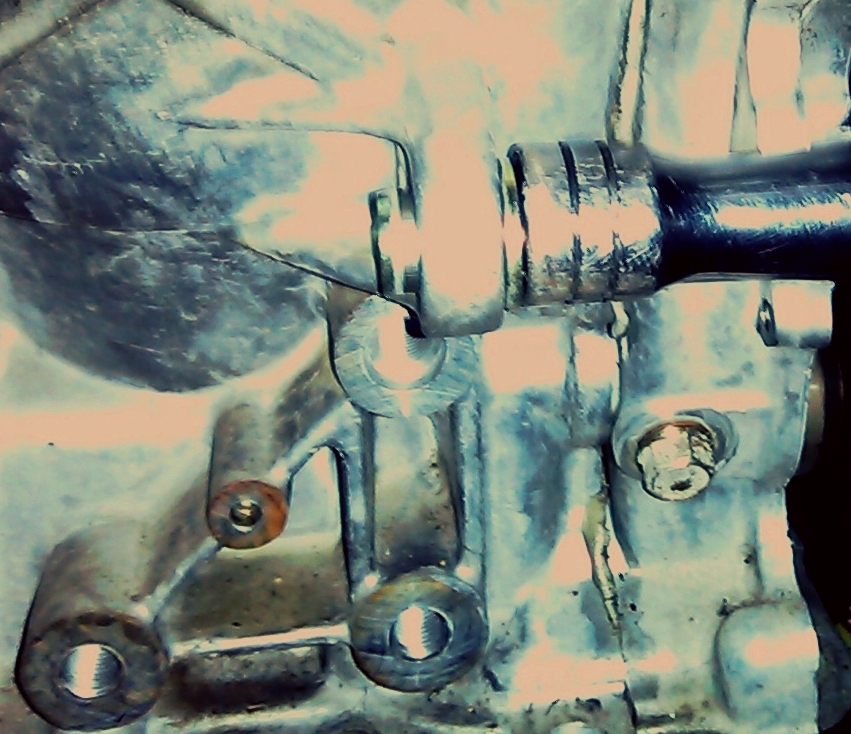
So I looked up and saw the mounting bolt keeper (correct name?) as shown in the picture below. To reset the keeper position, I took my long handle 1/2 inch breaker bar and lined it up over the keeper and tapped it to provide the pump body with enough clearance to fit between the mounting brackets.
So for the next time I do a TC job, I will tap in the keeper to reset the position while I have the TC off. See picture below.
If you ever done resealed a TC, then you will know what I'm talking about or you were just plain lucky to get the pump back into position between the brackets.
I snapped the picture from the old engine to provide a better view of the bracket.

The pump body was too wide to fit in mounting bracket area after re-installing the TC.
So I looked up and saw the mounting bolt keeper (correct name?) as shown in the picture below. To reset the keeper position, I took my long handle 1/2 inch breaker bar and lined it up over the keeper and tapped it to provide the pump body with enough clearance to fit between the mounting brackets.
So for the next time I do a TC job, I will tap in the keeper to reset the position while I have the TC off. See picture below.
If you ever done resealed a TC, then you will know what I'm talking about or you were just plain lucky to get the pump back into position between the brackets.
I snapped the picture from the old engine to provide a better view of the bracket.
Last edited by CS_AR; 05-11-2014 at 07:49 PM.
12-04-2014, 09:27 PM
#37
Junior Member

Join Date: Sep 2014
Posts: 73
CS_AR,
I'm going to do this o-ring job myself and I have some question. I notice in one of your pictures you used an engine hoist to support the engine. Do you think I can use my cars jack to support the engine weight since 3 out of the 4 engine mounts would be removed?
I read through the whole post and didn't read anything about removing the rear TC cover. Do I have to remove the upper oil pan to free the rear TC cover like what the FSM says to do?
Thanks.
12-05-2014, 02:18 AM
#38
Senior Member
Thread Starter
Join Date: Jan 2011
Location: Central AR
Posts: 3,041
CS_AR,
I'm going to do this o-ring job myself and I have some question. I notice in one of your pictures you used an engine hoist to support the engine. Do you think I can use my cars jack to support the engine weight since 3 out of the 4 engine mounts would be removed?
I read through the whole post and didn't read anything about removing the rear TC cover. Do I have to remove the upper oil pan to free the rear TC cover like what the FSM says to do?
Thanks.
I'm going to do this o-ring job myself and I have some question. I notice in one of your pictures you used an engine hoist to support the engine. Do you think I can use my cars jack to support the engine weight since 3 out of the 4 engine mounts would be removed?
I read through the whole post and didn't read anything about removing the rear TC cover. Do I have to remove the upper oil pan to free the rear TC cover like what the FSM says to do?
Thanks.
http://www.harborfreight.com/1000-lb...bar-96524.html
In my case, I did not need to remove the rear timing cover to replace the o-rings. I wanted to check the timing marks and to reseal the outer TC and re-install the half moons. However, I remember re-torquing the inner TC bolts that I could reach with the outer cover off. So far no leaks..
While the timing cover can be removed without removing the upper oil pan,
to get the half moons positioned, requires it to be removed and installed from underneath.
From posts above:
Yep - I found the upper oil pan will need to be removed to properly seat the TC half moon.
In a couple of pages above:
Here's a picture of the new half moon mounted on the Timing Cover with the recommended amount of RTV as described in the FSM. I had to remove the Upper Oil Pan to properly install the new half moon.
NOTE: When preparing to install the outer TC, I made two or three "dry runs" without RTV to get the swing of it. If you are working by yourself, you'll see how finding a place for holding the TC while positioning it with RTV becomes important.
Last edited by CS_AR; 12-05-2014 at 06:41 AM.
12-05-2014, 10:01 AM
#39
Member

Join Date: Mar 2008
Location: Mesa, AZ
Posts: 220
What I did was after removing the upper oil pan I reinstalled the cross member to support the engine and then take off the timing cover motor mount and start taking off the timing cover, gears, rear timing cover etc. Should be able to reinstall the cross member in just a few minutes.
12-05-2014, 01:15 PM
#40
Senior Member
Thread Starter
Join Date: Jan 2011
Location: Central AR
Posts: 3,041
What I did was after removing the upper oil pan I reinstalled the cross member to support the engine and then take off the timing cover motor mount and start taking off the timing cover, gears, rear timing cover etc. Should be able to reinstall the cross member in just a few minutes.
Sent from my Z998 using Maxima