How To: Install Delrin Rear Beam Bushings + Review!
 09-13-2011, 07:48 PM
#1
Senior Member
Thread Starter
iTrader: (11)

Join Date: Aug 2006
Location: Sunshine State
Posts: 4,717
How To: Install Delrin Rear Beam Bushings + Review!
Ordered Delrin Rear Beam bushings from Speedymax99 and installed them today. The bushings replace the stock metal sleeve/rubber bushings in the control rod that connects to the lateral link and the rear beam. You can read more about the Delrin bushings in the for sale thread here:
http://forums.maxima.org/4th-generat...-bushings.html
The installation can be summed up as the following:
Difficulty: 6/10.
Time: 3 hours.
Tools: Jack stands, jack, pry bars, 22mm socket (not deep socket), 17mm socket, air tools help.
Specialty tools: Hydraulic press, or a vice/torch at minimum! The old bushings are pressed into the control rod. A shop can press them out for you.
Nutshell: Put car on jack stands, put jack under rear beam, loosen lateral link and control rod, remove lower strut nuts, lower rear beam with jack, remove lateral link and control rod. Replace bushings, reinstall.
1. To start off. Jack the car up, put a jack stand under each side of the car:
2. Put a jack under the center of the rear beam, and remove the bolts at the bottom of the struts.
3. Remove the bolts/nuts holding in the lateral link/control rod. They are highlighted in the picture below.
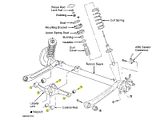
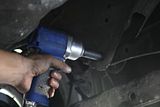
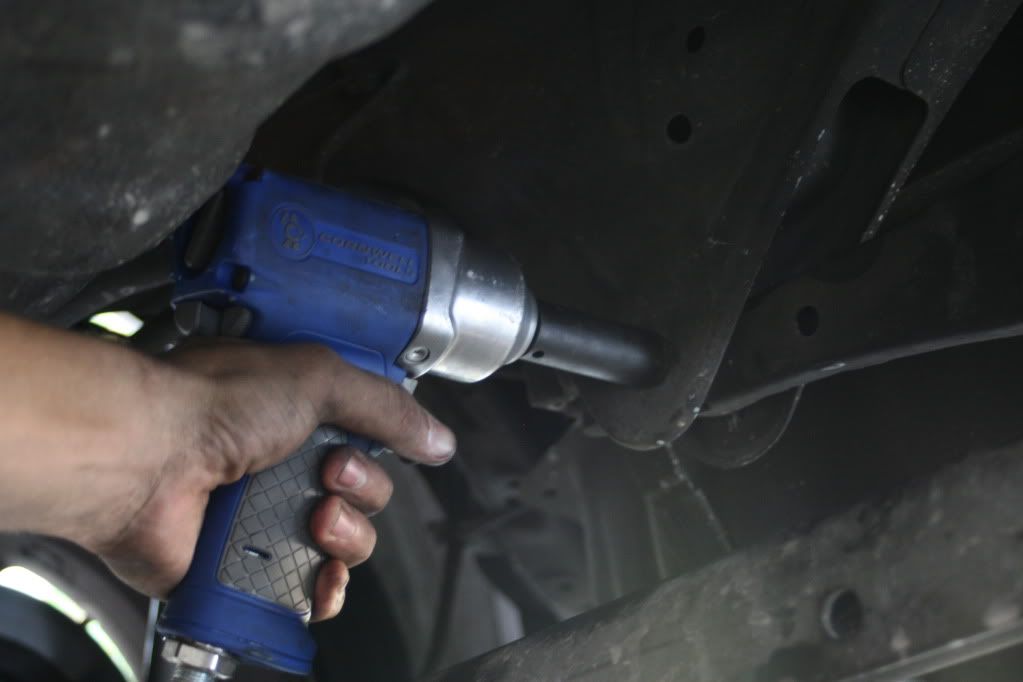
Using a 3/8" impact gun to remove the 17mm bolt/nut at the top of the lateral link.
The two nuts holding in the control rod, and the bolt on the far left is the lower lateral link bolt.
4. Once these bolts are removed, you'll remove the lateral link and control rod with some persuasion.
5. Now comes the difficult part. If you do not have a torch, a press (or at minimum, a bench vice) and the means to remove the bushings from the control rod, TAKE IT TO A SHOP. They have the means. Trust me.
6. I use two deep sockets, a torch, a vice and a combination of positions, pressing and adjusting to get them out. As you can see, my vice did a number on the aluminum, good thing its not aesthetic.
Once you "break" the sleeve loose, you may be able to hammer it out like this:

7. Next you need to press the Delrin bushings into the control rod. I used the vise, and LUBE! Use lube. Petroleum Jelly, tranny assembly lube, anything along those lines. It should slide in very easily.
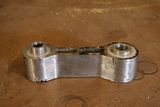
Delrin bushings pressed into the control arm.
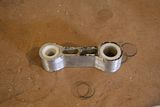
Sleeves put into the delrin. These slide in and out easily.
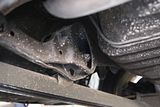
8. You're ready to reinstall. Simply do the reverse procedure. Use your jack to position the rear suspension and get the lateral link and control rod bolted back up. Dont forget the lower strut bolts!!!
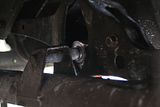
Installed.
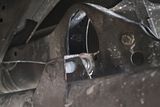
Installed.
Onto my first impressions:
I like it. Is it a huge difference? No. Noticeable? Yes. It reduces the sideways rear end shimmy that occured through turns, it feels more responsive in the rear. My front end is sloppy now, subframe bushings/delrin LCA bushings and a new steering rack are next.
Overall, I give it five stars. Its something that makes your max just a little bit better.
Thanks speedymax99!
http://forums.maxima.org/4th-generat...-bushings.html
The installation can be summed up as the following:
Difficulty: 6/10.
Time: 3 hours.
Tools: Jack stands, jack, pry bars, 22mm socket (not deep socket), 17mm socket, air tools help.
Specialty tools: Hydraulic press, or a vice/torch at minimum! The old bushings are pressed into the control rod. A shop can press them out for you.
Nutshell: Put car on jack stands, put jack under rear beam, loosen lateral link and control rod, remove lower strut nuts, lower rear beam with jack, remove lateral link and control rod. Replace bushings, reinstall.
1. To start off. Jack the car up, put a jack stand under each side of the car:

2. Put a jack under the center of the rear beam, and remove the bolts at the bottom of the struts.
3. Remove the bolts/nuts holding in the lateral link/control rod. They are highlighted in the picture below.
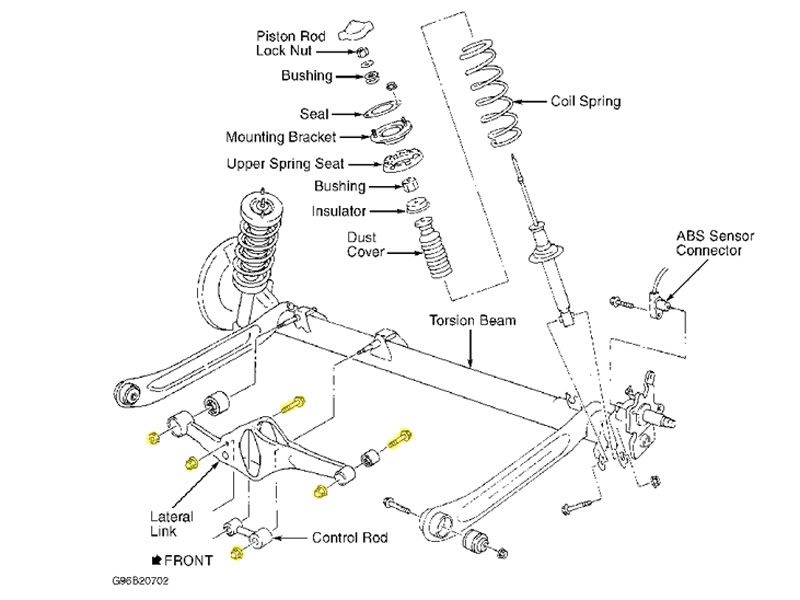
Using a 3/8" impact gun to remove the 17mm bolt/nut at the top of the lateral link.
The two nuts holding in the control rod, and the bolt on the far left is the lower lateral link bolt.

4. Once these bolts are removed, you'll remove the lateral link and control rod with some persuasion.
5. Now comes the difficult part. If you do not have a torch, a press (or at minimum, a bench vice) and the means to remove the bushings from the control rod, TAKE IT TO A SHOP. They have the means. Trust me.
6. I use two deep sockets, a torch, a vice and a combination of positions, pressing and adjusting to get them out. As you can see, my vice did a number on the aluminum, good thing its not aesthetic.
Once you "break" the sleeve loose, you may be able to hammer it out like this:

7. Next you need to press the Delrin bushings into the control rod. I used the vise, and LUBE! Use lube. Petroleum Jelly, tranny assembly lube, anything along those lines. It should slide in very easily.
Delrin bushings pressed into the control arm.

Sleeves put into the delrin. These slide in and out easily.

8. You're ready to reinstall. Simply do the reverse procedure. Use your jack to position the rear suspension and get the lateral link and control rod bolted back up. Dont forget the lower strut bolts!!!
Installed.

Installed.

Onto my first impressions:
I like it. Is it a huge difference? No. Noticeable? Yes. It reduces the sideways rear end shimmy that occured through turns, it feels more responsive in the rear. My front end is sloppy now, subframe bushings/delrin LCA bushings and a new steering rack are next.
Overall, I give it five stars. Its something that makes your max just a little bit better.
Thanks speedymax99!
Last edited by MOHFpro90; 09-13-2011 at 07:52 PM.

 09-13-2011, 08:14 PM
#3
Senior Member
Thread Starter
iTrader: (11)
Join Date: Aug 2006
Location: Sunshine State
Posts: 4,717
You bring up a point I forgot to mention... these are a compliment to other, existing suspension mods. All of the delrin bushings are, as well as the subframe collars. They make the car a bit more responsive and less mushy, something that pairs well with a propper spring/damper setup, and other suspension mods.

 09-15-2011, 11:57 AM
#7
Supporting Maxima.org Member

iTrader: (60)
Join Date: Aug 2003
Location: Southern California
Posts: 2,036
Great write up MOHFpro90!
Manufacturer is working on an instruction sheet, but they should be self explanatory for anyone doing the work. If anyone wants the manufacturer to press in/out the bushings, they'll do it for no charge.
The QT links use different bushing sizes, but the shop has made custom bushings for those too when people send in the links.
BTW, 95-98 use a black steel link instead of aluminum like 99's.
09-15-2011, 02:36 PM
#8

 Looking forward to having these Delrin bushings in my QT links..(links should be arriving to you today).
 Nice write-up/review MOHF. Thanks for sharing.

Thread
Thread Starter
Forum
Replies
Last Post
Dennis Twohy
1st & 2nd Generation Maxima (1981-1984 and 1985-1988)
0
10-01-2015 06:01 PM
Huttig2009
5th Generation Classifieds (2000-2003)
8
09-25-2015 03:31 PM

