***Product Review and Installation: 4th gen Subframe Collars***
 03-10-2010, 09:34 AM
#1
Kevlo for President

Thread Starter
iTrader: (36)
Join Date: Dec 2000
Location: Lake Orion, MI
Posts: 35,779
***Product Review and Installation: 4th gen Subframe Collars***
There is a new product for the 4th/5th gen world, it is made by one our own members and you can find the Group Deal Thread here:
http://forums.maxima.org/group-deals...e-collars.html
Installation
Included with the kit will be a set of instructions, but if they are not clear enough, the following will be
Tools
19mm wrench and socket
14mm socket (for SE's)
Torque Wrench
Jack and Jackstands
Breaker Bar
Prybar
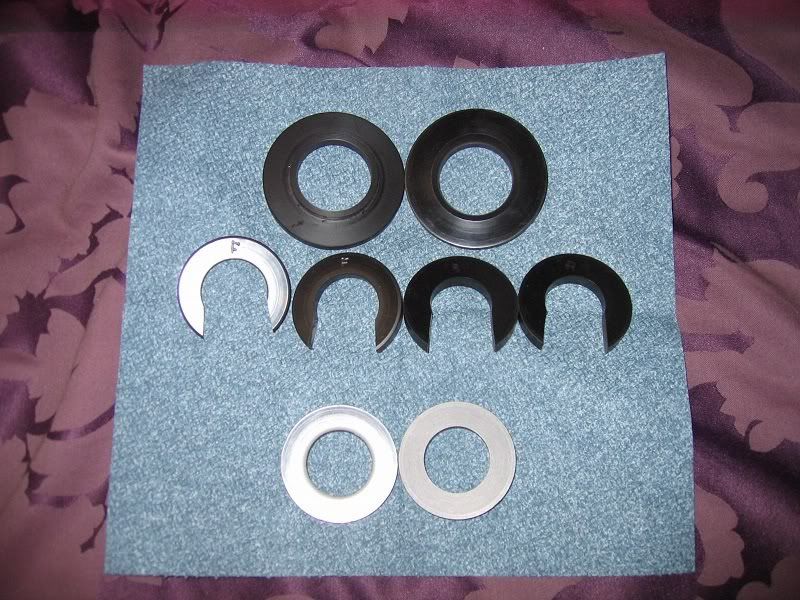
This is what is included in the box. Make sure you have all of them, otherwise you cannot continue
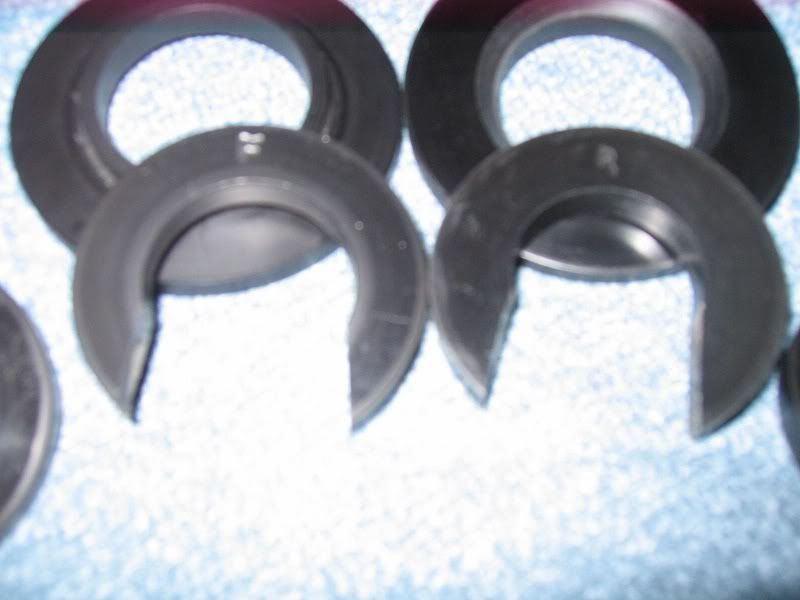
You will see that the C-shaped collars have "F" and "R" written on them, you will have two of each.
First you will want to loosen the lugs on the front wheels. Next you will jack up the car and place it on jack stands.
DO NOT LEAVE THE CAR ON THE JACK WHILE DOING THIS!!!
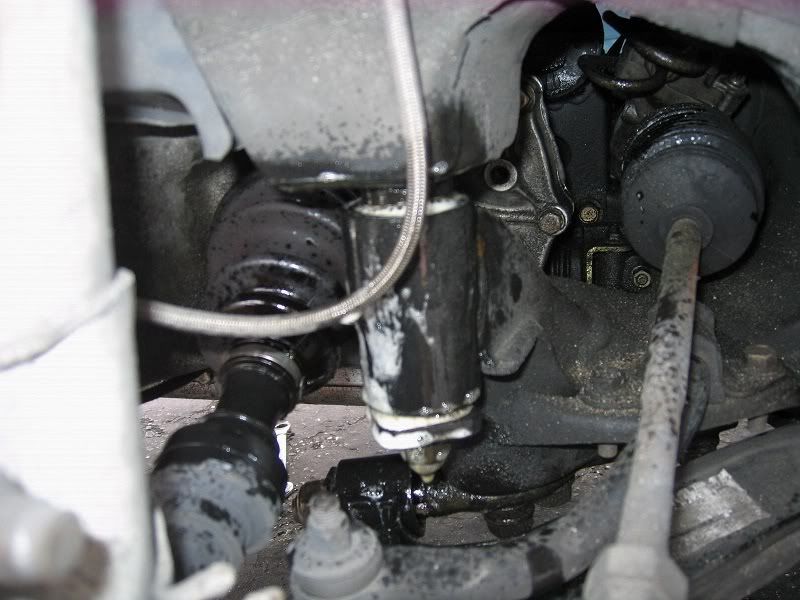
With the front wheels removed, you will want to locate these locations:

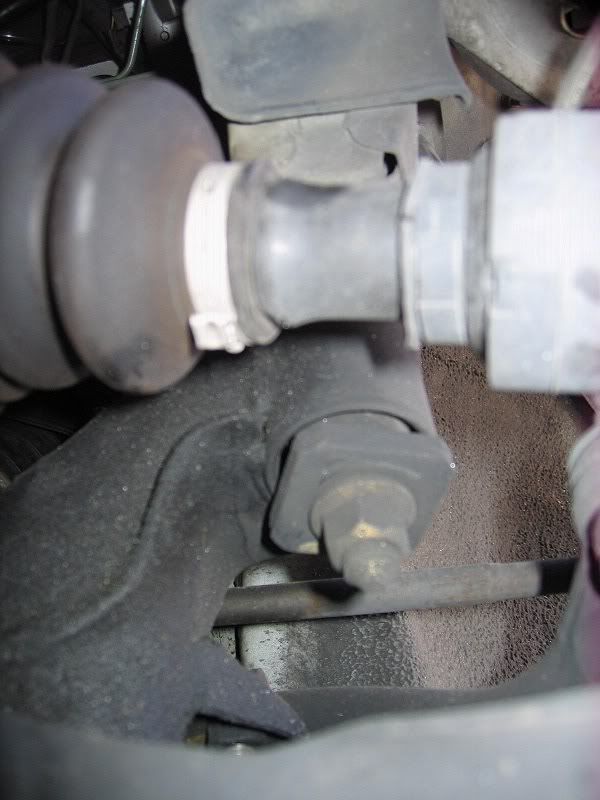
This is the "front" bolt and is located behind the strut and if you are facing the fender the "rear" bolt will be to the right of that (drivers side).
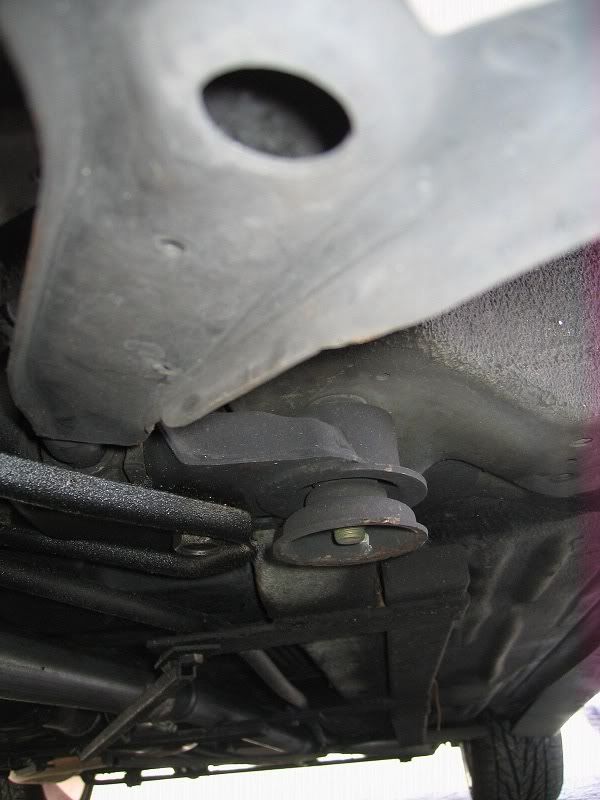
This is the rear bolt.
Cont...
http://forums.maxima.org/group-deals...e-collars.html
Installation
Included with the kit will be a set of instructions, but if they are not clear enough, the following will be
Tools
19mm wrench and socket
14mm socket (for SE's)
Torque Wrench
Jack and Jackstands
Breaker Bar
Prybar
This is what is included in the box. Make sure you have all of them, otherwise you cannot continue
You will see that the C-shaped collars have "F" and "R" written on them, you will have two of each.
First you will want to loosen the lugs on the front wheels. Next you will jack up the car and place it on jack stands.
DO NOT LEAVE THE CAR ON THE JACK WHILE DOING THIS!!!
With the front wheels removed, you will want to locate these locations:
This is the "front" bolt and is located behind the strut and if you are facing the fender the "rear" bolt will be to the right of that (drivers side).
This is the rear bolt.
Cont...
 03-10-2010, 09:34 AM
#2
Kevlo for President
Thread Starter
iTrader: (36)
Join Date: Dec 2000
Location: Lake Orion, MI
Posts: 35,779
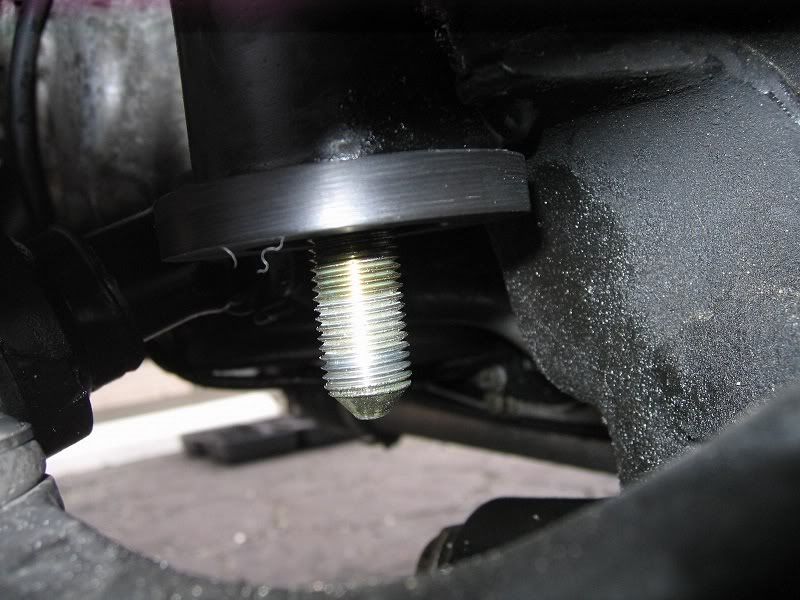
Next, starting with the rear, remove the nut. Next take the prybar and pry the subframe away from the body, this will give you clearance for the C-shaped (R) collars. Once the C-shaped collar is in, install the lipped collar where the nut and plate go.
Note: SE's will have an extra plate that is held in by 14mm bolts (TQ to 32ft-lbs), remove this as well in the installation of the collars, it should be obvious how they go from the FSM pic above.

It should look like that once it is installed. Make sure to clean the bolt and nut before installing, I used Amsoil Power Foam to do this (WD-40 can work as well). This is optional but it will make it easier to install the nut since there wont be dirt in the threads.
Tighten the nut to 100ft-lbs.

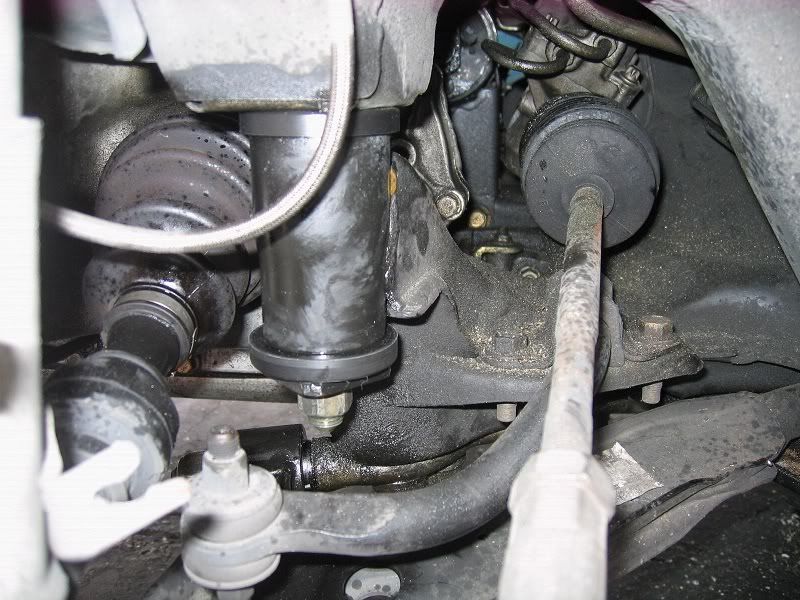
It should look like that when it is done.
Repeat this on the other side, do not do the front until both rears are done.
Now for the front:
Using the optional cleaner, I cleaned off the dirt and grease:
I had axle grease and dirt all over the nut/bolt so this was done to remove it so it would be easier to loosen.
Pry the subframe away from the chassis and install the C-shaped collars labeled "F". Install the round collar at the bottom.
Make sure the threads are clean.
Install the nut and torque to 100ft-lbs. It should look like that when it is done.
Install the wheels, lower the car, and torque the lugs to about 80ft-lbs.
Review
These collars are suppose to improve the ride and handling of the car. They do just that, since the gap between the subframe and chassis is eliminated, the front end feels stiffer. When I was going over bumps, the front end felt more solid. I cannot say if these reduce body roll since I have SFC's but I imagine they would on a non-SFC Maxima. Steering also felt tighter when jerking the wheel back and forth, normally there would be some play and lag when I did this, now it is perfect.
I would definitely recommend this product for all 4th/5th genners. These collars should have been done from the factory but they were not. Since many of us mod our cars, there is more stress on the chassis and subframe. These help distribute the load better as well.
http://forums.maxima.org/group-deals...e-collars.html
If you have any q's just let me know
Note: SE's will have an extra plate that is held in by 14mm bolts (TQ to 32ft-lbs), remove this as well in the installation of the collars, it should be obvious how they go from the FSM pic above.
It should look like that once it is installed. Make sure to clean the bolt and nut before installing, I used Amsoil Power Foam to do this (WD-40 can work as well). This is optional but it will make it easier to install the nut since there wont be dirt in the threads.
Tighten the nut to 100ft-lbs.
It should look like that when it is done.
Repeat this on the other side, do not do the front until both rears are done.
Now for the front:
Using the optional cleaner, I cleaned off the dirt and grease:
I had axle grease and dirt all over the nut/bolt so this was done to remove it so it would be easier to loosen.
Pry the subframe away from the chassis and install the C-shaped collars labeled "F". Install the round collar at the bottom.
Make sure the threads are clean.
Install the nut and torque to 100ft-lbs. It should look like that when it is done.
Install the wheels, lower the car, and torque the lugs to about 80ft-lbs.
Review
These collars are suppose to improve the ride and handling of the car. They do just that, since the gap between the subframe and chassis is eliminated, the front end feels stiffer. When I was going over bumps, the front end felt more solid. I cannot say if these reduce body roll since I have SFC's but I imagine they would on a non-SFC Maxima. Steering also felt tighter when jerking the wheel back and forth, normally there would be some play and lag when I did this, now it is perfect.
I would definitely recommend this product for all 4th/5th genners. These collars should have been done from the factory but they were not. Since many of us mod our cars, there is more stress on the chassis and subframe. These help distribute the load better as well.
http://forums.maxima.org/group-deals...e-collars.html
If you have any q's just let me know
Last edited by Kevlo911; 03-10-2010 at 09:48 AM.
 03-10-2010, 10:35 AM
#4

Nice work. Do you feel the little imperfections in the road more now with these collars? I would think that mechanically coupling the subframe to the chassis more rigidly would cause more vibrations inside the car. That being said, I'm sure the more sure-footed feel outweighs a little added vibration, especially for people interested in increasing their spring rates. I'm just curious how much more vibration is present in the car.
BTW, are those the General Exclaims?
BTW, are those the General Exclaims?
03-10-2010, 11:45 AM
#5
Senior Member

Join Date: Sep 2009
Location: Worcester, MA
Posts: 4,011
Review
These collars are suppose to improve the ride and handling of the car. They do just that, since the gap between the subframe and chassis is eliminated, the front end feels stiffer. When I was going over bumps, the front end felt more solid. I cannot say if these reduce body roll since I have SFC's but I imagine they would on a non-SFC Maxima. Steering also felt tighter when jerking the wheel back and forth, normally there would be some play and lag when I did this, now it is perfect.
I would definitely recommend this product for all 4th/5th genners. These collars should have been done from the factory but they were not. Since many of us mod our cars, there is more stress on the chassis and subframe. These help distribute the load better as well.
http://forums.maxima.org/group-deals...e-collars.html
If you have any q's just let me know
Do i really need an impact wrench and prybar to install. I dont have jacks so i prolly wd let my mech put it on for me. The instructions u gave are pretty good. Im sure the with the pics i can figure out how to install.
The c-sections are pretty much self-explanatory / evident to install? Like, they only go in one way, correct?
03-10-2010, 11:50 AM
#6

I will probably be installing these tomorrow morning, I will add to this great thread my mini-review.
Thanx alot Kevin that cleared up a couple of questions I had, I have never ever messed with the body or suspension so I was a bit confused. You cleared it up, thanx.
Thanx alot Kevin that cleared up a couple of questions I had, I have never ever messed with the body or suspension so I was a bit confused. You cleared it up, thanx.
03-10-2010, 11:59 AM
#7
Senior Member
Join Date: Sep 2009
Location: Worcester, MA
Posts: 4,011
I will probably be installing these tomorrow morning, I will add to this great thread my mini-review.
Thanx alot Kevin that cleared up a couple of questions I had, I have never ever messed with the body or suspension so I was a bit confused. You cleared it up, thanx.
Thanx alot Kevin that cleared up a couple of questions I had, I have never ever messed with the body or suspension so I was a bit confused. You cleared it up, thanx.
THats cool man...more pics and tips is always helpful.
03-10-2010, 12:27 PM
#8
Kevlo for President
Thread Starter
iTrader: (36)
Join Date: Dec 2000
Location: Lake Orion, MI
Posts: 35,779
Nice work. Do you feel the little imperfections in the road more now with these collars? I would think that mechanically coupling the subframe to the chassis more rigidly would cause more vibrations inside the car. That being said, I'm sure the more sure-footed feel outweighs a little added vibration, especially for people interested in increasing their spring rates. I'm just curious how much more vibration is present in the car.
BTW, are those the General Exclaims?
BTW, are those the General Exclaims?
And yes, they are Exclaims
Kevlo...who do u PM to get these?
Do i really need an impact wrench and prybar to install. I dont have jacks so i prolly wd let my mech put it on for me. The instructions u gave are pretty good. Im sure the with the pics i can figure out how to install.
The c-sections are pretty much self-explanatory / evident to install? Like, they only go in one way, correct?
Yes they can only go in one way but you can install them from any direction and it should have the same effect. It will be easy to understand when you actually install them.


 03-29-2010, 08:58 AM
#17

did you hear a clunk/thud/looseness going over bumps before this install that disappeared as a result of this product? Curious..
Last edited by din9lebeRrY; 03-29-2010 at 09:01 AM.
03-29-2010, 10:01 AM
#18

I had these installed by my mechanic when I redid my control arms and front wheel bearings...He knew exactly where they went when I said subframe collars, but didn't put them on because he didn't know what they were for. I told him they reinforce the subframe to compensate for the bigger wheels etc, and he installed them...
(Maximeltman, I also had just enough room for the C shaped-collar without taking the bolt off, but it seemed like he would have to still hammer it in, so I told my mechanic to just take off the bolts and put them in, as I didn't want to risk cracking them or anything...)
To be honest, i'm not sure if it was the combination of the new control arms, wheel bearings and these collars, but the car ABSOLUTELY feels more stable when going over bumps/pot holes. I have D2 coilovers (dropped just enough to stick a finger from top of the fender opening and the wheel) with 19" wheels...before this, it would feel like the car was going to break every time i went over something. I literally clinched up (yes, butt-cheeks and all) when I saw an unavoidable pothole. Now that feeling has slowly dissipated. I am extremely happy with these, and they're definitely money well spent.
03-29-2010, 10:44 AM
#19
I had these installed by my mechanic when I redid my control arms and front wheel bearings...He knew exactly where they went when I said subframe collars, but didn't put them on because he didn't know what they were for. I told him they reinforce the subframe to compensate for the bigger wheels etc, and he installed them...
(Maximeltman, I also had just enough room for the C shaped-collar without taking the bolt off, but it seemed like he would have to still hammer it in, so I told my mechanic to just take off the bolts and put them in, as I didn't want to risk cracking them or anything...)
To be honest, i'm not sure if it was the combination of the new control arms, wheel bearings and these collars, but the car ABSOLUTELY feels more stable when going over bumps/pot holes. I have D2 coilovers (dropped just enough to stick a finger from top of the fender opening and the wheel) with 19" wheels...before this, it would feel like the car was going to break every time i went over something. I literally clinched up (yes, butt-cheeks and all) when I saw an unavoidable pothole. Now that feeling has slowly dissipated. I am extremely happy with these, and they're definitely money well spent.
(Maximeltman, I also had just enough room for the C shaped-collar without taking the bolt off, but it seemed like he would have to still hammer it in, so I told my mechanic to just take off the bolts and put them in, as I didn't want to risk cracking them or anything...)
To be honest, i'm not sure if it was the combination of the new control arms, wheel bearings and these collars, but the car ABSOLUTELY feels more stable when going over bumps/pot holes. I have D2 coilovers (dropped just enough to stick a finger from top of the fender opening and the wheel) with 19" wheels...before this, it would feel like the car was going to break every time i went over something. I literally clinched up (yes, butt-cheeks and all) when I saw an unavoidable pothole. Now that feeling has slowly dissipated. I am extremely happy with these, and they're definitely money well spent.
Im very happy/positive to read this. I'm literally in the same situation as you (albeit I have 18's and BC coilovers on a i35/5.5). I had my endlinks, swaybar bushings/and bushings (ES LCA) replaced but to no avail...the sound exists word for word just as you mentioned.
I'm hoping this fixes it, only way to find out is when I get these babies. Thanks for the input!
 04-04-2010, 12:09 PM
#21
Supporting Maxima.org Member
iTrader: (60)
Join Date: Aug 2003
Location: Southern California
Posts: 2,036
We need to show support so they keep making new stuff for our cars that nobody else make. They are going to test out some more stuff on my suspension in a few weeks for the Stillen show.

 04-13-2010, 04:09 PM
#24
Supporting Maxima.org Member

Join Date: Aug 2004
Location: Atlanta
Posts: 277
anyone know the nut/thread size for the subframe bolts?
Three of the subframe collar pairs went on fine. When i got to the passenger side front i rounded the nut (stupid 12 point sockets). I tried a pipe wrench and some vice grips but just can't get the leverage. So I'm left with cutting it off. Before doing so I went to home depot and bought a selection of metric nuts but none seem to fit. Anyone know what size I should be looking for? the closest I could find was a 12mm X 1.75; but it's a tad too small. I called the Nissan parts department but they didn't know.
04-14-2010, 04:59 AM
#25
The same thing happened to me, except it was the rear connector. Both bolts are 19mm. I called Dave Burnett and e-mailed the FSM picture used on the first page. He figured out what was needed and ordered them for me. I installed them in the other three locations, and I can already feel the difference. But before you cut it off, get yourself a bolt extractor. http://www.acetoolonline.com/product-p/irw-53914.htm
Last edited by NABU6; 04-14-2010 at 05:04 AM.
04-14-2010, 03:11 PM
#26
Supporting Maxima.org Member
Join Date: Aug 2004
Location: Atlanta
Posts: 277
The same thing happened to me, except it was the rear connector. Both bolts are 19mm. I called Dave Burnett and e-mailed the FSM picture used on the first page. He figured out what was needed and ordered them for me. I installed them in the other three locations, and I can already feel the difference. But before you cut it off, get yourself a bolt extractor. http://www.acetoolonline.com/product-p/irw-53914.htm
While there though I did buy a nut splitter for $10. It's basically a loop of steel with a wedge on a screw going through it. You just put it around the nut and tighten until is cuts through. Hopefully this won't hurt the bolt.
05-06-2010, 04:37 AM
#28
Just finished installing the last set on one of the rear connectors after stripping the bolt and ordering a new one from Dave B. Installation was very straight forward and relatively simple. I highly recommend this. The difference was very noticeable. So much so that my wife noticed the difference after riding around with me one day. She asked me if I did anything different to the car because it felt more solid, bumps where not as harsh as they where before installation. By the way, car is lowered on H&R springs with tokico Illum. shocks all around. For all you maxima drivers out there, get this, you will not be disappointed.
 05-06-2010, 02:49 PM
#32
http://www.google.com/search?q=defin...ient=firefox-a
a licensed medical practitioner
Dr J
05-08-2010, 08:08 PM
#33
I just installed them on my i30. First of all the upper collars must have provided just enough room to allow the steering rack to clear something because I've had a grinding noise when making a full left and right turn and now the noise is gone!
Also, My suspension went from tight to very tight and I'm sure these collars picked up some slack. Trust me, they do work but a caveat, this is not your fathers Buick ride!
Also, My suspension went from tight to very tight and I'm sure these collars picked up some slack. Trust me, they do work but a caveat, this is not your fathers Buick ride!
05-08-2010, 10:22 PM
#34
Got a hold of a set for 5th gen and installed them. Interesting concept. Even weirder is why was the original design so flawed?! It was doomed to be stressed and weakened from the factory. Thank goodness for SEMA-like businesses to help end users and consumers keep their cars on the road.
Dr J
Dr J
07-15-2010, 06:01 PM
#35

Repost from the FS thread:
So I'm under my car with the collars in hand along with the SE chassis stiffening plates that I was going to install on my car (that SE's have to remove to install the collars), and there's a bit of a problem. It looks like the collars will fit just fine with the SE plates, but I also have a stage 2 LTB on my car, and that's where the problems arise.
It looks like if we install the rear collars it will space the LTB down so far that it will be impossible to reinstall the front of the LTB due to the lower control arm shafts nuts being at an angle.


As you know this tie bar recesses the front lower control arm nuts into the bar.

I can barely get a chrome socket in to the hole to engage the lower control arm nuts. As is, it's already difficult to reinstall the LTB, and it looks like these washers will make the problem worse. Additionally, it looks like if we installed the collars and somehow got the LTB to reinstall it would then cause the front LCA bushing to bind.
So the question I have for everyone: can these collars be made to work with a LTB? Are these even necessary if I have the LTB already?
So I'm under my car with the collars in hand along with the SE chassis stiffening plates that I was going to install on my car (that SE's have to remove to install the collars), and there's a bit of a problem. It looks like the collars will fit just fine with the SE plates, but I also have a stage 2 LTB on my car, and that's where the problems arise.
It looks like if we install the rear collars it will space the LTB down so far that it will be impossible to reinstall the front of the LTB due to the lower control arm shafts nuts being at an angle.
As you know this tie bar recesses the front lower control arm nuts into the bar.
I can barely get a chrome socket in to the hole to engage the lower control arm nuts. As is, it's already difficult to reinstall the LTB, and it looks like these washers will make the problem worse. Additionally, it looks like if we installed the collars and somehow got the LTB to reinstall it would then cause the front LCA bushing to bind.
So the question I have for everyone: can these collars be made to work with a LTB? Are these even necessary if I have the LTB already?
Last edited by 95maxrider; 07-15-2010 at 07:30 PM.
07-20-2010, 04:11 PM
#36

Those collars defintely made the ride smoother and more solid. It took less than an hour to install those collars. With such a large gap between the subframe and chassis I didn't need to use a prybar to slide in those c-shaped collars.
Over the last few months I've installed tokio blues, lowering springs, LCAs, and sway bar end links but there was still a rattle in the ride. I finally got rid of that rattle for only $89
Over the last few months I've installed tokio blues, lowering springs, LCAs, and sway bar end links but there was still a rattle in the ride. I finally got rid of that rattle for only $89
07-20-2010, 04:28 PM
#37
Kevlo for President
Thread Starter
iTrader: (36)
Join Date: Dec 2000
Location: Lake Orion, MI
Posts: 35,779
Repost from the FS thread:
So I'm under my car with the collars in hand along with the SE chassis stiffening plates that I was going to install on my car (that SE's have to remove to install the collars), and there's a bit of a problem. It looks like the collars will fit just fine with the SE plates, but I also have a stage 2 LTB on my car, and that's where the problems arise.
It looks like if we install the rear collars it will space the LTB down so far that it will be impossible to reinstall the front of the LTB due to the lower control arm shafts nuts being at an angle.
[IMG]http://i72.photobucket.com/albums/i161/95maxrider/Picture011.jpg[/IM]
[IMG]http://i72.photobucket.com/albums/i161/95maxrider/Picture012.jpg[/IG]
As you know this tie bar recesses the front lower control arm nuts into the bar.
[IMG]http://i72.photobucket.com/albums/i161/95maxrider/Picture009.jpg[/IG]
I can barely get a chrome socket in to the hole to engage the lower control arm nuts. As is, it's already difficult to reinstall the LTB, and it looks like these washers will make the problem worse. Additionally, it looks like if we installed the collars and somehow got the LTB to reinstall it would then cause the front LCA bushing to bind.
So the question I have for everyone: can these collars be made to work with a LTB? Are these even necessary if I have the LTB already?
07-20-2010, 05:51 PM
#38
Too late!
I got 6 of the 8 to fit. It wasn't really any harder than normal, but the lower rears would have caused the front LTB bolt to bind, so we left them out.


It's tough to tell sometimes, but I think there is a small improvement in ride quality now, as well as slightly better road feel.
I also had something else done recently.....

Where I noticed this:

And then my LTB clearance...


I got 6 of the 8 to fit. It wasn't really any harder than normal, but the lower rears would have caused the front LTB bolt to bind, so we left them out.
It's tough to tell sometimes, but I think there is a small improvement in ride quality now, as well as slightly better road feel.
I also had something else done recently.....
Where I noticed this:
And then my LTB clearance...
07-21-2010, 10:51 AM
#40
No, I wouldn't say big. Certainly not as noticeable as the RSB. It's tough to say, as the difference was small. It all depends on if you're installing it yourself. The bushings were about $100 and that's what it cost to have them installed, so if you have $200 burning a hole in your pocket it's not a bad idea, but there are other things I would do first.