Oil leak from timing chain cover?
 01-26-2010, 08:35 AM
#41

I don't suggest that method, but thats just be. The way I did mine was I had a friend hold a big flat bladed screw driver in between the teeth of the starter wheel and moved it to the edge of the access hole while I had a wrench with a pipe on the end of it and gave it hell. It did take quite a bit of muscle, but I got it no problem. This method also helped keep it close to TDC as well.
 01-26-2010, 08:58 AM
#42

Guys,
I am having trouble getting the crank pulley bolt off. I searched and it looks like a lot of people set a breaker bar on the bolt, wedge it against the ground and then turn the key to break the bolt loose. I think it's a good option, and I have already removed the fuel pressure fuse and released the fuel pressure so the car won't be able to start. But I was wondering if anyone can tell me if this will mess up the piston position. I have to set #1 at TDC and I am worried this method will through that off. Can I break the bolt this way and then turn the pulley by hand to reset to TDC?
Thanks
I kind of doubt you can turn the engine by hand using the pulley, but what you can do is tighten the pulley bolt just hand tight and use a rachet or breaker bar to get back to TDC, then hold the pulley while you loosen the bolt and take it back off. Or have a friend jam a screwdriver against the starter ring to keep the engine from turning. I'm assuming you have an auto tranny.
Last edited by Stephen Max; 01-26-2010 at 09:22 AM.
01-26-2010, 09:12 AM
#43
Member
Thread Starter

Join Date: Dec 2009
Posts: 223
I don't suggest that method, but thats just be. The way I did mine was I had a friend hold a big flat bladed screw driver in between the teeth of the starter wheel and moved it to the edge of the access hole while I had a wrench with a pipe on the end of it and gave it hell. It did take quite a bit of muscle, but I got it no problem. This method also helped keep it close to TDC as well.
 .
.EDIT: BTW I'm no muscle man lol. I'm 130 lbs on a good day, and I work in an office with no windows
 .
.
Last edited by dan1el; 01-26-2010 at 09:18 AM.
01-26-2010, 09:24 AM
#44
I am definitely not a risk taker, so I would rather do it the way the FSM says, but I can't seem to get anything in the signal plate/starter wheel teeth while I have the center member still on, however if I remove the center member, then the engine moves when I try to loosen the bolt. I think this evening I'll try the easy way and if it doesn't work, then worst case scenario I have an excuse to learn how to do an engine swap .
EDIT: BTW I'm no muscle man lol. I'm 130 lbs on a good day, and I work in an office with no windows.
.EDIT: BTW I'm no muscle man lol. I'm 130 lbs on a good day, and I work in an office with no windows
.
01-26-2010, 10:12 AM
#45
Member
Thread Starter
Join Date: Dec 2009
Posts: 223
EDIT: Plus my tools are all Craftsman, so I kind of like breaking them because it means I get a new one
.
01-26-2010, 12:45 PM
#47
Member
Thread Starter
Join Date: Dec 2009
Posts: 223
What I meant actually was the mark on the crank pulley and the tab on the water pump cover. If those 2 are in line am I good? Or were you referring to all the marks inside on the timing equipment?
01-26-2010, 02:20 PM
#48
I was referring to the marks on the timing gears. You can wait to set to TDC until after you get the outer timing cover off.
01-26-2010, 03:26 PM
#49
Member
Thread Starter
Join Date: Dec 2009
Posts: 223
Or do you mean some other way?
01-26-2010, 07:02 PM
#50
You can do it that way. Actually, you don't even need to put the pulley back on, you can just put the pulley bolt back in sans pulley (after removing the timing cover) and use a breaker bar to rotate the crank.
01-27-2010, 08:34 AM
#51
Member
Thread Starter
Join Date: Dec 2009
Posts: 223
The following is a testament to how little I know about cars:
I was stoked and thought it would be simple turn the key and move on. I was going to use the starter/breaker bar strategy to get the crank pulley bolt off. I got home, set the breaker bar in position and turned the key (my fuel pump fuse was already out and I released fuel pressure days ago). It didn’t do anything. It sounded like my battery was dead. I went to look under the hood and realized I had already removed the ignition coils, the upper intake manifold, the valve covers and the spark plugs. It hit me that the car just won’t try to start with NO ELECTRICITY!!!!!!!!
I broke a 1/4” allen wrench and bent a 3/8” allen wrench into a check mark by using it to lock the pulley. Then I put a shop towel on each hand for cushion and gave the breaker bar hell. The bolt came loose, and the breaker bar doesn’t swivel anymore
. So now I get to go to SEARS and get a new breaker bar, and 2 new allen wrenches. All in all a good day, but my shoulders are killing me lol.Final question about that is, could I just have put the spark plugs and the coils back in and plugged the wire harness into them and done the starter/breaker bar method? Or would I have screwed something up since I had the VC's and the intake manifold off?
Last edited by dan1el; 01-27-2010 at 08:37 AM.
01-27-2010, 09:09 AM
#52
You don't want the car to start when you do this. All you need is a blip of the starter to break the bolt loose. So you didn't need the spark plugs and ignition coils connected at all. Sorry, I should have been more explicit. But if you couldn't even crank the engine, then your battery must be dead, or disconnected.
01-27-2010, 10:33 AM
#53
Member
Thread Starter
Join Date: Dec 2009
Posts: 223
You don't want the car to start when you do this. All you need is a blip of the starter to break the bolt loose. So you didn't need the spark plugs and ignition coils connected at all. Sorry, I should have been more explicit. But if you couldn't even crank the engine, then your battery must be dead, or disconnected.
 . But I got a good work out at least lol.
Couple more questions:
-Will it hurt to blip the starter with the oil already drained? Or more importantly, when I hit the key and blip the starter are the pistons and all that moving or just the crank?
-When I get all these pictures and everything written up for the o rings/guide and tensioner replacement, will I be able to post the pics on the .org? I have tried to post a pic of the upper oil pan tightening order but couldn't. Am I not allowed or not doing it right? And do I need a certain number of posts before I can post the pics? I hate to do all the extra work of taking pics for the walk-through if I can't even post them.
01-27-2010, 11:12 AM
#54
Yes, everything attached to the crank, including pistons and valvetrain, moves when the crank moves. But it won't hurt at all. There is enough of a residual oil film on all the bearing surfaces for low speed rotation of the crank. An engine can even idle for a pretty substantial time without fresh oil being pumped through it. Eventually heat will build up and bearing surfaces start to contact each other, but you could probably rotate by hand or with the starter for hours without any problem.
01-29-2010, 12:43 PM
#57
Member
Thread Starter
Join Date: Dec 2009
Posts: 223
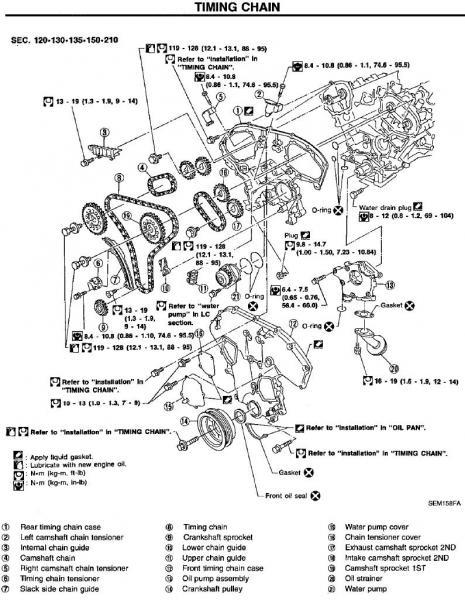
Does anyone know if you have to remove the alternator to get the front timing chain case off? I have all the bolts I can find out, but am having trouble getting it off. I feel it tight near and around the alternator, but also can't seem to get the alternator off. I've removed the 2 bolts the FSM shows. Is there something I'm missing to get the alt off?
Here is the TC diagram to refresh memories...
Here is the TC diagram to refresh memories...
01-29-2010, 02:27 PM
#58
Newbie - Just Registered

Join Date: Aug 2009
Location: San Diego
Posts: 10
Hi Daniel. I have been reading you posts with great intrest as I am underway with a rear timing case R&R. I believe the alternator flange is pinched between the front and rear timing cases. It was pretty tight on my '97. Had to tap it with a hammer to get it loose.
01-30-2010, 09:33 AM
#59
Does anyone know if you have to remove the alternator to get the front timing chain case off? I have all the bolts I can find out, but am having trouble getting it off. I feel it tight near and around the alternator, but also can't seem to get the alternator off. I've removed the 2 bolts the FSM shows. Is there something I'm missing to get the alt off?
I can't remember exactly, but areN'T there two bolts that bolt to the underside of the TC that you have to get to by removing the steel oil pan? I know there are a couple of bolts there, but I may be thinking of the inner TC.
Last edited by Stephen Max; 01-30-2010 at 09:35 AM.
01-30-2010, 05:54 PM
#60
Member
Thread Starter
Join Date: Dec 2009
Posts: 223
There are 2 or 3 under the steel oil pan, but, I already got those. I figured it out. The alternator was pinching the front and rear TC covers together. I was surprised the FSM didn't mention it, but I got it off, I'm down to the rear cover now.
 03-12-2010, 08:20 AM
#62
Member
Thread Starter
Join Date: Dec 2009
Posts: 223
I got the thing back together month ago, but had a no-start issue since then. Turned out my timing got way off because of not torquing a bolt tight enough on the camshaft sprocket. Andy way, I drove to work today (about 12 miles) and did about 70 all the way here. I let her sit for a couple hours and just checked for oil. Didn’t leak a single drop! I’m freaking stoked right now. I finally after 3 months of work fixed the oil leak. Now I have some other issues to work out. Namely P1336, P1105, and P0325.
Thanks for the help and ASAP I’ll put up the walkthrough on replacing o rings behind the rear TC case.
Thanks, Dan
Thanks for the help and ASAP I’ll put up the walkthrough on replacing o rings behind the rear TC case.
Thanks, Dan
03-12-2010, 08:32 AM
#63
Member

Join Date: Jan 2009
Posts: 263
I got the thing back together month ago, but had a no-start issue since then. Turned out my timing got way off because of not torquing a bolt tight enough on the camshaft sprocket. Andy way, I drove to work today (about 12 miles) and did about 70 all the way here. I let her sit for a couple hours and just checked for oil. Didn�t leak a single drop! I�m freaking stoked right now. I finally after 3 months of work fixed the oil leak. Now I have some other issues to work out. Namely P1336, P1105, and P0325.
Thanks for the help and ASAP I�ll put up the walkthrough on replacing o rings behind the rear TC case.
Thanks, Dan
Thanks for the help and ASAP I�ll put up the walkthrough on replacing o rings behind the rear TC case.
Thanks, Dan
The codes should be no problem, relative to what you've already done. CKPS-POS, MAP/BARO solenoid, knock sensor.
11-08-2010, 06:59 PM
#64
Newbie - Just Registered

Join Date: Oct 2010
Posts: 1
oil leak behind rear cover. theres an O ring for the oil gallery.
I'm going to throw my .02 in here, mainly due to the fact that I am in the middle of the same job, only after doing half of the job in August, just to start it, see it leaking and tear it down again. Yea, I was not happy. I wouldnt think that the 97 would have this problem as I have only really heard about it in the 95's and 96's, but What I honestly think it is, is the o-rings between the block and the INNER timing cover. Judging from what I have read here, the OP is of the same opinion. "and it doesn't sit right with me to pay someone $750 for a job that the parts cost <$10 just because I don't know how to do the work." From What has been replaced, I still feel strongly that this is what the leak is because I replaced the same parts myself throughout the last year and the leak progressively got worse.
This pic is with the outer cover off, and the power steering pump is dangling off the the left out of frame. This should be the approximate area of your leak:

In my opinion, you should just go ahead and take the whole upper oil pan off. You will also need the valve covers off as you have to remove all the timing gear to get the inner cover off and to do so have to use an adjustable wrench on the cams to loosen the spprocket bolts. While you are here, you might as well replace the water pump and timing chain tensioner. Great insurance measure there.
Your cleaning method is OK with the bleach, but i think i would go to Lacquer thinner on the metal parts to clean their mating surfaces. It's a cleaning agent, and dries clean as well. I can't tell you how much I have used on my Maxima's and no problems what-so-ever. And to the dude that said you can't scrape the pans?? Bull. I use just about everything imagineable to clean my old RTV. From putty knives to my bench grinder (ever so lightly mind you)
But other than the general knowledg I have from doing the outer cover the first time and the RMS and trans rebuild on my other Max, it really isn't that hard and I have just looked at the FSM for bolt removal patterns and torque specs. There is A LOT to remove which, I think, is why a lot of people call it a PITA. It just takes a lot of time. And yes, I am doing mine in the engine bay. Didn't really see a reason to pull it.
OP - if you have anymore questions, just ask!
NM91
This pic is with the outer cover off, and the power steering pump is dangling off the the left out of frame. This should be the approximate area of your leak:
In my opinion, you should just go ahead and take the whole upper oil pan off. You will also need the valve covers off as you have to remove all the timing gear to get the inner cover off and to do so have to use an adjustable wrench on the cams to loosen the spprocket bolts. While you are here, you might as well replace the water pump and timing chain tensioner. Great insurance measure there.
Your cleaning method is OK with the bleach, but i think i would go to Lacquer thinner on the metal parts to clean their mating surfaces. It's a cleaning agent, and dries clean as well. I can't tell you how much I have used on my Maxima's and no problems what-so-ever. And to the dude that said you can't scrape the pans?? Bull. I use just about everything imagineable to clean my old RTV. From putty knives to my bench grinder (ever so lightly mind you)
But other than the general knowledg I have from doing the outer cover the first time and the RMS and trans rebuild on my other Max, it really isn't that hard and I have just looked at the FSM for bolt removal patterns and torque specs. There is A LOT to remove which, I think, is why a lot of people call it a PITA. It just takes a lot of time. And yes, I am doing mine in the engine bay. Didn't really see a reason to pull it.
OP - if you have anymore questions, just ask!
NM91
have pics if interested.
02-01-2012, 12:29 PM
#65
Newbie - Just Registered

Join Date: Dec 2003
Posts: 8
is the upper oil pan in any way tied together with the timing chain covers (both front and rear)? if you fix the upper oil pan leak and replace both half moon seals now and then decide to work on the timing chain covers later down the line have any affect on the upper oil pan? i would want to do any work twice.
thanks!
thanks!
02-27-2012, 07:57 PM
#66
Newbie - Just Registered

Join Date: May 2005
Posts: 7
Yes, they are tied together with the TC covers (both front and rear).
When you open the lower oil pan, you can see bolts that run into the TC covers without too much difficulties.
I did TC cover work first and upper oil pan work second.
But I think the reverse way will work fine.
When you open the lower oil pan, you can see bolts that run into the TC covers without too much difficulties.
I did TC cover work first and upper oil pan work second.
But I think the reverse way will work fine.
02-27-2012, 08:26 PM
#67
Newbie - Just Registered
Join Date: May 2005
Posts: 7
Thanks to everyone.
All,
I worked on my TC cover and upper oil pan during last four weeks (4 Saturdays).
It was a nightmare for a die hard DIY fan.
But it was successful and I really thank to God and every one in this forum.
Here goes my two cents.
1. After replacing two O-rings inside the rear timing chain, reinstall cam sprockets and chains, I dry fitted the front timing chain cover and found that my crank pully marker did not align with the arrow in the water pump cover. So I played a gamble by unchain the crank pully and adjust the pully to fit the timing mark. Later it turned out that I won the gamble.
So I recommend to dry fit first before you glue everything.
2. When you remove the cam sprockets, you tend to rotate the cam axle. That's what happened to me actually. If I do it again, I will just loosen all the cam sprockets and crank pully first without removing them. Then I will check TDC again, then I will actually remove cam sprockets, chain, water pump,...
3. Reinstalling the power steering pump was a pain for me. It just did not go into its place. I used an air tool to grind off the mating surface of the PS pump a little, then the pump went into the place without a problem.
4. When you do this work, you probably will have a good access to your PS pump. For my case, I found PS oil leak and a loose fastner for the large PS oil hose. Of course I tightened it.
After all these works, I checked the oil leak for last two days, and there was no leak.
 06-24-2012, 10:11 AM
#70
Newbie - Just Registered

Join Date: Jun 2012
Posts: 12
I got the thing back together month ago, but had a no-start issue since then. Turned out my timing got way off because of not torquing a bolt tight enough on the camshaft sprocket. Andy way, I drove to work today (about 12 miles) and did about 70 all the way here. I let her sit for a couple hours and just checked for oil. Didn�t leak a single drop! I�m freaking stoked right now. I finally after 3 months of work fixed the oil leak. Now I have some other issues to work out. Namely P1336, P1105, and P0325.
Thanks for the help and ASAP I�ll put up the walkthrough on replacing o rings behind the rear TC case.
Thanks, Dan
Thanks for the help and ASAP I�ll put up the walkthrough on replacing o rings behind the rear TC case.
Thanks, Dan
09-18-2012, 07:04 PM
#71
Newbie - Just Registered
Join Date: May 2005
Posts: 7
It's not the cam shaft problem
usablue,
It's not the problem of the cam nut.
Cam sprockets keep the proper alignment by wedges (sorry I don't know the exact name).
As far as the nuts are there, sprockets will not slip.
Perhaps, your cam sprockets and main shaft are not properly aligned.
One easy way to check the proper alignment of the cam sprockets is to see whether all those markers are properly algined.
When you open the TC cover, you will know what I meant by those markers.
 06-25-2016, 04:21 PM
#73
Newbie - Just Registered

Join Date: Apr 2016
Posts: 12

Thread
Thread Starter
Forum
Replies
Last Post