Comprehensive Pictures and Directons - EGR Tube Cleaning P0400
 02-14-2012, 09:33 PM
#161

Seeing as how my 95 has 280k miles and there is no record of this being done (im 2nd owner), I think I might should hop on this little project when the weather will permit it. If I do an 00vi swap sometime in the near future, then what would be reccomended that I take the time to clean other than the egr and iacv?
 02-14-2012, 11:00 PM
#162

I did the egr cleaning and the iacv i also took the upper manifold off. Well needless to say the egr tubes and the upper manifold were completely clogged. Once i put it all back together I cant get the vehicle to start. Maybe vacuum line off somewhere? It turns over and acts like its almost gonna start but never does. Any help would be great. Thanks
02-20-2012, 09:42 AM
#163
Newbie - Just Registered

Join Date: Mar 2011
Posts: 1
1998 I30 EGR Tube Cleaning successful results
Thank you for posting your experience and photos. This was a great help. The plywood is absolutely necessary along with a mirror to find the hidden nut.
After 8 grueling hours of scraping my arms and fingers, I completed the EGR tube cleaning and entry port cleaning to the intake manifold. Your photos "mirrored" my pluggage problem. I have 134,000 miles for this first time cleaning, but it first showed P0400 symptoms at 125,000 miles. I was able to delay the inevitible a year ago by removing the temperature sensor and shooting carb cleaner into the opening.
The primary source of the pluggage was at the entry of the intake manifold right where the tube bolts to the manifold. The heavy deposits form right at the entry where there is a cast elbow in manifold. From there the deposits back up into the EGR tube itself. The rough cast aluminum surface catches particles/droplets falling out of the exhaust gas and it just builds up over time. Same for the outlet elbow of the EGR tube by the temperature sensor. The problem lessens toward the exhaust entry.
Cleaning the tube was fairly easy with a small slotted screwdriver and carb cleaner. Digging out the port at the manifold was another story. I swear there was 1" of solid carbon/heavy organic residue that took an hour to properly dig, chisel, etc. I vacuumed the chunks by inserting a shop vac hose into the IAC opening.
Besides scrapped knuckles, forearms and sore abs and lower back, the biggest challenge was simply removing the two lower EGR tube nuts. I took your advice and used a Dremel cutting disk (no flex cable needed) and trimmed off the stud's torq end. Unfortunately, I discovered that the factory had lock-tite on the nut, so when I backed out the nut I was actually extracting the entire stud. Fortunately because I trimmed off the entire torq end, the entire stud and nut cleared the EGR tube. Although I didn't get the stud re-tightened back into its hole all the way, I re-installed the stud with spacer, washer and nut in place so I again cleared the EGR tube.
Lord willing I am good to go for another 50,000-100,000 miles.
I do not expect any improvement in fuel economy, because EGR is intended only to reduce NOx emissions by lowering combustion gas temperature. EGR is just a low cost option to meet EPA regulations.
02-20-2012, 09:47 AM
#164
Junior Member

Join Date: Jan 2012
Posts: 25
I just removed the EGR tube yesterday so I might block it off with a plate.
 04-25-2012, 07:44 PM
#166

This is perfect. I'm a relatively new Maxima owner (2 years) and I work with a guy who has a 4th gen Max as well. He told me to come on here to find out how I can clean up stuff under hood and maybe improve the performance of my Maxima. I love the car and I plan on working on it once I secure another daily driver.
The guy at work recommended I clean the EGR tube to clear the P0400 code and also while I was at it to clean the TB and the IACV, as well as change the knock sensor (code P0325). I can do the TB, IACV and KS (and the intake manifold while I'm at it, LOL) no sweat, but I wasnt sure on the EGR tube. With these pics, I can get an idea of what to do. I might not be a master mechanic, but I know enough to get around a car fairly well, even if my confidence is shaky.
Much appreciated, and hopefully I will get better performance, too.

 08-06-2012, 12:48 PM
#169

EGR valve replacement
Stared this job today, I got a code for EGR valve itself. I purchased both the EGR valve and solenoid to be safe and the car is 14 years old anyway.. original owner.
One problem so far was that I had to cut off the EGR small metal tube assembly that comes from the front of the ERG valve and goes up to Control BPT Valve, I could not get that nut to spin, only the entire metal tube along with the nut would spin.
So I cut it off (12 dol part anyway) with a small tubing cutter and ordered a new one. Can I run the car without this tube?
I will be without my car at least 3 days waiting for this part to come in.. (no one had it in stock) needless to say I wont be completing the job today. Black Lion is down for the count. Going to continue to do what I can for now. Do I need to remove the upper intake manifold to remove the ERG tube (tube that looks like a door handle) and tube coming off the EGR valve? Someone mentioned that they did not have to remove the upper intake manifold to do the job.
A friend of mine who is a mechanic for Nissan did this cleaning for me a few years ago and he told me he cleaned out the tubes so Im not sure if I should remove them and check anyway or just replace my EGR valve, solenoid, and see if that erases my code. Any input would help fellas.
One problem so far was that I had to cut off the EGR small metal tube assembly that comes from the front of the ERG valve and goes up to Control BPT Valve, I could not get that nut to spin, only the entire metal tube along with the nut would spin.
So I cut it off (12 dol part anyway) with a small tubing cutter and ordered a new one. Can I run the car without this tube?
I will be without my car at least 3 days waiting for this part to come in.. (no one had it in stock) needless to say I wont be completing the job today. Black Lion is down for the count.
Going to continue to do what I can for now. Do I need to remove the upper intake manifold to remove the ERG tube (tube that looks like a door handle) and tube coming off the EGR valve? Someone mentioned that they did not have to remove the upper intake manifold to do the job. A friend of mine who is a mechanic for Nissan did this cleaning for me a few years ago and he told me he cleaned out the tubes so Im not sure if I should remove them and check anyway or just replace my EGR valve, solenoid, and see if that erases my code. Any input would help fellas.
Last edited by maxprivate; 08-07-2012 at 04:23 PM.
08-06-2012, 05:30 PM
#170
I did not have to hack any bolts off.. I simply pushed the EGR tube down a little and used a 12mm deep socket rachet wrench and got it off no problem. I also used PB blaster on the bolts on let it soak a while.
08-07-2012, 08:04 AM
#171
Junior Member
Thread Starter

Join Date: Jul 2002
Location: Atlanta, GA
Posts: 87
Stared this job today, I got a code for EGV valve itself. I purchased both the EGR valve and solenoid to be safe and the car is 14 years old anyway.. original owner.
One problem so far was that I had to cut off the EGR small metal tube assembly that comes from the front of the ERG valve and goes up to Control BPT Valve, I could not get that nut to spin, only the entire metal tube along with the nut would spin.
So I cut it off (12 dol part anyway) with a small tubing cutter and ordered a new one. Can I run the car without this tube?
I will be without my car at least 3 days waiting for this part to come in.. (no one had it in stock) needless to say I wont be completing the job today. Black Lion is down for the count. Going to continue to do what I can for now. Do I need to remove the upper intake manifold to remove the ERG tube (tube that looks like a door handle) and tube coming off the EGR valve? Someone mentioned that they did not have to remove the upper intake manifold to do the job.
A friend of mine who is a mechanic for Nissan did this cleaning for me a few years ago and he told me he cleaned out the tubes so Im not sure if I should remove them and check anyway or just replace my EGR valve, solenoid, and see if that erases my code. Any input would help fellas.
One problem so far was that I had to cut off the EGR small metal tube assembly that comes from the front of the ERG valve and goes up to Control BPT Valve, I could not get that nut to spin, only the entire metal tube along with the nut would spin.
So I cut it off (12 dol part anyway) with a small tubing cutter and ordered a new one. Can I run the car without this tube?
I will be without my car at least 3 days waiting for this part to come in.. (no one had it in stock) needless to say I wont be completing the job today. Black Lion is down for the count.
Going to continue to do what I can for now. Do I need to remove the upper intake manifold to remove the ERG tube (tube that looks like a door handle) and tube coming off the EGR valve? Someone mentioned that they did not have to remove the upper intake manifold to do the job. A friend of mine who is a mechanic for Nissan did this cleaning for me a few years ago and he told me he cleaned out the tubes so Im not sure if I should remove them and check anyway or just replace my EGR valve, solenoid, and see if that erases my code. Any input would help fellas.
To answer your question -- you do NOT need to remove the upper intake manifold. I recommend starting to read at the beginning of this popular thread, and my first post has pictures. The navigation buttons on this forum may be hard to find, but we are now on "Page 5 of 5" and it is next to a "First" button which has my pictures of how to remove that tube. As I have been saying, this information is NOT in the factory Nissan manual nor is it in the derivative general Maxima repair manuals.
You also ask about running the car without the tube. However, you also said you want to replace the EGR valve. I'm still using my original factory EGR valve at 140K miles. I have been advising on this thread to have fully functioning systems, meaning a functioning EGR valve, and a clear EGR Tube. You can read this thread to see people who have different ideas on this topic (and are ignoring car computer codes
) -- but the whole point of this thread is to clean the tube so that you do NOT need to ignore codes from the car computer. In your case, you might NOT be needing a new EGR valve: perhaps just cleaning this tube (as described) will solve the code issue. 
My cleaning advice from the first page on has proved to be successful for many people -- since first posted now three years ago, August 2009.
08-07-2012, 01:46 PM
#172
Hello -- this thread is centrally about the EGR Tube -- which you refer to as "tube that looks like a door handle": this first tube is the one which -- if you do NOT remove other parts, (typically) requires hacking to remove most efficiently. You appear to be also talking about a second tube, one which comes off the EGR valve.
To answer your question -- you do NOT need to remove the upper intake manifold. I recommend starting to read at the beginning of this popular thread, and my first post has pictures. The navigation buttons on this forum may be hard to find, but we are now on "Page 5 of 5" and it is next to a "First" button which has my pictures of how to remove that tube. As I have been saying, this information is NOT in the factory Nissan manual nor is it in the derivative general Maxima repair manuals.
You also ask about running the car without the tube. However, you also said you want to replace the EGR valve. I'm still using my original factory EGR valve at 140K miles. I have been advising on this thread to have fully functioning systems, meaning a functioning EGR valve, and a clear EGR Tube. You can read this thread to see people who have different ideas on this topic (and are ignoring car computer codes) -- but the whole point of this thread is to clean the tube so that you do NOT need to ignore codes from the car computer. In your case, you might NOT be needing a new EGR valve: perhaps just cleaning this tube (as described) will solve the code issue.
My cleaning advice from the first page on has proved to be successful for many people -- since first posted now three years ago, August 2009.
To answer your question -- you do NOT need to remove the upper intake manifold. I recommend starting to read at the beginning of this popular thread, and my first post has pictures. The navigation buttons on this forum may be hard to find, but we are now on "Page 5 of 5" and it is next to a "First" button which has my pictures of how to remove that tube. As I have been saying, this information is NOT in the factory Nissan manual nor is it in the derivative general Maxima repair manuals.
You also ask about running the car without the tube. However, you also said you want to replace the EGR valve. I'm still using my original factory EGR valve at 140K miles. I have been advising on this thread to have fully functioning systems, meaning a functioning EGR valve, and a clear EGR Tube. You can read this thread to see people who have different ideas on this topic (and are ignoring car computer codes
) -- but the whole point of this thread is to clean the tube so that you do NOT need to ignore codes from the car computer. In your case, you might NOT be needing a new EGR valve: perhaps just cleaning this tube (as described) will solve the code issue. My cleaning advice from the first page on has proved to be successful for many people -- since first posted now three years ago, August 2009.
 Im also aware that this is page 5. Im simply offering tips on my findings during my EGR replacement/ tube cleaning. I did not have to hack the bolt to remove the tube we are all speaking of. Read my earlier post.
 As I stated earlier, I had my mechanic do this service for me a few years ago but this time around I wanted to save money so I did it myself
 . I removed the tube and found it was fairly clear just some minor build up as well as on the sensor. I cleaned that up really well. So this assures me that It was the EGR valve and being that its the original ERG (about 151,000 miles) and solenoid I will replace both to be safe.
01-18-2013, 10:06 PM
. I removed the tube and found it was fairly clear just some minor build up as well as on the sensor. I cleaned that up really well. So this assures me that It was the EGR valve and being that its the original ERG (about 151,000 miles) and solenoid I will replace both to be safe.
01-18-2013, 10:06 PM
#173
Newbie - Just Registered

Join Date: Jan 2013
Location: Plano, TX
Posts: 11
My maxima threw the p0400(low/no flow EGR) code paired with p0325(KS). Also would die after starting unless i gave it gas. first thought was to clean the egr guide tube. With the pictures from this thread did it with no problem. lots of deposits but not completly clogged, cleaned it out anyway. while getting to the bottom two bolts i noticed the little rubber tube connecting EGR BPT to the thin pipe underneath had exploded. at least that what it looks like. after replacing it car starts and stays on without having to give it gas. had the codes removed and am waiting to see if they'll return.
i have 2 questions.
1.) would the tubing below the EGR BPT being severed cause a p0400?
2.) I replaced the KS 4 months ago, removed it just the other day and it looks fine. no cracks. the bolt holding it down felt like it came off too easily. would it being loosely bolted down cause a p0325 or is it more likely to be the harness?
01-19-2013, 12:56 PM
#174
Junior Member
Thread Starter
Join Date: Jul 2002
Location: Atlanta, GA
Posts: 87
My maxima threw the p0400(low/no flow EGR) code paired with p0325(KS). Also would die after starting unless i gave it gas. first thought was to clean the egr guide tube. With the pictures from this thread did it with no problem. lots of deposits but not completly clogged, cleaned it out anyway. while getting to the bottom two bolts i noticed the little rubber tube connecting EGR BPT to the thin pipe underneath had exploded. at least that what it looks like. after replacing it car starts and stays on without having to give it gas. had the codes removed and am waiting to see if they'll return.
i have 2 questions.
1.) would the tubing below the EGR BPT being severed cause a p0400?
2.) I replaced the KS 4 months ago, removed it just the other day and it looks fine. no cracks. the bolt holding it down felt like it came off too easily. would it being loosely bolted down cause a p0325 or is it more likely to be the harness?
i have 2 questions.
1.) would the tubing below the EGR BPT being severed cause a p0400?
2.) I replaced the KS 4 months ago, removed it just the other day and it looks fine. no cracks. the bolt holding it down felt like it came off too easily. would it being loosely bolted down cause a p0325 or is it more likely to be the harness?
01-19-2013, 08:15 PM
#175
Newbie - Just Registered
Join Date: Jan 2013
Location: Plano, TX
Posts: 11
I had my codes checked today and the knock sensor was fine. system ready with no codes. from what i've gathered the knock sensor code can be prompted by other problems, without any legitamate malfunction to the KS system. strange. EGR system was all good too. I'm thinking the p0400 was caused only by the little rubber hose being split. i would advise anyone who has a egr code to check your connection underneath the EGR-BPT. The picture labeled "unscrew this device for more room". THANKS for this write up marktab.


 01-19-2013, 10:56 PM
#177
Junior Member

Join Date: Jan 2013
Posts: 39
my 99 max SE was throwing those 2 codes, p0400 and p0325 for over 2 years. I ordered the cheapy knock sensor replacement from ebay in early 2011 and replaced it. That cleared the KS code after about 3 months (it kept coming back on after clearing it until several months went by). My flex section of my Y-pipe blew a large hole in it about 2 weeks ago, I had a local exhaust hatchet shop cut the flex section out and weld a new one in. My car sounds like NEW (literally the loudest part of the car is now the blower motor for the heater/AC). My check engine light was throwing the EGR code at me for over 2 years and I was too lazy to do this cleaning process although I did read the thread long ago. After the exhaust fix, NO MORE EGR CODE! This could be random or it could be related, but I would make sure your y-pipe/flex, rear cat, and O2 sensors are ok if you are getting this code.
01-21-2013, 06:03 AM
#178
Junior Member

Join Date: Jul 2002
Posts: 25
When you think you've done it all and the P0400 comes back,,,
I've performed the cleaning process on my 2 Maxima's and never had to hacksaw the bolts this procedure details. Some say you need to remove the intake manifold, some say you don't.
My recommendation - remove the intake manifold (IM) to do the job right. Get it out of your way and clean it too while you are at it - don't lose the EGR tube gasket on the back while you're at it. Also, it's aggravating, but pay attention to the coolant hoses on the back of the IM. Once the IM is out of your way, the job is easier and the results are better.
While your at it here, might as well clean the throttle body and IACV, heck, take it off, might as well put it back on cleaned up - you will be happy you did.
But what happens when you have just about done it all and the P0400 returns shortly afterwards? Start cheap and work up! Cleaning everything above shouldn't cost you much except for time and cleaning materials.
But......
I have 2 Max's, a 95 and a 97, have never ever received the P0400 on the 95 and couldn't get it to go away on the 97. The 95 never got the code even though the EGR tube was completely clogged.
The 97 has been on so much the SES light burned out.
Here's what I have done and I may have fixed it on the 97.
I replaced the EGR valve - stayed off for a couple of weeks, but did return.
Cleaned EGR tube, intake manifold, IACV, throttle body, you name it, it was cleaned. - code returned in a couple of weeks.
Swapped EGR temp sensor from 95 to 97 - code returned after a couple of weeks.
Did replace knock sensor on both cars - was melted on one, cracked on the other - the Knock sensor code went away but the P0400 returned.
Kept digging, kept reading. Some suggested bypassing the BPT to see if the BPT was causing it. I haven't done this but the BPT was replaced 3 or so years ago when daughter bought the car.
EGR solenoid seems to be okay, could replace it with one from 95 but haven't done so - did replace it on 95 when the code for it came up.
Read some more and discovered via Google that a few indicated the gas cap may be faulty or not have been tightened enough at fill up. Considering the randomness of this P0400, didn't seem to be triggered by city or highway driving all the time, I figured I could replace the gas cap. I had noticed that for some reason, the gas cap on the 97 was a Fram one indicating it had been replaced before.
Bought a new gas cap for about $9 around Dec 1, 2012. Have driven a mix of highway and city, filled up, or added gas several times and so far, the P0400 has yet to return.
Some indicated that a gas cap check (pressure maybe?) was part of the EGR system check. I don't know if this is true or not and can only say time will tell if this has corrected my issue.
Like you, I had tried everything else and figured this < $10 fix couldn't hurt and if it helped, I would be happy.
So, if you seemingly do it all and the P0400 returns, splurge for the $10 gas cap and see if the code goes away. Mine has and so far so good (this is the longest it has been off in 4 years.)
01-22-2013, 04:43 PM
#179
Newbie - Just Registered
Join Date: Jan 2013
Location: Plano, TX
Posts: 11
so i'm cleaning the egr guide tube on my girls 98 maxima gle now. a little easier the second time around.
how can you tell if you need new gaskets? they are certainly not new looking but all in one piece. i removed them so as not to get carb cleaner on them.
also, cleaning opening that the top of the egr guide tube connects to. just scrape what you can? carb cleaner in there or no?
how can you tell if you need new gaskets? they are certainly not new looking but all in one piece. i removed them so as not to get carb cleaner on them.
also, cleaning opening that the top of the egr guide tube connects to. just scrape what you can? carb cleaner in there or no?
01-23-2013, 04:31 AM
#180

Well I guess this might be the next step.
All my Maxima ever throws is the Knock Sensor and P0400!
I've checked ever stupid solenoid and valve and canister on it and all work.
I shall try cleaning out the EGR and/or replace it.
Thanks for the helpful thread!
One side note for others...
The Knock Sensor can't cause the ECU to throw a code.
It's weird, I know, but the KS doesn't cause codes to be thrown.
The KS only relays that there is a knock going on.
The info is then relayed to the ECU which changes parameters to fix it.
I've driven without the knock sensor in the car and have had no code.
It's a BS code that is caused by some other function in the ECU.
I'll get a bit more info on that and explain better if needed.
Mine also usually throws O2 sensor codes at the same time as a KS.
EDIT: The KS detects vibrations in the motor.
The vibrations cause a current that is sent directly (most cases) to PCM.
The voltage tells the PCM to retard the timing to prevent further knock.
It has no other function and doesn't cause a CEL for being faulty.
Your PCM will throw a KS code due to another issue.
Be that a faulty coil pack, CPS, O2 Sensor...
Basically anything that would cause a knock.
Without the sensor the PCM runs normally, without KS input.
It just won't adjust for knock.
Hopefully that helps!
And please correct me if I am wrong...It's happened once or twice.
Last edited by Smaximae; 01-23-2013 at 05:42 AM. Reason: Further Explaination
01-23-2013, 06:20 AM
#181
Junior Member
Thread Starter
Join Date: Jul 2002
Location: Atlanta, GA
Posts: 87
so i'm cleaning the egr guide tube on my girls 98 maxima gle now. a little easier the second time around.
how can you tell if you need new gaskets? they are certainly not new looking but all in one piece. i removed them so as not to get carb cleaner on them.
also, cleaning opening that the top of the egr guide tube connects to. just scrape what you can? carb cleaner in there or no?
how can you tell if you need new gaskets? they are certainly not new looking but all in one piece. i removed them so as not to get carb cleaner on them.
also, cleaning opening that the top of the egr guide tube connects to. just scrape what you can? carb cleaner in there or no?
Here are some answers based on my experience.
1) On gaskets -- the purpose of the gasket is to prevent gases from escaping. Gaskets are cheap (in my opinion) or you can use exhaust-temperature-rated silicone gasket in the tube.
2) On cleaning the top -- you should be able to reach in more through the hole where the IACV assembly goes (assuming my directions). For the solvent, I used fuel-injector safe carburetor cleaner.
Also, some repeated answers from my Questions and Answers post from August 2009:
Do you recommend removing from the top or the bottom?
Some have had success removing the tube from the bottom (under the car). However, I believe a better solution is to remove the IACV assembly so that you can clean it. Also, the hole where the IACV assembly goes provides a way to scrape and clean the area where the EGR Tube empties into the main air flow chamber. I did NOT remove the intake manifold.
Do I need to purchase replacement gaskets?
I did not, and I made sure that I was not soaking my original gaskets with the cleaning solvent. If you do destroy yours, you could probably cut your own new ones from gasket material designed for exhaust pipes.
Did you replace your EGR flow tube?
Someone mentioned that they bought a replacement tube. I think it's sufficient to clean the tube you have unless you have some reason to get a new one (say if it rusted or cracked). Even if you buy a replacement tube, you will still need to clean the sensor off, and also the ports where the EGR tube connects to the car. I found more carbon at the top end, and I believe there was more there because of the sharp airflow angle. The IACV assembly also can be cleaned, and the IACV assembly port allows for cleaning the main airflow chamber.
01-23-2013, 06:34 AM
#182
Junior Member
Thread Starter
Join Date: Jul 2002
Location: Atlanta, GA
Posts: 87
Well I guess this might be the next step.
All my Maxima ever throws is the Knock Sensor and P0400!
I've checked ever stupid solenoid and valve and canister on it and all work.
I shall try cleaning out the EGR and/or replace it.
Thanks for the helpful thread!
One side note for others...
The Knock Sensor can't cause the ECU to throw a code.
It's weird, I know, but the KS doesn't cause codes to be thrown.
The KS only relays that there is a knock going on.
The info is then relayed to the ECU which changes parameters to fix it.
Thanks for the feedback -- I continue to be amazed how many people have read this thread, and have made pictures of my Maxima famous since 2009. Though I am glad people are keeping their vehicles operating and on the road. I hope your cleaning helps.
On the knock sensor -- thanks for the information. And, yes, technically speaking, no sensor or device will directly throw a code unless the computer (ECU) says so. The internal computer programming completely determines the conditions of what throws a code and when. Even in vehicles from the 1990s, computers could be programmed to conditionally throw codes based on a variety of sensors and values. As you said, simply disconnecting the knock sensor -- in your experience -- does not automatically throw a code.
Some people assume that all codes are all like the fuel gauge: when a sensor gets to a certain level a code is thrown. If that simplicity were true, then the situation could be hardwired through electronics and passed through to a light. These days, in most newer cars since the 4th generation Maximas, we have become conditioned to a single light for many codes: the "check engine" light. My motivation for this thread is that P0400 is among many codes which could trigger this light, some more severe than others. Clearing this EGR-tube condition not only restores the original exhaust design, but also allows the "check engine" light to remain dormant for other situations which might be more severe and require immediate attention.
Because of the complexity involved in the computer throwing codes, and because we do not necessarily know that Maximas from the 4th generation all have identical input condition programming (I have not seen such a claim), I believe it is most accurate to describe the possible but not necessarily complete set of conditions which might lead to an output code for this Maxima generation.
There are a number of "sticky" posts which permanently start this forum, and one of them is on the "check engine" lights -- and this thread also describes the codes, including how to check the Knock Sensor.
Last edited by marktab; 01-23-2013 at 06:37 AM.
01-23-2013, 08:12 AM
#183
Hi Smaximae
Thanks for the feedback -- I continue to be amazed how many people have read this thread, and have made pictures of my Maxima famous since 2009. Though I am glad people are keeping their vehicles operating and on the road. I hope your cleaning helps.
On the knock sensor -- thanks for the information. And, yes, technically speaking, no sensor or device will directly throw a code unless the computer (ECU) says so. The internal computer programming completely determines the conditions of what throws a code and when. Even in vehicles from the 1990s, computers could be programmed to conditionally throw codes based on a variety of sensors and values. As you said, simply disconnecting the knock sensor -- in your experience -- does not automatically throw a code.
Some people assume that all codes are all like the fuel gauge: when a sensor gets to a certain level a code is thrown. If that simplicity were true, then the situation could be hardwired through electronics and passed through to a light. These days, in most newer cars since the 4th generation Maximas, we have become conditioned to a single light for many codes: the "check engine" light. My motivation for this thread is that P0400 is among many codes which could trigger this light, some more severe than others. Clearing this EGR-tube condition not only restores the original exhaust design, but also allows the "check engine" light to remain dormant for other situations which might be more severe and require immediate attention.
Because of the complexity involved in the computer throwing codes, and because we do not necessarily know that Maximas from the 4th generation all have identical input condition programming (I have not seen such a claim), I believe it is most accurate to describe the possible but not necessarily complete set of conditions which might lead to an output code for this Maxima generation.
There are a number of "sticky" posts which permanently start this forum, and one of them is on the "check engine" lights -- and this thread also describes the codes, including how to check the Knock Sensor.
Thank you much!
I have been dealin with my '97 for 8 years come Feb 14th.
Constantly get the KS code coupled with either O2 Sensor or EVAP Purge Solenoid (or both).
As stated, both have been checked numerous times with no failures.
Seriously have checked just about everything with that system and P0400 remains.
I haven't tried nor thought to clean the EGR or replace it.
A little trick to sneak through inspections is to let the tank drop towards E.
Fill it only 1/2 tank and drive.
Repeat the process, never filling above 1/2 tank and the EVAP system stops runnin checks
Light with go off long enough for inspection.
Filling the tank will cause the EVAP System to run another check.
If the problem hasnt been fixed then light will pop back on.
My MS3's Accessport can just delete codes and tell the ECU to stop lookin for em.
Wish my Maxima had one...lol.
-Drew-
02-10-2013, 07:16 AM
#184
Newbie - Just Registered

Join Date: Feb 2006
Location: Nashville
Posts: 9
I did this same job on my '99. I did not cut anything. I loosened the large tube nut that fastens the exhaust tube to the valve first. I also removed the EGR valve for inspection and cleaning. The EGR on this car uses a Hitachi torque motor to open and close the valve. The armature inside the motor threads down onto a ball screw type shaft. As the armature turns is retracts or extends the shaft through the center of the armature thus opening or closing the valve. http://www.google.com/imgres?start=1...25&tx=71&ty=66 It is not a simple magnetic or vacuum solenoid. What I don't know is if the valve opening is variable. It certainly could be with this design. If you removed the 3 socket head cap screws you lift the top (slight prying action to separate it from the casting) and then see if the valve stem can be actuated. Mine was not. So after I cleaned the EGR tube I also made sure the valve action was functioning properly. I made sure my valve was opening and closing properly by filling the cast iron chamber with carb cleaner and scraping away at the build up until I could feel the spring loaded shaft move up and down. Be very careful if you disassemble the valve top. The armature core has a bearing on either end that you don't want to damage or lose.
It seems to me if you go to the effort to clean the EGR tube you would have to make sure the EGR valve is functioning correctly while you are into it that deep.
It seems to me if you go to the effort to clean the EGR tube you would have to make sure the EGR valve is functioning correctly while you are into it that deep.
02-10-2013, 09:06 AM
#185
Newbie - Just Registered

Join Date: Feb 2013
Posts: 1
Bad oil leak
Hi everyone, this is my first time on a forum but im needing some help. I have a 1997 maxima with 202,176 miles on it and has a oil leak from hell lol. I love my car and would love to fix it but i dont know where its coming from. I've seen a lot of post on the 3.5 swap and i wouldnt mind doing it but i would really like to know whats all involved and if its worth it. So if anyone could give me any advice on which way to go i would be happy. I want to keep my babe so if i need to rebuild i would is a swap is good ill go that way as well. Thanks a lot on any help.
02-10-2013, 10:34 AM
#186

Hi everyone, this is my first time on a forum but im needing some help. I have a 1997 maxima with 202,176 miles on it and has a oil leak from hell lol. I love my car and would love to fix it but i dont know where its coming from. I've seen a lot of post on the 3.5 swap and i wouldnt mind doing it but i would really like to know whats all involved and if its worth it. So if anyone could give me any advice on which way to go i would be happy. I want to keep my babe so if i need to rebuild i would is a swap is good ill go that way as well. Thanks a lot on any help.
http://forums.maxima.org/4th-generat...e-posting.html
Enjoy
02-10-2013, 10:42 AM
#187
Junior Member

Join Date: Oct 2006
Location: los angeles, ca
Posts: 25
hey drew,
i just finished cleaning the upper 1/3 of the engine in my 96 max w/217,000mi. and got the p0400 after it all went back together. i did the valve covers, uim, egr tube, valve and bpt valve, iacv, tb, pcv, couple of hoses, etc. when i put it all back, everything was fine for a few minutes, then p0400 came up. after no luck getting it to go away with a seafoam and some aggressive driving, i took the egr valve and bpt off again. (able to do so from the drivers side with only the top of the airbox and the TB removed.) (** hint** the best way to get the big nut off of the egr pipe is with a crescent wrench coming at it from about 4 o'clock under the hoses - [4 if your looking at the car from the front and 12 is straight up])
anyway, i cleaned the egr valve again, paying particular attention to making sure the spindle inside was moving freely in both the open and closed position. got it all cleaned and then put it back.
Also cracked open the egrc solenoid and tried to refurb it. didn't get the click from it when plugging it back in so i swapped it out with one from my other max and when i started it back up p0400 was gone. i did get p1105 come up after, but i missed a small hose on the TB on reistallation and once i foundthatand hooked itback up, i've been code free.


 07-10-2013, 07:29 PM
#191

While you're at it clean your MAF but it's IMPORTANT to only use a product which is formulated for MAF cleaning, such as CRC Mass air flow sensor cleaner or something similar, do not use anything else.
Last edited by bprice92; 07-10-2013 at 07:40 PM.
08-21-2013, 05:22 AM
#192
Member

Join Date: Dec 2000
Location: RI
Posts: 110
I just got the P0400 on my 231k mile 96 Maxima. I'm not sure the EGR system has ever been serviced but I'll ask my Dad (who has the records for this car) if he can find evidence of EGR service. That would be pretty incredible if it hasn't!
I ordered a mess of gaskets from Courtesy (plus a console lid latch) just in case. I plan to remove the tube, clean it, and clean everything else I can get to, including the EGR valve and IACV, but I don't plan to remove the upper manifold. I MAY remove the TB - we'll see.
I did want to address EGR system function as I saw that had come up earlier in the thread. EGR is primarily for emissions but has some fuel economy and spark knock implications as well.
The emissions side of it is accomplished by doing what we all understand the EGR valve to do: mix inert exhaust gas back into the intake charge (in a controlled way, under specific conditions). This dilutes the fresh air/fuel charge and decreases exhaust gas temps, driving down NOx emissions. Since exhaust gas is inert, it lowers the volumetric efficiency of the engine, requiring more throttle for a given power output. This decreases pumping loss, which can improve fuel economy.
The link to the knock sensor may be more elusive for some. I cannot speak specifically for Nissan's VQ engine mangement strategy but TYPICALLY EGR system operation requires additional spark advance to account for the less volumetrically efficient overall intake charge. It's harder to light off (and once lit off, slower to burn) a more diluted intake charge, so more spark advance is required. An insufficiently flowing EGR system, particularly before the ECU declares the system totally nonfunctional (via temp sensor feedback and potentially intake manifold pressure feedback, which is a known GM strategy), you COULD have a situation where you have too much spark advance for the current EGR flow. That is why I suspect the KS codes often pop up with EGR codes. I don't know how Nissan deals with the KS codes but I'll try to check my FSM when I next get a chance.
I could speculate (and some claim there is no KS diagnostic which can't be true), but I won't. More to come.
EDIT: My 96 FSM specifically states that the KS code P0325 will not light the MIL. Still looking for how the diagnostic routine works but it may just simply be an excessively high or low voltage that sets it. Fairly rudimentary. What I don't know is if the ECU changes spark timing with this silent code set. This is a bit off topic but it was discussed earlier in the thread and I read the whole thing today...
Last edited by kevm14; 08-21-2013 at 03:23 PM.
08-31-2013, 02:45 PM
#193
Member
Join Date: Dec 2000
Location: RI
Posts: 110
I finally got my gaskets from Courtesy. Only ended up needing an IACV gasket and the EGR valve gasket. I mostly followed marktab's instructions.
Key points:
- Removing the IACV helps and you can clean it, and the intake a little better
- You really should pull the EGR valve to clean it and the passages, though mine I think was alright at 231k
- Removing the EGR feed tube (the one that runs from the exhaust to the EGR valve) doesn't really seem possible without removing the upper intake. I was able to loosen the nut that holds it to the EGR valve, however, which was very difficult. It is 30mm.
- I found a broken vacuum line that runs from a hard line that comes off the EGR valve to the EGRC-BPT valve (marktab calls this the "device"). This may have been the actual cause of my code. I did not remove this valve.
- One of the EGR valve studs came out with the nut, the other did not (just the nut).
- Once I removed the EGR valve, I was able to bend that tube down enough to get the nut off the crossover pipe without hacking on the stud. I even got a deep socket on it by prying down a little on the EGR feed tube.
- The EGR crossover pipe was fairly clogged but not as bad as others I've seen here. This car has 231k and I don't believe this has been done before.
Top side of my tube, mostly plugged

The bottom side (not bad at all)

EGR valve (not clogged but I cleaned it anyway)

EGR valve again

- I cleaned that hard line that comes from the EGR valve, though the line fitting was extremely difficult to remove (it was stuck to the line itself, so they were turning together). Had to use map gas to finally get it to turn, though it was never free. I did this off the car. This tube seemed clogged so people should look at theirs. You may be able to remove it without removing the EGR valve, but I recommend removing the valve. It lets you pry down on the feed tube and get that nut off without hacking the stud, anyway. And you can clean the EGR valve, too.
- Did not remove the TB.
- Used PB blast on everything and did not break anything.
- Solvent of choice was B12 Chemtool, which is my favorite carb/TB cleaner.
- Used anti-seize on everything, including the EGR feed tube 30mm nut.
- I didn't need to do some of the "move this out of the way" recommendations, as it is to taste/individual necessity. For example I left the fuel filter in the holder, and did not need to remove any coolant or heater hoses, though I did unclasp the heater hoses from their retainer.
- Nissan nicely buried the EGR on this engine, and it wasn't a whole lot of fun working in this area. I had the front end up on ramps so at least I didn't have to bend down as far.
- This job took me about 7 hours, including time to run to Harbor Freight for the wrench set (30mm)
I reset the code and drove around until the OBD-II EGR diagnostic became ready, so I know the problem is now fixed. It seems to drive a little better.
EDIT: Adding that I also used a screw extractor by hand to dig carbon buildup out from the engine side where it was awkward to use a whole screw driver. A little scraping side to side, in and out and twisting seemed to really dig the junk out, then I'd blow off the tool with compressed air and give a good spray of the B12 chemtool between scrapings.
Key points:
- Removing the IACV helps and you can clean it, and the intake a little better
- You really should pull the EGR valve to clean it and the passages, though mine I think was alright at 231k
- Removing the EGR feed tube (the one that runs from the exhaust to the EGR valve) doesn't really seem possible without removing the upper intake. I was able to loosen the nut that holds it to the EGR valve, however, which was very difficult. It is 30mm.
- I found a broken vacuum line that runs from a hard line that comes off the EGR valve to the EGRC-BPT valve (marktab calls this the "device"). This may have been the actual cause of my code. I did not remove this valve.
- One of the EGR valve studs came out with the nut, the other did not (just the nut).
- Once I removed the EGR valve, I was able to bend that tube down enough to get the nut off the crossover pipe without hacking on the stud. I even got a deep socket on it by prying down a little on the EGR feed tube.
- The EGR crossover pipe was fairly clogged but not as bad as others I've seen here. This car has 231k and I don't believe this has been done before.
Top side of my tube, mostly plugged
The bottom side (not bad at all)
EGR valve (not clogged but I cleaned it anyway)
EGR valve again
- I cleaned that hard line that comes from the EGR valve, though the line fitting was extremely difficult to remove (it was stuck to the line itself, so they were turning together). Had to use map gas to finally get it to turn, though it was never free. I did this off the car. This tube seemed clogged so people should look at theirs. You may be able to remove it without removing the EGR valve, but I recommend removing the valve. It lets you pry down on the feed tube and get that nut off without hacking the stud, anyway. And you can clean the EGR valve, too.
- Did not remove the TB.
- Used PB blast on everything and did not break anything.
- Solvent of choice was B12 Chemtool, which is my favorite carb/TB cleaner.
- Used anti-seize on everything, including the EGR feed tube 30mm nut.
- I didn't need to do some of the "move this out of the way" recommendations, as it is to taste/individual necessity. For example I left the fuel filter in the holder, and did not need to remove any coolant or heater hoses, though I did unclasp the heater hoses from their retainer.
- Nissan nicely buried the EGR on this engine, and it wasn't a whole lot of fun working in this area. I had the front end up on ramps so at least I didn't have to bend down as far.
- This job took me about 7 hours, including time to run to Harbor Freight for the wrench set (30mm)
I reset the code and drove around until the OBD-II EGR diagnostic became ready, so I know the problem is now fixed. It seems to drive a little better.
EDIT: Adding that I also used a screw extractor by hand to dig carbon buildup out from the engine side where it was awkward to use a whole screw driver. A little scraping side to side, in and out and twisting seemed to really dig the junk out, then I'd blow off the tool with compressed air and give a good spray of the B12 chemtool between scrapings.
Last edited by kevm14; 09-01-2013 at 02:02 PM.
09-01-2013, 02:51 PM
#194
Junior Member
Thread Starter
Join Date: Jul 2002
Location: Atlanta, GA
Posts: 87
Thanks kevm14 for your look at not only the EGR tube but also the entire EGR system.
I believe yours is the most in-depth analysis to date of my original directions since I posted them. The pictures were great too. Of course, you earned those insights through the 7 hours you invested in your vehicle. I have no doubt that your work will save people who do the same even hours more since they will know what to expect and how to better prepare.
Because my car is still lower miles (just passed 150K for 1997) I am not going to see the typical wear and use for that model year. I thus recommend people studying your tips and directions especially if they are beyond 200K. I quoted only a portion in this post.
Just some comments:
I believe yours is the most in-depth analysis to date of my original directions since I posted them. The pictures were great too. Of course, you earned those insights through the 7 hours you invested in your vehicle. I have no doubt that your work will save people who do the same even hours more since they will know what to expect and how to better prepare.
Because my car is still lower miles (just passed 150K for 1997) I am not going to see the typical wear and use for that model year. I thus recommend people studying your tips and directions especially if they are beyond 200K. I quoted only a portion in this post.
I finally got my gaskets from Courtesy. Only ended up needing an IACV gasket and the EGR valve gasket. I mostly followed marktab's instructions...
- Solvent of choice was B12 Chemtool, which is my favorite carb/TB cleaner.
- Used anti-seize on everything, including the EGR feed tube 30mm nut.
- I didn't need to do some of the "move this out of the way" recommendations, as it is to taste/individual necessity. For example I left the fuel filter in the holder, and did not need to remove any coolant or heater hoses, though I did unclasp the heater hoses from their retainer.
- Nissan nicely buried the EGR on this engine, and it wasn't a whole lot of fun working in this area. I had the front end up on ramps so at least I didn't have to bend down as far.
- This job took me about 7 hours, including time to run to Harbor Freight for the wrench set (30mm)
Just some comments:
- I noticed you chose to put the car on ramps, but I left it on the ground, and worked on the plywood I described: people have been varying on what works best partly based on what else might have to be done.
- I agree the EGR valve is not fun -- I have already resolved to allow my regular mechanic to handle that fun when replacement becomes necessary
- As you said, the anti-seize is a best practice since all these nuts and bolts are rusting out over the long years of service
- I am also a Harbor Freight fan -- I remember they were only in Camarillo, CA with only mail order, but they have retail outlets across the USA including Atlanta Perimeter
 02-20-2014, 10:19 PM
#196
Newbie - Just Registered

Join Date: Apr 2013
Posts: 11
I'm doing a rear valve cover gasket replace and planning on cleaning up many of these things along the way. Since I'm removing the Upper Intake and the upper opening to the EGR Tube will be exposed, i'm hoping to save some time (and a hack job) and clean it with it still attached. Is there any danger in cleaning it through with it still attached? I plan on using a heavy duty pipe cleaner and carb cleaner to work out the carbon deposits all the way through while attached. Are the deposits to hard to clean it with it connected? Will pushing deposits/cleaner through the pipe harm anything on the other end?
07-12-2014, 12:19 PM
#197
Junior Member

Join Date: Sep 2013
Location: Spartanburg, SC
Posts: 56
Thanks for this tutorial!
Just did this to my '95 for the first time...your pics made this easy. I have had this car since '95 (it had been a demo so it had a few miles...now has about 270) needless to say, the tube was clogged...should have listened earlier about the goggles when using the carb cleaner.
Thanks again!
Just did this to my '95 for the first time...your pics made this easy. I have had this car since '95 (it had been a demo so it had a few miles...now has about 270) needless to say, the tube was clogged...should have listened earlier about the goggles when using the carb cleaner.
Thanks again!
12-29-2014, 02:26 PM
#198
Newbie - Just Registered

Join Date: Dec 2014
Posts: 3
my experience so far with this
Been following this to do my EGR tube as it's the best I can find.
I've gotten stuck at the "remove this device" step, as taking out the screws adds no flexibility. The two top tubes and central bottom tube keep it pretty well in place. So I'm going to go under it with an inspection camera and see if I get to hacking the bolt. Removing the screws for the device required a very tiny 8mm wrench.
The pictures show, but do not mention, removing the tube next to the sensor. The sensor itself doesn't unscrew easily and so I will continue while leaving it in--figuring it'll be easier to get out later when the tube is removed.
I'm doing this work on two 1996 maxima's. A parts car, and the driving car. I can confirm that high-octane gas does produce less build-up. One car has 194k with only premium gas since 20k, and the other has 166k with who knows what for gas but terrible build-up in the IACV.
The dirty one first had a bad purge control valve as first CEL, so it seems not cleaning these tubes out will lead to purge control valve failure.
If, when done, you start the car and it idles down and stalls after 15 seconds, this can occur if the IACV gasket slipped and didn't fully get on all the bolts (whoops...)
12-29-2014, 03:06 PM
#199
Senior Member

Join Date: Jan 2011
Location: Central AR
Posts: 3,041
Been following this to do my EGR tube as it's the best I can find.
I've gotten stuck at the "remove this device" step, as taking out the screws adds no flexibility. The two top tubes and central bottom tube keep it pretty well in place. So I'm going to go under it with an inspection camera and see if I get to hacking the bolt. Removing the screws for the device required a very tiny 8mm wrench.
The pictures show, but do not mention, removing the tube next to the sensor. The sensor itself doesn't unscrew easily and so I will continue while leaving it in--figuring it'll be easier to get out later when the tube is removed.
I'm doing this work on two 1996 maxima's. A parts car, and the driving car. I can confirm that high-octane gas does produce less build-up. One car has 194k with only premium gas since 20k, and the other has 166k with who knows what for gas but terrible build-up in the IACV.
The dirty one first had a bad purge control valve as first CEL, so it seems not cleaning these tubes out will lead to purge control valve failure.
If, when done, you start the car and it idles down and stalls after 15 seconds, this can occur if the IACV gasket slipped and didn't fully get on all the bolts (whoops...)
I've gotten stuck at the "remove this device" step, as taking out the screws adds no flexibility. The two top tubes and central bottom tube keep it pretty well in place. So I'm going to go under it with an inspection camera and see if I get to hacking the bolt. Removing the screws for the device required a very tiny 8mm wrench.
The pictures show, but do not mention, removing the tube next to the sensor. The sensor itself doesn't unscrew easily and so I will continue while leaving it in--figuring it'll be easier to get out later when the tube is removed.
I'm doing this work on two 1996 maxima's. A parts car, and the driving car. I can confirm that high-octane gas does produce less build-up. One car has 194k with only premium gas since 20k, and the other has 166k with who knows what for gas but terrible build-up in the IACV.
The dirty one first had a bad purge control valve as first CEL, so it seems not cleaning these tubes out will lead to purge control valve failure.
If, when done, you start the car and it idles down and stalls after 15 seconds, this can occur if the IACV gasket slipped and didn't fully get on all the bolts (whoops...)
Here's a slide show that shows some pictures that I snapped when I worked on mine.
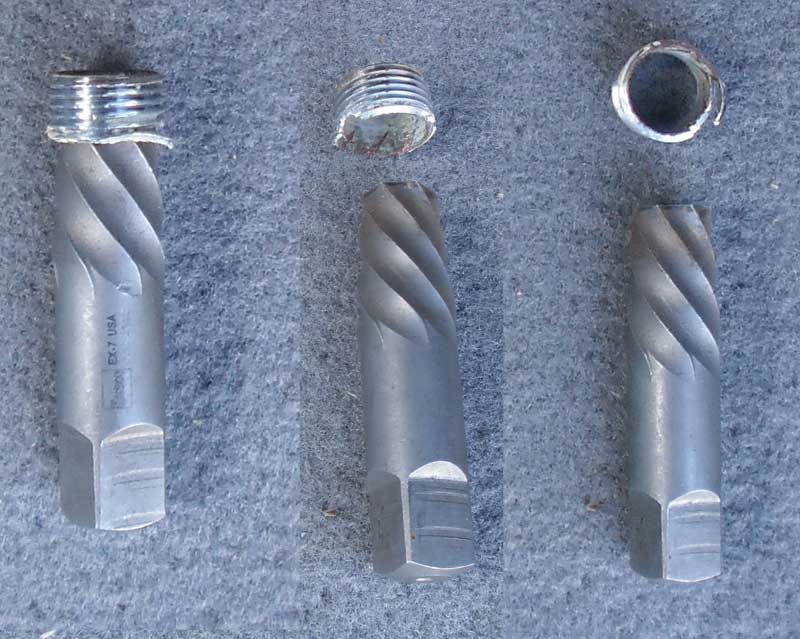
I haven't found a need to use a hacksaw to cut the bolts. The bolts can be removed with a 5mm star pattern socket if you need to remove a bolt. On my first EGR job I had to remove one of the bolts.
If I recall correctly, I remove the EGR, loosen the EGR mounting assembly, then EGR temp sensor and then remove the EGR tube and mounting assembly. After part removal, I throw the carboned up tube and mounting assembly into a can of carb cleaner and let them soak at least over night. Parts store carb cleaner in the gallon bucket seems to melt the carbon deposits away.
I try to keep a clean EGR tube and valve assembly in the workshop and ready to go for the next time I need to use a set.
http://s286.photobucket.com/user/Rid...999/EGR?sort=9
12-30-2014, 12:46 PM
#200
Junior Member

Join Date: Feb 2014
Location: Central Mass.
Posts: 41
Why do you have to hack the stud?
Is it clearance to get the nut off or clearance to get the tube out after the nut is off? And is it fairly evident how much you need to cut? That's the only part of this I'm confused about. Otherwise, if it wasn't 20 degrees out I'd get on this because I get P0400 constantly.
Nice write up - thanks.
Nice write up - thanks.