Removing Upper Intake Manifold (UIM) w/pics
 07-26-2009, 04:56 PM
#1
Member
Thread Starter

Join Date: Jan 2009
Posts: 263
Removing Upper Intake Manifold (UIM) w/pics
Recently I had to remove my UIM to tighten the hose clamps on the coolant hoses connected to the back side of the UIM. Here's a description of the job with some photos. The car is a 1997 GLE Fed spec.
Part 1:
First you have to remove the air intake. Start by popping off the four clips that secure the top of the air filter box: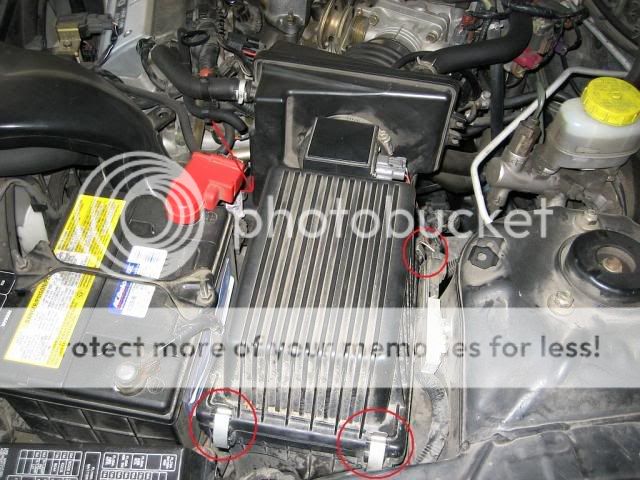
Disconnect the MAF sensor electrical connector:

Disconnect the two large vacuum hoses and one small hose from the resonator:


Note that I unhooked the IACV end of the second large hose, to keep the hose attached to the resonator.
Part 1:
First you have to remove the air intake. Start by popping off the four clips that secure the top of the air filter box:
Disconnect the MAF sensor electrical connector:
Disconnect the two large vacuum hoses and one small hose from the resonator:
Note that I unhooked the IACV end of the second large hose, to keep the hose attached to the resonator.
Last edited by ATTappman; 07-26-2009 at 05:00 PM.
 07-26-2009, 04:59 PM
#2
Member
Thread Starter
Join Date: Jan 2009
Posts: 263
Part 2:
Loosen the hose clamp on the throttle body, wiggle the air duct off the throttle body, and lift the whole air intake assembly out of the engine bay:


Disconnect the two electrical connectors from the throttle position sensor:

Disconnect the four electrical connectors from the IACV/fast idle solenoids/EGR temp sensor:

Loosen the hose clamp on the throttle body, wiggle the air duct off the throttle body, and lift the whole air intake assembly out of the engine bay:
Disconnect the two electrical connectors from the throttle position sensor:
Disconnect the four electrical connectors from the IACV/fast idle solenoids/EGR temp sensor:
07-26-2009, 05:05 PM
#3
Member
Thread Starter
Join Date: Jan 2009
Posts: 263
Part 3:
Unhook the cruise control and accelerator cables from the throttle lever. Note that the accelerator cable runs underneath the little tab on top of the throttle lever:


Remove the three 10mm bolts that secure the cable brackets to the UIM. Move the whole assembly to the back of the engine bay:

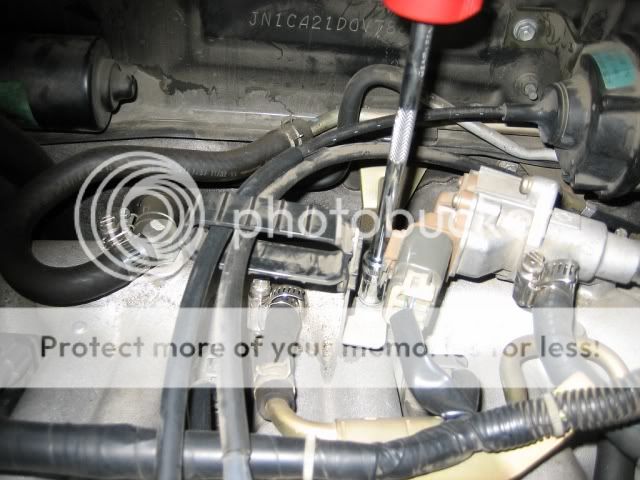
Disconnect the electrical connector on the EVAP purge volume control valve:

Unhook the cruise control and accelerator cables from the throttle lever. Note that the accelerator cable runs underneath the little tab on top of the throttle lever:
Remove the three 10mm bolts that secure the cable brackets to the UIM. Move the whole assembly to the back of the engine bay:
Disconnect the electrical connector on the EVAP purge volume control valve:
07-26-2009, 05:12 PM
#4
Member
Thread Starter
Join Date: Jan 2009
Posts: 263
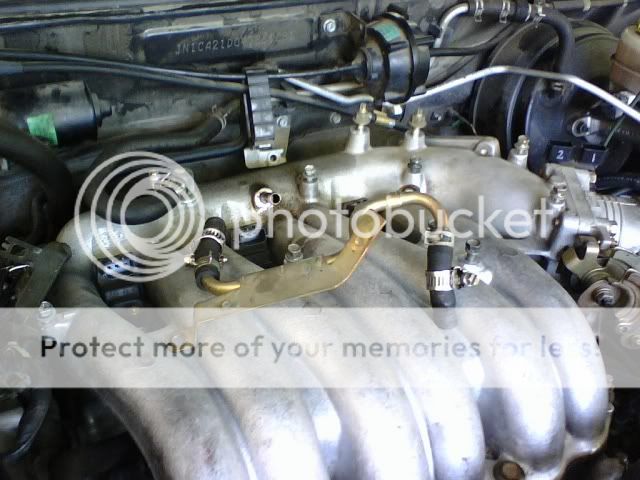
Part 4:
Disconnect the electrical connectors to the ignition coils and the front O2 sensor:


Unhook the wiring harness. It's secured by plastic clips. With a pair of needle nose pliers, compress the two "wings" on the bottom of the clip while simultaneously lifting up from the top. Move the wiring harness to the passenger side of the engine bay:
Remove the two 10mm and two 12mm bolts/nuts securing the EVAP purge control valve and the EVAP purge volume control valve to the UIM:

Disconnect the electrical connectors to the ignition coils and the front O2 sensor:
Unhook the wiring harness. It's secured by plastic clips. With a pair of needle nose pliers, compress the two "wings" on the bottom of the clip while simultaneously lifting up from the top. Move the wiring harness to the passenger side of the engine bay:
Remove the two 10mm and two 12mm bolts/nuts securing the EVAP purge control valve and the EVAP purge volume control valve to the UIM:
07-26-2009, 05:18 PM
#5
Member
Thread Starter
Join Date: Jan 2009
Posts: 263
Part 5:
Remove the 10mm bolt holding the EGR temperature sensor bracket onto the IACV. This bolt is hard to see - you can locate it by feel. You'll need a 3" extension or a deep socket. The EGR temp sensor wire is in the way - make sure to move it aside to keep from pinching it with the socket. (No pics for this - it's too hard to see).
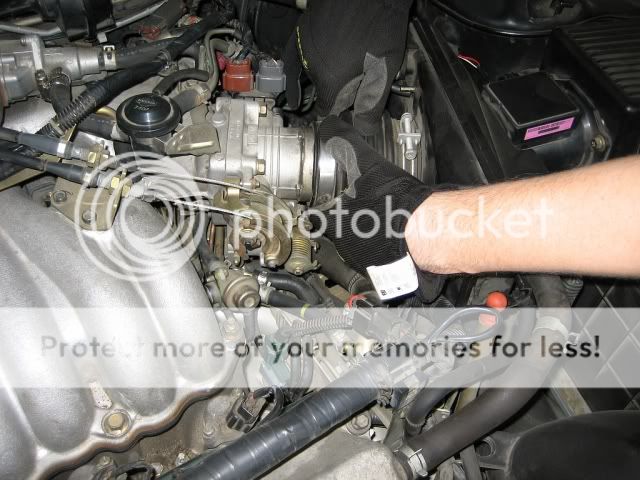
Remove the three 12mm bolts holding the IACV to the throttle body. You need an extension for the bottom bolt (my camera battery went dead here and I switched to my cell phone camera - the pics are blurry, sorry):


Lift off the IACV, being careful not to lose the gasket in the engine bay:

Move the EVAP valves back toward the driver's side of the engine bay. Most of the hoses will still be attached:

Remove the 10mm bolt holding the EGR temperature sensor bracket onto the IACV. This bolt is hard to see - you can locate it by feel. You'll need a 3" extension or a deep socket. The EGR temp sensor wire is in the way - make sure to move it aside to keep from pinching it with the socket. (No pics for this - it's too hard to see).
Remove the three 12mm bolts holding the IACV to the throttle body. You need an extension for the bottom bolt (my camera battery went dead here and I switched to my cell phone camera - the pics are blurry, sorry):
Lift off the IACV, being careful not to lose the gasket in the engine bay:
Move the EVAP valves back toward the driver's side of the engine bay. Most of the hoses will still be attached:
07-26-2009, 05:31 PM
#6
Member
Thread Starter
Join Date: Jan 2009
Posts: 263
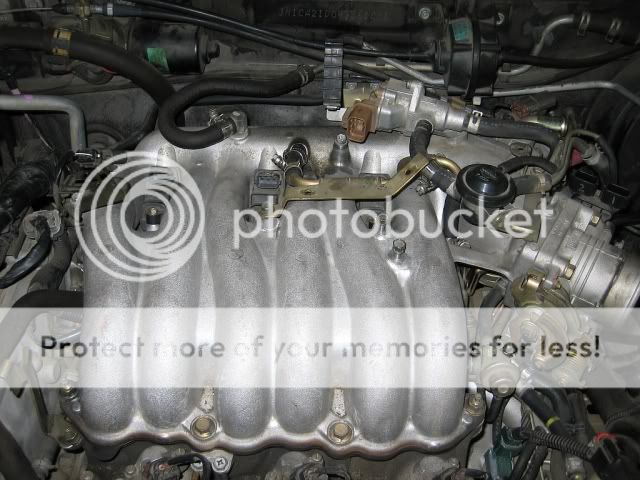
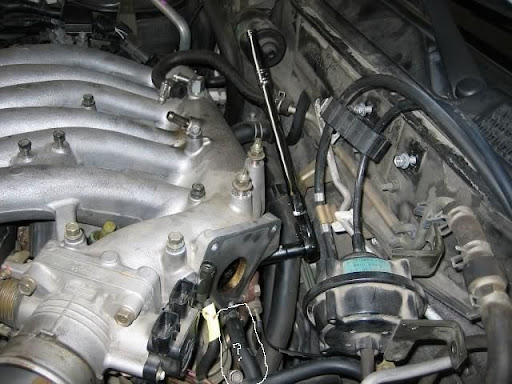
Part 6:
Remove the clamps on both ends of the PCV hose assembly, remove the 10mm bolts holding it to the UIM, and remove it:
Unscrew the two screws holding each ignition coil, and pull out the ignition coils. (No pics).
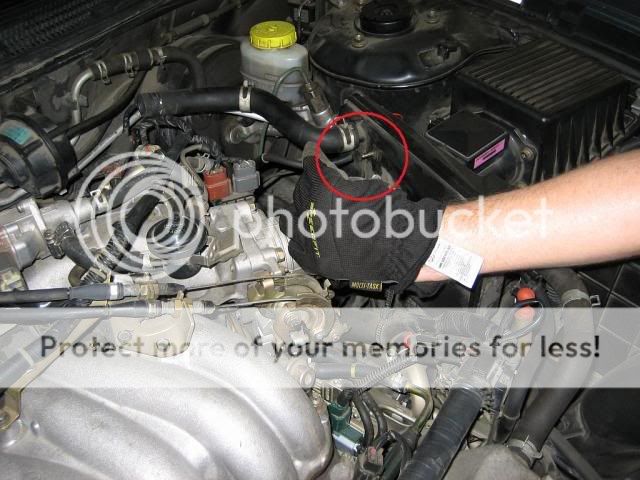
Unhook the vacuum hose from the UIM to the brake booster:

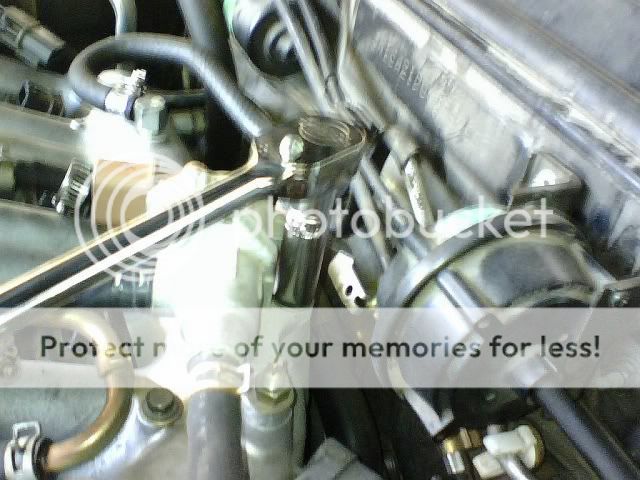
No comes the hard part. The UIM is bolted onto the rear cylinder head with two support brackets. The EGR guide tube is also bolted to the UIM with two bolts. All of these are 12mm. The best way to locate the support bracket bolts is to feel with your hand along the firewall side of the UIM. Here's what it looks like with a socket and ratchet on one of the bracket bolts:

You can see one of the EGR tube bolts, but you have to locate the other one by feel. It's difficult to get a socket on the right UIM bracket bolt. You need a pretty shallow socket and a low profile flex head ratchet (this is one job where Snap on tools pay off). If you can't use a ratchet, try a 12mm offset wrench. Once you loosen the bolts, use a socket to spin them off. Be careful not to drop them.
Taking off the left EGR tube bolt:

Remove the clamps on both ends of the PCV hose assembly, remove the 10mm bolts holding it to the UIM, and remove it:
Unscrew the two screws holding each ignition coil, and pull out the ignition coils. (No pics).
Unhook the vacuum hose from the UIM to the brake booster:
No comes the hard part. The UIM is bolted onto the rear cylinder head with two support brackets. The EGR guide tube is also bolted to the UIM with two bolts. All of these are 12mm. The best way to locate the support bracket bolts is to feel with your hand along the firewall side of the UIM. Here's what it looks like with a socket and ratchet on one of the bracket bolts:
You can see one of the EGR tube bolts, but you have to locate the other one by feel. It's difficult to get a socket on the right UIM bracket bolt. You need a pretty shallow socket and a low profile flex head ratchet (this is one job where Snap on tools pay off). If you can't use a ratchet, try a 12mm offset wrench. Once you loosen the bolts, use a socket to spin them off. Be careful not to drop them.
Taking off the left EGR tube bolt:
Last edited by ATTappman; 07-26-2009 at 07:10 PM.
07-26-2009, 05:57 PM
#7
Member
Thread Starter
Join Date: Jan 2009
Posts: 263
Part 7:
At this point, I was soaked with sweat and had a back ache, so I stopped taking pictures.
The only remaining bolts are the four 12mm bolts on the front of the UIM. There's a pattern for tightening these bolts, so I loosened them in the opposite order. If you're looking down at the UIM from the front of the engine bay, the tightening order is 4-1-2-3 from left to right, so take them off in the reverse order.
Now the only thing holding the UIM on is two coolant hoses in the very back. If the UIM won't separate from the lower intake manifold, take a thin putty knife and gently pry between the UIM and the gasket, being careful not to gouge the UIM.
Next, get an assistant (I used my wife - she's a good scout) to hold the UIM as far up in the air as they can. This will reveal the two coolant hoses on the back of the UIM. It's an extreme PITA to loosen the hose clamps and pull off these hoses. When you pull on them, you just pull the UIM and your assistant toward you. It took me a lot of patience and a lot of swearing to get them off. Getting them back on is no fun either. Maybe somebody can share a trick for this.
With the coolant hoses off, you can lift the UIM out of the engine bay. Here's what it looks like with the UIM removed:
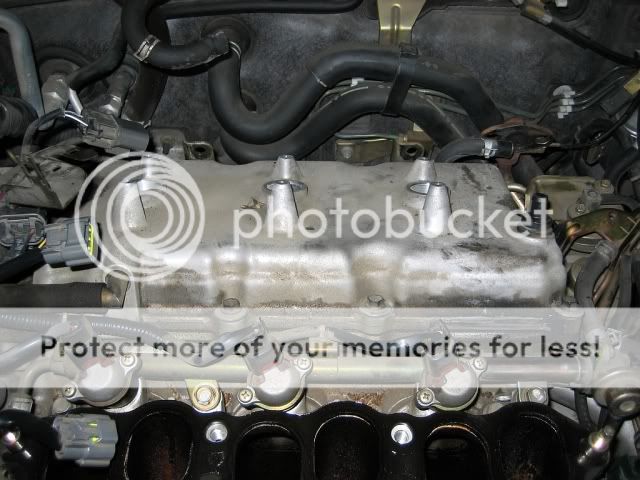
You can see the two support brackets, and the top of the EGR guide tube. Here's what my EGR guide tube looked like the first time I took the UIM off:

Reinstallation, as they say, is simply the reverse of removal.
Be careful not to knock the EGR tube gasket off into the engine bay. If you put in a new EGR tube gasket before reinstalling the UIM, it helps to tie two loops of fine dental floss through the EGR tube bolt holes and the gasket. This will secure the gasket to the EGR tube and keep it from falling off when you're putting the UIM back on.
When reinstalling the UIM bracket bolts, get your assistant to move the UIM up and down slightly so that you can align the bolt holes on the UIM with the bolt holes on the cylinder head.
As you may have noticed, I rethreaded most of the bolts into their holes to keep from losing them. The ones you can't do this with are the IACV/EGR temp sensor bracket bolts, the UIM support bracket bolts, EGR tube bolts, and UIM bolts themselves. I made post-its for each set and put the bolts on the post-its.
I used Permatex gasket adhesive to hold the UIM gasket and the IACV gasket in place during reinstallation. It was mildly successful.
That's about it. Hope this helps somebody.
At this point, I was soaked with sweat and had a back ache, so I stopped taking pictures.
The only remaining bolts are the four 12mm bolts on the front of the UIM. There's a pattern for tightening these bolts, so I loosened them in the opposite order. If you're looking down at the UIM from the front of the engine bay, the tightening order is 4-1-2-3 from left to right, so take them off in the reverse order.
Now the only thing holding the UIM on is two coolant hoses in the very back. If the UIM won't separate from the lower intake manifold, take a thin putty knife and gently pry between the UIM and the gasket, being careful not to gouge the UIM.
Next, get an assistant (I used my wife - she's a good scout) to hold the UIM as far up in the air as they can. This will reveal the two coolant hoses on the back of the UIM. It's an extreme PITA to loosen the hose clamps and pull off these hoses. When you pull on them, you just pull the UIM and your assistant toward you. It took me a lot of patience and a lot of swearing to get them off. Getting them back on is no fun either. Maybe somebody can share a trick for this.
With the coolant hoses off, you can lift the UIM out of the engine bay. Here's what it looks like with the UIM removed:
You can see the two support brackets, and the top of the EGR guide tube. Here's what my EGR guide tube looked like the first time I took the UIM off:
Reinstallation, as they say, is simply the reverse of removal.
Be careful not to knock the EGR tube gasket off into the engine bay. If you put in a new EGR tube gasket before reinstalling the UIM, it helps to tie two loops of fine dental floss through the EGR tube bolt holes and the gasket. This will secure the gasket to the EGR tube and keep it from falling off when you're putting the UIM back on.
When reinstalling the UIM bracket bolts, get your assistant to move the UIM up and down slightly so that you can align the bolt holes on the UIM with the bolt holes on the cylinder head.
As you may have noticed, I rethreaded most of the bolts into their holes to keep from losing them. The ones you can't do this with are the IACV/EGR temp sensor bracket bolts, the UIM support bracket bolts, EGR tube bolts, and UIM bolts themselves. I made post-its for each set and put the bolts on the post-its.
I used Permatex gasket adhesive to hold the UIM gasket and the IACV gasket in place during reinstallation. It was mildly successful.
That's about it. Hope this helps somebody.

 07-26-2009, 07:06 PM
#10
Member
Thread Starter
Join Date: Jan 2009
Posts: 263
I did - that picture was from the first time I took the UIM off to replace the valve cover gasket. I replaced the spring clamps on the two coolant hoses with worm drive screw clamps, and apparently didn't tighten them down enough. A few months later, one of them suddenly started leaking. So I had to take the UIM off again, and this time I took more pics. I didn't have to completely remove the UIM this time, just lift it up enough to get to those hoses. I tried getting to them from under the car, but although I could see them there was too much stuff in the way.
 07-28-2009, 08:17 PM
#13
Junior Member

Join Date: Mar 2009
Location: Rockford IL
Posts: 36
Awesome write up
Very thorough job, I was able to pull mineoff today without removing the IACV from the intake manifold, if someone wanted to save that step and not worry abou the gasket, but Im sure it helped to see near the EGR tube. Anyways, wish I had seen this the first time I had to pull the UIM off. I went in blind.
07-30-2009, 09:40 AM
#14
Senior Member

Join Date: May 2003
Posts: 217
Excellent write up and pics. Thank you for your efforts.
My experience with it: When I pulled mine I left the IACV on. Looked like it would have been easier to do it with it removed. I assembled the intake then attched the one coolant line that need connected to the engine side after the UIM was bolted down. Took a bit of work and yes hard to see but it worked out and I didn't have to fight the UIM. Oh I removed the cruise actuator for more room (2 bolts). Not sure if that was mentioned.
My experience with it: When I pulled mine I left the IACV on. Looked like it would have been easier to do it with it removed. I assembled the intake then attched the one coolant line that need connected to the engine side after the UIM was bolted down. Took a bit of work and yes hard to see but it worked out and I didn't have to fight the UIM. Oh I removed the cruise actuator for more room (2 bolts). Not sure if that was mentioned.
07-31-2009, 08:43 AM
#15
Senior Member

Join Date: Apr 2005
Location: 92626
Posts: 1,187
As expected of an EGR guide tube, nasty as always.
10-05-2009, 02:39 PM
#17
Junior Member

Join Date: Oct 2009
Posts: 13
Hi ATTappman,
Thanks for this tutorial. I've taken the UIM off and put it back on; however, my engine is now stalling after I start it. I'm trying to figure out if I have all my hoses connected properly. Can you tell me if the hose I circled in your picture is suppose to connect to the coolant out/pipe on the throttle body?
Thanks,
A
Last edited by acclimate; 10-05-2009 at 07:28 PM.
 10-05-2009, 05:37 PM
#20
Member
Thread Starter
Join Date: Jan 2009
Posts: 263
Hi ATTappman,
Thanks for this tutorial. I'm taken the UIM off and put it back on; however, my engine is now stalling after I start it. I'm trying to figure out if I have all my hoses connected properly. Can you tell me if the hose I circled in your picture is suppose to connect to the coolant out/pipe on the throttle body?
Thanks,
A
 11-12-2009, 07:41 PM
#23
Newbie - Just Registered

Join Date: Nov 2009
Posts: 6
replacing grommets from Valve cover
Great pictorial step by step instuctions. I actually got emboldened to change the VC gasket and decided on changing the front VC first.
Now, I hit a snag with the grommets (spark plug seals) attached to the front VC. I could not get them off as they appear to be fused on the VC.
The grommets started to tear to pieces as I pulled on it with pliers leaving the outer edge stuck on the ring of the spark plug opening of the VC.
Is there a way to remove the rubber grommets safely? I tried putting silicone remover but majorityof the rubber is still fused on the metal ring.
Anybody encountered this problem? This is the first time the valve cover was removed since I bought my Maxima in 1995. Appreciate any suggestions and thanks in advance.
SunsetPalms@hotmail.com
11-14-2009, 11:13 PM
#24
Newbie - Just Registered
Join Date: Nov 2009
Posts: 6
Great pictorial step by step instuctions. I actually got emboldened to change the VC gasket and decided on changing the front VC first.
Now, I hit a snag with the grommets (spark plug seals) attached to the front VC. I could not get them off as they appear to be fused on the VC.
The grommets started to tear to pieces as I pulled on it with pliers leaving the outer edge stuck on the ring of the spark plug opening of the VC.
Is there a way to remove the rubber grommets safely? I tried putting silicone remover but majorityof the rubber is still fused on the metal ring.
Anybody encountered this problem? This is the first time the valve cover was removed since I bought my Maxima in 1995. Appreciate any suggestions and thanks in advance.
SunsetPalms@hotmail.com
Now, I hit a snag with the grommets (spark plug seals) attached to the front VC. I could not get them off as they appear to be fused on the VC.
The grommets started to tear to pieces as I pulled on it with pliers leaving the outer edge stuck on the ring of the spark plug opening of the VC.
Is there a way to remove the rubber grommets safely? I tried putting silicone remover but majorityof the rubber is still fused on the metal ring.
Anybody encountered this problem? This is the first time the valve cover was removed since I bought my Maxima in 1995. Appreciate any suggestions and thanks in advance.
SunsetPalms@hotmail.com

 12-29-2009, 11:06 AM
#27
Member

Join Date: Dec 2009
Posts: 223
Next, get an assistant (I used my wife - she's a good scout) to hold the UIM as far up in the air as they can. This will reveal the two coolant hoses on the back of the UIM. It's an extreme PITA to loosen the hose clamps and pull off these hoses. When you pull on them, you just pull the UIM and your assistant toward you. It took me a lot of patience and a lot of swearing to get them off. Getting them back on is no fun either. Maybe somebody can share a trick for this.
 It is a lot easier putting on than it is taking off if you just use a little bit longer hose (just an inch or so to give your hands a little more room.)
The PITA hose on the driver side of the UIA is actually pretty easy if you remove the IACV first.
Last edited by dan1el; 12-29-2009 at 11:09 AM.
12-29-2009, 11:13 AM
#28
Member
Join Date: Dec 2009
Posts: 223
Now, I hit a snag with the grommets (spark plug seals) attached to the front VC. I could not get them off as they appear to be fused on the VC.
The grommets started to tear to pieces as I pulled on it with pliers leaving the outer edge stuck on the ring of the spark plug opening of the VC.
Is there a way to remove the rubber grommets safely? I tried putting silicone remover but majorityof the rubber is still fused on the metal ring.
Anybody encountered this problem? This is the first time the valve cover was removed since I bought my Maxima in 1995. Appreciate any suggestions and thanks in advance.
SunsetPalms@hotmail.com
 01-02-2010, 03:25 PM
#30
Senior Member

Join Date: Feb 2001
Posts: 323
Although I doubt whether I would do this, it's great information. Very detailed description and the pictures are great. Thanks for you time and effort, I'm sure that this will inspire one of us to "get r done". My one suggestion is this: while you have the intake manifold off, replace the knock sensor. Preventive maintenance and probably due if you're taking off the intake to do something, ie high mileage. Anyway, it's a $22 part off eBay and it's a heck of a lot easier to replace with the intake off than on. Yes, I just replaced mine and have the cuts and scrapes to prove it. Cheers
 01-30-2010, 10:18 PM
#32
Member

Join Date: Jan 2010
Location: Queens, NY
Posts: 33
Hi
Im new to maximas, and I am buying a 95 that needs to have the valve cover gaskets done, so I read the post.
Here is my thoughts.......
In doing this job, isn't easier to simply unbolt the Throttle body from the intake manifold, leaving all the coolant, throttle etc lines connected and lay it aside. This is how I have always done them on my previous Mazda6 V6 and it was way better then breaking lines?
Advice for the Max newbie please???
 01-31-2010, 12:55 AM
#34

Hi
Im new to maximas, and I am buying a 95 that needs to have the valve cover gaskets done, so I read the post.
Here is my thoughts.......
In doing this job, isn't easier to simply unbolt the Throttle body from the intake manifold, leaving all the coolant, throttle etc lines connected and lay it aside. This is how I have always done them on my previous Mazda6 V6 and it was way better then breaking lines?
Advice for the Max newbie please???
Im new to maximas, and I am buying a 95 that needs to have the valve cover gaskets done, so I read the post.
Here is my thoughts.......
In doing this job, isn't easier to simply unbolt the Throttle body from the intake manifold, leaving all the coolant, throttle etc lines connected and lay it aside. This is how I have always done them on my previous Mazda6 V6 and it was way better then breaking lines?
Advice for the Max newbie please???
u can do that, but its not that hard to see where what goes. the reason why people dont take it off i think, is because they dont want to change the gasket between the throttle body and the IM
come on people. i am a newb, and i took off the intake manifold off at least 5 times. no problems.
heres a little tip.
1. i never installed the brackets in the rear. you dont really need them.
2. you dont have to connect the hoses in the back. the ones that go to the EGR. there is a way to hack it. just folow the lines and you will be able to see really easily. (maybe i can take some pictures tomorrow)
3. have a box where you can put all your bolts. i lost 2 bolts before. PITA to get them back.
01-31-2010, 08:02 AM
#36
Not really 'design error', more like design constraints. With a 90 degree V engine, there's much more room to have an intake manifold in between the heads, allowing free access to the valve covers and everything else on top. The downside is how much more space the engine will take up in the engine bay.
A 60 degree V, like the VQ and most other common V6s, is good for overall size, but requires more 'overlap' on components. Ever done plugs on a 1MZ? IIRC, the J30/J32/J35 are the same way. See the Ford/Jag 3 liters in the S-type and LS, etc.
01-31-2010, 12:37 PM
#38
Perhaps the design isn't the best, but they DO have a budget to work with, as well as physical constraints and other limitations.
just my $.02
