A32 Ignition Switch Replacement - Howto (lots of pics)
 07-09-2009, 07:31 PM
#1
No more Maximas...

Thread Starter
iTrader: (26)
Join Date: Jul 2005
Location: Oak Ridge, TN
Posts: 14,331
A32 Ignition Switch Replacement - Howto (lots of pics)
On my site here: http://boredmder.com/howto/ignitionswitch/
This howto is for the quick and easy task of replacing the ignition switch. If you have to jiggle the key around for the car to start, have to do any special tricks for it to work, whatever.
This whole process shouldn't take but 10 minutes, if that.
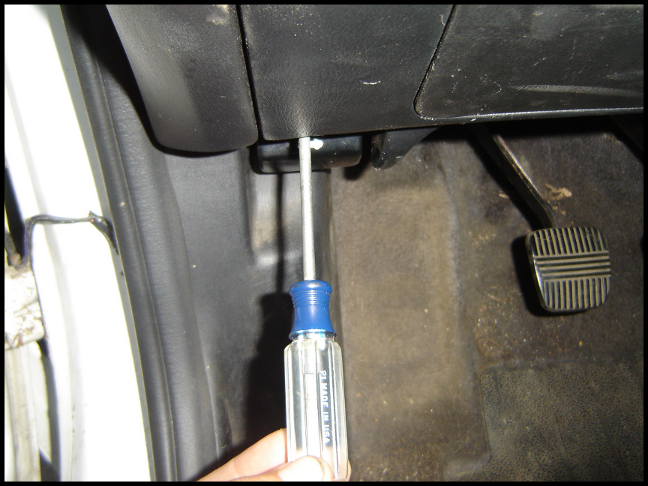
First up, grab a phillips head screwdriver, and acquaint yourself with the kneeling position outside your driver's side door. You should (kinda) see this:
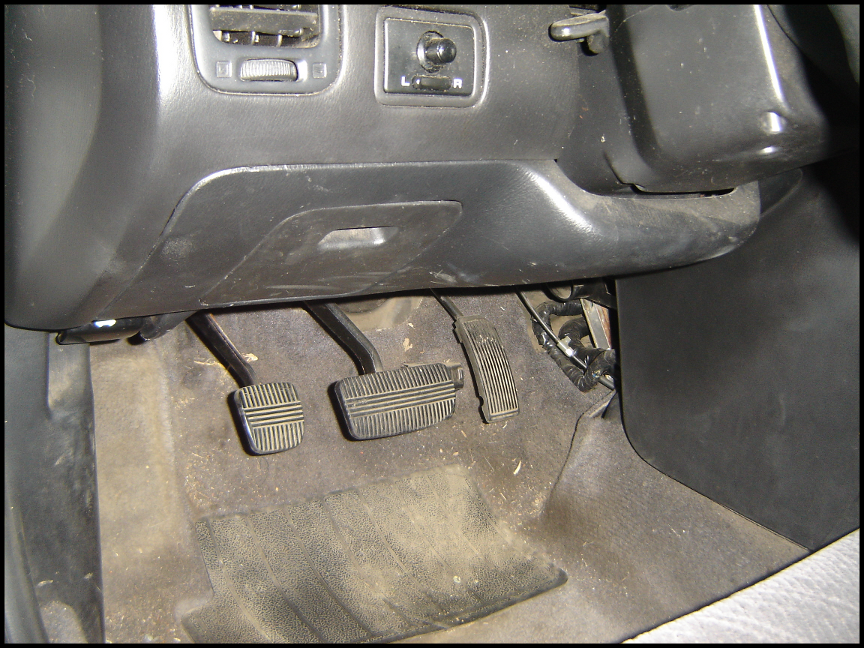
Yes, that's an automatic brake pedal. Deal with it.
You'll need to locate the two screws, one at either end of the bottom of the panel.
They're indicated by circles in the photo below (the rectangular highlights are the clips that hold the panel on):
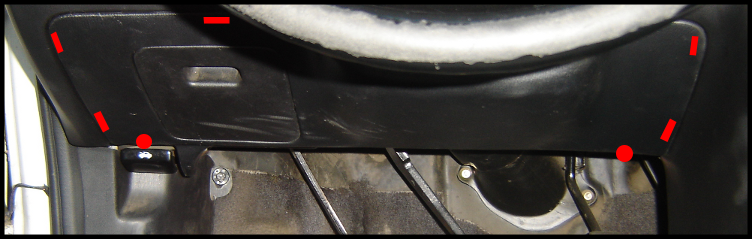
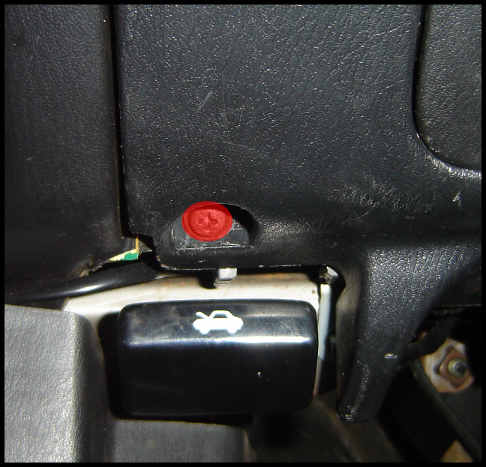
Left side screw, above the hood release:
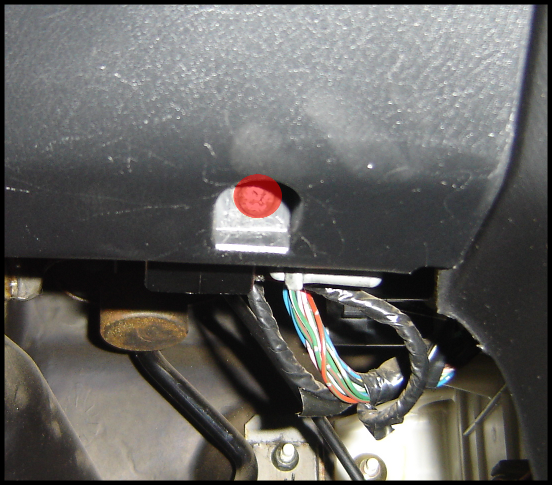
Right side screw:
Now to remove the screws. If you can't figure this out, you're just...lost.
This howto is for the quick and easy task of replacing the ignition switch. If you have to jiggle the key around for the car to start, have to do any special tricks for it to work, whatever.
This whole process shouldn't take but 10 minutes, if that.
First up, grab a phillips head screwdriver, and acquaint yourself with the kneeling position outside your driver's side door. You should (kinda) see this:
Yes, that's an automatic brake pedal. Deal with it.
You'll need to locate the two screws, one at either end of the bottom of the panel.
They're indicated by circles in the photo below (the rectangular highlights are the clips that hold the panel on):
Left side screw, above the hood release:
Right side screw:
Now to remove the screws. If you can't figure this out, you're just...lost.
 07-09-2009, 07:31 PM
#2
No more Maximas...
Thread Starter
iTrader: (26)
Join Date: Jul 2005
Location: Oak Ridge, TN
Posts: 14,331
Removing left side screw:
Removing right side screw:
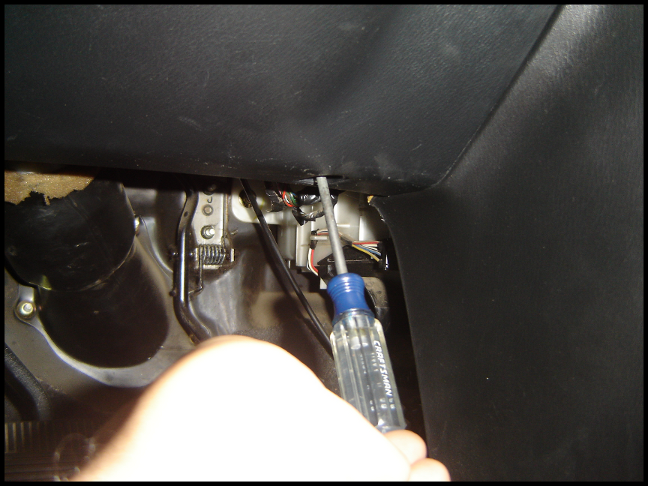
Grab along the bottom of the panel and pull it off. There are several clips that hold it in place (see above picture), so it may be a little resistant. Don't be afraid of breaking it, be a man (if applicable).
When it comes off, just toss it to the side. You'll then see this:
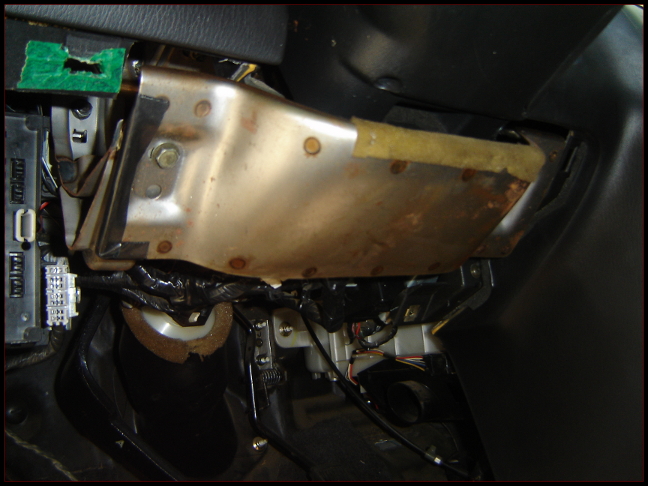
That bar is safety equipment, there to protect you in the event of a crash (AFAIK). It's held on by two 10mm head bolts, shown here:
Removing the left side bolt:
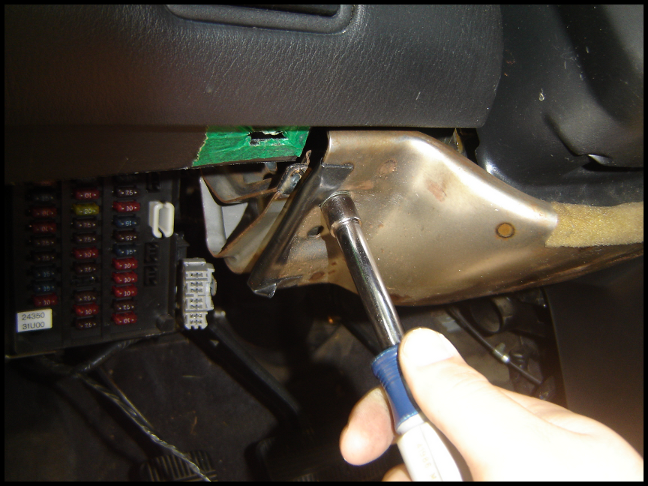
Removing right side screw:
Grab along the bottom of the panel and pull it off. There are several clips that hold it in place (see above picture), so it may be a little resistant. Don't be afraid of breaking it, be a man (if applicable).
When it comes off, just toss it to the side. You'll then see this:
That bar is safety equipment, there to protect you in the event of a crash (AFAIK). It's held on by two 10mm head bolts, shown here:
Removing the left side bolt:
07-09-2009, 07:32 PM
#3
No more Maximas...
Thread Starter
iTrader: (26)
Join Date: Jul 2005
Location: Oak Ridge, TN
Posts: 14,331
Removing the right side bolt:
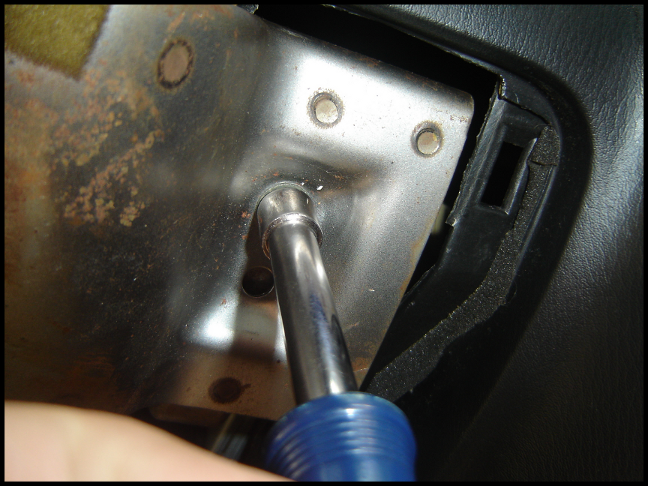
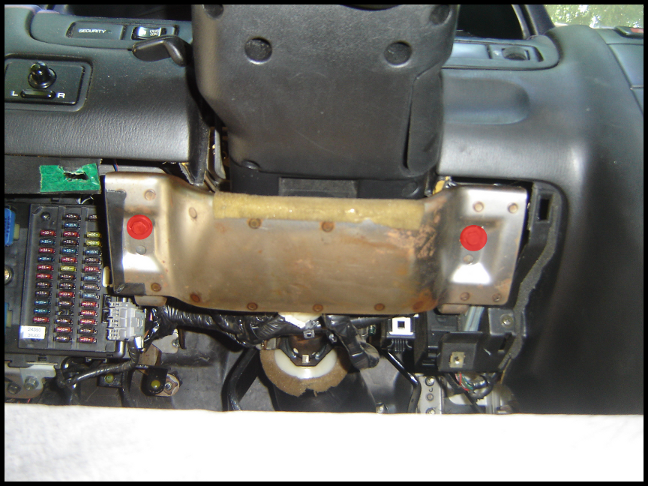
Now the view with the crash bar removed:
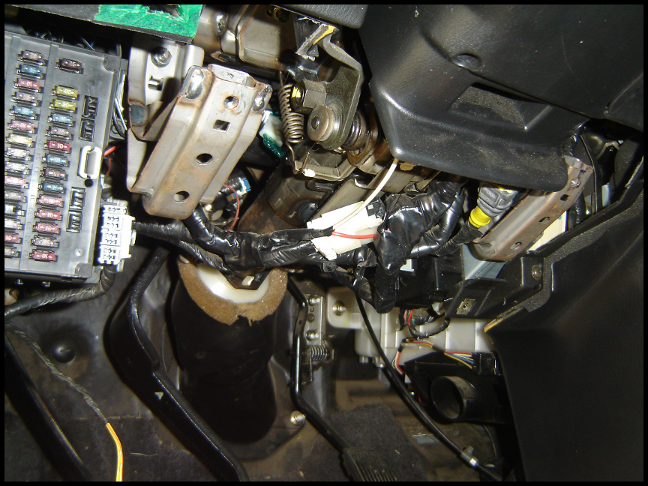
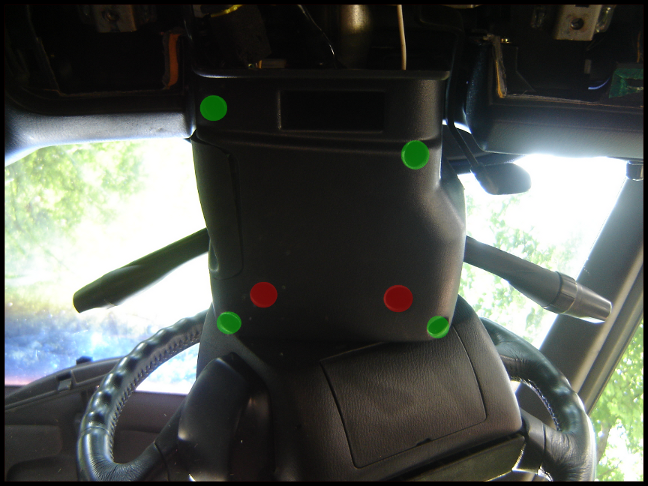
Now you need to remove the steering column trim. There are 6 screws; the outer 4 hold the two pieces of the surround together, the two in the middle hold the lower piece to the steering column.
View from directly underneath, showing the screws. Green holds the two pieces together, red holds the lower piece to the column:
Now once you remove all of those (no pictures of that, but...yea) you can just pull the top piece right off:
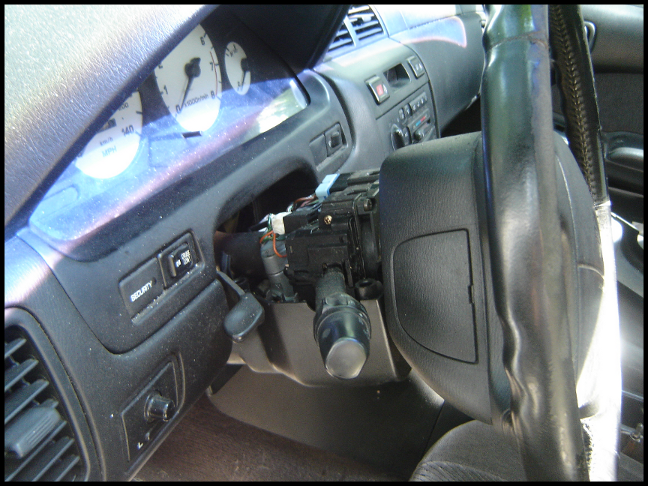
Pop the trim around the key cylinder out (not pictured, it's what goes around where you put the key), then pull off the lower piece:
Now the view with the crash bar removed:
Now you need to remove the steering column trim. There are 6 screws; the outer 4 hold the two pieces of the surround together, the two in the middle hold the lower piece to the steering column.
View from directly underneath, showing the screws. Green holds the two pieces together, red holds the lower piece to the column:
Now once you remove all of those (no pictures of that, but...yea) you can just pull the top piece right off:
Pop the trim around the key cylinder out (not pictured, it's what goes around where you put the key), then pull off the lower piece:
07-09-2009, 07:32 PM
#4
No more Maximas...
Thread Starter
iTrader: (26)
Join Date: Jul 2005
Location: Oak Ridge, TN
Posts: 14,331
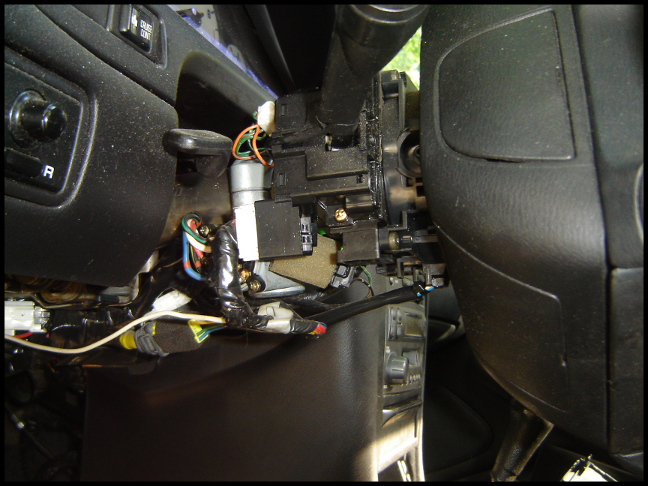
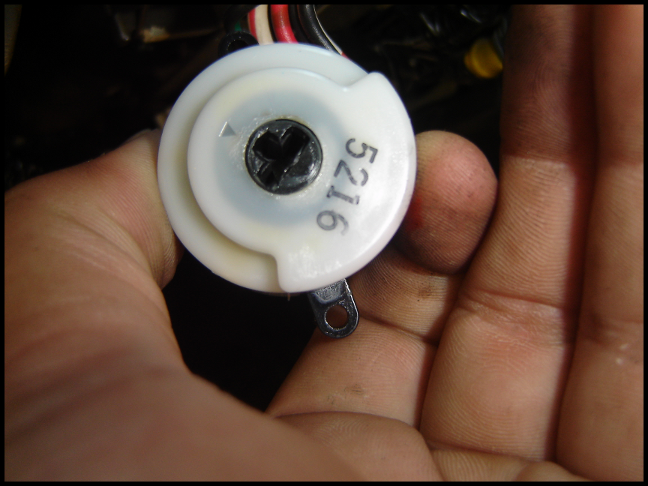
Here's your ignition switch, mounted to the back of the lock cylinder (don't mind the unplugged white connector, it was in the way):
To remove the ignition switch, you'll need a finer tipped screwdriver than what you used for everything else.
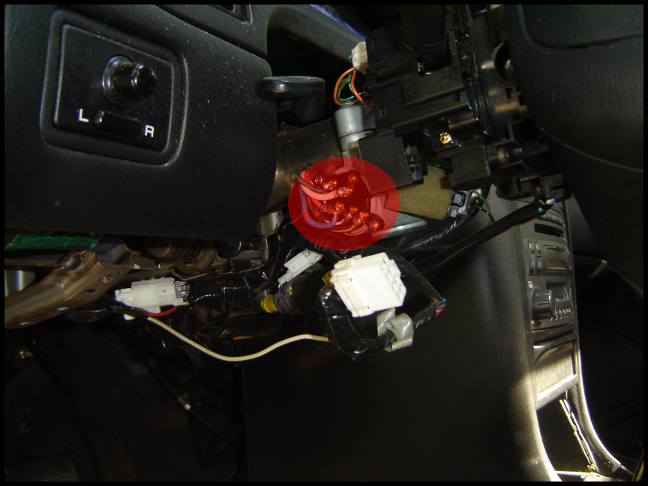
The two screws that affix it to the key cylinder:
Removing the left side screw (a shorter screwdriver helps):
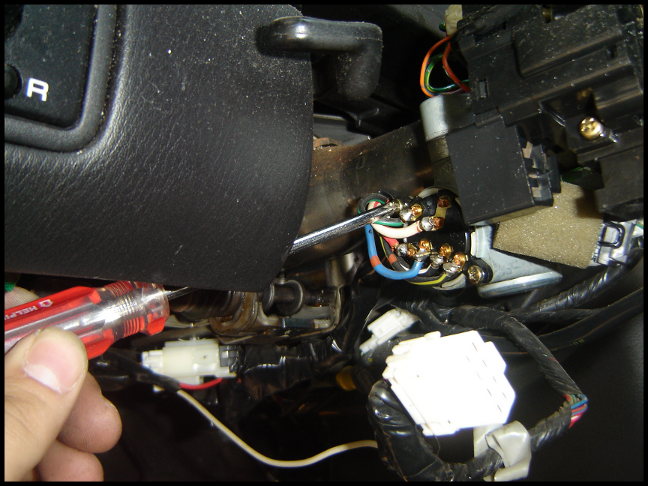
Removing the right side screw:
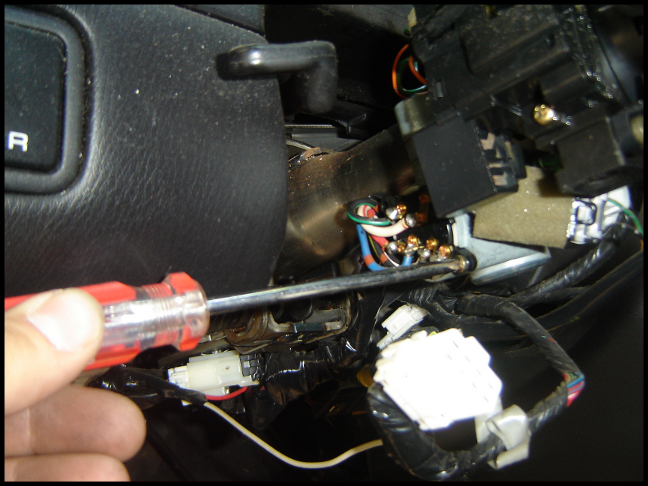
The ignition switch then just pulls right out:
To remove the ignition switch, you'll need a finer tipped screwdriver than what you used for everything else.
The two screws that affix it to the key cylinder:
Removing the left side screw (a shorter screwdriver helps):
Removing the right side screw:
The ignition switch then just pulls right out:
07-09-2009, 07:33 PM
#5
No more Maximas...
Thread Starter
iTrader: (26)
Join Date: Jul 2005
Location: Oak Ridge, TN
Posts: 14,331
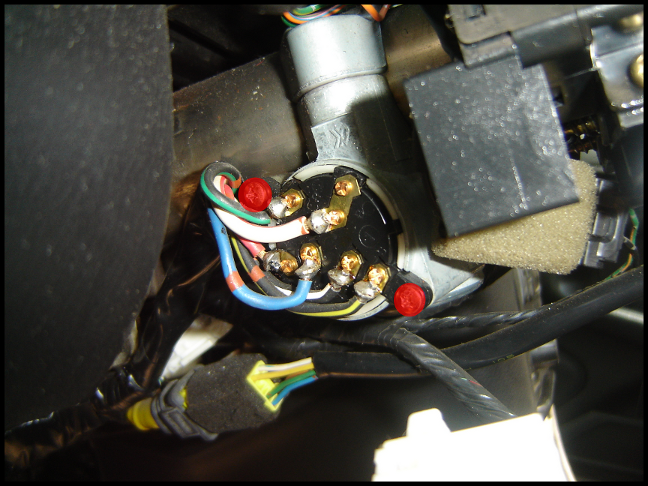
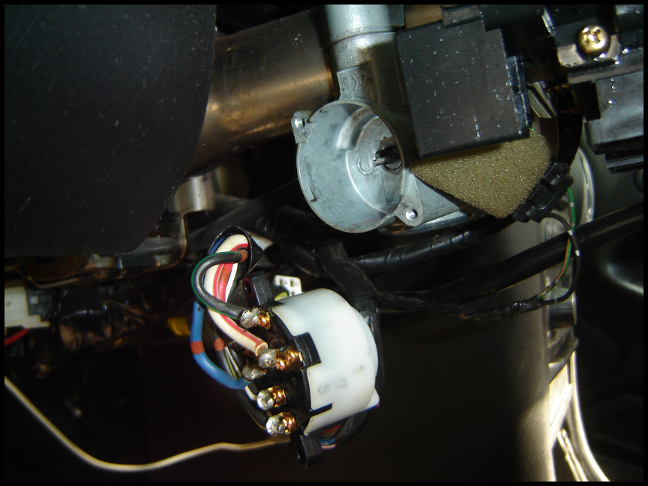
This is the tab in the lock cylinder that rotates along with the key:
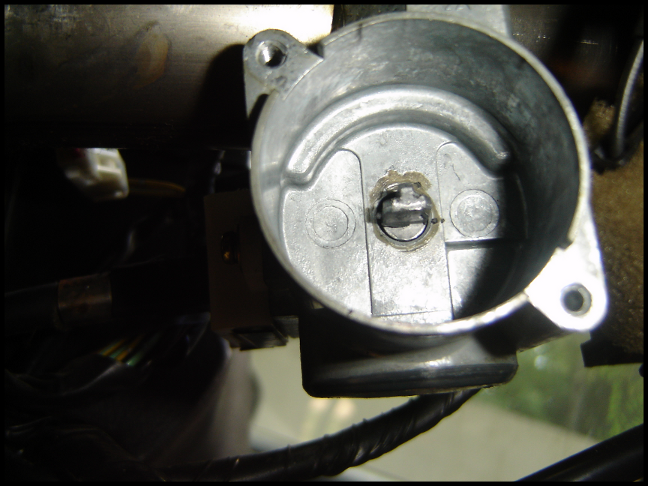
Which fits into this slot on the ignition switch:
You really can't install the ignition switch improperly (one would think, anyway...).
Obviously installation is the reverse of removal. I don't have a picture specifically of the ignition switch harness connector, but just follow the harness back and you'll find it.
Video tutorial:
Last edited by pmohr; 07-09-2009 at 07:38 PM.


 07-10-2009, 07:12 AM
#11
Should I disconnect the negative cable on my battery first? LOL.
I dont have an ignition switch problem, but by looking at the very last pic it looks like maybe the reason they fail is the black plastic piece in the center gets worn out?
I dont have an ignition switch problem, but by looking at the very last pic it looks like maybe the reason they fail is the black plastic piece in the center gets worn out?
 07-10-2009, 08:00 AM
#13
No more Maximas...
Thread Starter
iTrader: (26)
Join Date: Jul 2005
Location: Oak Ridge, TN
Posts: 14,331
And yes, you can see how mine (original from '95) is starting to wear out in the middle. You can also see how it scuffs along the lock cylinder (right around the tab there are wear marks).
07-11-2009, 12:49 PM
#15

I took my switch apart and the contact inside for the starter solenoid was burned and blackened from arcing. I cleaned the contact and the contact plate and filled it with light bulb grease and put it back in the car. It works fine.

 09-26-2009, 02:12 PM
#18
Newbie - Just Registered

Join Date: Sep 2009
Posts: 1
quick key turning
1995 gxe. Do you think i need to replace the ignition switch if the car won't start for 5 to 6 times when i turn the key normal, but when i turn it very fast it starts on the first try?? I do hear relays clicking excessively (in the fuse panel located under the dash) when i turn the key slow. Could it be relay problem)??


 09-24-2010, 06:56 AM
#22
Newbie - Just Registered

Join Date: Dec 2007
Posts: 3
Great write and the video was nice to see as well. My ignition goes sometimes right away and sometimes takes turning the key a few times to get the connection. I'll be attempting this, this weekend. Hope no one cares about posting a comment on an old thread, but this is a nice help! Thanks again.
 11-17-2010, 03:09 PM
#24

Join Date: Oct 2003
Posts: 16
pmohr - Nice Job! I 'relived' fixing mine. - That picture you show where the ignition switch is in your hands gives a real good look at the black center slot which is worn. I added a small piece of cut out scrap plastic and crazy glued it in place to take up the slop. That metal piece that goes into it was nice and snug again after that and it's been working fine ever since.
Also when I put the switch back in place, before I tightened down both screws, I felt some slight left-to-right movement. I took advantage by turning the switch assembly against the travel direction of the key. In other words the ignition key now had to turn less (not much, just a little bit) to activate the switch.
My problem showed the way someone else had mentioned. Nothing would happen when you turned the key numerous times and then it would work with no trouble for awhile. Turning it real hard and fast - once I realized it - would work almost all the time.
 10-09-2011, 09:52 PM
#26
Newbie - Just Registered

Join Date: Sep 2007
Posts: 9
Great thread, very helpful, would have taken me 8 minutes to do, except that when I exposed the ignition switch wiring, I found THIS nasty little surprise - a disused Clifford car alarm / remote starter, possibly 50% or more of my problem;

(the ignition switch is at lower left - note the very poor splicing and miles of electrical tape, along with about 3,000 zip ties)
Thirty minutes with diagonal cutters and electrical tape, and it was all fixed, but that was unnerving!
(the ignition switch is at lower left - note the very poor splicing and miles of electrical tape, along with about 3,000 zip ties)
Thirty minutes with diagonal cutters and electrical tape, and it was all fixed, but that was unnerving!
Last edited by lifesabeachnj; 10-09-2011 at 10:06 PM.

 05-07-2016, 05:11 AM
#31
Newbie - Just Registered

Join Date: Sep 2014
Location: Quebec
Posts: 3
Great illustration. I just replaced my ignition switch, and I recommend not attaching the cabling plug to the metal bracket until you have finished putting the covers around the column back, this way it's easier to get them in place. I ran the ignition cable right under the column through the cutout, other cables through the right side. My Canadian 98 also does not have the large metal brace, there is no mounting studs either, so it has not been forgotten - it's just not present on all models.
08-27-2016, 01:33 PM
#32
Join Date: Oct 2003
Posts: 16
Back Again!
pmohr - Nice Job! I 'relived' fixing mine. - That picture you show where the ignition switch is in your hands gives a real good look at the black center slot which is worn. I added a small piece of cut out scrap plastic and crazy glued it in place to take up the slop. That metal piece that goes into it was nice and snug again after that and it's been working fine ever since.
Also when I put the switch back in place, before I tightened down both screws, I felt some slight left-to-right movement. I took advantage by turning the switch assembly against the travel direction of the key. In other words the ignition key now had to turn less (not much, just a little bit) to activate the switch.
My problem showed the way someone else had mentioned. Nothing would happen when you turned the key numerous times and then it would work with no trouble for awhile. Turning it real hard and fast - once I realized it - would work almost all the time.
Also when I put the switch back in place, before I tightened down both screws, I felt some slight left-to-right movement. I took advantage by turning the switch assembly against the travel direction of the key. In other words the ignition key now had to turn less (not much, just a little bit) to activate the switch.
My problem showed the way someone else had mentioned. Nothing would happen when you turned the key numerous times and then it would work with no trouble for awhile. Turning it real hard and fast - once I realized it - would work almost all the time.
I also made the two mounting holes in the switch a little bit bigger so I could get more clockwise travel when I replaced it this time. Works great now!
08-27-2016, 03:00 PM
#33
No more Maximas...
Thread Starter
iTrader: (26)
Join Date: Jul 2005
Location: Oak Ridge, TN
Posts: 14,331
After all these years I had to come back and look this over again, this time for my Dad's Maxima. The same trick worked again.
I also made the two mounting holes in the switch a little bit bigger so I could get more clockwise travel when I replaced it this time. Works great now!
I also made the two mounting holes in the switch a little bit bigger so I could get more clockwise travel when I replaced it this time. Works great now!


Thread
Thread Starter
Forum
Replies
Last Post