How To: Fix Your Spoiler LED Light
 02-05-2009, 08:34 PM
#1
Senior Member
Thread Starter
iTrader: (4)

Join Date: Feb 2007
Location: Cedar Rapids, Iowa
Posts: 373
How To: Fix Your Spoiler LED Light
Hi .org members. Recently I swapped trunk lids with one with a spoiler. And to my unpleasant suprise the LED strip on the spoiler did not work. I got on and searched and searched, Looked through the how-to's and couldn't find anything. Although someone did mention that the resistors go bad. Some people need this to work to pass inspection, and if you are like me and think that the clear LED strip "replacement" is ugly, nor do you want to shell out 170 bucks to Nissan for a new one, You can do this.
Materials:
A Blow dryer/Heat gun, Soldering Iron, A Razorblade (or something to "pry" the casing off) and a $1.05.
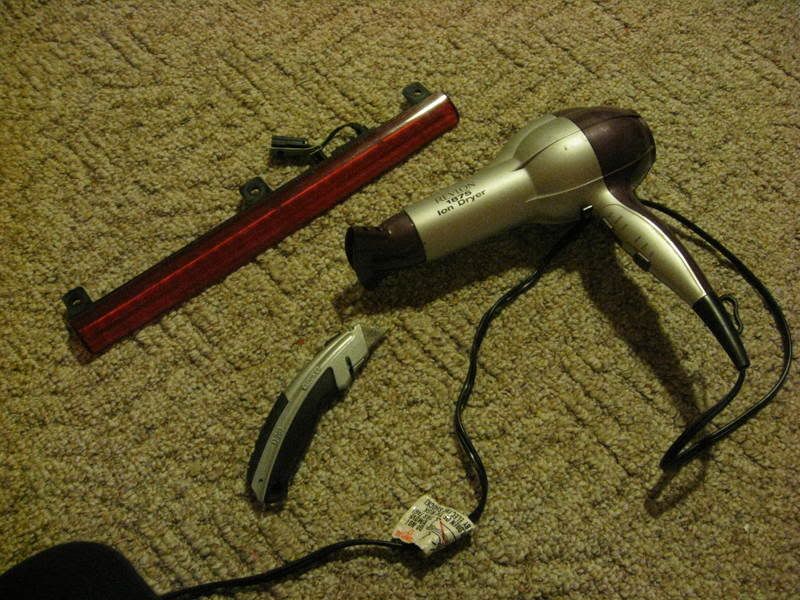
I used a blow dryer because well, I didn't have a heat gun and this works too. Your best bet is to heat up one side and try to 'pry' it open with something like a razorblade, Be careful not to crack it because it does crack pretty easily I noticed, Although I wasn't too worried about it because when it is on the car you cannot see it, Just be careful to not crack it to bad so that water or something can seep it and destroy it.

I heated up one side and then stuck the razorblade in there and pried it down. Continued heating each part I pried.

After getting it pried down I noticed one of the resistors was pretty badly burnt out. I honestly do not know the resistance of it. I went to my local Radio Shack and picked up a set of resistors for a $1.05, I got 560 watt 1/2 ohm.

You can easily get a lower resistance, but be careful though. I did notice the 560 ohm wasn't as bright as I wanted it and will be going back tomorrow for something lower.
Here is a picture of it put in:

Notice the cut up black casing, Don't worry to much about it, it should go back together like a puzzle, or atleast mine did.
Because of the fact that I want a brighter one I do not have pictures of it on my car. Note that it is a LOT brighter than you think when you put the red reflector over it so don't judge by just how bright the LEDS look w/o it.
I will get a better picture of it tomorrow. I havn't sealed it back up yet but make sure to use something that will not let moisture in. But that is the easy part.
Hope this helps out some of you people!
Materials:
A Blow dryer/Heat gun, Soldering Iron, A Razorblade (or something to "pry" the casing off) and a $1.05.
I used a blow dryer because well, I didn't have a heat gun and this works too. Your best bet is to heat up one side and try to 'pry' it open with something like a razorblade, Be careful not to crack it because it does crack pretty easily I noticed, Although I wasn't too worried about it because when it is on the car you cannot see it, Just be careful to not crack it to bad so that water or something can seep it and destroy it.
I heated up one side and then stuck the razorblade in there and pried it down. Continued heating each part I pried.
After getting it pried down I noticed one of the resistors was pretty badly burnt out. I honestly do not know the resistance of it. I went to my local Radio Shack and picked up a set of resistors for a $1.05, I got 560 watt 1/2 ohm.
You can easily get a lower resistance, but be careful though. I did notice the 560 ohm wasn't as bright as I wanted it and will be going back tomorrow for something lower.
Here is a picture of it put in:
Notice the cut up black casing, Don't worry to much about it, it should go back together like a puzzle, or atleast mine did.
Because of the fact that I want a brighter one I do not have pictures of it on my car. Note that it is a LOT brighter than you think when you put the red reflector over it so don't judge by just how bright the LEDS look w/o it.
I will get a better picture of it tomorrow. I havn't sealed it back up yet but make sure to use something that will not let moisture in. But that is the easy part.
Hope this helps out some of you people!

 02-05-2009, 09:07 PM
#3
Senior Member
Thread Starter
iTrader: (4)
Join Date: Feb 2007
Location: Cedar Rapids, Iowa
Posts: 373
Hey. As it is too dark and about 5 degrees here in Iowa I don't. I will Get a day and night shot tomorrow as soon as possible. I'm going to go get different resistors. as these ones arn't as bright as I want it. Although it's about as bright as stock. My resistor on the end was burnt out and I do not know the exact ohm of it. So if yours is working or if someone knows the exact number I'd like to know.
Last edited by ZaxWhite97Max; 02-05-2009 at 09:09 PM.
 02-05-2009, 09:14 PM
#5
Senior Member
Thread Starter
iTrader: (4)
Join Date: Feb 2007
Location: Cedar Rapids, Iowa
Posts: 373
The colors are: Blue/blue/black/gold. BUT the second blue might be wrong it's on there very very thin and I cannot tell if it is blue or violet. In any case they are 66ohm with a tolerance of 5%. But I did not find anything in there that matched those.
I know for a fact the 560 isn't the right one. It's bright enough for people to notice. I could easily see it from accross the street. but I want it to be brighter.
I just figured with all the people shelling out to pass inspection. In any case you don't have to spend 100 dollars to fix a 1.05 problem. Or you can buy the clear ones for what? 30 bucks? I don't think the clear ones look good on a white maxima though. Maybe any other color but I wasn't feeling the clear look on my spoiler.
Last edited by ZaxWhite97Max; 02-05-2009 at 09:24 PM.
02-06-2009, 06:25 AM
#6
Member

Join Date: Oct 2007
Posts: 292
I did the exact same repair many years ago, and my spoiler LED assembly has worked fine ever since.
I carefuly pried mine apart without using heat, and the back popped right off the light assembly (probably how I was getting water in to cause the resistor corrosion in the first place).
I read the resistor code to get the right one, but I forget now exactly which ones I got. Just match the resistors up at Radio Shack. I do remember they were in a pack of 2 for $1.
The way I silicone glued it back together, I just hope I never have to try to take it apart again.
 02-06-2009, 07:58 AM
#8
Senior Member

Join Date: Jun 2005
Posts: 184
so what if you're a single guy who doesnt have access to a hair dryer? oh wait....if you were a single guy with no lady to nag you....then you would just go out and buy your own heat gun! haha...nice write up....final pix would be great though
02-06-2009, 07:37 PM
#10
Senior Member
Thread Starter
iTrader: (4)
Join Date: Feb 2007
Location: Cedar Rapids, Iowa
Posts: 373
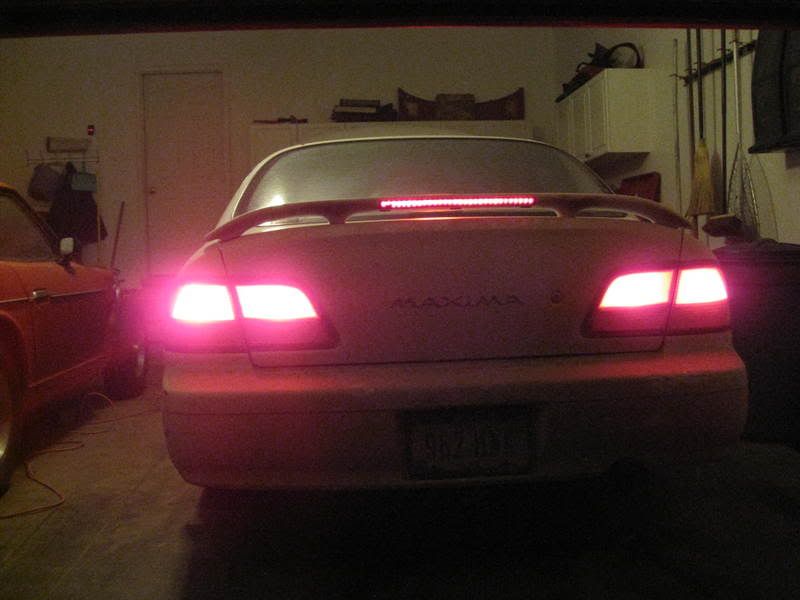
Final. put it back together quick for this. It's with about 140 ohms when I tested it. I want to get it more down to about 50ohms, I belive they (the resistors) are all 66 ohm or something close to this. but none the less the thread is complete hope you guys find this useful.
Edit: Sorry for the terrible picture. ;o
02-06-2009, 09:01 PM
#11
Member

Join Date: May 2005
Posts: 222
Way, and what if it's all rusted??
That's what I did:
-2 red LED "high beam"
-1 Store hexagonal rod
- One 470 ohms resistance
#1 : Grind at every 1/2 inches a line on the rod (makes light reflecting)
#2 : Drill 2 holes on each extremity and fit the LEDs in with clear cutex.
#3 : Put a bike reflection tape in the back side of the rod (to get more light out)
Works fine and it's strong!
Last edited by oVeRdOsE; 02-06-2009 at 09:04 PM.

 02-07-2009, 11:03 AM
#15
Senior Member

Join Date: Oct 2008
Location: Connecticut / Western Mass
Posts: 460
I know for a fact that not all 4th gens are the same. When my leds went out I went to the junk yard and got me a new one. It came out of a 98 and I must say it is MUCH MUCH brighter because it has more leds in it. Although you do have to modify the spoiler for it to fit its worth it.
02-07-2009, 12:34 PM
#16

I did the exact same repair many years ago, and my spoiler LED assembly has worked fine ever since.
I carefuly pried mine apart without using heat, and the back popped right off the light assembly (probably how I was getting water in to cause the resistor corrosion in the first place).
I read the resistor code to get the right one, but I forget now exactly which ones I got. Just match the resistors up at Radio Shack. I do remember they were in a pack of 2 for $1.
The way I silicone glued it back together, I just hope I never have to try to take it apart again.
I carefuly pried mine apart without using heat, and the back popped right off the light assembly (probably how I was getting water in to cause the resistor corrosion in the first place).
I read the resistor code to get the right one, but I forget now exactly which ones I got. Just match the resistors up at Radio Shack. I do remember they were in a pack of 2 for $1.
The way I silicone glued it back together, I just hope I never have to try to take it apart again.
 02-16-2009, 09:38 PM
#18

The led light on mine had significant water damage so i couldn't do this... I bought the led strip that has no tabs and mounts via double sided tape. The only problem i ran into was that the wiring was centered on this new strip. The cheapest place i found was 35 bucks shipped on ebay.
I bought the led strip that has no tabs and mounts via double sided tape. The only problem i ran into was that the wiring was centered on this new strip. The cheapest place i found was 35 bucks shipped on ebay.
02-17-2009, 09:06 AM
#19
Senior Member
Thread Starter
iTrader: (4)
Join Date: Feb 2007
Location: Cedar Rapids, Iowa
Posts: 373
The led light on mine had significant water damage so i couldn't do this... I bought the led strip that has no tabs and mounts via double sided tape. The only problem i ran into was that the wiring was centered on this new strip. The cheapest place i found was 35 bucks shipped on ebay.
I bought the led strip that has no tabs and mounts via double sided tape. The only problem i ran into was that the wiring was centered on this new strip. The cheapest place i found was 35 bucks shipped on ebay.
02-17-2009, 01:04 PM
#21

I have 98 GXE and when I bought it it came with a SE spoiler on it, but there was a problem: the stop light was under the driver's seat. I went to do inspections and the stupid guy said 5 stop lights is not enough you need to fix that one. I cut the top peace with a knife, took the circuit board out, cleaned it up, put new wires and put the circuit board back in. I made sure to seal it well with super glue. Then I mounted the stop light with 2-sided tape and connected the wires to one of the stop lights located on the trunk. It look perfect and never had problems with it! 
02-17-2009, 02:06 PM
#22
Senior Member
Thread Starter
iTrader: (4)
Join Date: Feb 2007
Location: Cedar Rapids, Iowa
Posts: 373
I have 98 GXE and when I bought it it came with a SE spoiler on it, but there was a problem: the stop light was under the driver's seat. I went to do inspections and the stupid guy said 5 stop lights is not enough you need to fix that one. I cut the top peace with a knife, took the circuit board out, cleaned it up, put new wires and put the circuit board back in. I made sure to seal it well with super glue. Then I mounted the stop light with 2-sided tape and connected the wires to one of the stop lights located on the trunk. It look perfect and never had problems with it!
") Probably wont be able to open it agian but oh well lol
Probably wont be able to open it agian but oh well lol
 02-17-2009, 04:52 PM
#24
02-17-2009, 06:52 PM
#25
Junior Member

Join Date: Sep 2008
Location: Pittsburg, KS
Posts: 48
Perhaps there is something I am missing about the actual removal of the light. I think this fix will absolutely help me but I can't see the three screws that hold the fixture to the spoiler. Everyone's pictures look the same and my fixture appears to be the same but the three screw would be hidden from view. Were the 95's different?
 02-18-2009, 09:18 AM
#27
Senior Member
Thread Starter
iTrader: (4)
Join Date: Feb 2007
Location: Cedar Rapids, Iowa
Posts: 373
Perhaps there is something I am missing about the actual removal of the light. I think this fix will absolutely help me but I can't see the three screws that hold the fixture to the spoiler. Everyone's pictures look the same and my fixture appears to be the same but the three screw would be hidden from view. Were the 95's different?
02-18-2009, 03:59 PM
#28
Junior Member
Join Date: Sep 2008
Location: Pittsburg, KS
Posts: 48
Well since the title says "how to" and I need to fix mine anyway, let's be thorough. Here is a picture of the bottom of my 95'.
http://i15.photobucket.com/albums/a3...runderside.jpg
Has anyone with a 95' done this? Does anyone have a spoiler that looks like this? None of the factory manuals seem to address it. There are two small holes but the offset screw driver doesn't find anything in there. It sounds so easy to do, I just can't get the housing free.
02-19-2009, 08:42 AM
#29
Senior Member
Thread Starter
iTrader: (4)
Join Date: Feb 2007
Location: Cedar Rapids, Iowa
Posts: 373
Well since the title says "how to" and I need to fix mine anyway, let's be thorough. Here is a picture of the bottom of my 95'.
http://i15.photobucket.com/albums/a3...runderside.jpg
Has anyone with a 95' done this? Does anyone have a spoiler that looks like this? None of the factory manuals seem to address it. There are two small holes but the offset screw driver doesn't find anything in there. It sounds so easy to do, I just can't get the housing free.
http://i15.photobucket.com/albums/a3...runderside.jpg
Has anyone with a 95' done this? Does anyone have a spoiler that looks like this? None of the factory manuals seem to address it. There are two small holes but the offset screw driver doesn't find anything in there. It sounds so easy to do, I just can't get the housing free.
The how-to refers to fixing the light not...how to remove your spoiler light
02-19-2009, 02:26 PM
#30
Well since the title says "how to" and I need to fix mine anyway, let's be thorough. Here is a picture of the bottom of my 95'.
http://i15.photobucket.com/albums/a3...runderside.jpg
Has anyone with a 95' done this? Does anyone have a spoiler that looks like this? None of the factory manuals seem to address it. There are two small holes but the offset screw driver doesn't find anything in there. It sounds so easy to do, I just can't get the housing free.
http://i15.photobucket.com/albums/a3...runderside.jpg
Has anyone with a 95' done this? Does anyone have a spoiler that looks like this? None of the factory manuals seem to address it. There are two small holes but the offset screw driver doesn't find anything in there. It sounds so easy to do, I just can't get the housing free.
02-19-2009, 02:53 PM
#31
Junior Member
Join Date: Sep 2008
Location: Pittsburg, KS
Posts: 48
The spoiler came with the car which I bought used but appears to be completely stock. The inside of the trunk lid is well sealed with black sealant that matches elsewhere in the trunk. The harness does not show any taps.
If the light "pops out" I am going to have to know that before I go prying on it. The lense is already separated which is why it's probably burnt out. I just figured I would ask as everything about fixing this simply says unscrew the light and mine does not. I thought it would add to the thread for the others that have searched this subject and found theirs isn't like that.
If the light "pops out" I am going to have to know that before I go prying on it. The lense is already separated which is why it's probably burnt out. I just figured I would ask as everything about fixing this simply says unscrew the light and mine does not. I thought it would add to the thread for the others that have searched this subject and found theirs isn't like that.
02-19-2009, 11:48 PM
#32
Senior Member
Thread Starter
iTrader: (4)
Join Date: Feb 2007
Location: Cedar Rapids, Iowa
Posts: 373
The spoiler came with the car which I bought used but appears to be completely stock. The inside of the trunk lid is well sealed with black sealant that matches elsewhere in the trunk. The harness does not show any taps.
If the light "pops out" I am going to have to know that before I go prying on it. The lense is already separated which is why it's probably burnt out. I just figured I would ask as everything about fixing this simply says unscrew the light and mine does not. I thought it would add to the thread for the others that have searched this subject and found theirs isn't like that.
If the light "pops out" I am going to have to know that before I go prying on it. The lense is already separated which is why it's probably burnt out. I just figured I would ask as everything about fixing this simply says unscrew the light and mine does not. I thought it would add to the thread for the others that have searched this subject and found theirs isn't like that.
02-20-2009, 07:35 AM
#33
Member
Join Date: Oct 2007
Posts: 292
I looked in the FSM and couldn't find any mention of how the light is attached or how to get it off - likely because the screws are so obvious.
And the only damage inside mine was the rusted off resistor leads. All the Led's were fine.
Last edited by nafddur; 02-20-2009 at 07:38 AM.
02-20-2009, 10:19 AM
#34
The spoiler came with the car which I bought used but appears to be completely stock. The inside of the trunk lid is well sealed with black sealant that matches elsewhere in the trunk. The harness does not show any taps.
If the light "pops out" I am going to have to know that before I go prying on it. The lense is already separated which is why it's probably burnt out. I just figured I would ask as everything about fixing this simply says unscrew the light and mine does not. I thought it would add to the thread for the others that have searched this subject and found theirs isn't like that.
If the light "pops out" I am going to have to know that before I go prying on it. The lense is already separated which is why it's probably burnt out. I just figured I would ask as everything about fixing this simply says unscrew the light and mine does not. I thought it would add to the thread for the others that have searched this subject and found theirs isn't like that.


