I'm ready to tackle water pump replacement...
 08-21-2008, 02:07 AM
#1
Member
Thread Starter

Join Date: Mar 2002
Posts: 118
I'm ready to tackle water pump replacement...
here's what I bought:
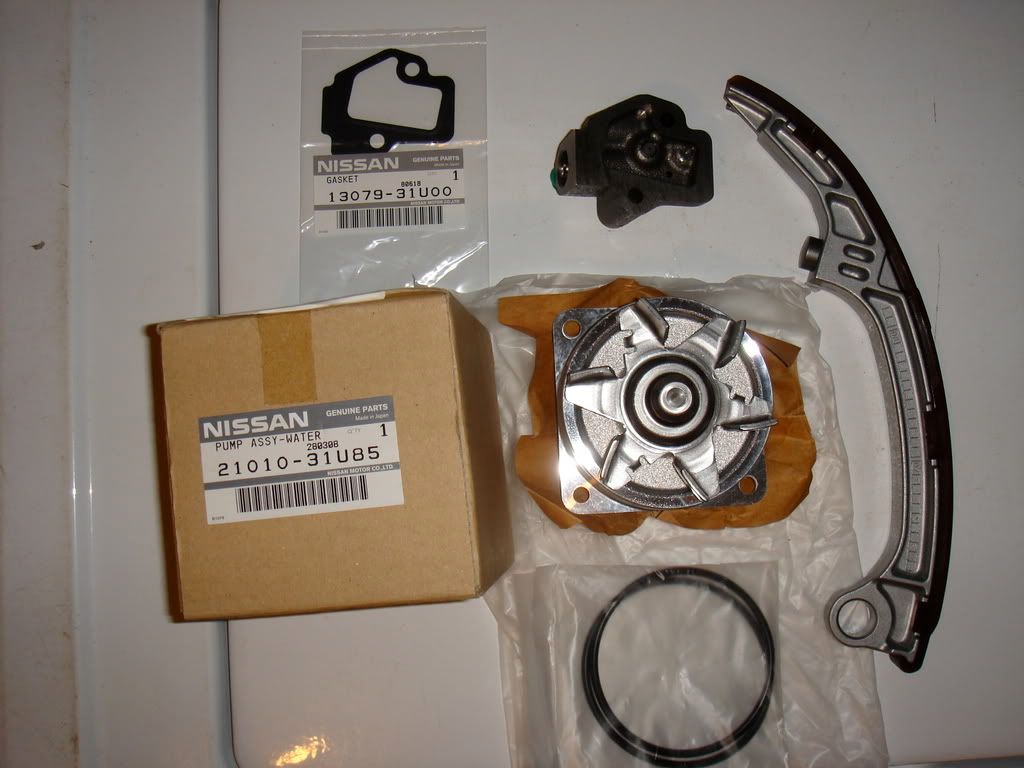
21010-31U85 = 80.52
13079-31U00 = 4.80
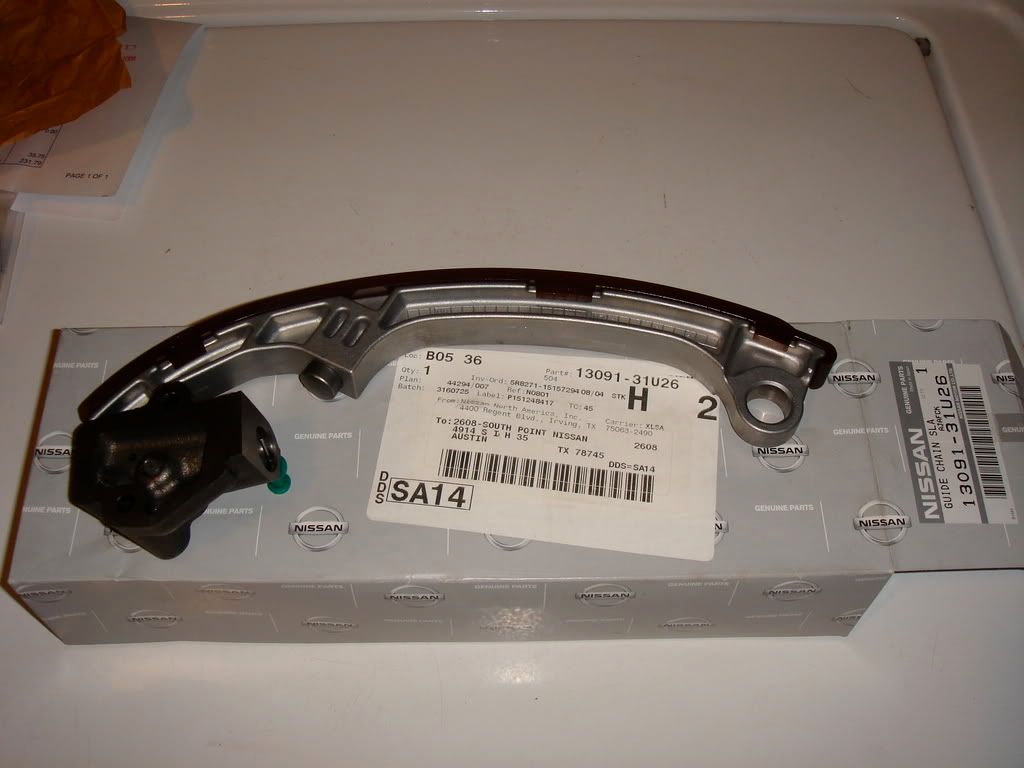
13091-31U26 = 55.66
I'm going to replace as much stuff as I can along the way. I bought my stuff from Dave B. Awesome guy. Since I have a "95", I'm going to replace the guts of the tensioner. But Dave said the price for the tensioner alone is the same as the tensioner and guide kit so I bought that. While on the phone with Dave, he actually went and opened the tensioner box to verify it was the same part as in the kit...talk about great service.
Anyway, just wanted to pass on some part #'s and price for anyone doing the same. Hopefully I got the correct stuff. All I need to get now is some Toyota FIPG (form in place gasket).
Thanks for reading.
21010-31U85 = 80.52
13079-31U00 = 4.80
13091-31U26 = 55.66
I'm going to replace as much stuff as I can along the way. I bought my stuff from Dave B. Awesome guy. Since I have a "95", I'm going to replace the guts of the tensioner. But Dave said the price for the tensioner alone is the same as the tensioner and guide kit so I bought that. While on the phone with Dave, he actually went and opened the tensioner box to verify it was the same part as in the kit...talk about great service.
Anyway, just wanted to pass on some part #'s and price for anyone doing the same. Hopefully I got the correct stuff. All I need to get now is some Toyota FIPG (form in place gasket).
Thanks for reading.
 08-21-2008, 11:11 AM
#3
he didn't just by sealent because if you know (which ... you obviously do not!) Nissan has a gasket for the TC tensioner replacement and on a 95, you replace the guide and tensioner both. also ... wtf is wrong with doing a job like this in the driveway? funny ... I recall doing my water pump and TC tensioner in my drive and not having a bit of trouble. I'll admit ... doing the guide will not be much fun, but it shouldn't matter if he is in a swimming pool to do the work.
Magic .... couple things:
first off ... you'll need 2 - M12 (?) bolts to remove the pump - search water pump, it'll come up .... can't recall off hand the length / size, I just know I have a set.
second .... your sig says "96" ??? you have 2 Max's?
Magic .... couple things:
first off ... you'll need 2 - M12 (?) bolts to remove the pump - search water pump, it'll come up .... can't recall off hand the length / size, I just know I have a set.
second .... your sig says "96" ??? you have 2 Max's?
08-21-2008, 12:58 PM
#4
Supporting Maxima.org Member

Join Date: Mar 2005
Location: Minneapolis,MN
Posts: 737
I did mine about a year ago. I replaced the tensioner, but not that big slide.
I also manged to drop that thumbtack thingy into the engine. I left it in there and have been perfectly fine.
I also manged to drop that thumbtack thingy into the engine. I left it in there and have been perfectly fine.
08-21-2008, 01:27 PM
#5
 08-21-2008, 04:25 PM
#6
Member

Join Date: Jul 2008
Location: FL
Posts: 96
he didn't just by sealent because if you know (which ... you obviously do not!) Nissan has a gasket for the TC tensioner replacement and on a 95, you replace the guide and tensioner both. also ... wtf is wrong with doing a job like this in the driveway? funny ... I recall doing my water pump and TC tensioner in my drive and not having a bit of trouble. I'll admit ... doing the guide will not be much fun, but it shouldn't matter if he is in a swimming pool to do the work.
damn dude, never said it couldnt be done..i can see you dont interpret things well...i meant it wont be fun...and trust me ive done my fair share so i would just prefer to do them on a lift thats all.
08-21-2008, 04:56 PM
#7

good luck to you bud!!! I would rather replace an entire engine than to do this... it would be nice if you could do a good write up with many pics! and problems or mishaps you get along the way, as well as suggestions, and if you were to do it again what would you do different.
08-21-2008, 05:11 PM
#8
Senior Member

Join Date: Oct 2003
Location: Pleasanton,CA
Posts: 1,136
Good luck, I got my pump and tensioner replaced early this week. Got it done by a patient of my wife. I just did a oil change since coolant was all over mixed up with the oil (2 oil changes in 5 days).
08-21-2008, 05:13 PM
#9
Nissan OEM sealent...bleh. Black RTV FTW.
As for the bolts to jack the water pump out, you can use the bolts from the left side guide (right above the water pump), since you're taking the front cover off. They're the right size and thread pitch, and long enough to get the water pump out enough.
As for the bolts to jack the water pump out, you can use the bolts from the left side guide (right above the water pump), since you're taking the front cover off. They're the right size and thread pitch, and long enough to get the water pump out enough.
08-26-2008, 01:35 AM
#10
Member
Thread Starter
Join Date: Mar 2002
Posts: 118
he didn't just by sealent because if you know (which ... you obviously do not!) Nissan has a gasket for the TC tensioner replacement and on a 95, you replace the guide and tensioner both. also ... wtf is wrong with doing a job like this in the driveway? funny ... I recall doing my water pump and TC tensioner in my drive and not having a bit of trouble. I'll admit ... doing the guide will not be much fun, but it shouldn't matter if he is in a swimming pool to do the work.
Magic .... couple things:
first off ... you'll need 2 - M12 (?) bolts to remove the pump - search water pump, it'll come up .... can't recall off hand the length / size, I just know I have a set.
second .... your sig says "96" ??? you have 2 Max's?
Magic .... couple things:
first off ... you'll need 2 - M12 (?) bolts to remove the pump - search water pump, it'll come up .... can't recall off hand the length / size, I just know I have a set.
second .... your sig says "96" ??? you have 2 Max's?
The sticker by my driver side door says manufacture date = 09/95 but my car is registered as 96'. So from what I've read, I can only change out the guts for the tensioner. And the gasket I bought should fit my original tensioner? Can someone verify?
08-26-2008, 01:36 AM
#11
Member
Thread Starter
Join Date: Mar 2002
Posts: 118
If I were to replace the tensioner, I would tie a rope to the thumbnail thingy and tie the other end to ur wrist, just in case it falls inside.
Good luck, I got my pump and tensioner replaced early this week. Got it done by a patient of my wife. I just did a oil change since coolant was all over mixed up with the oil (2 oil changes in 5 days).
Good luck, I got my pump and tensioner replaced early this week. Got it done by a patient of my wife. I just did a oil change since coolant was all over mixed up with the oil (2 oil changes in 5 days).
08-26-2008, 01:44 AM
#12
Member
Thread Starter
Join Date: Mar 2002
Posts: 118
08-26-2008, 04:53 AM
#13
Supporting Maxima.org Member
Join Date: Mar 2005
Location: Minneapolis,MN
Posts: 737
08-26-2008, 05:05 AM
#14
Supporting Maxima.org Member
Join Date: Mar 2005
Location: Minneapolis,MN
Posts: 737
08-26-2008, 01:00 PM
#15
Member
iTrader: (4)

Join Date: Sep 2005
Location: Long Beach, CA is where i live. Queens NYC is always home.
Posts: 297
o man .. ya doin guides,waterpump at home ... eeeek.... O well.. least it`s not a 6th gen. or altima 3.5L I remove the engine when i do this job on those cars. It`s sooo much easier. My VE is similar to the VQ and my senior tech tell me that I`m beter off dropping my engine to do my chains. There`s practically no room to work on it
 08-27-2008, 01:17 PM
#17

 08-28-2008, 12:59 AM
#18
Member
Thread Starter
Join Date: Mar 2002
Posts: 118
o man .. ya doin guides,waterpump at home ... eeeek.... O well.. least it`s not a 6th gen. or altima 3.5L I remove the engine when i do this job on those cars. It`s sooo much easier. My VE is similar to the VQ and my senior tech tell me that I`m beter off dropping my engine to do my chains. There`s practically no room to work on it

 12-06-2008, 04:10 AM
#21
Member
Thread Starter
Join Date: Mar 2002
Posts: 118
Job done!!
Sorry took me a while to do a write up on my WP job, but here goes. Since the existing WP write ups are good, this is a readers digest version so you have to refer back to the other posts. Hopefully you can find some useful info in here.
First of all, all the parts are correct. I used the tensioner gasket on my old style tensioner. Used the guts of the new tensioner to rebuild my old style tensioner. Remember I have a '95.
PREP WORK:
I decided to remove everything that people said would help make room. So I removed the motor mount, power steering canister, belt tensioner, windshield washer filler neck, and coolant reservoir. Make sure you keep track of the order of nuts, washers, etc. of the belt tensioner assembly. Look how much room I have.
http://i262.photobucket.com/albums/i...oomtowork1.jpg
http://i262.photobucket.com/albums/i...oomtowork2.jpg
Had to put an extension on my 17-mm wrench to remove the motor mount nuts facing the fender. After I got all the nuts and bolts off the motor mounts, I had to raise the engine a little to get the motor mount out. I used the car jack with a piece of 2x4 on the oil pan to raise the engine.
I was planning on doing a coolant flush so I removed my thermostat and my radiator was drained too. A bunch of coolant gushed out.
ACCESS COVER REMOVAL:
- Removed WP & tensioner access covers
- Removed old gasket from block with gasket scraper tool
http://i262.photobucket.com/albums/i...erremoved1.jpg
http://i262.photobucket.com/albums/i...erremoved2.jpg
http://i262.photobucket.com/albums/i...to/WP_pic1.jpg
- Used a pick to remove old gasket in the grove on block side
TENSIONER REMOVAL:
- The plunger felt very hard to push in. Barely any gap between plunger and chain guide to get leverage to push it in using a flat blade screwdriver.
http://i262.photobucket.com/albums/i...ingcontact.jpg
- I was afraid of scratching plunger and/or chain guide.
- Folded foil and stuck it under tensioner to act as a plate/catch
http://i262.photobucket.com/albums/i...gtensioner.jpg
- Loosened (2) tensioner bolts, but didn't remove the bolts.
- Pushed plunger in and out until the pressure on the plunger was relieved.
- This made it easier to push the plunger in.
- Removed top bolt and rotated tensioner CCW.
- All the while holding stubby slotted screw driver tip on plunger to prevent it from shooting out.
- Once plunger got out of the way of where it meets the chain guide, pushed plunger in and locked it in with pin.
- Removed plunger with bolt on.
WP REMOVAL:
- Folded foil and stuck it under WP to act as a plate/catch. Not much to room to put the foil under WP though.
- Loosened bolts and slowly removed (3) of them. This was the scariest part because the bolts are further in than the tensioner.
- As mentioned in other posts, washers won't come off bolt.
http://i262.photobucket.com/albums/i...-oldnewwp1.jpg
http://i262.photobucket.com/albums/i...-oldnewwp2.jpg
* - A LOT of coolant drains out to the oil pan when you remove the WP. I didn't remove the drain plug next to the WP area. I didn't care too much since I planned on removing the oil pan to get rid of the extra stuff laying below the drain plug. See how much is left after draining from drain plug.
http://i262.photobucket.com/albums/i...anremoved1.jpg
http://i262.photobucket.com/albums/i...anremoved2.jpg
http://i262.photobucket.com/albums/i...anremoved3.jpg
- Removed all old gasket from oil pan
http://i262.photobucket.com/albums/i...eanoilpan1.jpg
http://i262.photobucket.com/albums/i...eanoilpan2.jpg
REBUILT TENSIONER:
http://i262.photobucket.com/albums/i...tensioner1.jpg
http://i262.photobucket.com/albums/i...tensioner2.jpg
- Cleaned tensioner with brake cleaner
- Swapped plunger, spring (w/black piece) and o-ring
- Used pick to remove and install o-ring
- Plunger tension felt stronger w/new parts
INSTALLED WP:
- Cleaned WP mating surface.
- Sanded with 400 grit sandpaper. Some black crap wouldn't come off by rubbing w/rag.
http://i262.photobucket.com/albums/i...edcloseup1.jpg
http://i262.photobucket.com/albums/i...edcloseup6.jpg
- Taped WP perpeller with electrical tape so doesn�t cut o-ring while installing them.
- Installed o-rings.
- Put oil on outer ring and coolant on inner ring.
- Jacked up block to get maximum access.
- Lined bottom of access hole with foil to catch falling objects.
- Held chain out of way with a pick and installed WP.
- Screwed bolts in by hand.
- Made sure chain on teeth of WP.
- Slowly tightened all three bolts little by little.
- Torqued bolts.
INSTALLED REBUILT TENSIONER:
- The outside edges of the new style gasket doesn't really match the old tensioner but the inside cutout matches.
http://i262.photobucket.com/albums/i...ylegasket1.jpg
http://i262.photobucket.com/albums/i...ylegasket2.jpg
- Turned pulley CW 20 degrees to get slack back at tensioner
- Used allen wrench to hold up chain.
- Cleaned tensioner mating surface.
http://i262.photobucket.com/albums/i...ioncloseup.jpg
- Pinned plunger.
http://i262.photobucket.com/albums/i...installed1.jpg
- Lined bottom of access hole with foil to catch falling objects.
- Put gasket on tensioner and top bolt.
- Attached bottom bolt and made sure gasket was lined up correctly.
http://i262.photobucket.com/albums/i...installed2.jpg
- Removed CAMSHAFT sensor to make room for torque wrench.
- Torqued tensioner bolts.
EXTRA PICS:
- Look at the wear on my chain guides. This needs to be changed down the road. I hate to think how this would have to be done.
http://i262.photobucket.com/albums/i...wearmarks1.jpg
http://i262.photobucket.com/albums/i...wearmarks2.jpg
- My gasket maker
http://i262.photobucket.com/albums/i...asketmaker.jpg
- Oil pickup
http://i262.photobucket.com/albums/i...-oilpickup.jpg
-------------------
* For those that don't plan on removing the oil pan, might want to figure out a way to remove a lot of coolant. At least below the level of the WP so the coolant doesn't go into the oil pan.
I forgot to mention the crankshaft turn to put slack on the chain to remove the WP.
SUMMARY:
Car started with the horrible noise the first time but now I don't get any rattle at cold startups like I did.
Thanks to all the good write ups about this, this wasn't a very hard project, just a lot to do. Especially after taking everything off and making a lot of room to work. It was worth the extra work. It took me about 2 weeks to do. I could only work on my car a little at a time so I had to share cars in the meantime. But I really wanted to take my time and not mess up. One of the crappiest part of this project was dealing with the oil pan. I'm glad I took it off because thats a lot of coolant to run through my engine, but to do it again, I don't know. Anyway, thanks for reading and thanks for making this possible for me.
02-04-2009, 10:57 AM
#22
Newbie - Just Registered

Join Date: Feb 2009
Location: Costa Rica
Posts: 1
hi, frieds. I got to find the repair manuals of the maxima, and the water pump replacement step by step. you can do it by free at www.pdftown.com--i think this information can be valuabel for u. thanks.
02-04-2009, 12:42 PM
#23
Supporting Maxima.org Member

Join Date: Feb 2004
Location: Louisville, KY
Posts: 197
REBUILT TENSIONER:
http://i262.photobucket.com/albums/i...tensioner1.jpg
http://i262.photobucket.com/albums/i...tensioner2.jpg
- Cleaned tensioner with brake cleaner
- Swapped plunger, spring (w/black piece) and o-ring
- Used pick to remove and install o-ring
- Plunger tension felt stronger w/new parts
http://i262.photobucket.com/albums/i...tensioner1.jpg
http://i262.photobucket.com/albums/i...tensioner2.jpg
- Cleaned tensioner with brake cleaner
- Swapped plunger, spring (w/black piece) and o-ring
- Used pick to remove and install o-ring
- Plunger tension felt stronger w/new parts
Thanks
02-04-2009, 12:57 PM
#24
So if I'm NOT doing the tensioner I'd just be doing these steps right:
Or do I have to do the tensioner work too? Does the Haynes manual have a how to about this?
PREP WORK:
I decided to remove everything that people said would help make room. So I removed the motor mount, power steering canister, belt tensioner, windshield washer filler neck, and coolant reservoir. Make sure you keep track of the order of nuts, washers, etc. of the belt tensioner assembly. Look how much room I have.
http://i262.photobucket.com/albums/i...oomtowork1.jpg
http://i262.photobucket.com/albums/i...oomtowork2.jpg
Had to put an extension on my 17-mm wrench to remove the motor mount nuts facing the fender. After I got all the nuts and bolts off the motor mounts, I had to raise the engine a little to get the motor mount out. I used the car jack with a piece of 2x4 on the oil pan to raise the engine.
I was planning on doing a coolant flush so I removed my thermostat and my radiator was drained too. A bunch of coolant gushed out.
ACCESS COVER REMOVAL:
- Removed WP & tensioner access covers
- Removed old gasket from block with gasket scraper tool
http://i262.photobucket.com/albums/i...erremoved1.jpg
http://i262.photobucket.com/albums/i...erremoved2.jpg
http://i262.photobucket.com/albums/i...to/WP_pic1.jpg
- Used a pick to remove old gasket in the grove on block side
WP REMOVAL:
- Folded foil and stuck it under WP to act as a plate/catch. Not much to room to put the foil under WP though.
- Loosened bolts and slowly removed (3) of them. This was the scariest part because the bolts are further in than the tensioner.
- As mentioned in other posts, washers won't come off bolt.
http://i262.photobucket.com/albums/i...-oldnewwp1.jpg
http://i262.photobucket.com/albums/i...-oldnewwp2.jpg
* - A LOT of coolant drains out to the oil pan when you remove the WP. I didn't remove the drain plug next to the WP area. I didn't care too much since I planned on removing the oil pan to get rid of the extra stuff laying below the drain plug. See how much is left after draining from drain plug.
http://i262.photobucket.com/albums/i...anremoved1.jpg
http://i262.photobucket.com/albums/i...anremoved2.jpg
http://i262.photobucket.com/albums/i...anremoved3.jpg
- Removed all old gasket from oil pan
http://i262.photobucket.com/albums/i...eanoilpan1.jpg
http://i262.photobucket.com/albums/i...eanoilpan2.jpg
INSTALLED WP:
- Cleaned WP mating surface.
- Sanded with 400 grit sandpaper. Some black crap wouldn't come off by rubbing w/rag.
http://i262.photobucket.com/albums/i...edcloseup1.jpg
http://i262.photobucket.com/albums/i...edcloseup6.jpg
- Taped WP perpeller with electrical tape so doesn’t cut o-ring while installing them.
- Installed o-rings.
- Put oil on outer ring and coolant on inner ring.
- Jacked up block to get maximum access.
- Lined bottom of access hole with foil to catch falling objects.
- Held chain out of way with a pick and installed WP.
- Screwed bolts in by hand.
- Made sure chain on teeth of WP.
- Slowly tightened all three bolts little by little.
- Torqued bolts.
02-04-2009, 01:11 PM
#25
You only have to do the tensioner if you want to install the upgraded version.
02-04-2009, 01:15 PM
#26
Nah. I'm looking to do this perhaps when I hit 100k (or maybe earlier) as preventive maintenance.
I'm at 76k now and don't have any issues with my car except for a nagging MAP/BARO SSV code (P1105) which is probably just a sensor.
What does an upgraded tensioner do? Did Nissan F up on the 95 tensioner or something?
I'm at 76k now and don't have any issues with my car except for a nagging MAP/BARO SSV code (P1105) which is probably just a sensor.
What does an upgraded tensioner do? Did Nissan F up on the 95 tensioner or something?
02-04-2009, 01:17 PM
#27
Nah. I'm looking to do this perhaps when I hit 100k (or maybe earlier) as preventive maintenance.
I'm at 76k now and don't have any issues with my car except for a nagging MAP/BARO SSV code (P1105) which is probably just a sensor.
What does an upgraded tensioner do? Did Nissan F up on the 95 tensioner or something?
I'm at 76k now and don't have any issues with my car except for a nagging MAP/BARO SSV code (P1105) which is probably just a sensor.
What does an upgraded tensioner do? Did Nissan F up on the 95 tensioner or something?
02-04-2009, 01:56 PM
#29
02-04-2009, 02:43 PM
#31
Junior Member

Join Date: Jan 2009
Location: Rhode Island
Posts: 21
I just replaced my tensioners 2 days ago in my 98, while I was in there I did the water pump too. Took me a good chunk of time and I gotta say I was VERY glad to be doing it on a lift. Alot of lifting and dropping the car to get to bolt and for easier movements
04-04-2014, 08:48 PM
#32
Newbie - Just Registered

Join Date: Dec 2011
Posts: 10
magic max
1. may i know what prompted you to change the water pump, which part of the car did you see water leaking out? mine even without the engine running and by just opening the radiator cap water begin to leak out of the area between alternator and water pump area. your advice please.
2. You mentioned "* - A LOT of coolant drains out to the oil pan when you remove the WP. I didn't remove the drain plug next to the WP area. I didn't care too much since I planned on removing the oil pan to get rid of the extra stuff laying below the drain plug. See how much is left after draining from drain plug."
Can you e mail me picture or detailed information on which exactly is the water drain plug near the water pump?
my email: philipsee1@yahoo.com Many many thanks magic max
Last edited by cool; 04-04-2014 at 09:18 PM.
04-04-2014, 09:19 PM
#33

magic max 1. may i know what prompted you to change the water pump, which part of the car did you see water leaking out? mine even without the engine running and by just opening the radiator cap water begin to leak out of the area between alternator and water pump area. your advice please. 2. You mentioned "* - A LOT of coolant drains out to the oil pan when you remove the WP. I didn't remove the drain plug next to the WP area. I didn't care too much since I planned on removing the oil pan to get rid of the extra stuff laying below the drain plug. See how much is left after draining from drain plug." Can you e mail me picture or detailed information on which exactly is the water drain plug near the water pump? my email: philipsee1@yahoo.com Many many thanks magic max
This is a 2008 post.
04-04-2014, 09:33 PM
#35
Newbie - Just Registered
Join Date: Dec 2011
Posts: 10
Last edited by cool; 04-04-2014 at 09:37 PM.
06-19-2014, 12:36 PM
#37
Newbie - Just Registered

Join Date: Jun 2014
Location: Florence Az.
Posts: 7
water leak
yes i know, would you know the answer to the question? the video you posted does not specifically say anything about my question except showing water leak on the ground, dripping from the compressor but not specifying exactly where, cause it may be the drain plug near the water pump that might be loose?
Came off ,as well as timing chain ... I am in way farther than I wanted to be ...
When I took off front chain ,, cams on rear spun back .... now I am stressed out on how to reset it ....... water pump is hard to turn , and seals are cracked / brittle .....
There is a drain near back of a/c compressor 2" back and near top of compressor .. big head 17mms???
Last edited by bobjob; 06-19-2014 at 12:39 PM.
06-20-2014, 06:09 PM
#38

I did it on a friends moms '97 in the backyard in the dirt. And that was my first time doing one. Water pump and tensioner are easy. Before I did it I read horror stories and knew what not to do. I now have that car and it's the botton one in the sig. I do all my work on a driveway. Luckily it's paved but I help out all the time and it's not always paved. If there's a will, there's a way! old post ftw.

Thread
Thread Starter
Forum
Replies
Last Post
My Coffee
New Member Introductions
15
06-06-2017 02:01 PM

