Comprehensive Manual (5spd) Trans Rebuild - Write up (with pix)
 01-28-2008, 03:07 PM
#1
Whatchyou say?

Thread Starter
iTrader: (5)
Join Date: Apr 2007
Location: Springfield, Missouri
Posts: 1,870
Comprehensive Manual (5spd) Trans Rebuild - Write up (with pix)
Nissan Maxima 5spd Transmission Write Up - 4th Generation (95-99)
By Jim Bethel (JtzMax on Maxima.org)
Ok, first I need to mention that I will try to add more pictures, so there may be edits in the near future. Also, can a mod please PLEASE please make this a sticky! I spent a lot of time doing this to try to help others, so I hope that it will!
I decided to do a write up for those who are considering doing a rebuild on the Maxima 5spd transmission. First I must say, this is not a job for a beginer in any way shape or form. I am not a professional mechanic but I have been working on cars since I was able to hold a wrench. I must give credit to Maxima.org and to Motorvate, for this wouldn't ever have been possible for me to do without their help. Many thanks!
I will try to break it down in steps as to what to do when and how to get it done. If there is a will there is a way. My rebuild did not go off with out a hitch, there were certainly some issues to deal with along the way. I will walk you through how I did mine and you can compare it to the one on Motorvate.com. My soul intention in doing this rebuild was to remove and replace all of the bearings and seals. I bought my kit from GtTransmissions and it was a fair price. I did not replace the syncornizers nor did I remove any of the gears from the shafts. I did make several stops at the hardware and tool store, so I will try to complie a list of the tools I needed to do this job. I also replaced the clutch, which was the easiest part of this job. I used hand tools, I don't own a compressor or impacts. I did however buy an electric 1/2" drive impact along the way. (240lb of tourqe is hard to argue with )
)
Tool List:
Tire Chalks
Floor Jack
Jack Stands
Tourqe Wrench (I use a 1/2" drive)
Ratchet and metric socket set (10mm, 12mm, 14mm, 17mm, 19mm, and a 36mm)
Extension set (you'll need several) - Swivle head (very very handy, but you can get by without one)
Open end / Box end wrenches - metric (12mm, 14mm, 17mm) - I sugesst ratchet wrenches (well worth the money!)
Breaker bar (long pipe to fit over ratchet or wrench)
Gloves - leather are good (just get a good pair, don't go cheap, you'll be able to get a better feel with better gloves)
FSM (Field Service Manual) - DL here: http://phatg20.net/index.php?option=...c=select&id=28
Parts (bearings / seals) (clutch)
Thread lock
Gasket sealer - get the red stuff, just don't get it on you
Rubber Mallet and regular hammer
Degreaser (Engine foam works well)
Dremal Tool (with cutting blades - I use the reinforced ones and they last a while)
Punch (3/16")
Pry bar (various sizes are good to have)
Sand paper (I used 240 gritt)
Preperation:
Ok, first step in all of this is to READ ALL of these instructions, then re-read them again. Gather your tools and then lift the hood and remove the battery (including the tray), intake (up to the TB), starter, slave cylinder. The spedo sensor (10mm bolt, above the shift linkage) can be a beotch to get to - leave it in, disconnect the wire for now. After all of the wires and sensors up top are unhooked, it's time to jack the car up and place it on the stands.
Removing the transmission from the car:
Make certain the car is in N, with the parking brake on. Place a chalk behind each rear tire and get out the floor jack. In the center of the front of the car you'll see a small bump on the crossmember. Depending on your jack, you may place a peice of wood between the jack and this point, to get the car high enough to work on. Jack up the car as high as you can, the more room you have, the better. I placed my stands on the controll arms (long thick bracket with 3 bolts in it - not the sub frame rails!). I wasn't able to get the car as high as I would have liked, but it worked. The first step I did was to drain the gear oil from the trans. (you can check it using a maganet and if you have any chipped inner / outter races, there may be metal in the oil. If you plan to reuse (not reccomended) the oil, make sure you use a clean tub to catch it in.) To drain the oil, you can pull out the shift selector switch (40mm on the bottom drivers side) but if you do this, be careful not to break it - the plastic gets brittle as it ages) or you can use the drain bolt under the shift support rod. Once this is done, take the wheels off. (note, you'll have to loosen the lugs prior to jacking the car up) With the wheels off, take out the center cotter key and get the 36mm socket. This is why I bought the electric impact to be quite honest. And ... it was worth it I used the handle of my jack and slid it between the lugs. Be careful not to use something that will damage the lugs or bend and damage you. Take off the center retaining nut (36mm) and washer. Next, take a 17mm box end wrench and a deep well 19mm socket and unbolt the strut knuckle bolts (2 each side). This will allow you to swing the rotor assembely out of the way. You may have to rotate the strut about 90� so the rotor will move just that little bit more. With that done, slip the CV shaft out of the hub. (Be careful not to put too much strain on the brake line while doing this, it does fit and if it's not working, something is wrong.) Now, holding onto the shaft (not the boots!) push the shaft in and yank it out. Should come out pretty easy, just be careful not to hurt the threads on the end, or the splines on either end. The passangers side is a bit different, there are 3 - 14mm bolts that hold a bracket which in turn holds the longer CV shaft. The bracket can be easily reached from inside the wheel well (you'll need extensions). Remove the bracket and remove the CV shaft.
Next step is to get the transmission out of the car. Pull the trans mount (drivers side) out, you'll need a 14mm to do this. (hint: It's easiest to pull the center retaining bolt first, so the socket can slip past it and onto the rear bolts) You'll have to remove the clutch line from the mount as well as the retaining clip on the side. Once you get that done, you'll need to go under the car and unbolt the shift rod and shift support linkage. (this is where the 14mm gear wrench come is real handy) Remove the CPS (front - 10mm) from the trans housing. Also, while you're down there, unbolt the bottom trans bolts. (no - it's not gonna fall on your head just yet) Next thing to do is to remove the remaining bolts from the trans. This is where it comes in very handy to have a bit of muscle around to help you out. The transmission weights in at around 109 lbs and it's not the weight that makes it difficult to handle, it's the odd shape and sharp corners. With all the bolts removed, you may still have to pry the trans loose from the bell housing. BE CAREFUL not to drop the trans while doing this. (I got under the car and wiggled the trans while a mate of mine pryed a bit from the top. It gets hung on the pins coming off the bell housing, into the clutch housing.) Lower the trans (use a jack if you can - good luck!) I just lowered it to my chest and then slid if off and out through the drivers side wheel well. You can't just drop it straight down either, because of the clutch and IPS (input shaft) splines. Once the trans is out, set the clutch housing face on some wood - so as to not scratch it or nick it.
Transmission break down:
Now that the trans is out and you have taken a breather, it's time to open this puppy up and see just how bad those bearings have gotten. The case bolts are all the same with the exception of a couple (mid diff and opposite side - really long one) and they are 14mm. Remove the TOB and shift release fork from the clutch housing. If you didn't remove the spedo sensor, now is a good time. If you left the shift selector switch in place, leave it for now, we'll get to that in a moment. Remove all the case bolts. There are two hex bolts (14mm) on the top part of the trans - with the differential sitting to the right. These are the 1-2 and 3-4 detent bolts / springs / check *****. Inside behind the bolt is a spring and a ball, do not loose them. Remove the bolts and the springs / check *****. Before the lid will come off, you need to remove the R bolt (12mm - just under the 1/2 - 3/4 detents). Then the lid should come off easily. This is what a 5spd Nissan Maxima trans looks like. Now the fun begins! Be carefull not to loose the shims (thin metal rings atop the IPS) remove the shims and the plastic peice covering the IPS bearing. Set the lid and the shims aside.
The FSM is about as clear as mud on some of this stuff ... so I'll try my best to tell you how I did mine. (which is different I know - but it works) The proper way to do this is to remove the R shaft pin. Mine did NOT want to come out and play nice, so it stayed in. This is NOT a screw. (the R pin is on the left) :Pic 1 Below: From inside the trans, slide a strong enough wire between the gear stacks (IPS) (left) and MS (main shaft) (right) to the back of the pin. Push the pin out and twist at the same time from the outside (there is a flat head on it that looks like a screw). The pin can get stuck (like in my case) and not want to come out. I decided to go about it another way in this case, since mine was being so stubborn. Remove the two springs on the R assembely. Note which way the inner sping is going. Select 4th gear and remove the R gear. Remove the two 12mm bolts and lift the R assmebely up. Remove the "C" clip from the 5/R fork (top and bottom come off). Also, remove the top and bottom "C" clip from the 3/4 fork. (If the R shaft pin comes out, you will not need to drive out the 5/R shift rod retaining pin) Next, take the 3/16" punch and find the pin on the 5/R shift rod - punch it through. This can be tricky, just think of it like a jig saw puzzle, you'll be fine. Remove the 5/R detent on the clutch housing, this is the detent for the 5/R rod. Remove the spring and ball behind the hex head. Now you should be able to remove the 5/R rod and fork. You'll have to slip it past the R assembley and at the same time, don't loose the spring or larger check ball (found in the bottom of the R assmebely - see pic - it's the larger hole at the bottom). With the shift rod / fork out, you can remove the 3/4 shift rod as well. There are more check ***** and interlock plungers here ... BE CAREFUL not to loose any of them. Use a maganet to remove them all after you take out one shift rod, remove the check ball and interlock plunger. You should be left with the 1/2 shift rod / fork and the IPS and MS (and if you didn't get the R assmebely out, it should be there too) This is IMPORTANT: Lift the IPS and MS and the 1/2 rod all at the same time and straight out. The differential will just be sitting there, it will then lift out too. Teardown is well under way now. You can seperate the IPS and MS and put them on something that will not damage the gear teeth. Set the differential aside as well. Now is a good time to remove the shift selector switch if it's still in. Remove the bolt (10mm) and then use a rubber mallet to pop the switch out. Last but not lease you need to remove the gear selector rod and the R gate. (there is a check ball here .... don't loose it.) Drive out the retaining pin from the fluid drain hole for the selector rod. Remove the two 14mm bolts on the R gate and lift it out. Note how it looks as you take it out.
Bearing removal - the unconventional way!:
Hope you have a good Dremel tool and some cutting blades. This part was the most scary for me, and I would have much preffered to have the bearings pulled / pressed on / off ... but I couldn't afford to pay a shop to do it, nor could I afford the "propper" tools. I say "propper" cause ... as long as the job gets done, and done right, it shouldn't matter what tools you use. I wrapped the shafts with a towel to protect the gears as much as possible. Leaving only the bearing showing, I cut off the outter shell of the bearing. :PIC 0 Below: This makes the bearing almost, but not quite, fall apart - leaving the inner race (part that slides onto the IPS). Remove the ***** and outter shell. I had to cut all the way through the outter shell and the ball ring to remove them. Wear some eye protection, last thing you need is a hot piece of steel in your eye. (I also suggest long sleaves and a good thick pair of gloves - it's gonna get warm) With the outter shell off, cut into the inner race. Try not to go too deep, and if you can, cut a cross or an X into it. (something for you to be able to place a screwdriver into the slot and get a bite on it) Put the chissle or screwdriver into the newly cut slot - smack the crap outta it. The object is to get the bearing loose without having to cut all the way throught it. (heating it up with a tourch may help as well) If you can get a good enough bite, the smacking will spin the bearing on the shaft - thus loosening it and it will come right off. This is how I did all of my bearings. The differential can be a bit difficult becasue of the spedo ring, don't cut through that or melt it either - or you will be replacing it or living without a spedo. :Pic 2 Below: The roller type beaings (MS and diff) :PIC 2a Below: (this is the bottom of the MS - old bearing still in place) will come off by cutting the top and bottom of the outter shell, then the pins will drop right out leaving the inner race. (I cut mine in 1/2 on either side - worked very well) DON'T place any new bearings on untill you're done cutting. You don't want to have metal shavings in your brand new bearings. I took a can of Dust Off and sprayed the shafts after I was done cutting to help remove any micro pieces of metal. With the bearings all removed, now we can put the new ones on and start putting this all back together.
Bearing replacement:
Here's a picture of the bearing / seal kit I got. :PIC 2b Below:Take your trusty 36mm socket and have it handy! Get an extension (6" or so - this is so when you need the end of the socket that fits the ratchet, you can place the extension into the socket and hit it instead of trying to hit all the edges at the same time). Set the bearing on the shaft (or diff) and place the socket on top of the new bearing. (depends on which bearing it is, you'll use either end of the 36mm - which ever side lines up to the inner race) :PIC 2c Below: Use a real hammer, not the rubber one, and give a good forcefull and firm smack to the socket. It should start the bearing on straight so you won't have it slanted to one side or the other. Do this untill the socket "dings" off the bearing. This is how you know the bearing is seated fully and poperly. (you should use the punch to be certain that it's on all the way. hit at 12, 6, 3, 9 untill the punch bounces off the race) It will make a different sound as well. There should be no mistaking if the bearing is on all the way or not. Do this for all the bearings. I placed a peice of wood under the new bearings while doing the oppisite side - just to be safe. The hard part of this is not placing the new bearings, but removing the old ones without damaging the shafts or diff. If your bearing kit has this ring on it, take it off - it's not needed. (IPS bearing, clutch side) :PIC 3 Below:
Transmission case:
First ... make sure you have every thing out of the case (top and bottom). There should be 9 check ***** (note that one is larger - it's from the R assembly, 3 springs (1 long, 2 shorter) and 2 interlock plungers. If you don't see those, don't continue. You will want this thing clean enough to eat out
of. Spray the degreaser in the csase and let it soak. After your coffee break, spray off the degreaser and let it dry. You may have to do this a couple of times (I did) to make sure it's all nice and clean. Don't forget to hit the clutch housing on the under side too. With everything clean and dry, it's time to start putting it all back in. To remove the outter race (part of the beaing still in the case) you'll need to remove the plugs from the lid. Use a long screwdriver or punch to remove them. With the pulgs out, it's easy to get a punch onto the bottom of the outter race. Smack it out and replace it with the new one. The MS outter race (in the clutch housing) :Pic 4 Below: was not replaced, it didn't look too bad and to get it out would require a low profile bearing puller - not worth it if it looks ok. Otherwise, good luck - you'll need it.
Seal removal / replacement:
There are a total of 3 seals (two diff and one shift selector rod) to be replaced. The seals are actually a metal ring with rubber molded around them. This is a good thing for us ... as we can use a punch to remove them very easily. The diff seals are placed in from the outside of the case. I'll repeat that casue I know how I am and I didn't catch that the first time I read it either so ... The differential seals come out and go into the case from the OUTSIDE. The selector rod seal you can get a hold of with some pliers and just tug it out. (helps if you walk it out, 3,6,9,12 and pull ... pull, pull) The new one will go right in with the help of the rubber mallet. The differential seals will slide in from the outside. I reccomend leaving the passangers side out for now (DO NOT FORGET TO PUT THIS IN PRIOR TO INSTALL - or you will be very very sorry) The reason I leave the diff seal out is so that while you are putting the trans back together, it isn't destroyed, chipped, or broken on the piece of wood. Just don't forget to put that seal in.
Reshimming the diff bearings:
I need to add this to my write up, thought I did at one pointe, but maybe not. When you place new bearings on the diff, it will change the "pre-load" on the bearings when the case is all put together. The factory places shims behind the outter race (cup) in the case cover. Only that side, not on the clutch side. These shims place a certain amount of pressure on the bearing to keep in in place and not allow it to float around. You don't want the shims to be too tight, or too lose either way. There are a couple of ways to meassure the thickness you'll need. I'll go into that in a moment, right now, I am just trying to explain what the shims are, how they work, and where they are located.
Ways to meassure needed shim thickness -
The first way I will describe is considered the "Solder crush meathod". This is the meathod I used personally and it worked just fine for me. First off, you need to make certain the bearings are all the way seated on the diff. The punch should bounce off the race and that will let you know they are all the way down. Place the diff in the case and then take two peices of solder (thick stuff, but not so thick it will not crush properly), cut them the length of the bearing. The ends should be even with the outter race. Place the solder in an X formation (this means that one peice will need to be just a little longer and bent in the middle so it sits right). Place the case cover on and place the bolts back in at several places around the case. I did all of them around the diff and several in other places (every other or so). The idea here is to crush the solder to the thickness needed to hold the bearing in place. If you end up with lettering on the solder end, you can't use that reading, discard and repeat. You should end up with 4 flattened solder ends. You need to take those ends and measure them. The readings will be 0.xx numbers (like 0.68). They will likely not be the same. It's ok, you're going to add them all up and then divide by 4 to get the average. Look up that number in the FSM and get the part number. You'll need to special order the shim(s) from Nissan.
The other way to measure is to use a micrometer and do the same set up as above. The bearings all the way seated, case cover on and bolted down. Use a pin type micormeter (depth gauge) and push the pin head against the race of the bearing. You want to meassure to the case cover outter race. It's hard to describe and the space will be so close, it'll be hard to see clearly. Again, the numbers will read very small. (like above) Go to the FSM, get the part number and order.
Keep in mind there are VLSD and NON VLSD transaxles and they are not really seperated in the FSM. The chart / table will tell you, but don't do what I did and order shims for a VLSD when you don't have one. lol Make sure when you talk to Nissan that your part number matches theirs.
Transmission assembely:
Ok, now that the old bearings, seals, and outter races are replaced and the case is clean, it's time to put it back together. You'll need to get the torque
specs from the FSM or your Haynes / Chiltons book. To start, replace the selector rod and then replace the R gate assembely (don't forget the small check ball) (this is under the diff, above the selector rod) and tighten it down. Next place the diff in place. Make sure it is centered, it should spin freely. Now, it's time to place the MS and IPS (including the 1/2 shift rod / fork) back down into the trans. The way I found easiest to place it all in is to hold it up and align everything first, then slip it in. It will slide all the way in but the IPS lower bearing will not sit all the way in, it only goes in two-thirds the way. (it'll stick out a bit) Make sure you look at the FSM for the next part here! Place a check ball and then the larger interlock plunger
against the 1/2 shift rod. Then place a check ball on the oppisite side. (ball, larger plunger, ball) Then place in the 3/4 shift rod / fork. Place the other plunger (smaller one) against the rod. Then place two (2) check ***** in the channel. (rod, plunger, check ball, check ball) then the 5/R shift rod (this will be tricky if you didn't remove the R assembly- but it will fit) Next to the 5/R rod, place the last check ball and the longer spring, put the detent bolt in and snug it down. Now take the larger check ball and lift the R assembly up, place the ball in the lower hole (use Vasaline to hold it). Select 4th gear and slip in the R gear. Snug the R assembly down and replace the springs and the locking pin. Place the shims on top of the IPS and the oil sealer (plastic piece) (use Vasaline to hold the shims if needed). Don't forget to place the selector switch (goes on the shift selector head - small white and copper piece) and the R shaft locking pin in place. Set the lid on and slide it down. (you shouldn't need to force it - it should line up and go on easily, it may take a tap or two to get it all the way down. Make sure it fits then lift it up and place sealer around the lip - don't use too much, you don't want it to seap down into the case. If you removed the selector switch, replace it after you snug all the bolts down. Shift through the gears and make sure it is hitting each gate like it should. If it doesn't, something is likely wrong and needs to be fixed prior to doing the install. (Get the torque settings from the FSM)! TaDa .... you have just rebuilt your 5spd transmission. MAKE SURE YOU PLACED THE DIFF SEAL ON THE TRANS PRIOR TO INSTALATION !!!!
Clutch:
So easy a monkey could do it. (if you're not doing the clutch, just move on to the instalaition)
It's a good idea, while the trany is out, to do your clutch. Here is how to do it. Your new clutch should have come with an alignment tool, you'll need it.
First thing to do is to remvoe the old clutch. There are 9 bolts that hold the pressure plate to the flywheel. The friction disk sits inside between the pressure plate and flywheel. Once the old clutch is off, take some 240 gritt or so sandpaper and just go over the flywheel a time or two. Next, get the clutch and the alignment tool. Place the tool through the PP and FD, align the bolts and torque them down to specs. Done.
Transmission instalation:
There are a couple of different ways to get the trans back on the bell housing. I found it easiest to just lift it in to place and have a mate start a bolt or two at the top and I got a couple started from the under side. This can be sorrta tricky because the trans has to line up level with the clutch so the splines will slide all the way in. I got the trans up and then my mate pushed it snug from atop. Made it much easier. The other way to raise the trans is to place it on a floor jack and slide it in through the drivers side wheel well. Just make sure it doesn't fall on you or the ground. It really is best to have help with this part. Once you have a couple bolts started, it'll hang on it's own. Take a breather and then place the rest of the bolts in the
housing. (note ... some go into the bell housing (engine block) and some go into the clutch housing (tranny) from the other side. It helps to keep the bolts seperated so you know which came from top, which came from the bottom. After you get the trans up and bolted on, reattach the shift support rod and gear selector (note the shorter bolt goes towards the rear and a 14mm gear wrench will save you time and frusturation here more than you know). Replace the CPS at the front. Next step is to install the trans mount (drivers side). Bolt the mount to the trans first and then place the center bolt in and snug it up. Remount the slave cylinder and the starter (the starter can't go on prior to torquing the housing bolts). I like to finish up where I am working before moving on to something else, so I did my intake and battery after the slave and starter. Take a quick moment and sit in the car and run through the gears. It should shift and it may be stiff, but it should be ok once the gear oil is in. Now it's time to replace the axles. It shouldn't matter which side you do first, but I found it easiest to do the more difficult one (passangers side) first. Be very careful not to gouge the seal with the end of the axle. It is tricky with the bracket in place, but it will slide in. (sit on the left side of the rotor assmebly and guide it in with your left hand - support the outter end of the axle on your right arm) Make sure it's all the way in. I had mine not seat all the way even though I had the mounting bracket aligned and all 3 bolts started. (you may have to try and reach in and (holding the axle - not the CV joint) give it a push, it should go in. You can also look up above the shift support rod and see if the axle is in all the way.) Place it back in the hub and then start the strut knucle bolts. You may have to reach behind the outter CV boot and help slide it all the way into the hub. Tighten up the 36mm (don't forget the washer) and place in the cotter pin. Tighten the strut knuckle. Go to the drivers side and this one is a lot easier. Place the axle in the trans (you should feel and / or hear it "click") Slide this one back into the hub and repeat the process you just did on the passangers side. Replace the tires, lower the car, and tighten the lugs. VERY MPORTANT :::: Don't forget to fill the trans with gear oil (4.5 quarts of GL-4 75w - 90) To fill the trans, you will need an oil pump. Test drive and make sure it all feels ok.
Hope this will help someone!
By Jim Bethel (JtzMax on Maxima.org)
Ok, first I need to mention that I will try to add more pictures, so there may be edits in the near future. Also, can a mod please PLEASE please make this a sticky! I spent a lot of time doing this to try to help others, so I hope that it will!
I decided to do a write up for those who are considering doing a rebuild on the Maxima 5spd transmission. First I must say, this is not a job for a beginer in any way shape or form. I am not a professional mechanic but I have been working on cars since I was able to hold a wrench. I must give credit to Maxima.org and to Motorvate, for this wouldn't ever have been possible for me to do without their help. Many thanks!
I will try to break it down in steps as to what to do when and how to get it done. If there is a will there is a way. My rebuild did not go off with out a hitch, there were certainly some issues to deal with along the way. I will walk you through how I did mine and you can compare it to the one on Motorvate.com. My soul intention in doing this rebuild was to remove and replace all of the bearings and seals. I bought my kit from GtTransmissions and it was a fair price. I did not replace the syncornizers nor did I remove any of the gears from the shafts. I did make several stops at the hardware and tool store, so I will try to complie a list of the tools I needed to do this job. I also replaced the clutch, which was the easiest part of this job. I used hand tools, I don't own a compressor or impacts. I did however buy an electric 1/2" drive impact along the way. (240lb of tourqe is hard to argue with
)Tool List:
Tire Chalks
Floor Jack
Jack Stands
Tourqe Wrench (I use a 1/2" drive)
Ratchet and metric socket set (10mm, 12mm, 14mm, 17mm, 19mm, and a 36mm)
Extension set (you'll need several) - Swivle head (very very handy, but you can get by without one)
Open end / Box end wrenches - metric (12mm, 14mm, 17mm) - I sugesst ratchet wrenches (well worth the money!)
Breaker bar (long pipe to fit over ratchet or wrench)
Gloves - leather are good (just get a good pair, don't go cheap, you'll be able to get a better feel with better gloves)
FSM (Field Service Manual) - DL here: http://phatg20.net/index.php?option=...c=select&id=28
Parts (bearings / seals) (clutch)
Thread lock
Gasket sealer - get the red stuff, just don't get it on you
Rubber Mallet and regular hammer
Degreaser (Engine foam works well)
Dremal Tool (with cutting blades - I use the reinforced ones and they last a while)
Punch (3/16")
Pry bar (various sizes are good to have)
Sand paper (I used 240 gritt)
Preperation:
Ok, first step in all of this is to READ ALL of these instructions, then re-read them again. Gather your tools and then lift the hood and remove the battery (including the tray), intake (up to the TB), starter, slave cylinder. The spedo sensor (10mm bolt, above the shift linkage) can be a beotch to get to - leave it in, disconnect the wire for now. After all of the wires and sensors up top are unhooked, it's time to jack the car up and place it on the stands.
Removing the transmission from the car:
Make certain the car is in N, with the parking brake on. Place a chalk behind each rear tire and get out the floor jack. In the center of the front of the car you'll see a small bump on the crossmember. Depending on your jack, you may place a peice of wood between the jack and this point, to get the car high enough to work on. Jack up the car as high as you can, the more room you have, the better. I placed my stands on the controll arms (long thick bracket with 3 bolts in it - not the sub frame rails!). I wasn't able to get the car as high as I would have liked, but it worked. The first step I did was to drain the gear oil from the trans. (you can check it using a maganet and if you have any chipped inner / outter races, there may be metal in the oil. If you plan to reuse (not reccomended) the oil, make sure you use a clean tub to catch it in.) To drain the oil, you can pull out the shift selector switch (40mm on the bottom drivers side) but if you do this, be careful not to break it - the plastic gets brittle as it ages) or you can use the drain bolt under the shift support rod. Once this is done, take the wheels off. (note, you'll have to loosen the lugs prior to jacking the car up) With the wheels off, take out the center cotter key and get the 36mm socket. This is why I bought the electric impact to be quite honest. And ... it was worth it
I used the handle of my jack and slid it between the lugs. Be careful not to use something that will damage the lugs or bend and damage you. Take off the center retaining nut (36mm) and washer. Next, take a 17mm box end wrench and a deep well 19mm socket and unbolt the strut knuckle bolts (2 each side). This will allow you to swing the rotor assembely out of the way. You may have to rotate the strut about 90� so the rotor will move just that little bit more. With that done, slip the CV shaft out of the hub. (Be careful not to put too much strain on the brake line while doing this, it does fit and if it's not working, something is wrong.) Now, holding onto the shaft (not the boots!) push the shaft in and yank it out. Should come out pretty easy, just be careful not to hurt the threads on the end, or the splines on either end. The passangers side is a bit different, there are 3 - 14mm bolts that hold a bracket which in turn holds the longer CV shaft. The bracket can be easily reached from inside the wheel well (you'll need extensions). Remove the bracket and remove the CV shaft. Next step is to get the transmission out of the car. Pull the trans mount (drivers side) out, you'll need a 14mm to do this. (hint: It's easiest to pull the center retaining bolt first, so the socket can slip past it and onto the rear bolts) You'll have to remove the clutch line from the mount as well as the retaining clip on the side. Once you get that done, you'll need to go under the car and unbolt the shift rod and shift support linkage. (this is where the 14mm gear wrench come is real handy) Remove the CPS (front - 10mm) from the trans housing. Also, while you're down there, unbolt the bottom trans bolts. (no - it's not gonna fall on your head just yet) Next thing to do is to remove the remaining bolts from the trans. This is where it comes in very handy to have a bit of muscle around to help you out. The transmission weights in at around 109 lbs and it's not the weight that makes it difficult to handle, it's the odd shape and sharp corners. With all the bolts removed, you may still have to pry the trans loose from the bell housing. BE CAREFUL not to drop the trans while doing this. (I got under the car and wiggled the trans while a mate of mine pryed a bit from the top. It gets hung on the pins coming off the bell housing, into the clutch housing.) Lower the trans (use a jack if you can - good luck!) I just lowered it to my chest and then slid if off and out through the drivers side wheel well. You can't just drop it straight down either, because of the clutch and IPS (input shaft) splines. Once the trans is out, set the clutch housing face on some wood - so as to not scratch it or nick it.
Transmission break down:
Now that the trans is out and you have taken a breather, it's time to open this puppy up and see just how bad those bearings have gotten. The case bolts are all the same with the exception of a couple (mid diff and opposite side - really long one) and they are 14mm. Remove the TOB and shift release fork from the clutch housing. If you didn't remove the spedo sensor, now is a good time. If you left the shift selector switch in place, leave it for now, we'll get to that in a moment. Remove all the case bolts. There are two hex bolts (14mm) on the top part of the trans - with the differential sitting to the right. These are the 1-2 and 3-4 detent bolts / springs / check *****. Inside behind the bolt is a spring and a ball, do not loose them. Remove the bolts and the springs / check *****. Before the lid will come off, you need to remove the R bolt (12mm - just under the 1/2 - 3/4 detents). Then the lid should come off easily. This is what a 5spd Nissan Maxima trans looks like. Now the fun begins! Be carefull not to loose the shims (thin metal rings atop the IPS) remove the shims and the plastic peice covering the IPS bearing. Set the lid and the shims aside.
The FSM is about as clear as mud on some of this stuff ... so I'll try my best to tell you how I did mine. (which is different I know - but it works) The proper way to do this is to remove the R shaft pin. Mine did NOT want to come out and play nice, so it stayed in. This is NOT a screw. (the R pin is on the left) :Pic 1 Below: From inside the trans, slide a strong enough wire between the gear stacks (IPS) (left) and MS (main shaft) (right) to the back of the pin. Push the pin out and twist at the same time from the outside (there is a flat head on it that looks like a screw). The pin can get stuck (like in my case) and not want to come out. I decided to go about it another way in this case, since mine was being so stubborn. Remove the two springs on the R assembely. Note which way the inner sping is going. Select 4th gear and remove the R gear. Remove the two 12mm bolts and lift the R assmebely up. Remove the "C" clip from the 5/R fork (top and bottom come off). Also, remove the top and bottom "C" clip from the 3/4 fork. (If the R shaft pin comes out, you will not need to drive out the 5/R shift rod retaining pin) Next, take the 3/16" punch and find the pin on the 5/R shift rod - punch it through. This can be tricky, just think of it like a jig saw puzzle, you'll be fine. Remove the 5/R detent on the clutch housing, this is the detent for the 5/R rod. Remove the spring and ball behind the hex head. Now you should be able to remove the 5/R rod and fork. You'll have to slip it past the R assembley and at the same time, don't loose the spring or larger check ball (found in the bottom of the R assmebely - see pic - it's the larger hole at the bottom). With the shift rod / fork out, you can remove the 3/4 shift rod as well. There are more check ***** and interlock plungers here ... BE CAREFUL not to loose any of them. Use a maganet to remove them all after you take out one shift rod, remove the check ball and interlock plunger. You should be left with the 1/2 shift rod / fork and the IPS and MS (and if you didn't get the R assmebely out, it should be there too) This is IMPORTANT: Lift the IPS and MS and the 1/2 rod all at the same time and straight out. The differential will just be sitting there, it will then lift out too. Teardown is well under way now. You can seperate the IPS and MS and put them on something that will not damage the gear teeth. Set the differential aside as well. Now is a good time to remove the shift selector switch if it's still in. Remove the bolt (10mm) and then use a rubber mallet to pop the switch out. Last but not lease you need to remove the gear selector rod and the R gate. (there is a check ball here .... don't loose it.) Drive out the retaining pin from the fluid drain hole for the selector rod. Remove the two 14mm bolts on the R gate and lift it out. Note how it looks as you take it out.
Bearing removal - the unconventional way!:
Hope you have a good Dremel tool and some cutting blades. This part was the most scary for me, and I would have much preffered to have the bearings pulled / pressed on / off ... but I couldn't afford to pay a shop to do it, nor could I afford the "propper" tools. I say "propper" cause ... as long as the job gets done, and done right, it shouldn't matter what tools you use. I wrapped the shafts with a towel to protect the gears as much as possible. Leaving only the bearing showing, I cut off the outter shell of the bearing. :PIC 0 Below: This makes the bearing almost, but not quite, fall apart - leaving the inner race (part that slides onto the IPS). Remove the ***** and outter shell. I had to cut all the way through the outter shell and the ball ring to remove them. Wear some eye protection, last thing you need is a hot piece of steel in your eye. (I also suggest long sleaves and a good thick pair of gloves - it's gonna get warm) With the outter shell off, cut into the inner race. Try not to go too deep, and if you can, cut a cross or an X into it. (something for you to be able to place a screwdriver into the slot and get a bite on it) Put the chissle or screwdriver into the newly cut slot - smack the crap outta it. The object is to get the bearing loose without having to cut all the way throught it. (heating it up with a tourch may help as well) If you can get a good enough bite, the smacking will spin the bearing on the shaft - thus loosening it and it will come right off. This is how I did all of my bearings. The differential can be a bit difficult becasue of the spedo ring, don't cut through that or melt it either - or you will be replacing it or living without a spedo. :Pic 2 Below: The roller type beaings (MS and diff) :PIC 2a Below: (this is the bottom of the MS - old bearing still in place) will come off by cutting the top and bottom of the outter shell, then the pins will drop right out leaving the inner race. (I cut mine in 1/2 on either side - worked very well) DON'T place any new bearings on untill you're done cutting. You don't want to have metal shavings in your brand new bearings. I took a can of Dust Off and sprayed the shafts after I was done cutting to help remove any micro pieces of metal. With the bearings all removed, now we can put the new ones on and start putting this all back together.
Bearing replacement:
Here's a picture of the bearing / seal kit I got. :PIC 2b Below:Take your trusty 36mm socket and have it handy! Get an extension (6" or so - this is so when you need the end of the socket that fits the ratchet, you can place the extension into the socket and hit it instead of trying to hit all the edges at the same time). Set the bearing on the shaft (or diff) and place the socket on top of the new bearing. (depends on which bearing it is, you'll use either end of the 36mm - which ever side lines up to the inner race) :PIC 2c Below: Use a real hammer, not the rubber one, and give a good forcefull and firm smack to the socket. It should start the bearing on straight so you won't have it slanted to one side or the other. Do this untill the socket "dings" off the bearing. This is how you know the bearing is seated fully and poperly. (you should use the punch to be certain that it's on all the way. hit at 12, 6, 3, 9 untill the punch bounces off the race) It will make a different sound as well. There should be no mistaking if the bearing is on all the way or not. Do this for all the bearings. I placed a peice of wood under the new bearings while doing the oppisite side - just to be safe. The hard part of this is not placing the new bearings, but removing the old ones without damaging the shafts or diff. If your bearing kit has this ring on it, take it off - it's not needed. (IPS bearing, clutch side) :PIC 3 Below:
Transmission case:
First ... make sure you have every thing out of the case (top and bottom). There should be 9 check ***** (note that one is larger - it's from the R assembly, 3 springs (1 long, 2 shorter) and 2 interlock plungers. If you don't see those, don't continue. You will want this thing clean enough to eat out
of. Spray the degreaser in the csase and let it soak. After your coffee break, spray off the degreaser and let it dry. You may have to do this a couple of times (I did) to make sure it's all nice and clean. Don't forget to hit the clutch housing on the under side too. With everything clean and dry, it's time to start putting it all back in. To remove the outter race (part of the beaing still in the case) you'll need to remove the plugs from the lid. Use a long screwdriver or punch to remove them. With the pulgs out, it's easy to get a punch onto the bottom of the outter race. Smack it out and replace it with the new one. The MS outter race (in the clutch housing) :Pic 4 Below: was not replaced, it didn't look too bad and to get it out would require a low profile bearing puller - not worth it if it looks ok. Otherwise, good luck - you'll need it.
Seal removal / replacement:
There are a total of 3 seals (two diff and one shift selector rod) to be replaced. The seals are actually a metal ring with rubber molded around them. This is a good thing for us ... as we can use a punch to remove them very easily. The diff seals are placed in from the outside of the case. I'll repeat that casue I know how I am and I didn't catch that the first time I read it either so ... The differential seals come out and go into the case from the OUTSIDE. The selector rod seal you can get a hold of with some pliers and just tug it out. (helps if you walk it out, 3,6,9,12 and pull ... pull, pull) The new one will go right in with the help of the rubber mallet. The differential seals will slide in from the outside. I reccomend leaving the passangers side out for now (DO NOT FORGET TO PUT THIS IN PRIOR TO INSTALL - or you will be very very sorry) The reason I leave the diff seal out is so that while you are putting the trans back together, it isn't destroyed, chipped, or broken on the piece of wood. Just don't forget to put that seal in.
Reshimming the diff bearings:
I need to add this to my write up, thought I did at one pointe, but maybe not. When you place new bearings on the diff, it will change the "pre-load" on the bearings when the case is all put together. The factory places shims behind the outter race (cup) in the case cover. Only that side, not on the clutch side. These shims place a certain amount of pressure on the bearing to keep in in place and not allow it to float around. You don't want the shims to be too tight, or too lose either way. There are a couple of ways to meassure the thickness you'll need. I'll go into that in a moment, right now, I am just trying to explain what the shims are, how they work, and where they are located.
Ways to meassure needed shim thickness -
The first way I will describe is considered the "Solder crush meathod". This is the meathod I used personally and it worked just fine for me. First off, you need to make certain the bearings are all the way seated on the diff. The punch should bounce off the race and that will let you know they are all the way down. Place the diff in the case and then take two peices of solder (thick stuff, but not so thick it will not crush properly), cut them the length of the bearing. The ends should be even with the outter race. Place the solder in an X formation (this means that one peice will need to be just a little longer and bent in the middle so it sits right). Place the case cover on and place the bolts back in at several places around the case. I did all of them around the diff and several in other places (every other or so). The idea here is to crush the solder to the thickness needed to hold the bearing in place. If you end up with lettering on the solder end, you can't use that reading, discard and repeat. You should end up with 4 flattened solder ends. You need to take those ends and measure them. The readings will be 0.xx numbers (like 0.68). They will likely not be the same. It's ok, you're going to add them all up and then divide by 4 to get the average. Look up that number in the FSM and get the part number. You'll need to special order the shim(s) from Nissan.
The other way to measure is to use a micrometer and do the same set up as above. The bearings all the way seated, case cover on and bolted down. Use a pin type micormeter (depth gauge) and push the pin head against the race of the bearing. You want to meassure to the case cover outter race. It's hard to describe and the space will be so close, it'll be hard to see clearly. Again, the numbers will read very small. (like above) Go to the FSM, get the part number and order.
Keep in mind there are VLSD and NON VLSD transaxles and they are not really seperated in the FSM. The chart / table will tell you, but don't do what I did and order shims for a VLSD when you don't have one. lol Make sure when you talk to Nissan that your part number matches theirs.
Transmission assembely:
Ok, now that the old bearings, seals, and outter races are replaced and the case is clean, it's time to put it back together. You'll need to get the torque
specs from the FSM or your Haynes / Chiltons book. To start, replace the selector rod and then replace the R gate assembely (don't forget the small check ball) (this is under the diff, above the selector rod) and tighten it down. Next place the diff in place. Make sure it is centered, it should spin freely. Now, it's time to place the MS and IPS (including the 1/2 shift rod / fork) back down into the trans. The way I found easiest to place it all in is to hold it up and align everything first, then slip it in. It will slide all the way in but the IPS lower bearing will not sit all the way in, it only goes in two-thirds the way. (it'll stick out a bit) Make sure you look at the FSM for the next part here! Place a check ball and then the larger interlock plunger
against the 1/2 shift rod. Then place a check ball on the oppisite side. (ball, larger plunger, ball) Then place in the 3/4 shift rod / fork. Place the other plunger (smaller one) against the rod. Then place two (2) check ***** in the channel. (rod, plunger, check ball, check ball) then the 5/R shift rod (this will be tricky if you didn't remove the R assembly- but it will fit) Next to the 5/R rod, place the last check ball and the longer spring, put the detent bolt in and snug it down. Now take the larger check ball and lift the R assembly up, place the ball in the lower hole (use Vasaline to hold it). Select 4th gear and slip in the R gear. Snug the R assembly down and replace the springs and the locking pin. Place the shims on top of the IPS and the oil sealer (plastic piece) (use Vasaline to hold the shims if needed). Don't forget to place the selector switch (goes on the shift selector head - small white and copper piece) and the R shaft locking pin in place. Set the lid on and slide it down. (you shouldn't need to force it - it should line up and go on easily, it may take a tap or two to get it all the way down. Make sure it fits then lift it up and place sealer around the lip - don't use too much, you don't want it to seap down into the case. If you removed the selector switch, replace it after you snug all the bolts down. Shift through the gears and make sure it is hitting each gate like it should. If it doesn't, something is likely wrong and needs to be fixed prior to doing the install. (Get the torque settings from the FSM)! TaDa .... you have just rebuilt your 5spd transmission. MAKE SURE YOU PLACED THE DIFF SEAL ON THE TRANS PRIOR TO INSTALATION !!!!
Clutch:
So easy a monkey could do it. (if you're not doing the clutch, just move on to the instalaition)
It's a good idea, while the trany is out, to do your clutch. Here is how to do it. Your new clutch should have come with an alignment tool, you'll need it.
First thing to do is to remvoe the old clutch. There are 9 bolts that hold the pressure plate to the flywheel. The friction disk sits inside between the pressure plate and flywheel. Once the old clutch is off, take some 240 gritt or so sandpaper and just go over the flywheel a time or two. Next, get the clutch and the alignment tool. Place the tool through the PP and FD, align the bolts and torque them down to specs. Done.
Transmission instalation:
There are a couple of different ways to get the trans back on the bell housing. I found it easiest to just lift it in to place and have a mate start a bolt or two at the top and I got a couple started from the under side. This can be sorrta tricky because the trans has to line up level with the clutch so the splines will slide all the way in. I got the trans up and then my mate pushed it snug from atop. Made it much easier. The other way to raise the trans is to place it on a floor jack and slide it in through the drivers side wheel well. Just make sure it doesn't fall on you or the ground. It really is best to have help with this part. Once you have a couple bolts started, it'll hang on it's own. Take a breather and then place the rest of the bolts in the
housing. (note ... some go into the bell housing (engine block) and some go into the clutch housing (tranny) from the other side. It helps to keep the bolts seperated so you know which came from top, which came from the bottom. After you get the trans up and bolted on, reattach the shift support rod and gear selector (note the shorter bolt goes towards the rear and a 14mm gear wrench will save you time and frusturation here more than you know). Replace the CPS at the front. Next step is to install the trans mount (drivers side). Bolt the mount to the trans first and then place the center bolt in and snug it up. Remount the slave cylinder and the starter (the starter can't go on prior to torquing the housing bolts). I like to finish up where I am working before moving on to something else, so I did my intake and battery after the slave and starter. Take a quick moment and sit in the car and run through the gears. It should shift and it may be stiff, but it should be ok once the gear oil is in. Now it's time to replace the axles. It shouldn't matter which side you do first, but I found it easiest to do the more difficult one (passangers side) first. Be very careful not to gouge the seal with the end of the axle. It is tricky with the bracket in place, but it will slide in. (sit on the left side of the rotor assmebly and guide it in with your left hand - support the outter end of the axle on your right arm) Make sure it's all the way in. I had mine not seat all the way even though I had the mounting bracket aligned and all 3 bolts started. (you may have to try and reach in and (holding the axle - not the CV joint) give it a push, it should go in. You can also look up above the shift support rod and see if the axle is in all the way.) Place it back in the hub and then start the strut knucle bolts. You may have to reach behind the outter CV boot and help slide it all the way into the hub. Tighten up the 36mm (don't forget the washer) and place in the cotter pin. Tighten the strut knuckle. Go to the drivers side and this one is a lot easier. Place the axle in the trans (you should feel and / or hear it "click") Slide this one back into the hub and repeat the process you just did on the passangers side. Replace the tires, lower the car, and tighten the lugs. VERY MPORTANT :::: Don't forget to fill the trans with gear oil (4.5 quarts of GL-4 75w - 90) To fill the trans, you will need an oil pump. Test drive and make sure it all feels ok.
Hope this will help someone!
Last edited by JtzMax; 10-22-2008 at 06:39 PM.

 Image 0
 Image 1
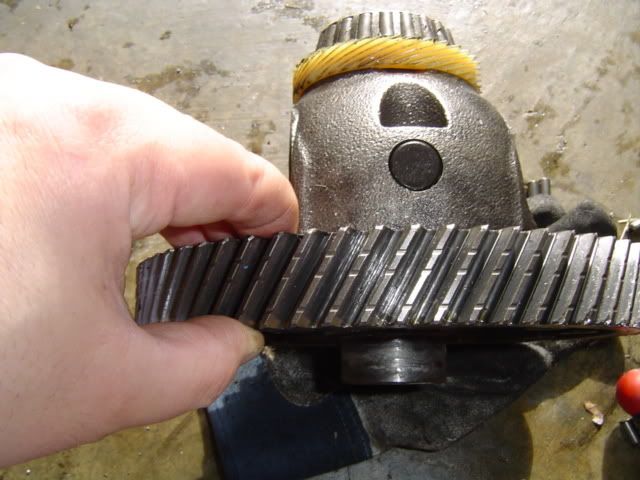 Image 2
 Image 2a
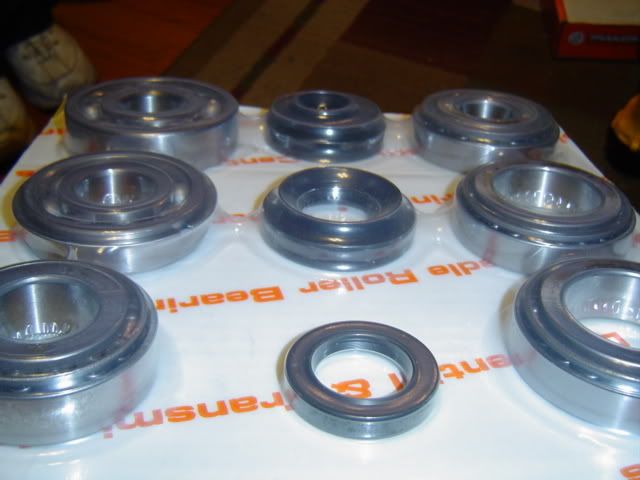 Imagbe 2b
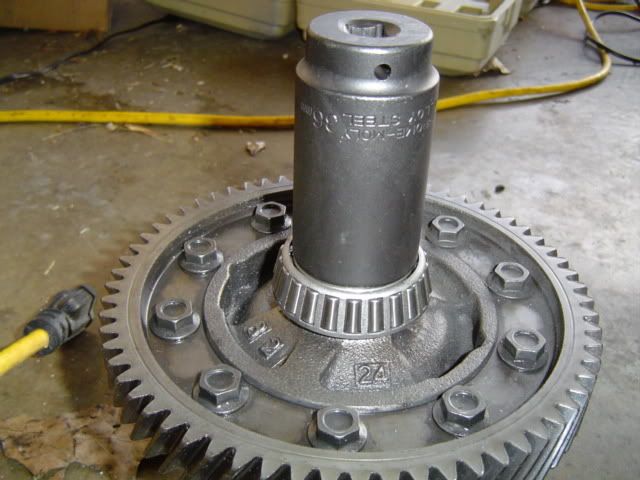 Image 2c
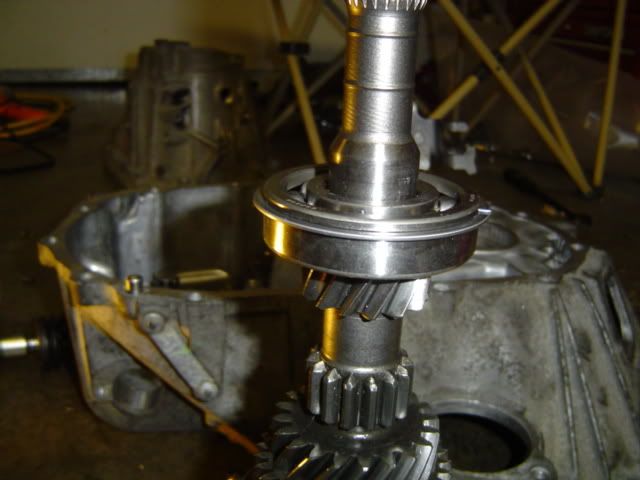 Image 3
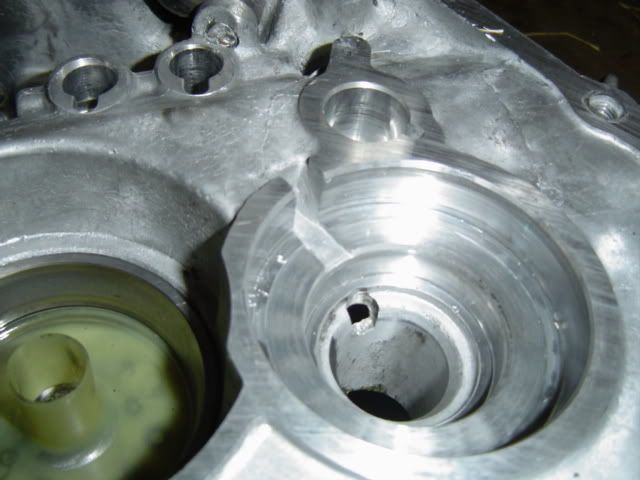 Image 4
01-28-2008, 04:25 PM
Image 4
01-28-2008, 04:25 PM
#6

excellent job man! i have a question for you though, i dont really want to make a new thread... on the drivers side axle, on the spline that goes into the transmission, there is a little clip type of thing. is this clip supposed to be loose or should it be snug around the spline? i had trouble getting the axle out and i remember looking at that and wondering wtf it was and if i messed it up.
01-28-2008, 04:42 PM
#7
Whatchyou say?
Thread Starter
iTrader: (5)
Join Date: Apr 2007
Location: Springfield, Missouri
Posts: 1,870
The clip should remain .... it snaps into the slot in the trans case (around the diff bearing) to help hold the axle to the trans.  So ... in a word, yes - you need it and it needs to be loose like that.
So ... in a word, yes - you need it and it needs to be loose like that.
 01-29-2008, 09:28 AM
#10
Whatchyou say?
Thread Starter
iTrader: (5)
Join Date: Apr 2007
Location: Springfield, Missouri
Posts: 1,870
Thanks all for the kind words. I really hope this will make the Stickyz and that it can help someone. Even if not rebuilding the trany, it's helpfull in getting it in and out to do the clutch. 
MOD ... let's STICKY this please.
MOD ... let's STICKY this please.


 01-30-2008, 05:36 AM
#15
Whatchyou say?
Thread Starter
iTrader: (5)
Join Date: Apr 2007
Location: Springfield, Missouri
Posts: 1,870
I tried to add pix in the OP ... but for some reason my coding must have been off cause it didn't like it. Anyway ... I am still working on more pix - i'll try again to add them between the steps (what I wanted to do in the first place)
Thanks all .... I really hope this will help someone - anyone. I looked prior to doing this wrtite up and all I really could find was the Motorvate (which btw is a VLSD tranny) and there seemed to be parts that cold be filled in better, so I tried.
Thanks all .... I really hope this will help someone - anyone. I looked prior to doing this wrtite up and all I really could find was the Motorvate (which btw is a VLSD tranny) and there seemed to be parts that cold be filled in better, so I tried.
01-30-2008, 05:47 AM
#16
Nice work man! Great attention to detail!
On a side note: Does anyone have a write up for replacing an auto tranny? I get this feeling that I'll have to do it in the next 6 months or so. Anyone? danke!
On a side note: Does anyone have a write up for replacing an auto tranny? I get this feeling that I'll have to do it in the next 6 months or so. Anyone? danke!
01-30-2008, 11:37 AM
#17
Whatchyou say?
Thread Starter
iTrader: (5)
Join Date: Apr 2007
Location: Springfield, Missouri
Posts: 1,870
I would think that removal / install of an auto would be very close if not the same as for the manual ..... dunno. Do you have an FSM? If not ... I posted the link in the "tools" list above - download it there. Should give you the "how to remove / replace" on an auto. I'm at work ... so I don't DL things here, otherwise I'd look for you. Let me know if it's in there, I am curious now.
Cheers!
Cheers!
01-30-2008, 11:47 AM
#18
Removal/Installation is the same, short of the fact that you don't have a shift lever on the transmission, but a cable that has to be disconnected instead. Don't forget to disconnect the tranny cooler lines either. A haynes/chiltons manual should either be purchased, or the FSM downloaded before doing this type of work either way.
02-01-2008, 01:13 PM
#20
Removal/Installation is the same, short of the fact that you don't have a shift lever on the transmission, but a cable that has to be disconnected instead. Don't forget to disconnect the tranny cooler lines either. A haynes/chiltons manual should either be purchased, or the FSM downloaded before doing this type of work either way.
02-01-2008, 05:16 PM
#21
Whatchyou say?
Thread Starter
iTrader: (5)
Join Date: Apr 2007
Location: Springfield, Missouri
Posts: 1,870
well ... hard to say, how many smoke breaks do you plan to take? lol i'd say it can be as long a job as you want it to be, and imho, it should take you a day to drop and a day to install ... for not much or any experience. hell ... the tool list is even up there. lol just follow the steps, you'd be suprised - it will not take you long mate
 02-02-2008, 10:59 AM
#23

iirc when i did it my first time(tranny drop) i think it approximatly took me about 3 hrs. The hardest part in it imo is just loosing the tough bolts and hard to reach ones. but in all honesty i didnt know what the hell i was doing. but thanks to alot of reading i was able to get the job done.
BTW nice write up. i want to see it be a sticky!! thank you for contributing to the maxima community! its people like yourself that make these forums work.
i know there is countless threads on the 00vi swap but when i do mine i hopefully will do a step by step with pictures for each step. so i can contribute. because i have gained so much knowledge from this site i owe in a big way.
 02-03-2008, 05:15 PM
#25

 02-04-2008, 04:48 AM
#27
Whatchyou say?
Thread Starter
iTrader: (5)
Join Date: Apr 2007
Location: Springfield, Missouri
Posts: 1,870
well ... Chillin, now I am worried. lol There were no shims on the diff, only the IPS. (not sure if it is because I don't have a VLSD trany, but I didn't see any) or ... maybe that is what my g/f found the other day and I am screwdged now. j/k
Dave: I PM'd to Kevlo, but I don't see him around much anymore (now that he became a mod) but he mentioned that it would likely be added to the "how to's" - when he gets around to it. So, to be quite honest - who knows.
Glad I did this write up none the less, if it helps even one peroson - it was worht it.
02-04-2008, 06:01 AM
#28
well ... hard to say, how many smoke breaks do you plan to take? lol i'd say it can be as long a job as you want it to be, and imho, it should take you a day to drop and a day to install ... for not much or any experience. hell ... the tool list is even up there. lol just follow the steps, you'd be suprised - it will not take you long mate
Thanks man, when the time comes, I may actually attempt this.
Now if I could only have a few days off of work that isn't already filled up!
02-04-2008, 09:03 AM
#29
02-04-2008, 10:30 AM
#30
Whatchyou say?
Thread Starter
iTrader: (5)
Join Date: Apr 2007
Location: Springfield, Missouri
Posts: 1,870
very true!!!!
Dave, did I maybe miss something while I was in there? I didn't see any diff shims (but as mentioned before, not sure the non - vlsd has any) or ... maybe my trans was redone prior to me opening it up and they didn't put any in? Doesn't seem like it was opened up before, but that may explain my stuck R shaft pin too, dunno. My diff bearings didn't look all that bad, certianly not as bad as the IPS bearings.
Cheers!
02-04-2008, 12:05 PM
#31
very true!!!!
Dave, did I maybe miss something while I was in there? I didn't see any diff shims (but as mentioned before, not sure the non - vlsd has any) or ... maybe my trans was redone prior to me opening it up and they didn't put any in? Doesn't seem like it was opened up before, but that may explain my stuck R shaft pin too, dunno. My diff bearings didn't look all that bad, certianly not as bad as the IPS bearings.
Cheers!
Dave, did I maybe miss something while I was in there? I didn't see any diff shims (but as mentioned before, not sure the non - vlsd has any) or ... maybe my trans was redone prior to me opening it up and they didn't put any in? Doesn't seem like it was opened up before, but that may explain my stuck R shaft pin too, dunno. My diff bearings didn't look all that bad, certianly not as bad as the IPS bearings.
Cheers!
I just tore down one tranny with a truly awful rebuild (they actually welded on the mainshaft under one bearing and used a grinder by hand to make a surface they could press the bearing onto!!) and it had only one diff shim. If someone else worked with your tranny, entirely anything is possible.
Dave
02-04-2008, 03:02 PM
#33
Whatchyou say?
Thread Starter
iTrader: (5)
Join Date: Apr 2007
Location: Springfield, Missouri
Posts: 1,870
LOL @ Chillin ....
sorry mate, not to make fun or anything like that, but I had the same idea in mind. Which, is part of the reason I did the write up after words, to maybe help save some people some time. Hope I can!
Dave .... no shims were there, am I in trouble? If they need to be in there - what now?
sorry mate, not to make fun or anything like that, but I had the same idea in mind. Which, is part of the reason I did the write up after words, to maybe help save some people some time. Hope I can!
Dave .... no shims were there, am I in trouble? If they need to be in there - what now?
02-04-2008, 05:59 PM
#34
If you force yourself to 3-4 days you'll probably do it wrong.
JtzMax, did you remove the differential bearing cup in the driver side housing half? So there were no shims stuck to the back of the bearing? As long as the diff isn't shifting inside the tranny it's probably going to run ok for a while.
Dave
JtzMax, did you remove the differential bearing cup in the driver side housing half? So there were no shims stuck to the back of the bearing? As long as the diff isn't shifting inside the tranny it's probably going to run ok for a while.
Dave
02-04-2008, 07:53 PM
#36
Whatchyou say?
Thread Starter
iTrader: (5)
Join Date: Apr 2007
Location: Springfield, Missouri
Posts: 1,870
Dave, no shims that I saw or noticed. The IPS shims were hard to miss, the diff maybe, but I don't think so. I looked at every bit and piece of that trany. The diff felt snug in the housing and spun freely via the IPS (through the clutch housing) after assembly. Odd there were no shims, makes me think I am not the first person to tear it down. I took it down at 106347 on the odo, but when I bought the car it had 83k and change on it. I think it started the infamous "spinning noise" around 92k or close. I am not overly hard on my car, I mean - I drive it like I stole it sometimes, but ... not a lot. Guess I'll see if the diff starts crunching soon enough. *fingers crossed*
Jim
Jim
02-08-2008, 12:36 PM
#37
Whatchyou say?
Thread Starter
iTrader: (5)
Join Date: Apr 2007
Location: Springfield, Missouri
Posts: 1,870
Chillin ... how's the re-build goin? Keep me posted and PM if you need help, I don't mind one bit and I have more pix (still to upload) but I am lazy at this point so ... PM and I can send them.
Cheers!
Cheers!
02-08-2008, 01:25 PM
#38
I'll probably need more pics unless you think its pretty straight forward because when i read this write up i am just lost without having the stuff in front of me. i'll definitely have questions for you when i get started. but its not looking like itll happen until the week after next at least.
 02-08-2008, 02:24 PM
#39
Whatchyou say?
Thread Starter
iTrader: (5)
Join Date: Apr 2007
Location: Springfield, Missouri
Posts: 1,870
Hit me up mate ... I don't mind a bit. Dave (Dgeesman) and Pmohr are good to ask of as well. Dave has done a few of these (15 or better anyway). I'll try to get those other pix uploaded this w/e (time permiting) at least on to my photobucket page ... so you can look at them. I totaly understand the being confused part without it all in front of you ... been there many times my friend. Too many in fact.
Keep me posted please ... and again, if I can help - I will!
Keep me posted please ... and again, if I can help - I will!