Turbo VG swapped stanza
 04-13-2019, 07:09 PM
#361
Member
Thread Starter

Join Date: Oct 2016
Posts: 284
im going to button up the cooling system, get the car back to being fully drive able, get it up to operating temp and set my fuel pressure and timing (i have a timing light that the bulb blew out of, im gonna try and fix it lol if i cant ill just buy a new one) then i will move on to tuning the car and possibly getting it legal and driving it on my days off to make sure everything is road worthy. if it needs some adjustments ill be posting about those in the future but im really excited to hear it run fully dialed in. im sure a set of headers will effect the way it sounds immensely lol
 04-20-2019, 07:56 AM
#362

im going to button up the cooling system, get the car back to being fully drive able, get it up to operating temp and set my fuel pressure and timing (i have a timing light that the bulb blew out of, im gonna try and fix it lol if i cant ill just buy a new one) then i will move on to tuning the car and possibly getting it legal and driving it on my days off to make sure everything is road worthy. if it needs some adjustments ill be posting about those in the future but im really excited to hear it run fully dialed in. im sure a set of headers will effect the way it sounds immensely lol
04-20-2019, 07:23 PM
#363
Member
Thread Starter
Join Date: Oct 2016
Posts: 284
they wouldnt fit anyway because of the way i had to do the crossmember. thats why i had to flip and chop up the stock headers. if they were the same from front to back i could probably just modify the ypipe but im not sure they would clear anything else, the radiator and fans take up way too much space to really run tubular headers unless they are some kind of block huggers. im not sure how i will end up addressing it but i am also considering doing a set of log style manifolds for the turbo. i really would love some equal length tubular headers just for the sound but im not sure space will allow for them, i will barely have space for the downpipe lol
04-27-2019, 06:40 PM
#364
Member
Thread Starter
Join Date: Oct 2016
Posts: 284
got the coolant system back together, RTV is curing as i type this. the fuel rail was leaking because the bung on that end is misshapen somehow. looks like it was dropped or something, it was perfect when it came off the lathe so idk but thats not a big deal to fix, i should have it done tomorrow.
this morning i went yard saling with a friend and bought a bunch of pulley pullers and a hood ornament. you can guess what my plans were for the hood ornament lol things didnt work out so well tho....


this happened immediately after i had the hole drilled too.... not sure how i didnt break it earlier it literally fell apart in my hands with the slightest effort. so now i am tasked with finding another hood ornament to replace this broken one or making one. if anyone has one or has any suggestions for what i should make please let me know id love some input. it doesnt really matter what i do to this hood anyway since its probably gonna get replaced, i cant stand that huge dent anymore.
this morning i went yard saling with a friend and bought a bunch of pulley pullers and a hood ornament. you can guess what my plans were for the hood ornament lol things didnt work out so well tho....
this happened immediately after i had the hole drilled too.... not sure how i didnt break it earlier it literally fell apart in my hands with the slightest effort. so now i am tasked with finding another hood ornament to replace this broken one or making one. if anyone has one or has any suggestions for what i should make please let me know id love some input. it doesnt really matter what i do to this hood anyway since its probably gonna get replaced, i cant stand that huge dent anymore.
04-27-2019, 11:49 PM
#365

2nd gen Maxima came with a hood badge that said Maxima, i think i bought some from a junkyard years back if i can find them tomorrow i'll post a picture. otherwise you can get a roll of carbon fiber wrap on Ebay and try that too
04-28-2019, 07:07 PM
#366
Member
Thread Starter
Join Date: Oct 2016
Posts: 284
i remember seeing that now and thats a great idea but i just realized that z31s come with a hood badge as well and the VG i put in the stanza actually came from a z31 so now im thinking about using that lol ill have to find one first.
 04-29-2019, 06:08 PM
#368
Member
Thread Starter
Join Date: Oct 2016
Posts: 284
i have no idea what it came off of i didnt ask. i could probably find a jaguar in the junkyard, i have before. i might just go to the yard just to see what i can find. i think for now ill just leave the wingless eagle there to cover the hole up lol
05-01-2019, 07:42 PM
#370
Member
Thread Starter
Join Date: Oct 2016
Posts: 284
05-02-2019, 02:52 PM
#371
Member

Join Date: Sep 2010
Location: DFW
Posts: 195
05-02-2019, 03:45 PM
#372
Member
Thread Starter
Join Date: Oct 2016
Posts: 284
05-03-2019, 06:50 PM
#373
Member
Thread Starter
Join Date: Oct 2016
Posts: 284
i chopped off the screwed up fitting and machined a new one and welded it on. something ive done like 20 times for this car now but i changed the geometry of the fitting itself in the hopes that A. it would seal better and B. it would have more material to protect it from damage. idk why the threads look like i cut them with a rusty pair of toenail clippers in the pictures, they look fine. i didnt wire brush or scotch brite them after cutting the threads so maybe its just the finish but anyway the threads are probably the best ive cut yet, the fitting threads on perfectly, super tight but with absolutely no binding whatsoever, im pretty proud of it, better not fricken leak.....


gonna throw them on the car tomorrow and possibly drive it. definitely going to attempt to get it up to temp and tune it a little bit at least.
gonna throw them on the car tomorrow and possibly drive it. definitely going to attempt to get it up to temp and tune it a little bit at least.
05-07-2019, 03:27 PM
#374
Member
Thread Starter
Join Date: Oct 2016
Posts: 284
ok well things didnt go to plan yesterday lol
fuel rail still leaks, had to pull the intake off to plug a hole i never plugged when i pulled the cast or pressed in coolant pipe out of it, decided to take the 70 amp stanza alternator off and put my 90 amp 99(?) maxima alternator on which made me have to get a longer belt and modify the alternator bracket (again) AND after i pulled the intake i noticed my intake gaskets were absolutely trashed so i ordered a new set of those as well as a belt.
the next logical thing to do was switch out the fitting i was using on the fuel rail, hoping that is what was causing the leak. if it still leaks after replacing both the bung and the fitting i will probably just break down and buy both parts brand new since so far ive been making them myself or using parts i had lying around like i have for every other area of the car and nothing else has given me any trouble but thats just how it goes sometimes lol ill have the parts by this weekend hopefully so everything should be back together and i can post a video of it running on all 6 cylinders.
05-13-2019, 06:08 PM
#375
Member
Thread Starter
Join Date: Oct 2016
Posts: 284
THE LEAK IS FIXED.
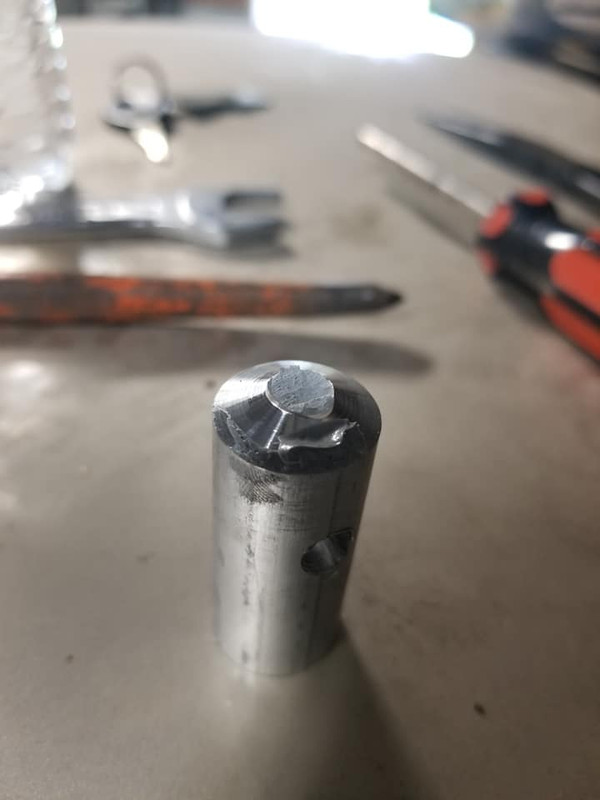
apparently the fitting was the issue, so with the fuel sorted out i was able to move on to the other issues but even before i did that i adressed the huge hole in my lower intakes coolant manifold. first i drilled the hole out and tapped it for m12x1.25 threads.

next i turned a plug on my lathe and undercut the middle area so it would be easy to snap off, same thing i did with my power steering rack.


i slathered it in RTV thinking that coolant can travel through straight threads, i wanted to use an NPT plug but i didnt have any and didnt feel like running around/wasting money on a whole kit ill never use the rest of.

it snapped off surprisingly clean, i expected more to stick out since my lathe can only cut standard threads so it wasnt even the same threads (which was fine with me since its never designed to come out anyway) but it would have threaded even further in if i tried, it started to bind up a little but it probably would have made it all the way through so i just whacked the stub with a hammer to snap it off. worked like a charm.
then i threw everything back together which at this point takes me a solid 20 minutes lol
then i moved onto the alternator bracket. i got the belt and of course it was a little too long so i had to add back the section i had just cut off of my alternator bracket but for some consolation i did have to flip it to the other side to push the bracket closer to the alternator, there are a few dimensional differences between the stanza and maxima/z31 alternator.

i just kinda welded it up and slapped it on and it works. it should probably be painted or powder coated at some point but for now its doing its job. i think im going to go back through the car at some point and redo a bunch of stuff for aesthetics sake but that wont be until i have a lift to use.

heres a little clip of the farty goodness
https://www.youtube.com/watch?v=P8Rv...ature=youtu.be
i ran out of time and light to get the car warmed up and it has been absolutely miserable weather out here lately but as soon as the sun comes back out im gonna warm the car up and get my base tune set and take her for a quick spin again. if that goes well ill be getting the car all legal and might even start taking it to work lol
apparently the fitting was the issue, so with the fuel sorted out i was able to move on to the other issues but even before i did that i adressed the huge hole in my lower intakes coolant manifold. first i drilled the hole out and tapped it for m12x1.25 threads.
next i turned a plug on my lathe and undercut the middle area so it would be easy to snap off, same thing i did with my power steering rack.
i slathered it in RTV thinking that coolant can travel through straight threads, i wanted to use an NPT plug but i didnt have any and didnt feel like running around/wasting money on a whole kit ill never use the rest of.
it snapped off surprisingly clean, i expected more to stick out since my lathe can only cut standard threads so it wasnt even the same threads (which was fine with me since its never designed to come out anyway) but it would have threaded even further in if i tried, it started to bind up a little but it probably would have made it all the way through so i just whacked the stub with a hammer to snap it off. worked like a charm.
then i threw everything back together which at this point takes me a solid 20 minutes lol
then i moved onto the alternator bracket. i got the belt and of course it was a little too long so i had to add back the section i had just cut off of my alternator bracket but for some consolation i did have to flip it to the other side to push the bracket closer to the alternator, there are a few dimensional differences between the stanza and maxima/z31 alternator.
i just kinda welded it up and slapped it on and it works. it should probably be painted or powder coated at some point but for now its doing its job. i think im going to go back through the car at some point and redo a bunch of stuff for aesthetics sake but that wont be until i have a lift to use.
heres a little clip of the farty goodness
https://www.youtube.com/watch?v=P8Rv...ature=youtu.be
i ran out of time and light to get the car warmed up and it has been absolutely miserable weather out here lately but as soon as the sun comes back out im gonna warm the car up and get my base tune set and take her for a quick spin again. if that goes well ill be getting the car all legal and might even start taking it to work lol
05-14-2019, 12:48 AM
#376
Oh my god! After sitting out on my front porch all this time waiting for you to drive by... I might be able to wave to you? Great! Could I ask you a favor? I'm getting low on beer out here, could you drop me off some?
05-15-2019, 06:16 AM
#377
Member
Thread Starter
Join Date: Oct 2016
Posts: 284
i live in eastern PA lol if anyone is somewhat near me let me know and you can check the car out in person, maybe even get a ride in it
05-16-2019, 11:09 AM
#378
Back to the hood ornament...

http://www.amazon.com/Rare-Howling-W.../dp/B07D64LQPV

http://www.trendhunter.com/trends/de...hood-ornaments

http://www.4statetrucks.com/exterior...iABEgKrZ_D_BwE
You can scroll down on these websites and see more designs.
http://www.amazon.com/Rare-Howling-W.../dp/B07D64LQPV
http://www.trendhunter.com/trends/de...hood-ornaments
http://www.4statetrucks.com/exterior...iABEgKrZ_D_BwE
You can scroll down on these websites and see more designs.
05-17-2019, 07:16 PM
#379
Member
Thread Starter
Join Date: Oct 2016
Posts: 284
[QUOTE=DennisMik;9202056]Back to the hood ornament...
i think im just gonna make something, i am definitely not gonna spend more than 20 bucks on it and i want it to be something really weird or unique or have some kind of story behind it. ill figure something out at some point, in the mean time im working on moving to a different garage space, my lease is up next month and i need a spot that isnt on a hill lol my Z is up next and im gonna need a decent space to work on it where i wont scrape every time i wanna leave lol
i think im just gonna make something, i am definitely not gonna spend more than 20 bucks on it and i want it to be something really weird or unique or have some kind of story behind it. ill figure something out at some point, in the mean time im working on moving to a different garage space, my lease is up next month and i need a spot that isnt on a hill lol my Z is up next and im gonna need a decent space to work on it where i wont scrape every time i wanna leave lol
05-30-2019, 02:54 PM
#380
Member
Thread Starter
Join Date: Oct 2016
Posts: 284
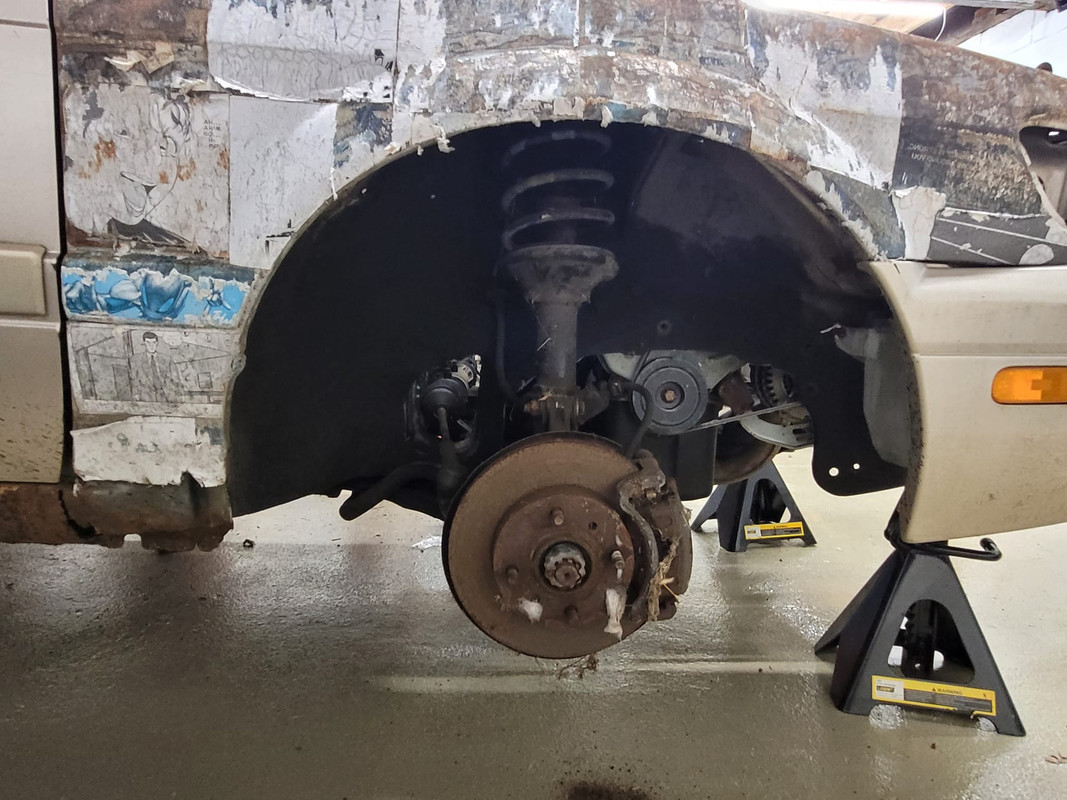
i went to pull the car out of the garage to do a little pull and the brake pedal went to the floor....
obviously i stopped, pulled the parking brake, and got out to look for signs of something wrong.
first place i checked was the engine bay, everything looked fine. then i looked under the car, no puddle (yet)
me and my buddy pushed the pedal a couple more times and then listened for any hints and i checked under the car again and bingo, huge puddle of brake fluid lol

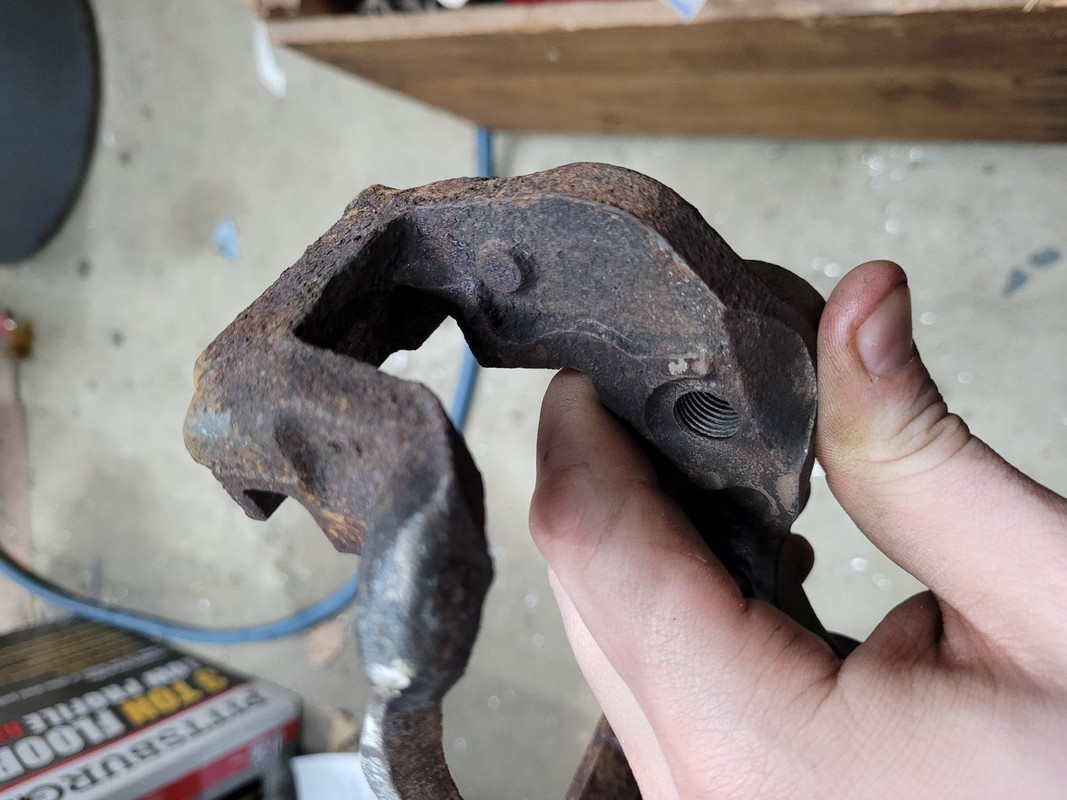
brake line burst. which isnt surprising given the appearance of this particular section lol
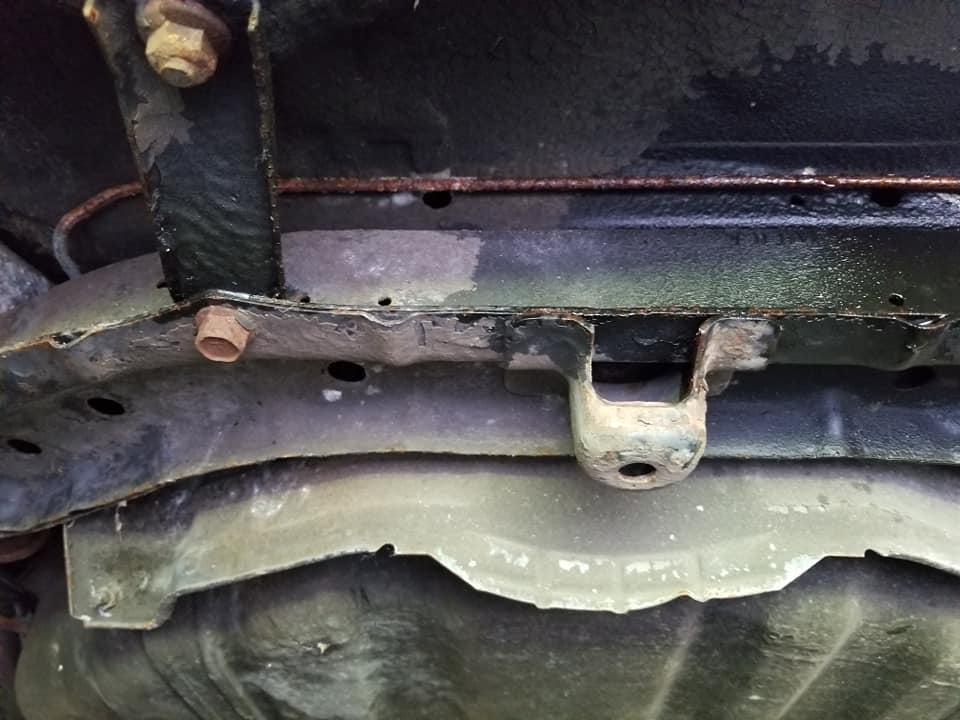
looks like the lines go up over the gas tank which means ill probably have to drop it. im looking through my diagrams trying to figure out how much line im gonna need and where they go, ill find out either way when i get the car higher up off the ground.

i ordered new brake pads and rubber lines for all 4 corners of the car, 30 bucks shipped to my door from rockauto! so next ill be buying the line itself and the fittings i need and redoing every line that isnt compromised (assuming there arent many of those lol) while im doing this i figure it will be a good time to drain the oil, drop the pan, drill out the correct dipstick location in the block and put some fresh oil in the car so that i can ideally actually get to tune and drive the heckin thing.
obviously i stopped, pulled the parking brake, and got out to look for signs of something wrong.
first place i checked was the engine bay, everything looked fine. then i looked under the car, no puddle (yet)
me and my buddy pushed the pedal a couple more times and then listened for any hints and i checked under the car again and bingo, huge puddle of brake fluid lol
brake line burst. which isnt surprising given the appearance of this particular section lol
looks like the lines go up over the gas tank which means ill probably have to drop it. im looking through my diagrams trying to figure out how much line im gonna need and where they go, ill find out either way when i get the car higher up off the ground.
i ordered new brake pads and rubber lines for all 4 corners of the car, 30 bucks shipped to my door from rockauto! so next ill be buying the line itself and the fittings i need and redoing every line that isnt compromised (assuming there arent many of those lol) while im doing this i figure it will be a good time to drain the oil, drop the pan, drill out the correct dipstick location in the block and put some fresh oil in the car so that i can ideally actually get to tune and drive the heckin thing.
07-03-2019, 05:18 AM
#381
Member
Thread Starter
Join Date: Oct 2016
Posts: 284
UPDATE
i havent really gotten anything done on the brakes. i have been scrambling to get moved into a new garage space which i am almost completely finished with. the bad news is i am doing a good friend a favor and rebuilding his engine so he can have a reliable truck for his small business. hopefully i can bang that out before the end of the month and finally get back to working on the stanza. when i do, i will have a LOT of stuff to post about. the brake lines, the dipstick, redoing all the engine and transmission mounts, making new headers, turbo installation, intercooler/maybe non intercooled, etc. i might be getting a new hood and not doing the hood ornament thing cause i dont like it as much as i thought i would and my dented up hood is bothering me..... anyway lots of content on its way eventually.
i havent really gotten anything done on the brakes. i have been scrambling to get moved into a new garage space which i am almost completely finished with. the bad news is i am doing a good friend a favor and rebuilding his engine so he can have a reliable truck for his small business. hopefully i can bang that out before the end of the month and finally get back to working on the stanza. when i do, i will have a LOT of stuff to post about. the brake lines, the dipstick, redoing all the engine and transmission mounts, making new headers, turbo installation, intercooler/maybe non intercooled, etc. i might be getting a new hood and not doing the hood ornament thing cause i dont like it as much as i thought i would and my dented up hood is bothering me..... anyway lots of content on its way eventually.
 07-07-2019, 08:05 PM
#384
Member
Thread Starter
Join Date: Oct 2016
Posts: 284
thank you! i didnt know about the stanza but i read your entire thread you did on the maxima, i think that was actually the first thread i ever read on this website lol probably the cleanest maxima ive ever seen. id love to see some of the stanza tho
07-08-2019, 01:11 PM
#385
Member

Join Date: Dec 2015
Location: NE England
Posts: 126
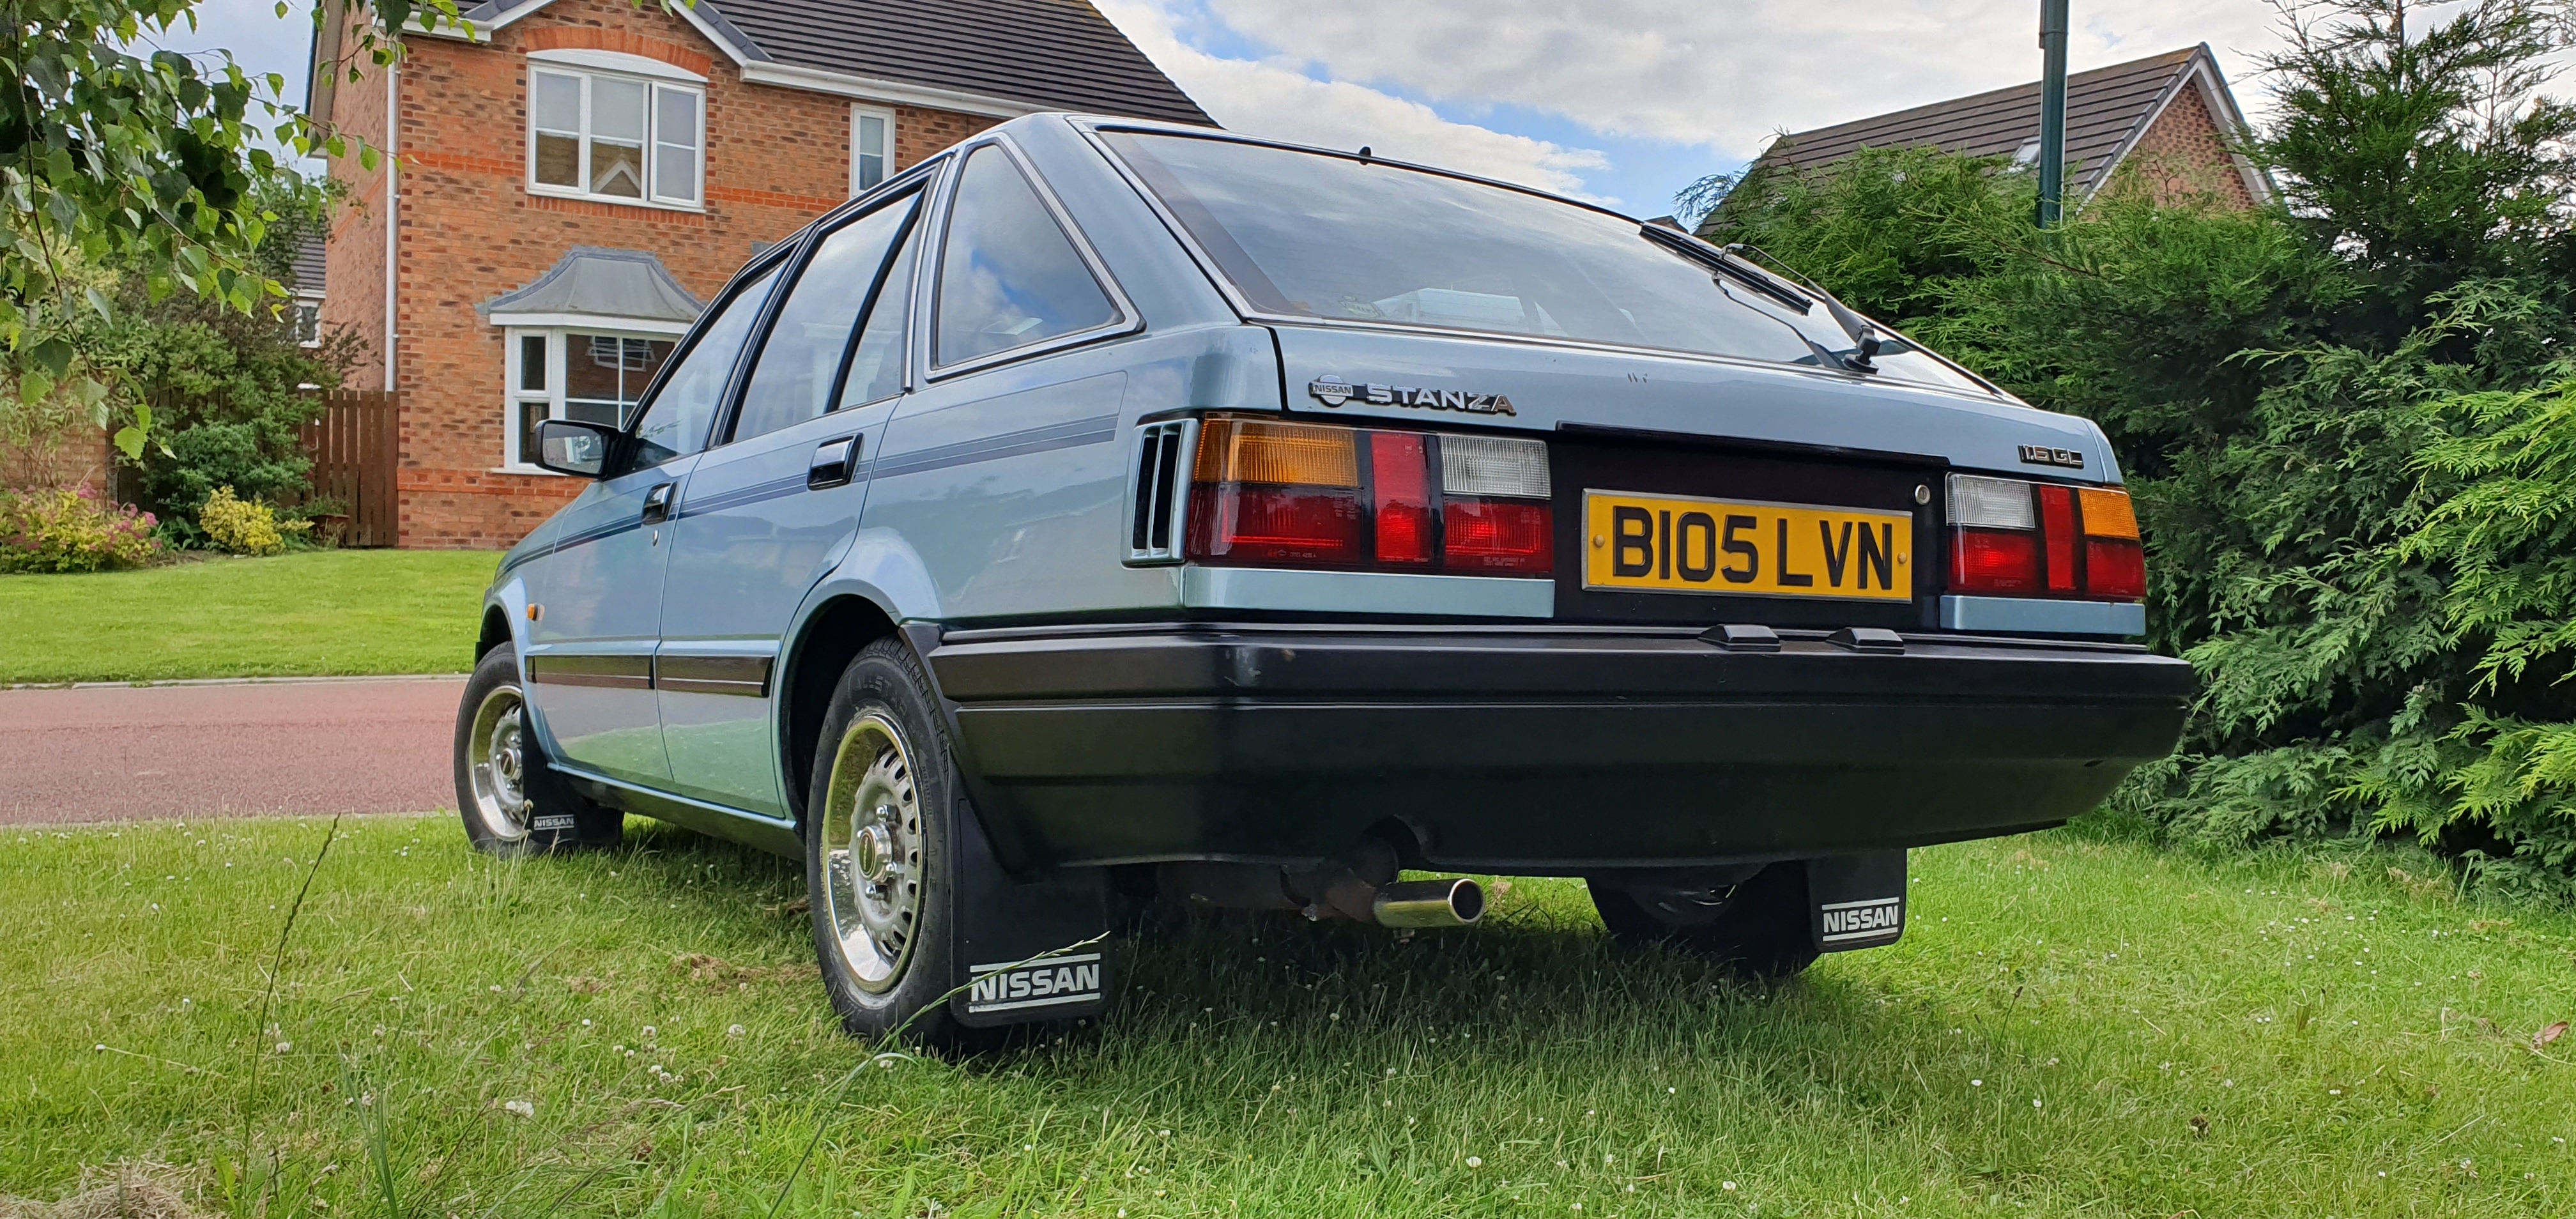
As for my T11, it was driven for three years from new in 1984 to 1987, clocking up 33k miles, then serviced and parked up in his garage for 32 years! Didn't move an inch!

 09-01-2019, 05:28 PM
#387
Member
Thread Starter
Join Date: Oct 2016
Posts: 284
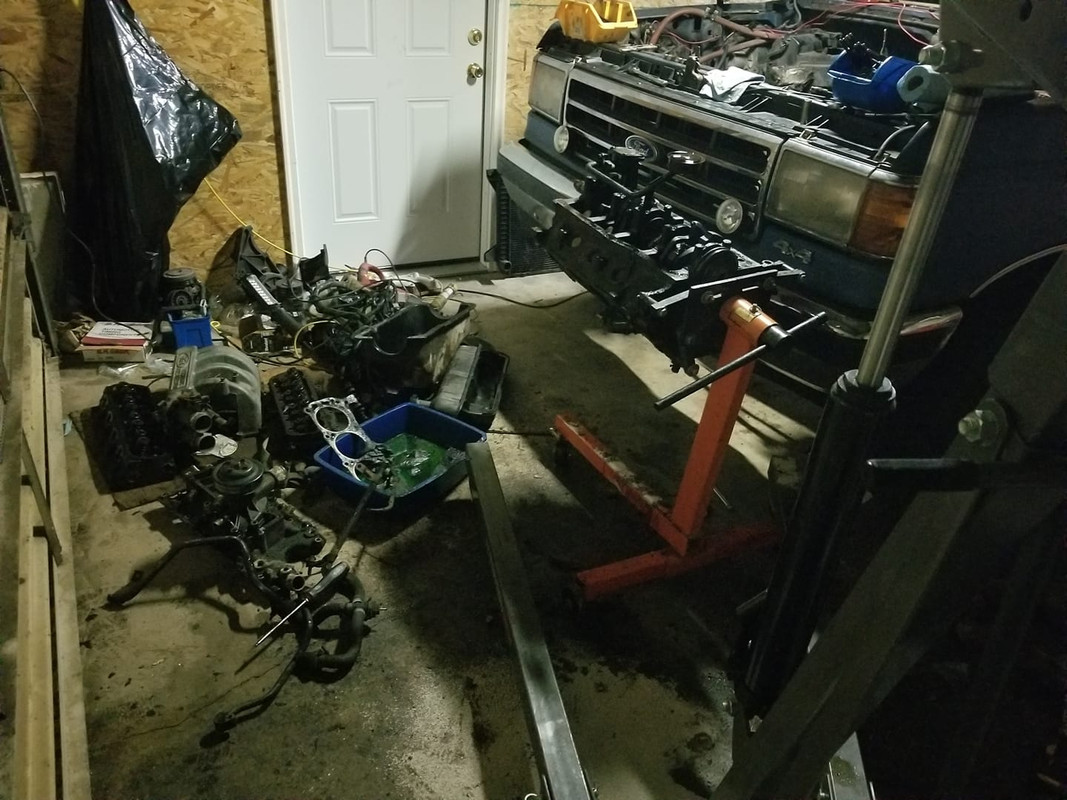
this is where im at with the truck, i have most of the parts for the engine already, just need to get the block cleaned and prepped for reassembly. ive been working on the wiring and interior in the mean time. it shouldnt take too much longer. i figured out why it stopped running in the first place, the ignition module died. after i replaced that it got spark back so once its back together it should just start up no issues.
thats the update on why im not posting about the stanza lol but i have good news for the future. something everyone will be looking forward to im sure.
in the next installment of "Turbo VG swapped Stanzima"
it is 100% confirmed.... that i will be installing................ coilovers!
oh and also i got a 3d printer so i can make a new hood ornament and cast it in aluminum. anyway yeah im not gonna say ill be back in a month but i promise i will be back lol yall know how it is.
 09-03-2019, 04:21 PM
#389
Member
Thread Starter
Join Date: Oct 2016
Posts: 284
i really could make anything i want. i have already printed a little hello kitty badge im thinking about using lol i was also thinking about getting a z31 hood badge and using that. i didnt realize how much i would dislike the look of something jutting up from the front of the hood until i saw it on the car, i always liked hood ornaments as a kid but i guess i was wrong. stupid kids.
03-21-2022, 10:06 PM
#390
Member
Thread Starter
Join Date: Oct 2016
Posts: 284
its been a while. im not even sure anyone is still following at this point, hopefully you are all alive and well as i am. a lot has changed, i sold the Z, but the stanza remains my main project car. i dont have a good explanation as to why so maybe less has changed than i thought... but nonetheless. the saga continues. first major change is the scenery. off to the new garage space we went.

the NEW (extremely old needing lots and lots of work to be usable) shop! and the stanzas new home for the next long while.

as promised, the first order of business was coilovers, i literally installed these before i even had half of my tools moved over. i was so consumed with the desire to work on this car i didnt care. so to start, these are maxpeedingrods coilovers, they were very cheap, im sure they will ride like crap but its the journey not the destination around here we should all be on the same page at this point.

coils as compared to stock, note the threaded sleeve is in the middle of its adjustment range.

this is the original suspension
and the coilover. the fronts were essentially bolt on parts. the only modification needed was the strut tower bolt holes, two line up perfectly, one was about a half inch off, so i used a die grinder to oval the hole out and its good to go.


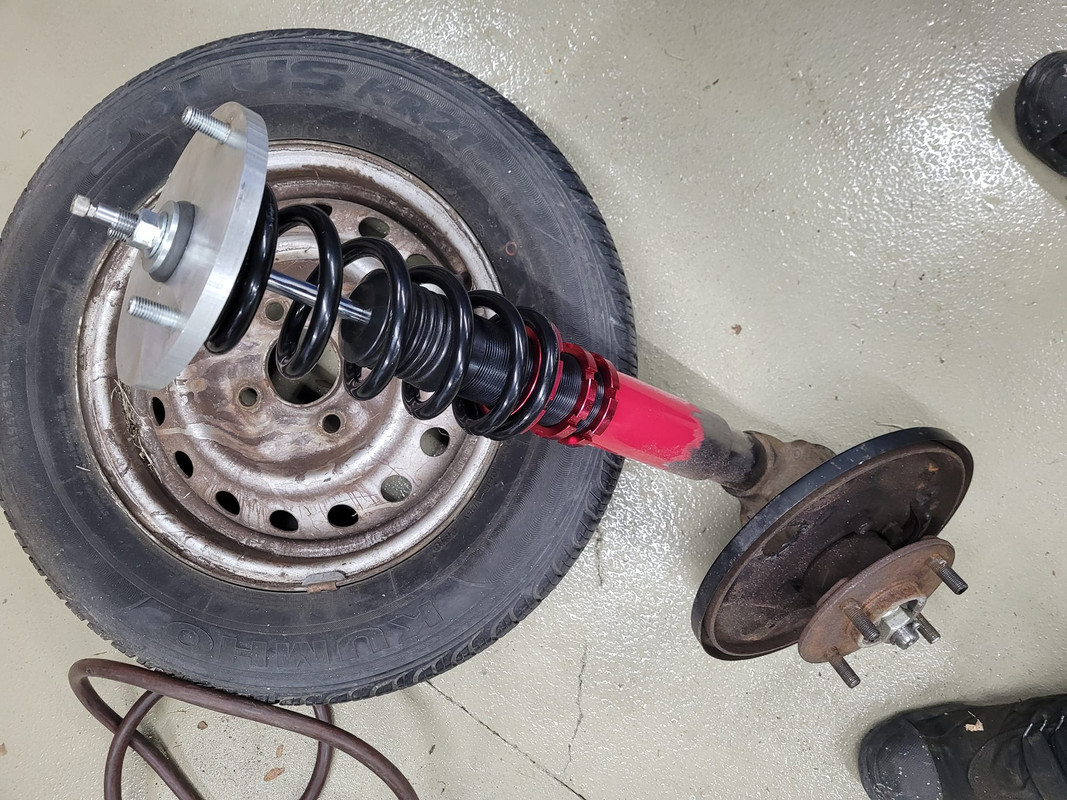
so with the fronts done, i was able to move onto the rear. which was far from a bolt on affair... as you will see.

these coilovers are actually for a 240sx, im sure they bolt right into one of those, but unfortunately the stanza does not have a multilink rear end, so this bottom mount will not work, the stanza has a rear suspension similar to the Z31s front suspension, so fortunately, i basically already did this once, just had to do it again, this time i did it a lot better imo lol

i started by chopping off this bottom cap.

machined the weld off down to the slip fit and then i was able to just knock it off leaving the threaded tube.

the strut tube was very loose inside of the threaded tube for the coilover, so i had to make a sleeve, the plan was to make it a press fit onto the original strut tube and then a press fit onto the threaded sleeve, and then weld it all. i couldnt find pipe that was close to the dimensions i needed, so i just got a solid round of steel and bored all of the inside out. as you can imagine on my tiny lathe, this took HOURS.


i took a bunch of rough measurements, taking the drop the front had achieved in the mid range of adjustment, i tried to mimic that with the rear so that it would just be level, this meant a 5 inch drop lol so thats what i aimed for.

the sleeves were each roughly one inch long. i figured one inch of interference fit between each tube would be plenty strong enough for what it is.

this sleeve went on pretty easily, it was a very good tight fit, not as tight as it could have been, but tight.

i did weld the sleeves to the strut tube at the top and left the bottom unwelded since i was going to weld them both at once and didnt want it to warp too bad before installing the threaded tube on, the fit was a lot tighter for these, but still doable, so i POUNDED these things on down. in hindsight a little heat probably would have made this way easier...

image limit...
the NEW (extremely old needing lots and lots of work to be usable) shop! and the stanzas new home for the next long while.
as promised, the first order of business was coilovers, i literally installed these before i even had half of my tools moved over. i was so consumed with the desire to work on this car i didnt care. so to start, these are maxpeedingrods coilovers, they were very cheap, im sure they will ride like crap but its the journey not the destination around here we should all be on the same page at this point.
coils as compared to stock, note the threaded sleeve is in the middle of its adjustment range.
this is the original suspension
and the coilover. the fronts were essentially bolt on parts. the only modification needed was the strut tower bolt holes, two line up perfectly, one was about a half inch off, so i used a die grinder to oval the hole out and its good to go.
so with the fronts done, i was able to move onto the rear. which was far from a bolt on affair... as you will see.
these coilovers are actually for a 240sx, im sure they bolt right into one of those, but unfortunately the stanza does not have a multilink rear end, so this bottom mount will not work, the stanza has a rear suspension similar to the Z31s front suspension, so fortunately, i basically already did this once, just had to do it again, this time i did it a lot better imo lol
i started by chopping off this bottom cap.
machined the weld off down to the slip fit and then i was able to just knock it off leaving the threaded tube.
the strut tube was very loose inside of the threaded tube for the coilover, so i had to make a sleeve, the plan was to make it a press fit onto the original strut tube and then a press fit onto the threaded sleeve, and then weld it all. i couldnt find pipe that was close to the dimensions i needed, so i just got a solid round of steel and bored all of the inside out. as you can imagine on my tiny lathe, this took HOURS.
i took a bunch of rough measurements, taking the drop the front had achieved in the mid range of adjustment, i tried to mimic that with the rear so that it would just be level, this meant a 5 inch drop lol so thats what i aimed for.
the sleeves were each roughly one inch long. i figured one inch of interference fit between each tube would be plenty strong enough for what it is.
this sleeve went on pretty easily, it was a very good tight fit, not as tight as it could have been, but tight.
i did weld the sleeves to the strut tube at the top and left the bottom unwelded since i was going to weld them both at once and didnt want it to warp too bad before installing the threaded tube on, the fit was a lot tighter for these, but still doable, so i POUNDED these things on down. in hindsight a little heat probably would have made this way easier...
image limit...
03-21-2022, 10:29 PM
#391
Member
Thread Starter
Join Date: Oct 2016
Posts: 284
next was the top hats which if you thought the lower mount was convoluted and time consuming, buckle up. this is the part that came on the coilovers that i need to replicate.


here is the 6 inch chunk of aluminum i got to make them out of.

to get from that to this took like 3 days, i basically turned most of the rough features (which was more than half of the material from that round) and then i had to cut the entire thing in half which i ended up using a sawzall for. i had no idea how difficult it can be to simply split a large diameter round of metal, i used the parting tool in my lathe and only got like a half inch before the chatter nearly shook my lathe apart...

here you can see that i mislabeled the top lol thats actually the bottom, fortunately i realized before i did anything wrong but also it ended up not mattering which side was which.

here is one side done, i used geo metro wheel studs to replicate the original hardware so it would not only fit properly into the rear strut tower but i could even use the same nuts as the stock part, which i did.
here they both are finished, all the rubber pieces fitting like they did on the parts i replaced.

and assembled.


so the car is absolutely slammed now, i will inevitably have to raise it up given the state of the roads around here, idek if i would make it out of the driveway like this, i have maybe 4 inches of clearance to the crossmember which id rather not destroy lol it looks cool but i want the car to be drivable, until then tho... its probably gonna stay like this. at least until i get tired of having to raise it up on jackstands in several stages lol

so next little mini thing i did was fitting the radiator, i already took the measurements for this so i knew it would fit but there are some things i will still need to modify, namely this absolutely trashed cross brace thing which is probably more just a way to hold up the harness up front because it was literally 16g sheet metal that i cut out with snips. probably not going to worry about replacing it with anything.


thats all for now. working on getting an engine hoist tomorrow, ill be pulling the engine and transmission and working on rebuilding that, i pulled the gas tank so i can do the brake lines, ill be redoing the engine and trans mounts, lots and lots to do, i have to completely rewire the garage space so thats going to take some time before i can really start welding much but progress has been FAST since i moved here, much better situation for me. so stay tuned.... assuming anyone actually sees this lol
here is the 6 inch chunk of aluminum i got to make them out of.
to get from that to this took like 3 days, i basically turned most of the rough features (which was more than half of the material from that round) and then i had to cut the entire thing in half which i ended up using a sawzall for. i had no idea how difficult it can be to simply split a large diameter round of metal, i used the parting tool in my lathe and only got like a half inch before the chatter nearly shook my lathe apart...
here you can see that i mislabeled the top lol thats actually the bottom, fortunately i realized before i did anything wrong but also it ended up not mattering which side was which.
here is one side done, i used geo metro wheel studs to replicate the original hardware so it would not only fit properly into the rear strut tower but i could even use the same nuts as the stock part, which i did.
here they both are finished, all the rubber pieces fitting like they did on the parts i replaced.
and assembled.
so the car is absolutely slammed now, i will inevitably have to raise it up given the state of the roads around here, idek if i would make it out of the driveway like this, i have maybe 4 inches of clearance to the crossmember which id rather not destroy lol it looks cool but i want the car to be drivable, until then tho... its probably gonna stay like this. at least until i get tired of having to raise it up on jackstands in several stages lol
so next little mini thing i did was fitting the radiator, i already took the measurements for this so i knew it would fit but there are some things i will still need to modify, namely this absolutely trashed cross brace thing which is probably more just a way to hold up the harness up front because it was literally 16g sheet metal that i cut out with snips. probably not going to worry about replacing it with anything.
thats all for now. working on getting an engine hoist tomorrow, ill be pulling the engine and transmission and working on rebuilding that, i pulled the gas tank so i can do the brake lines, ill be redoing the engine and trans mounts, lots and lots to do, i have to completely rewire the garage space so thats going to take some time before i can really start welding much but progress has been FAST since i moved here, much better situation for me. so stay tuned.... assuming anyone actually sees this lol

 03-24-2022, 03:24 PM
#394
Member
Thread Starter
Join Date: Oct 2016
Posts: 284
it was a z31 also haha i posted a picture on the first page of the thread of its old setup, i never ended up putting the LS in it, it just sat for too long, after the pandemic started i just ran out of time and extra money to throw at it and needed the parking space so i got rid of it. i still have the LS and a built th400 and the s475 tho so im sure ill get another project car eventually but for now its just the stanza. ive been looking for a hardbody to replace my daily with too, the hybrid civic is a great car but it is incredibly slow and not very practical for the season of life im heading into, i crammed an engine hoist in it the other day and lamented every minute of it lmao but that also means that the engine will be out of the stanza soon so there will be lots more posts in the thread at some point.
 04-06-2022, 09:50 PM
#396
Member
Thread Starter
Join Date: Oct 2016
Posts: 284
heres the hoist i crammed in the car, i got it used, hf 2 ton. ive always had good experiences with this tool in the past so i finally got one of my own, i considered the one ton but heard the reach was a big problem and i know ill be using this on other vehicles at some point so buy once cry once or whatever.

empty bay covered in years of filth

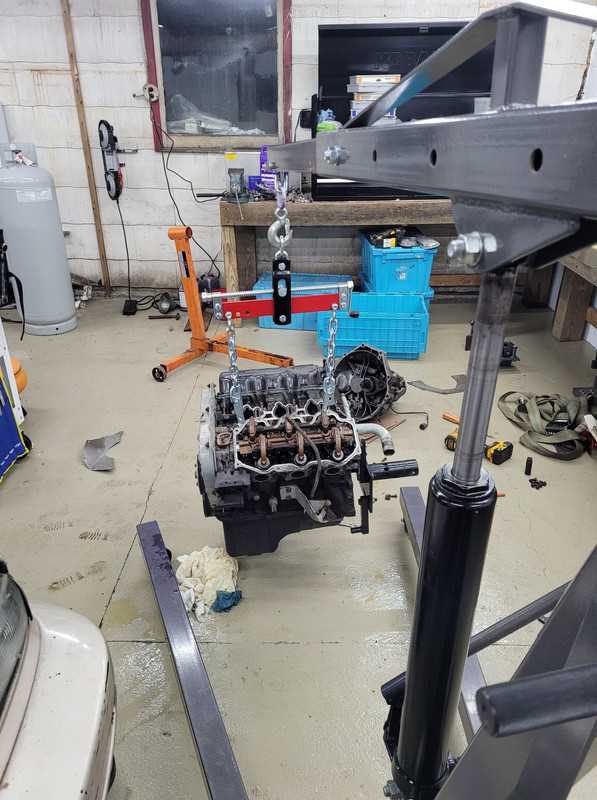


so things were going good, got the motor out, i was getting ready to take it apart but for some reason in my mind i kept putting off draining the oil and getting all of the coolant out of the engine while it was in the car and due to a series of miscalculations i was able to perform an impromptu test of the epoxy floor coating...

fortunately i had just bought a 40 quart bag of oil dri, so i used about half of that...
its got most of it soaked up and scooped into the trash now, this was from earlier today, theres still some residual moisture left i need to clean up. i have been thinking about getting a mop or something to really keep the floor clean, i really like the way i can just roll around on the floor in here and not be completely covered in concrete dust or oil like i used to at other garages so i wanna take care of stuff like this when it inevitably happens again. im gonna try to be more proactive in the future but its unavoidable to some extent.

so anyway with that minor inconvenience mostly taken care of i have some planning to do, there are several intersecting components of the car i need to work on. the brake lines and redoing the engine mounts are the major ones, ive been working on building a powder coating oven at home so i dont have to send anything out or be held up over it i can just do it myself when need be which is gonna save lots of time but before i really get into that and end up having stuff completely out of control everywhere i gotta expand my part storage and organization efforts. so im kind of at an impasse for the time being in terms of interesting content lol
knowing the brakes have to get done at some point, i decided i wanted to try to make the most presentable brake lines i possibly can by using a tubing straightener to iron all the kinks out of the coiled up tube, one of these tools new is like 100 bucks, but i decided to make my own for literally 5.

since i wasnt sure if it was going to work or not i didnt really put much effort into it, i probably spent about 30 minutes making this and it turned out surprisingly effective. i had planned to make it out of steel or maybe aluminum before seeing a piece of hardwood in my shed that seemed like it would work perfectly well enough and be much easier to drill and tap so i opted to try that, worst case i waste a bit of time and random wood i didnt need. but it worked, so i probably wont be making another lol this piece of tubing was bent, curved, even had a weird twist in it, compound angles etc. threw it in my drill and ran it through the straightener a few times and this is what came out:

it looks sort of bent still in this picture but its not, if it is bent it is completely imperceptible to me which is good enough lol so ill be using this 5 dollar bull**** whenever i end up making the new brake lines in the car, i also bought a half decent double flair tool so i hopefully wont be trashing these 10 foot segments cause the 50 foot of it that i have will go quick enough even if i dont lol
lastly for this update, i have clutch options. left one is the completely stock clutch i slapped together to get the car moving that is probably good for about 200hp or so but has really nice, gentle drivability, the other is a stage 5 drag clutch that can handle 600ftlbs iirc with the engagement of a solenoid... this clutch was in my Z back when it was vg33 powered and it was not my favorite thing lol super heavy clutch pedal and like i said the engagement was like a light switch, you cant really slide into it for like a slow controlled pull away, as soon as it touches the flywheel it grabs and youre moving. the slowest i could go in the z with the clutch engaged was 10mph lol which is sketch... so either im making a compromise here or im selling this drag clutch and getting something a little more cruise friendly. if anyone wants it or has an opinion on what i should go with let me know.

im gonna try to update at about this same pace, definitely trying to make a little progress every day or so, stuff will definitely pick up once it gets warmer and i have more infrastructural things in the garage taken care of so i can focus entirely on the car but for today, a sporadic and incoherent update will have to do.
empty bay covered in years of filth
so things were going good, got the motor out, i was getting ready to take it apart but for some reason in my mind i kept putting off draining the oil and getting all of the coolant out of the engine while it was in the car and due to a series of miscalculations i was able to perform an impromptu test of the epoxy floor coating...
fortunately i had just bought a 40 quart bag of oil dri, so i used about half of that...
its got most of it soaked up and scooped into the trash now, this was from earlier today, theres still some residual moisture left i need to clean up. i have been thinking about getting a mop or something to really keep the floor clean, i really like the way i can just roll around on the floor in here and not be completely covered in concrete dust or oil like i used to at other garages so i wanna take care of stuff like this when it inevitably happens again. im gonna try to be more proactive in the future but its unavoidable to some extent.
so anyway with that minor inconvenience mostly taken care of i have some planning to do, there are several intersecting components of the car i need to work on. the brake lines and redoing the engine mounts are the major ones, ive been working on building a powder coating oven at home so i dont have to send anything out or be held up over it i can just do it myself when need be which is gonna save lots of time but before i really get into that and end up having stuff completely out of control everywhere i gotta expand my part storage and organization efforts. so im kind of at an impasse for the time being in terms of interesting content lol
knowing the brakes have to get done at some point, i decided i wanted to try to make the most presentable brake lines i possibly can by using a tubing straightener to iron all the kinks out of the coiled up tube, one of these tools new is like 100 bucks, but i decided to make my own for literally 5.
since i wasnt sure if it was going to work or not i didnt really put much effort into it, i probably spent about 30 minutes making this and it turned out surprisingly effective. i had planned to make it out of steel or maybe aluminum before seeing a piece of hardwood in my shed that seemed like it would work perfectly well enough and be much easier to drill and tap so i opted to try that, worst case i waste a bit of time and random wood i didnt need. but it worked, so i probably wont be making another lol this piece of tubing was bent, curved, even had a weird twist in it, compound angles etc. threw it in my drill and ran it through the straightener a few times and this is what came out:
it looks sort of bent still in this picture but its not, if it is bent it is completely imperceptible to me which is good enough lol so ill be using this 5 dollar bull**** whenever i end up making the new brake lines in the car, i also bought a half decent double flair tool so i hopefully wont be trashing these 10 foot segments cause the 50 foot of it that i have will go quick enough even if i dont lol
lastly for this update, i have clutch options. left one is the completely stock clutch i slapped together to get the car moving that is probably good for about 200hp or so but has really nice, gentle drivability, the other is a stage 5 drag clutch that can handle 600ftlbs iirc with the engagement of a solenoid... this clutch was in my Z back when it was vg33 powered and it was not my favorite thing lol super heavy clutch pedal and like i said the engagement was like a light switch, you cant really slide into it for like a slow controlled pull away, as soon as it touches the flywheel it grabs and youre moving. the slowest i could go in the z with the clutch engaged was 10mph lol which is sketch... so either im making a compromise here or im selling this drag clutch and getting something a little more cruise friendly. if anyone wants it or has an opinion on what i should go with let me know.
im gonna try to update at about this same pace, definitely trying to make a little progress every day or so, stuff will definitely pick up once it gets warmer and i have more infrastructural things in the garage taken care of so i can focus entirely on the car but for today, a sporadic and incoherent update will have to do.
04-10-2022, 08:53 PM
#397
Member
Thread Starter
Join Date: Oct 2016
Posts: 284
powder coating oven is basically done, not 100% sure it wont literally burst into flames yet but its getting hot on the inside and not the outside so thats cool. ive started making a list so i can kind of figure out the order i wanna start getting stuff done in but in the mean time i had the idea that i wanna do my vacuum lines with hard line just so its more reliable and it will look cool and stuff but its been really hard to find information on what people use, it looks like people are using AN fittings with compression sleeves and flares but i have no idea what size is considered standard. the -4 stuff i was using was a little too big for my eye but i dont want to cause problems going too small either so ill have to keep researching.
another thing i have been rolling around my empty head is converting to manual brakes, i have only bad reasons for wanting to do this, aesthetics and cost, but they are reasons nonetheless. ive seen plenty of people who converted their much MUCH heavier and more powerful cars to them and have nothing but good things to say about them when done right, my only concern would be that my stock calipers would be too small. the rear drums would actually be a big benefit since they are so much more efficient than rotors (as far as i understand) so im not worried about the back as much as i am worried about the front not keeping up and fishtailing. a proportioning valve could help but if the disparity is large enough i would just end up with less braking power overall which is the opposite of a solution. gonna have to do more research, if anyone knows of bolt on brakes for these knuckles throw it down. i might just go with z32 brakes, i think those are a relatively bolt on affair but idk. even z31 brakes are bigger than the stanzas lol the real major concerns are keeping the little shaft from slipping out of the master and losing brakes entirely, which is a thing i know how to prevent by now so i personally am not worried about it, and the other is the fulcrum point of the brake pedal which makes all the difference. i believe a 6:1 ratio is what most people have that seems to work, so its as simple as raising the master up and redrilling the hole on the pedal so the brake pedal lever is longer.
ive got lots of time to think about it (i think) but i dont think im gonna end up changing my mind about doing it, just how it will be done. if guys on the ls1tech forum can do it, so can i.
05-12-2022, 09:42 PM
#398
Member
Thread Starter
Join Date: Oct 2016
Posts: 284
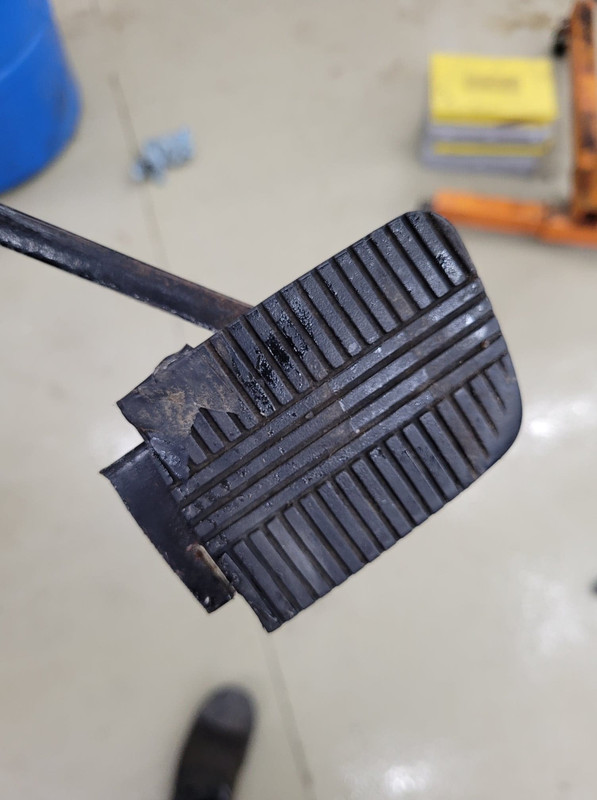
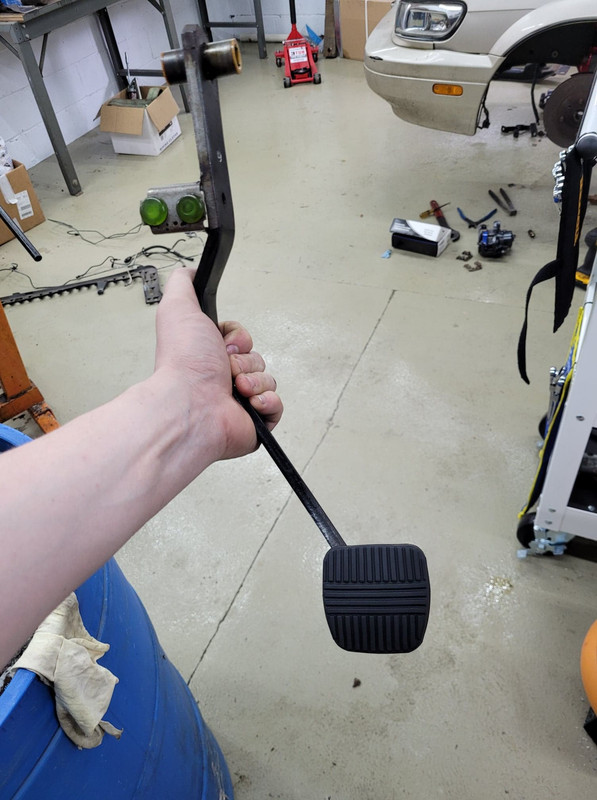
ok so i havent posted in a month, but thats because ive been busy and my ability to document things in a coherent way has suffered a bit from that lol but ill do my best with the stuff i did take pictures of, starting with the manual brake conversion and my super jank brake pedal i literally just cut in half because the auto pedal was too wide and was too close to the clutch pedal when i converted this car to manual with sentra parts, a socket set, a pneumatic drill and some sticks and chewing gum... and electrical tape. all while sleeping in a detached shed on an air mattress with a hole in it, without showering for 5 days straight.

converting to manual as opposed to just removing the brake booster means changing the pivot point for the push rod to get a better pedal ratio which will result in less force needed to get the same pressure. the ratio i went for was 6:1. as you may notice i also had to move one of the legs of that little bracket that holds those dot things that push against the brake light limit switches.

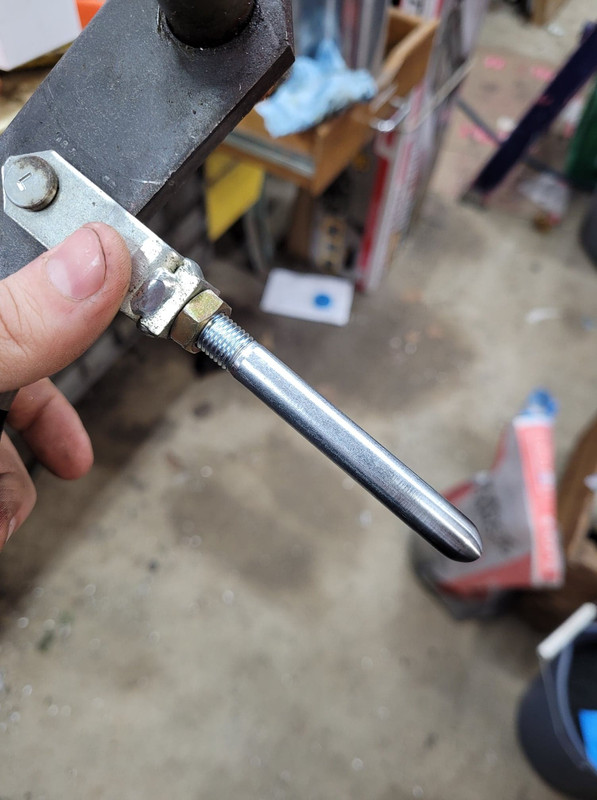
i made a new pushrod out of a bolt.
the reason the pedal has holes in it isnt because they kinda look cool, its because this piece of metal is from a door hinge because it was the only thing i could find that was the right thickness and material i needed. of course its also galvanized and was disgusting and unpleasant to weld.


here is the finished pedal with a brand new cover.
with the pivot higher of course the master also has to be moved up in order to keep the push rod level and coincidentally the bolt holes for the booster and the master line up perfectly and the spacing was perfect, so all i really had to do was make a plate to cover the old hole.

here it is with the new master and the rear lines done, the gap between this and the last image is probably 25 days lol ive had a lot of different things going on at once and the rear lines took a long time to run.

i have a lot more to do with the brake lines (i actually just finished the last one this afternoon) so im going to come back to this in the next update, im looking into clips and clamps and stuff to put the final touches on and clean everything up, none of the lines are perfect but there are some things i wanna do to make them look a little better.

now onto the vast majority of what ive been up to outside of the brakes.... powder coating! which also partially involves the brakes.
i built this powder coating oven out of a cabinet like 3 months ago knowing i was going to need it for powder coating, it was kind of sketch with how much dirt and oil and crap that was in it from years and years of it actually being used as a cabinet but its all burnt out now and is actually a pretty reliable oven, it works perfectly for what im doing anyway. basically all i did was line all of the sides and door with fiberglass insulation and then make aluminum panels to fit over them. the element is like 1500 watts and i got in on ebay, this thing easily gets to over 400 degrees in 10-15 minutes.

here is my even more jank powder coating area where i actually spray on the powder. once i can actually do this in the garage where the car is ill probably figure out a means of reclaiming the powder because this gun will blast out a TON of it for absolutely no reason just from tilting it certain ways, its really annoying but it only happens when its not running so it hasnt screwed anything up its just a waste of powder.

converting to manual as opposed to just removing the brake booster means changing the pivot point for the push rod to get a better pedal ratio which will result in less force needed to get the same pressure. the ratio i went for was 6:1. as you may notice i also had to move one of the legs of that little bracket that holds those dot things that push against the brake light limit switches.
i made a new pushrod out of a bolt.
the reason the pedal has holes in it isnt because they kinda look cool, its because this piece of metal is from a door hinge because it was the only thing i could find that was the right thickness and material i needed. of course its also galvanized and was disgusting and unpleasant to weld.
here is the finished pedal with a brand new cover.
with the pivot higher of course the master also has to be moved up in order to keep the push rod level and coincidentally the bolt holes for the booster and the master line up perfectly and the spacing was perfect, so all i really had to do was make a plate to cover the old hole.
here it is with the new master and the rear lines done, the gap between this and the last image is probably 25 days lol ive had a lot of different things going on at once and the rear lines took a long time to run.
i have a lot more to do with the brake lines (i actually just finished the last one this afternoon) so im going to come back to this in the next update, im looking into clips and clamps and stuff to put the final touches on and clean everything up, none of the lines are perfect but there are some things i wanna do to make them look a little better.
now onto the vast majority of what ive been up to outside of the brakes.... powder coating! which also partially involves the brakes.
i built this powder coating oven out of a cabinet like 3 months ago knowing i was going to need it for powder coating, it was kind of sketch with how much dirt and oil and crap that was in it from years and years of it actually being used as a cabinet but its all burnt out now and is actually a pretty reliable oven, it works perfectly for what im doing anyway. basically all i did was line all of the sides and door with fiberglass insulation and then make aluminum panels to fit over them. the element is like 1500 watts and i got in on ebay, this thing easily gets to over 400 degrees in 10-15 minutes.
here is my even more jank powder coating area where i actually spray on the powder. once i can actually do this in the garage where the car is ill probably figure out a means of reclaiming the powder because this gun will blast out a TON of it for absolutely no reason just from tilting it certain ways, its really annoying but it only happens when its not running so it hasnt screwed anything up its just a waste of powder.
05-12-2022, 10:09 PM
#399
Member
Thread Starter
Join Date: Oct 2016
Posts: 284
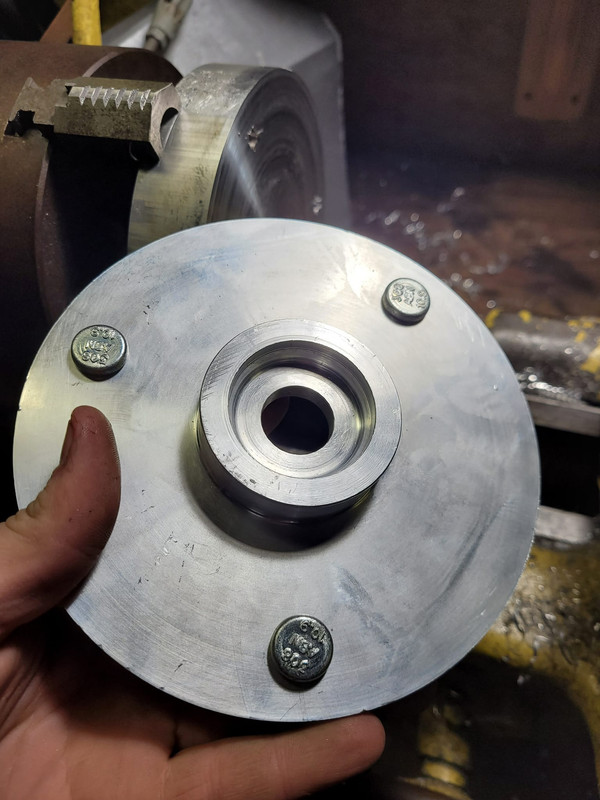
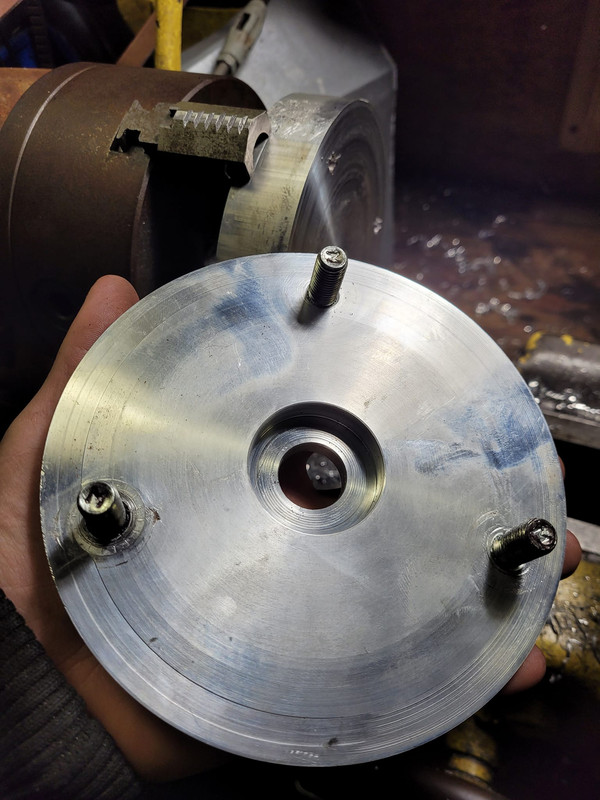
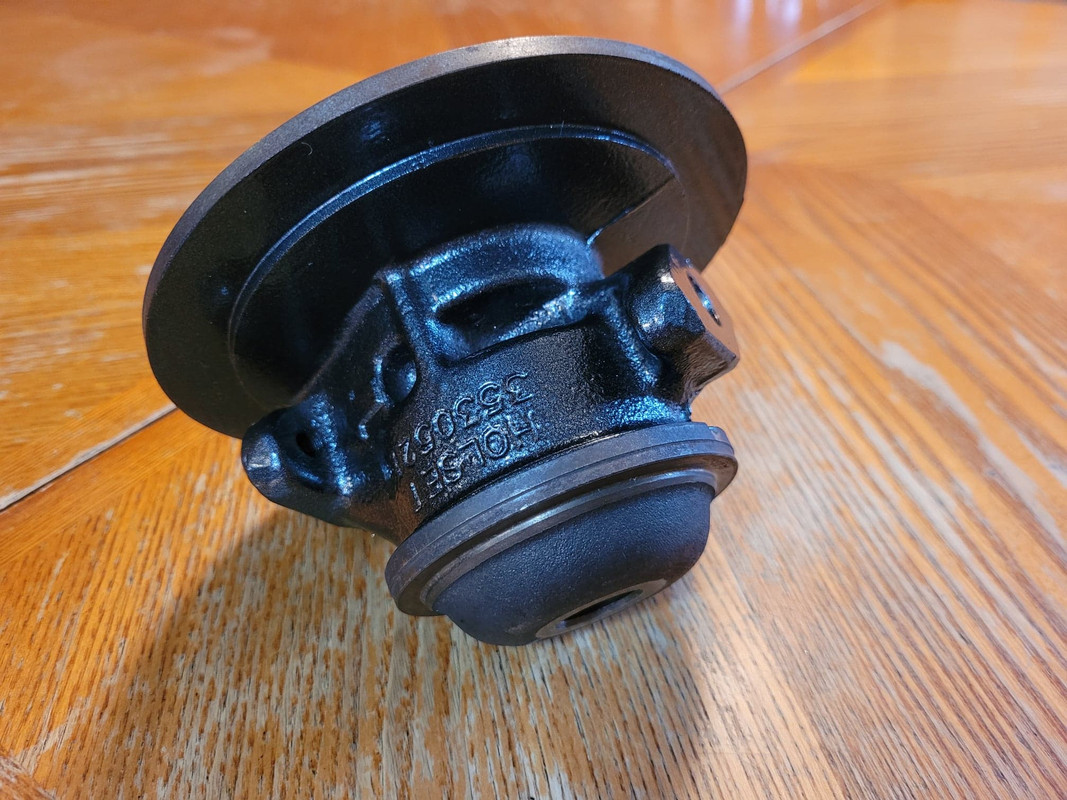
here is the pulley, this was the first ever attempt and it actually came out pretty good, i didnt really put much effort into preparing the part, thinking there was no way it was going to work and this was the easiest and simplest part to just clean up but it actually worked great so i moved on.

i didnt actually take pictures of the starter reassembled but its basically done. i have to chase out some threaded holes i didnt plug so when i do that ill take a picture, i mean youre definitely going to see it again regardless.

like an idiot i forgot that the starter grounds through the machined surface thats bolted to the transmission, you cant tell but i didnt tape it off and now i have to figure out a way to grind it all off while keeping it flat, it sounds easy but there is this big protrusion that means i cant just use a sanding block or whatever, im probably going to just have to use a file lol that was really the only mistake i made in doing all of this powder coat aside from poor coverage.


i did the alternator too, i didnt take any before pictures but you all have seen alternators before im sure.


you may notice at this point that a lot of the hardware on these parts still looks all rusty and gross, thats because it would cost money to replace them and its not really that important to me to put any real effort into cleaning this hardware up with how much other stuff i have to do, so i wire wheeled some things and just straight up left others the way they were. i kinda like the contrast tbh and it will also mean there is a slightly better chance i will ever actually drive this car.

i also did the center section of the turbo, i also rebuilt the turbo so it shouldnt spray a bunch of oil into the exhaust like it used to.

the brake calipers... i was debating on upgrading the front brakes, which i may still do at some point, but i already own this stuff and it will work just fine so i rebuilt and powder coated these too. i also got my sand blaster really dialed in which means the parts i put in it come out a lot cleaner in a fraction of the time, which is cool, its actually a useful thing now.


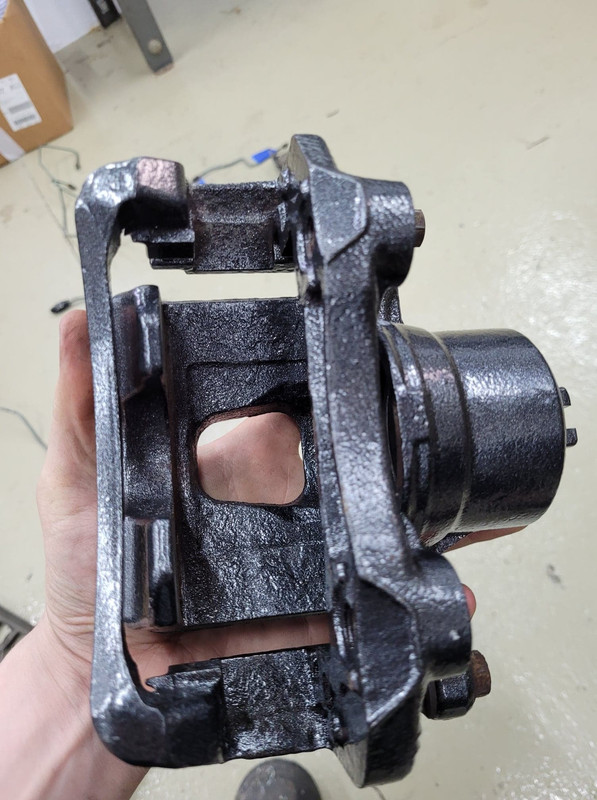
P.S. definitely getting new rotors dont worry.

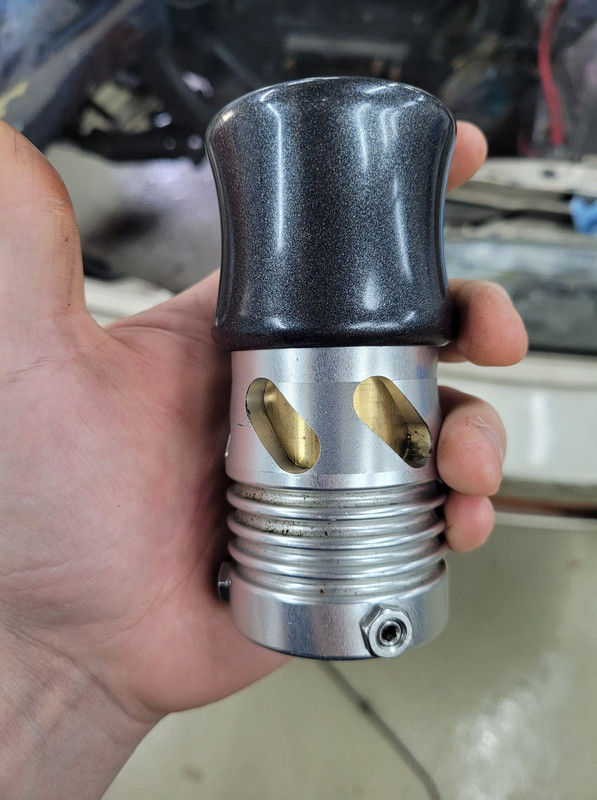
and finally the blow off valve top piece. i still kind of regret sanding off the anodizing from turbosmart since i like their brand and everything, but i cant be mad at how this looks.

i will be powder coating a LOT more stuff but as time goes on i am going to get more deliberate about what does and doesnt get it or maybe ill get some different colors. i still need to decide what color i will be doing the inlet housing on the turbo, but a lot of the stuff is going to be this cadillac grey, i have a maroon as well but im not sure i want that on this car yet.
i didnt actually take pictures of the starter reassembled but its basically done. i have to chase out some threaded holes i didnt plug so when i do that ill take a picture, i mean youre definitely going to see it again regardless.
like an idiot i forgot that the starter grounds through the machined surface thats bolted to the transmission, you cant tell but i didnt tape it off and now i have to figure out a way to grind it all off while keeping it flat, it sounds easy but there is this big protrusion that means i cant just use a sanding block or whatever, im probably going to just have to use a file lol that was really the only mistake i made in doing all of this powder coat aside from poor coverage.
i did the alternator too, i didnt take any before pictures but you all have seen alternators before im sure.
you may notice at this point that a lot of the hardware on these parts still looks all rusty and gross, thats because it would cost money to replace them and its not really that important to me to put any real effort into cleaning this hardware up with how much other stuff i have to do, so i wire wheeled some things and just straight up left others the way they were. i kinda like the contrast tbh and it will also mean there is a slightly better chance i will ever actually drive this car.
i also did the center section of the turbo, i also rebuilt the turbo so it shouldnt spray a bunch of oil into the exhaust like it used to.
the brake calipers... i was debating on upgrading the front brakes, which i may still do at some point, but i already own this stuff and it will work just fine so i rebuilt and powder coated these too. i also got my sand blaster really dialed in which means the parts i put in it come out a lot cleaner in a fraction of the time, which is cool, its actually a useful thing now.
P.S. definitely getting new rotors dont worry.
and finally the blow off valve top piece. i still kind of regret sanding off the anodizing from turbosmart since i like their brand and everything, but i cant be mad at how this looks.
i will be powder coating a LOT more stuff but as time goes on i am going to get more deliberate about what does and doesnt get it or maybe ill get some different colors. i still need to decide what color i will be doing the inlet housing on the turbo, but a lot of the stuff is going to be this cadillac grey, i have a maroon as well but im not sure i want that on this car yet.
06-09-2022, 07:24 PM
#400
Member
Thread Starter
Join Date: Oct 2016
Posts: 284
new rotors

front brakes are 100% done. lines, rubber hoses, brackets, fittings etc.


the holes in the firewall for the AC lines had to be blocked off

so i made a plate
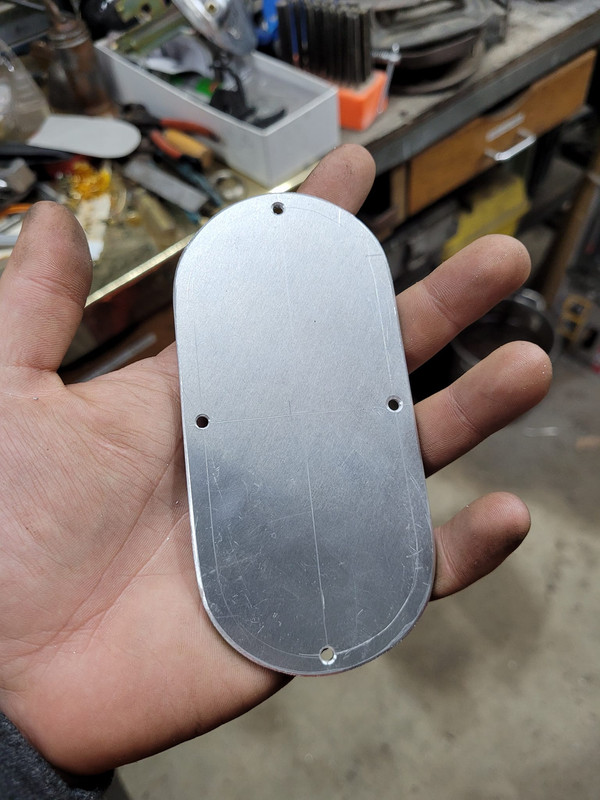
much better

this is the steering angle after the coilovers..... not good lol probably would have had really bad bump steer, fortunately someone makes these little adaptor things with the right taper so i was able to flip the tie rod ends to correct it.


Teraflex 990175 just in case anyone else needs this information. i followed the information from the absolute king who made this thread: https://ratsun.net/topic/72201-impor...pered-inserts/

here is the corrected steering angle. much better.

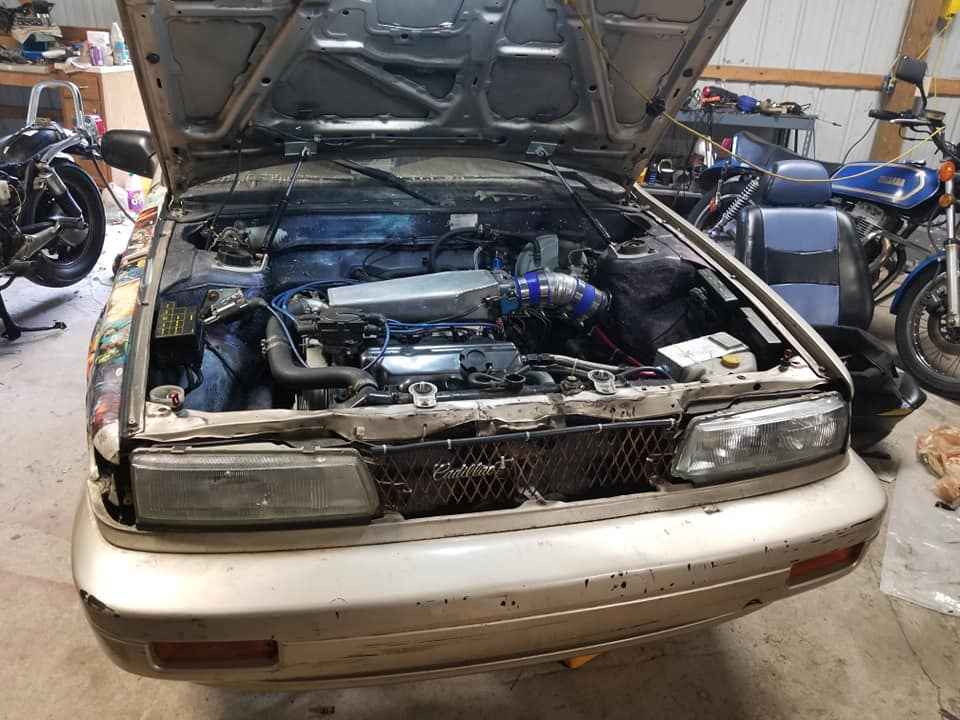
here is the engine bay as of now. im still working on the fuel system which i am going to try to get finished before putting the rear end back in so the rear brakes will have to be in another update.

i may start working on the motor mounts in the mean time, the fuel pump plate has needed so much more work than i expected lol its kind of ridiculous how much effort it takes to do things the right way sometimes but im not making any compromises, hopefully it will be done soon, then i have some wiring and other things to do in the rear end before i can finally set the car down again and focus entirely on the engine bay. im making a lot more progress than i can show unfortunately but things should come together in later updates.
front brakes are 100% done. lines, rubber hoses, brackets, fittings etc.
the holes in the firewall for the AC lines had to be blocked off
so i made a plate
much better
this is the steering angle after the coilovers..... not good lol probably would have had really bad bump steer, fortunately someone makes these little adaptor things with the right taper so i was able to flip the tie rod ends to correct it.
Teraflex 990175 just in case anyone else needs this information. i followed the information from the absolute king who made this thread: https://ratsun.net/topic/72201-impor...pered-inserts/
here is the corrected steering angle. much better.
here is the engine bay as of now. im still working on the fuel system which i am going to try to get finished before putting the rear end back in so the rear brakes will have to be in another update.
i may start working on the motor mounts in the mean time, the fuel pump plate has needed so much more work than i expected lol its kind of ridiculous how much effort it takes to do things the right way sometimes but im not making any compromises, hopefully it will be done soon, then i have some wiring and other things to do in the rear end before i can finally set the car down again and focus entirely on the engine bay. im making a lot more progress than i can show unfortunately but things should come together in later updates.