How-to : light switch assembly salvage
 08-28-2011, 08:13 AM
#1
Senior Member
Thread Starter

Join Date: Oct 2004
Location: Pretoria - South Africa
Posts: 1,205
How-to : light switch assembly salvage
After you have recovered from your heart by-pass surgery (brought on by receiving replacement cost of funky light switch assembly) you can follow this relatively easy 30 minute job and save yourself a lot of misery.
Symptoms: - one of both tail lights don't work or are intermittent, one or both head lights don't work or are intermittent, dim/bright selection is iffy and sometimes doesn't work at all ..................... all these are caused by funky headlight switch assembly. The poor little contacts just cannot be expected to carry the huge currents required and stay reliable - they are bound to burn at some stage, and if you have made it till now without any light hassles, then the switch assembly actually had a very good innings.
First thing to do - there is a very neat headlight mod (Wiking's) involving the fitting of relays to carry the huge currents going to the light assemblies and as a result lightening the work load of the contacts in the actual light switch assembly on the steering column ...................... you should already have done that first so as to ensure future reliable operation of the light switch - surface material from the contact surfaces in the light switch assembly is actually removed during the salvage of the light switch assembly, and as a result it will only be able to carry less current than even originally designed for contact surfaces - you can take a chance and not do the fitting of relays thing, but you are then bound to repeat this whole exorcize sooner rather than later - if you do this right, you should not be required to either replace or even touch the light switch assembly again for the rest of the life of the vehicle
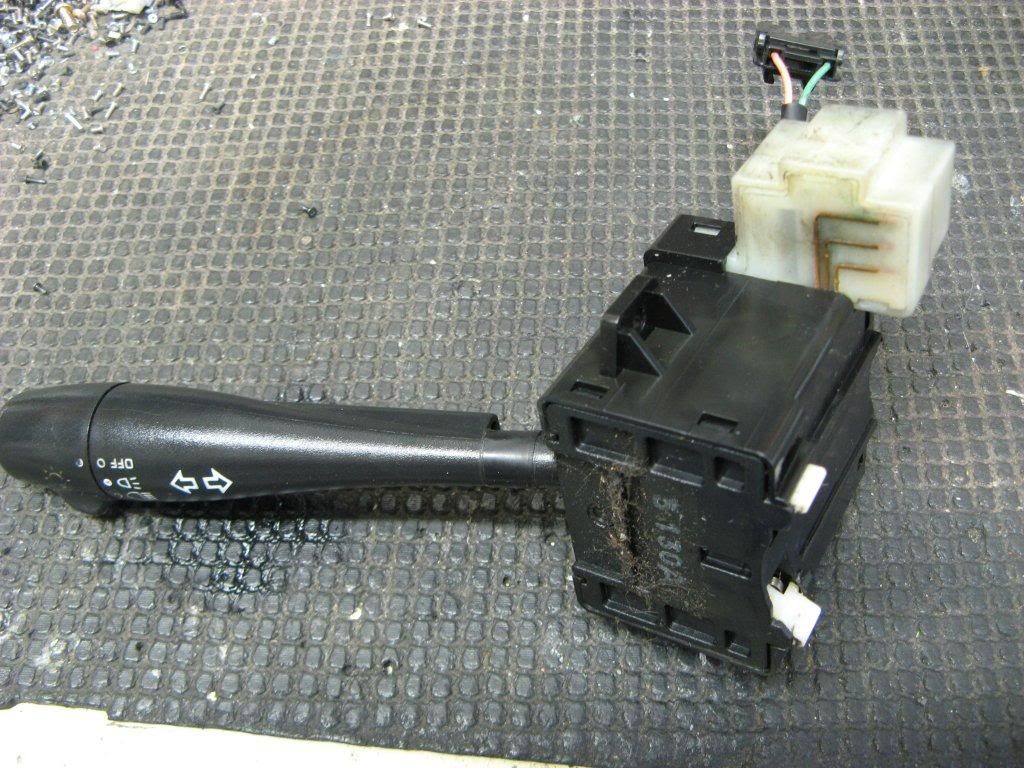
Remove 6 Philips screws from the steering column cover to expose the switch assemblies. Unplug the 2 sockets for the light switch assembly by depressing the tabs before pulling them out. Remove 2 Philips screws that holds the light-switch assembly in place................ pull out the switch assembly - this is what you will sit with in your hand
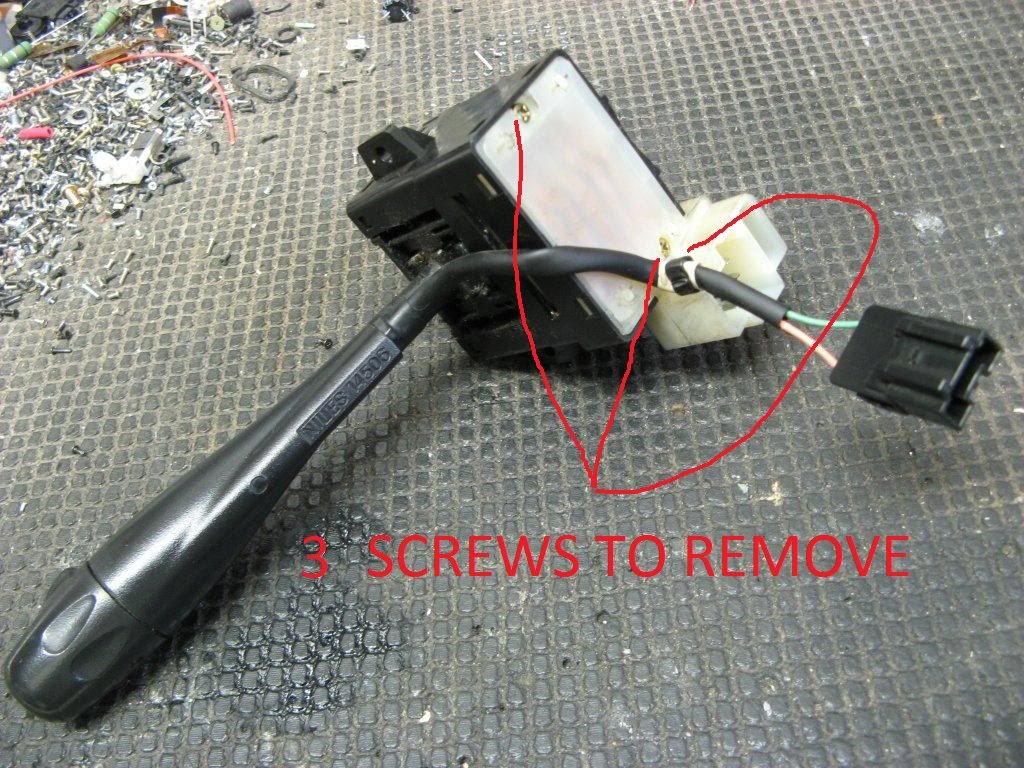
Now remove 2 big and one small Philips screw that holds the plastic sections together
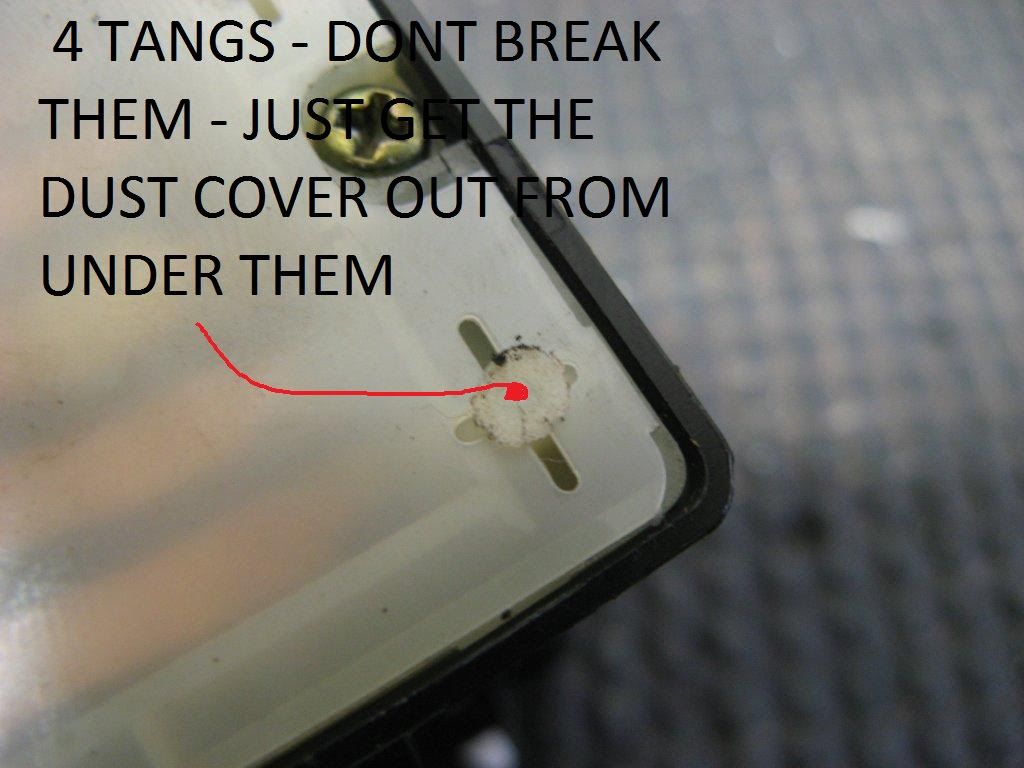
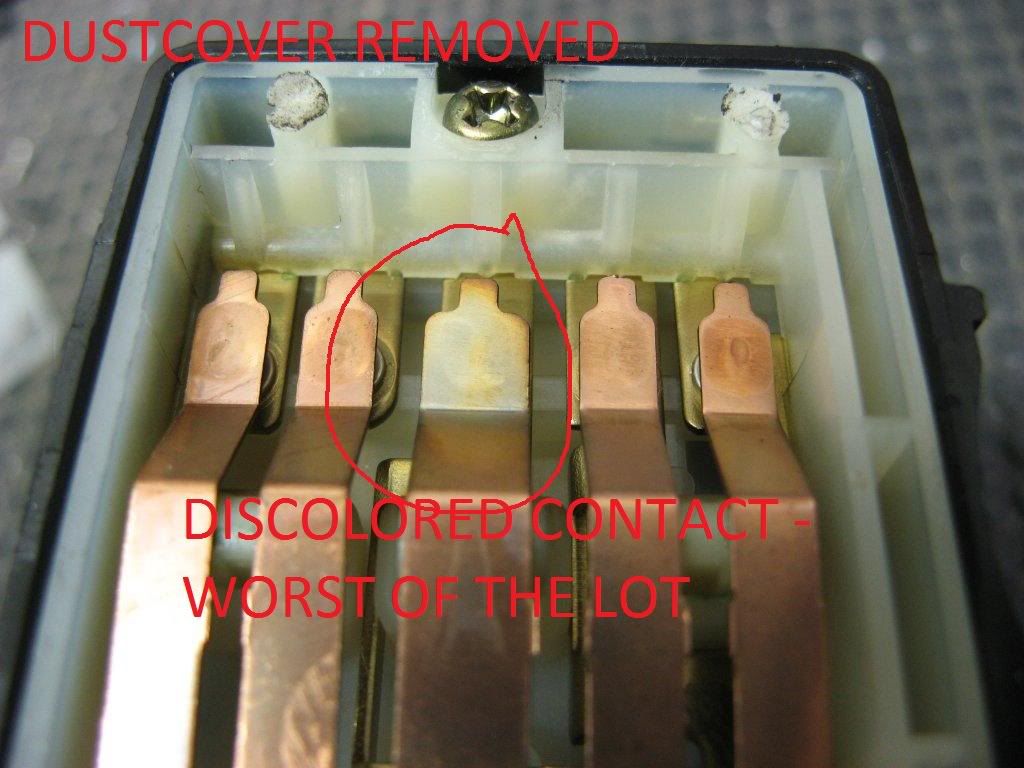
Remove the switches' plastic dust cover by prying the 4 corners from the split holes
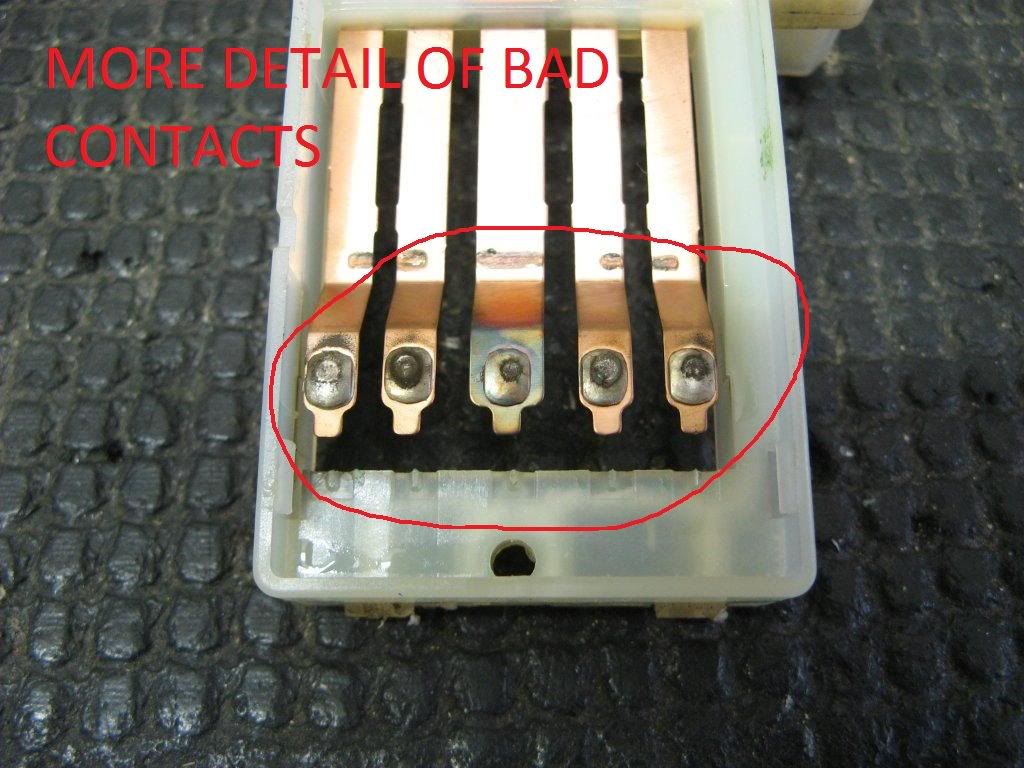
Notice some of the switches already showing known bad contact symptoms - ie - the bad contacts heat up and actually discolors the switch assembly
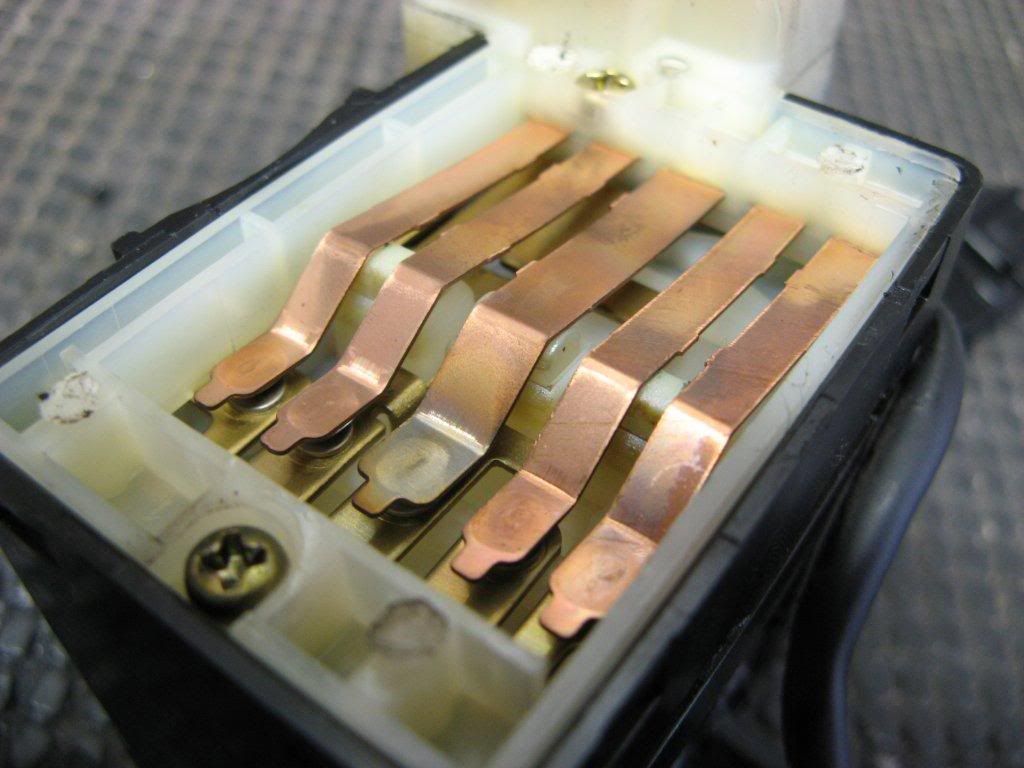
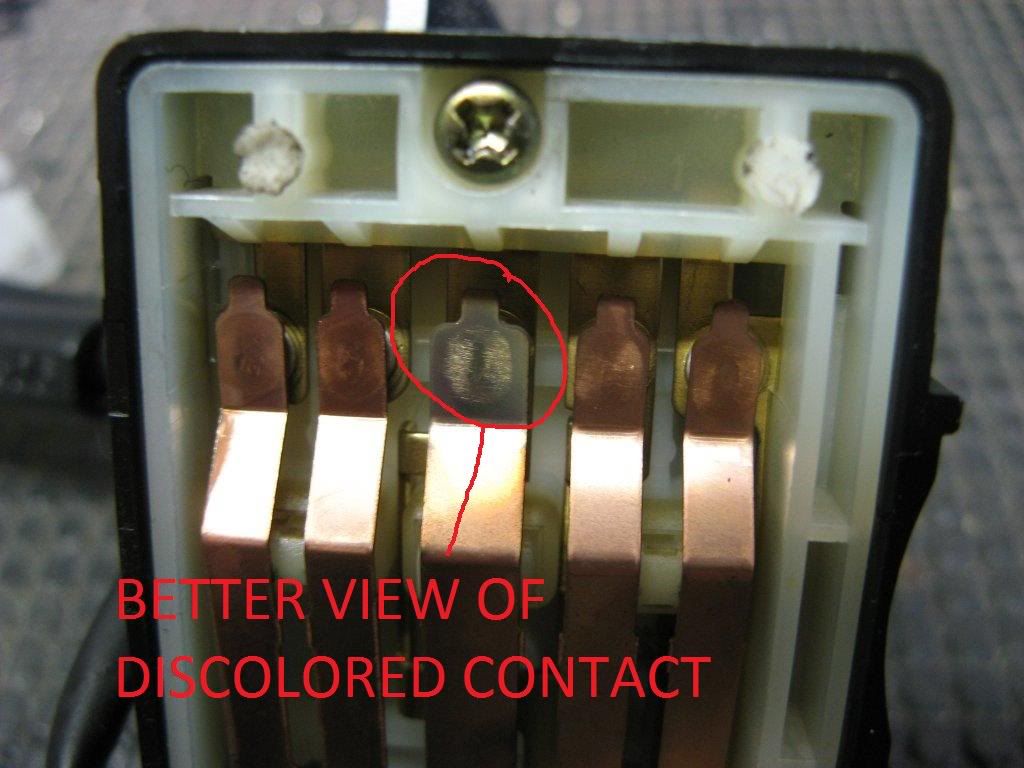
More detail of the discoloured contact
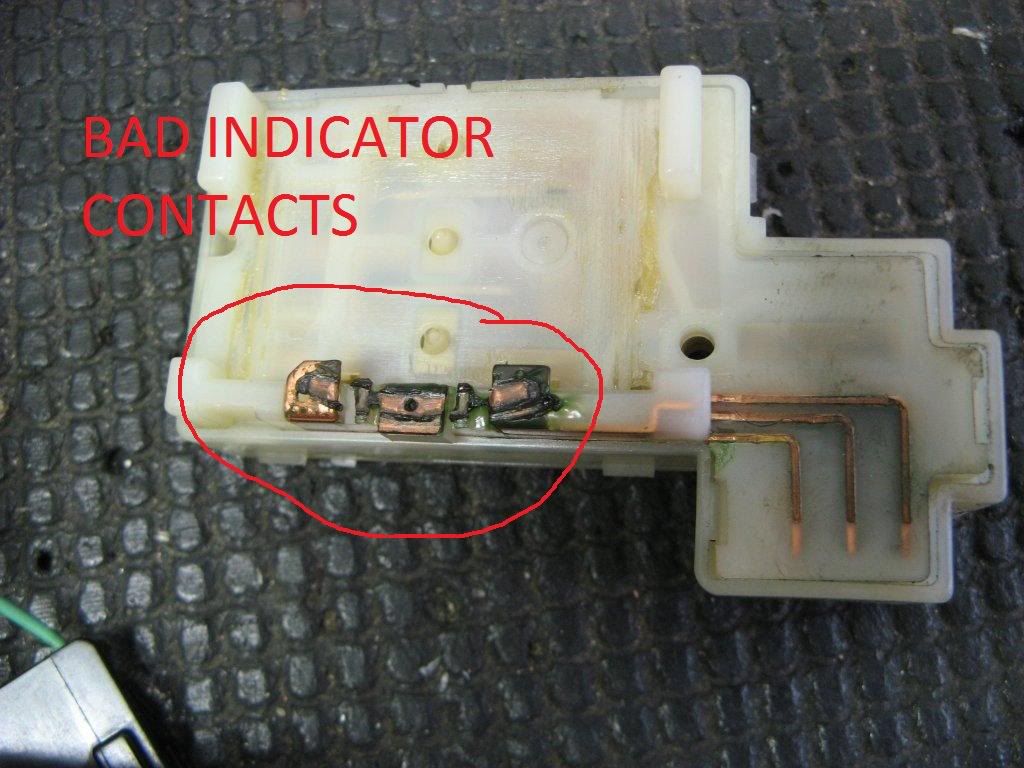
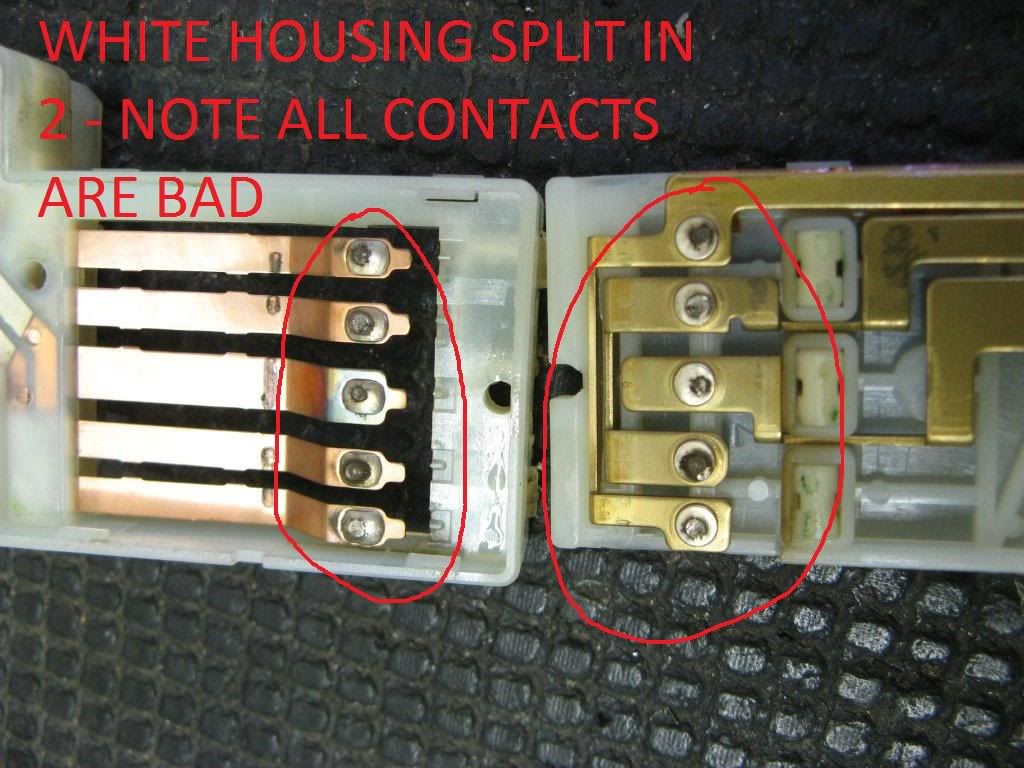
You can now split the black and the white sections of the switch by removing 2 Philips screws holding them together and then wedging the 8 clips open so that you can pull the white section out of the black section - keep the black section at the bottom so all its innards don't fall out on your feet - you should now be able to separate the 2 halves of the white section to get to the actual switch contact points and it will look pretty grotty - something like this
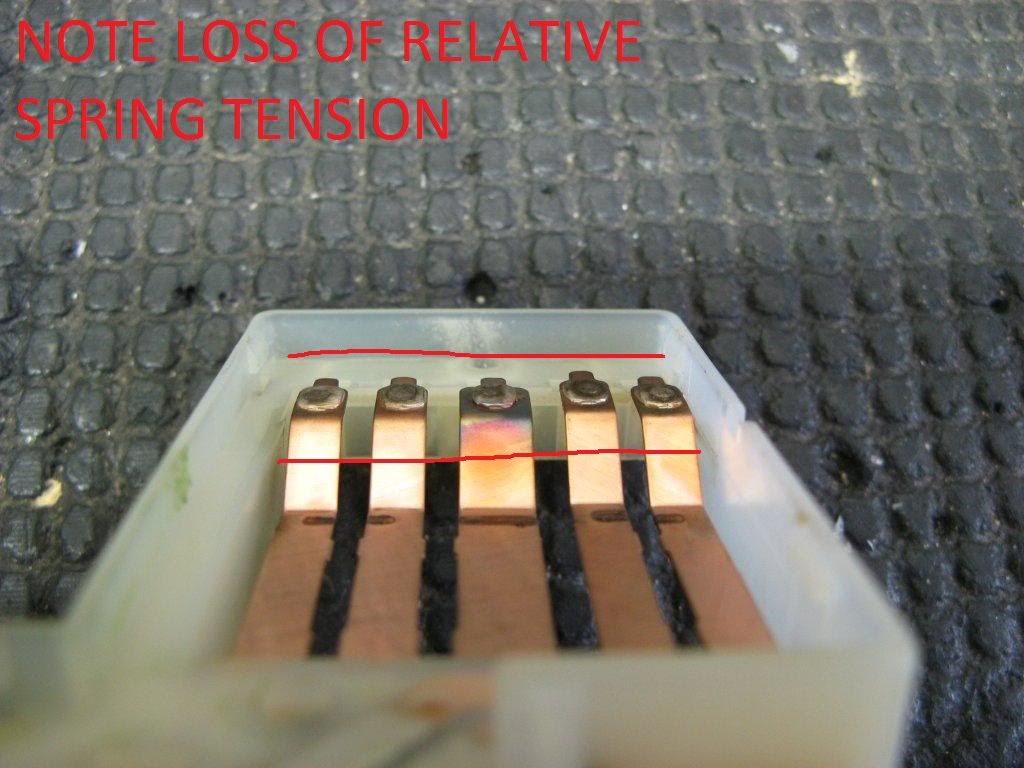
Notice how the contacts are not all sitting in a straight line - some has already lost a lot of their intended rest position memory due to loss of tension (heating up due to bad contacts)
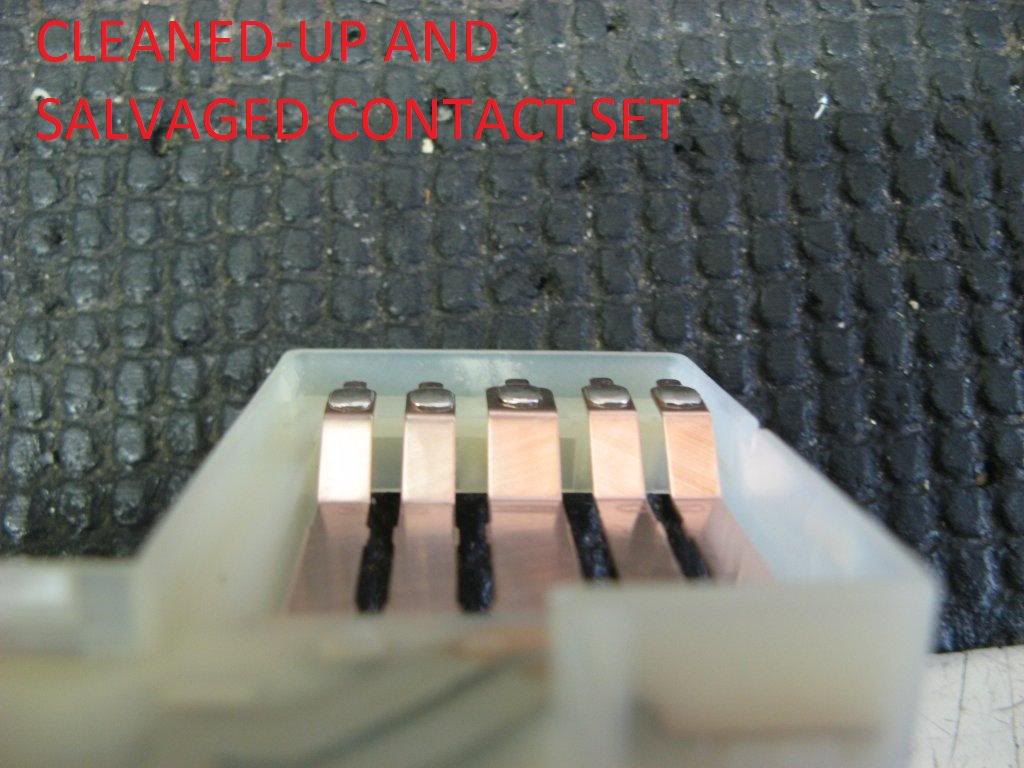
Once you clean up the moving contact set you should also bend the leafs as close to the plastic mounting area so that the contacts are about level with the plastic housing's edge
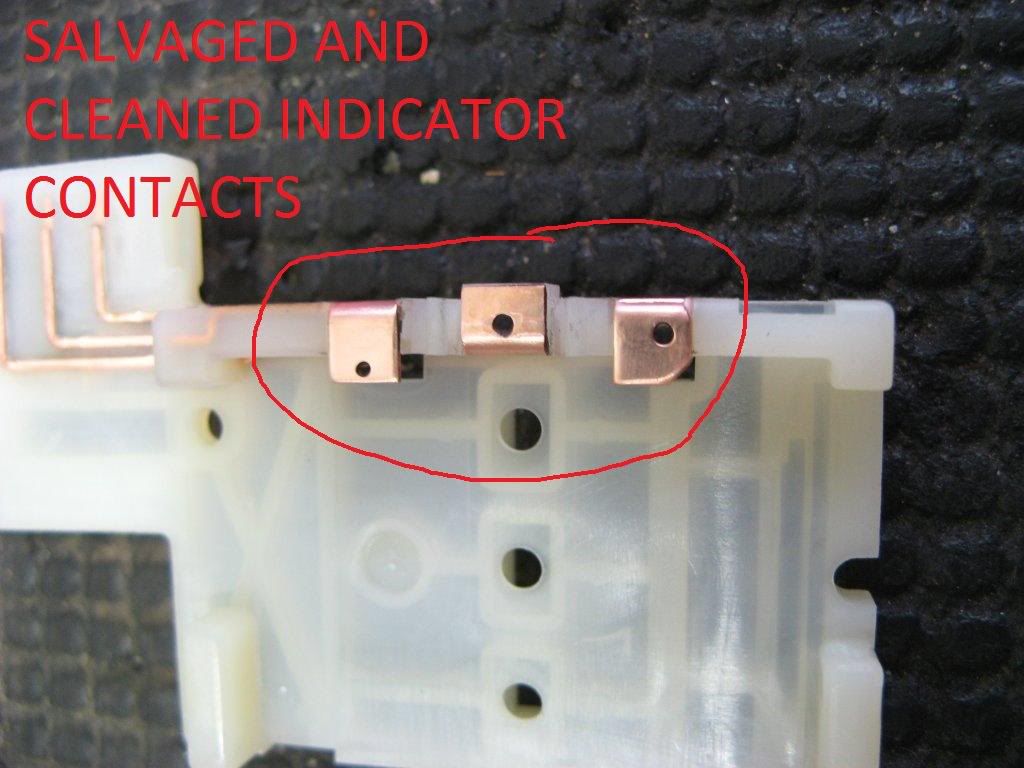
Clean up the indicator contacts - remove any old grease till they look like this
File down the static contacts till they are nice and clean and not showing any burn or pitting marks any more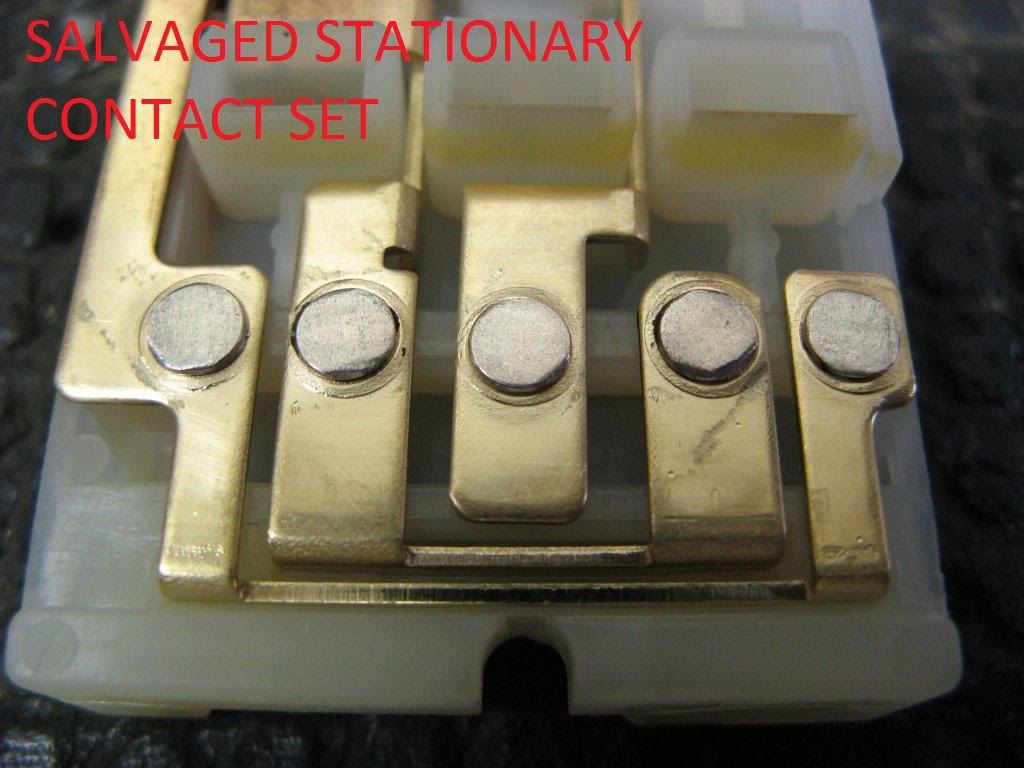
Once you are here, grease the 3 plastic cam followers in their pockets, grease their tips, insert them in their pockets, assemble the whole switch assembly again by reversing the disassembly order, and have a bit of reliable light in your life again once its back and mounted on the steering column.
Symptoms: - one of both tail lights don't work or are intermittent, one or both head lights don't work or are intermittent, dim/bright selection is iffy and sometimes doesn't work at all ..................... all these are caused by funky headlight switch assembly. The poor little contacts just cannot be expected to carry the huge currents required and stay reliable - they are bound to burn at some stage, and if you have made it till now without any light hassles, then the switch assembly actually had a very good innings.
First thing to do - there is a very neat headlight mod (Wiking's) involving the fitting of relays to carry the huge currents going to the light assemblies and as a result lightening the work load of the contacts in the actual light switch assembly on the steering column ...................... you should already have done that first so as to ensure future reliable operation of the light switch - surface material from the contact surfaces in the light switch assembly is actually removed during the salvage of the light switch assembly, and as a result it will only be able to carry less current than even originally designed for contact surfaces - you can take a chance and not do the fitting of relays thing, but you are then bound to repeat this whole exorcize sooner rather than later - if you do this right, you should not be required to either replace or even touch the light switch assembly again for the rest of the life of the vehicle
Remove 6 Philips screws from the steering column cover to expose the switch assemblies. Unplug the 2 sockets for the light switch assembly by depressing the tabs before pulling them out. Remove 2 Philips screws that holds the light-switch assembly in place................ pull out the switch assembly - this is what you will sit with in your hand
Now remove 2 big and one small Philips screw that holds the plastic sections together
Remove the switches' plastic dust cover by prying the 4 corners from the split holes
Notice some of the switches already showing known bad contact symptoms - ie - the bad contacts heat up and actually discolors the switch assembly
More detail of the discoloured contact
You can now split the black and the white sections of the switch by removing 2 Philips screws holding them together and then wedging the 8 clips open so that you can pull the white section out of the black section - keep the black section at the bottom so all its innards don't fall out on your feet - you should now be able to separate the 2 halves of the white section to get to the actual switch contact points and it will look pretty grotty - something like this
Notice how the contacts are not all sitting in a straight line - some has already lost a lot of their intended rest position memory due to loss of tension (heating up due to bad contacts)
Once you clean up the moving contact set you should also bend the leafs as close to the plastic mounting area so that the contacts are about level with the plastic housing's edge
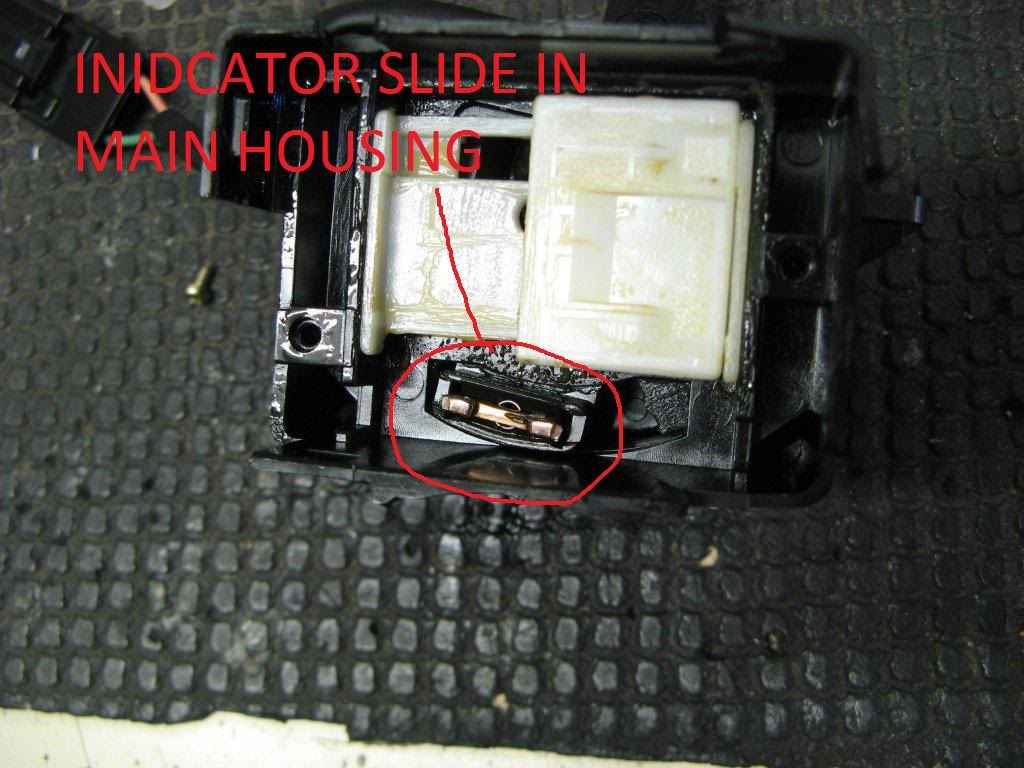
Clean up the indicator contacts - remove any old grease till they look like this
File down the static contacts till they are nice and clean and not showing any burn or pitting marks any more
Once you are here, grease the 3 plastic cam followers in their pockets, grease their tips, insert them in their pockets, assemble the whole switch assembly again by reversing the disassembly order, and have a bit of reliable light in your life again once its back and mounted on the steering column.
Last edited by LvR; 08-28-2011 at 08:24 AM.


 Thanks for this

Thread
Thread Starter
Forum
Replies
Last Post
MaxLife17
8th Generation Maxima (2016-)
43
06-27-2019 01:37 PM
Maxima30
5th Generation Maxima (2000-2003)
2
09-07-2015 06:13 PM